DIY Master Closet : Shoe Built In (Part 1)
"A DIY Master closet to die for! Built ins never looked so good."
| Materials Used |
| 3/4" Plywood |
| 1 1/4" Pocket Hole Screws |
| Fluted Casing |
| 1" and 2" Brad Nails |
| Wood Glue |
| 12" Drawer Slides |
| 3" Wood Screws |
| Select Pine Boards - 1x2, 1x6, 1x8, 1x12 |
| Wood Filler, Caulk, Spackle |
| Painters Tape |
| Tools Used |
| Brad Nailer |
| Miter Saw |
| Drill |
| Kreg Jig |
| Right Angle Clamps |
| Track Saw |
| Staple Gun |
| Hammer / Crowbar/ Utility Knife |
| Stud Finder |
For all of you visual learners, I tried my best to video the process so you can see it in action! See the full video below!
The Before
This particular project feels a little extra special because this is the first project I'm tackling in my new home! When I was having my home built, I knew I wanted to tackle my closet on my own and bring a cool custom design to it, so I asked my builder if he would leave my closet empty so that I could create my own dream closet and I'm so glad I did.
I had my builder install wood flooring and leave the walls blank, so I had a blank canvas to start with. Let's take a look.

Step 1: Layout the Design
Before I started building out the closet, I decided to use some painters tape to lay out the design. I didn't really have a design mapped out, so I wanted to visualize it beforehand before actually committing to build it. This is a great way to visualize a design before starting.
Many people asked why not use the IKEA Pax closet system, but I wanted to build my closet custom, it was a lot cheaper and I knew the wood I was using was better then the pre-fabbed cabinets.
 I used frog tape to first map out the shoe built in and then mapped out the other side of the closet.
The great thing about this technique is that you can always change your design on the fly. I am more of a "design as you go" person so I love using this technique and its so fun to compare the two pictures once I'm done building.

Step 2: Choosing Materials
Once, I had everything mapped out, I started figuring out what kind of materials I wanted to use for the closet. With this being a custom master closet, I knew I wanted to use a materiel that would last, so I used my Home Depot mobile app to search for plywood options.

After searching, I eventually landed on this maple plywood that I knew would be great for this project. The great thing about The Home Depot's mobile app is that it will show you how many items are in stock at your local store.
I was able to also utilize the mobile app to pick out some special items and have them delivered to the house while I was working on the closet. They arrived just in time!

Step 3: Remove Baseboards
The first step of the actual building process is to simply remove the baseboards. Now, this can seem like an intimidating process but it is fairly easy. The main thing you want to do before removing the baseboards is to score the caulk.


Step 4: Build out the Bottom Frame
Next, I started building out the bottom frame. I decided to put my built ins on a frame so that I could trim out the bottom to make it match the trim throughout the rest of my house. This step isn't necessary if you don't want to trim out your closet piece as I did.
Pro Tip: If you decide to trim your built in as I did, make sure your bottom frame is 3/4" wider than the actual built ins.

First, I built the frame by joining 2x4s together with construction screws. I found it much easier to the screw the screws through the wood after first drilling pilot holes into the desired location.
Once the frame was built, I placed it in its desired location and attached it to the wall. When attaching the frame to the wall, you want to make sure you drill the screws into the studs to ensure it's secure. If you drill the screws into the drywall it will likely just pull itself out.
If you need help finding the studs, use a stud finder. This particular stud finder, finds the edges of the studs for you so you know exactly where to screw.

Once the frame was secured to the wall, I added a 3/4' piece of plywood to cover the top of the frame. I secured the frame top to the frame with 2" brad nails, wood glue and a brad nailer.
Step 5: Build the Built Ins/Dresser
Sizing
Now with the frame all in place, it's time to start building the actual built ins. I decided to go with different sizes on each wall to allow for spacing within my closet.
For my shoe built in, I opted to go for a 15" depth. I made it smaller since it would be only holding shoes and I wanted to allow enough space for the door to be able to open fully.

When you're building your built in, feel free to decide which depths work best for you and your space
Building the Cabinets
I had my plywood cut down in half at my local Home Depot and then used my track saw to make additional cuts.
I used pocket holes to join the plywood pieces together to form the cabinets for my shoe built in using my Dewalt Drill combo. I used one of my favorite tools, the handy dandy Kreg jig to create the pocket holes. I put my jig on a 3/4" setting and used 1 1/4" pocket hole screws to attach the plywood together.
 I also utilized right angle clamps to help me put the cabinets together. I love these clamps because they help a ton when building by myself. One of the ends of the clamp fits right in the pocket hole.

Step 6: Secure Main Built Ins to Wall and Platform
When building the built ins, I made sure to add braces to the back of the built ins, so I would have something to drill the screws through to attach the built in to the wall. again, you want to make sure you secure the built ins to the wall by screwing those wood screws into the studs.
 I used my Ridgid Drill to screw in the construction screws into the Stus to secure the built ins. I also utilized clamps to clamp the pieces together once they were in place to ensure everything was lined up.
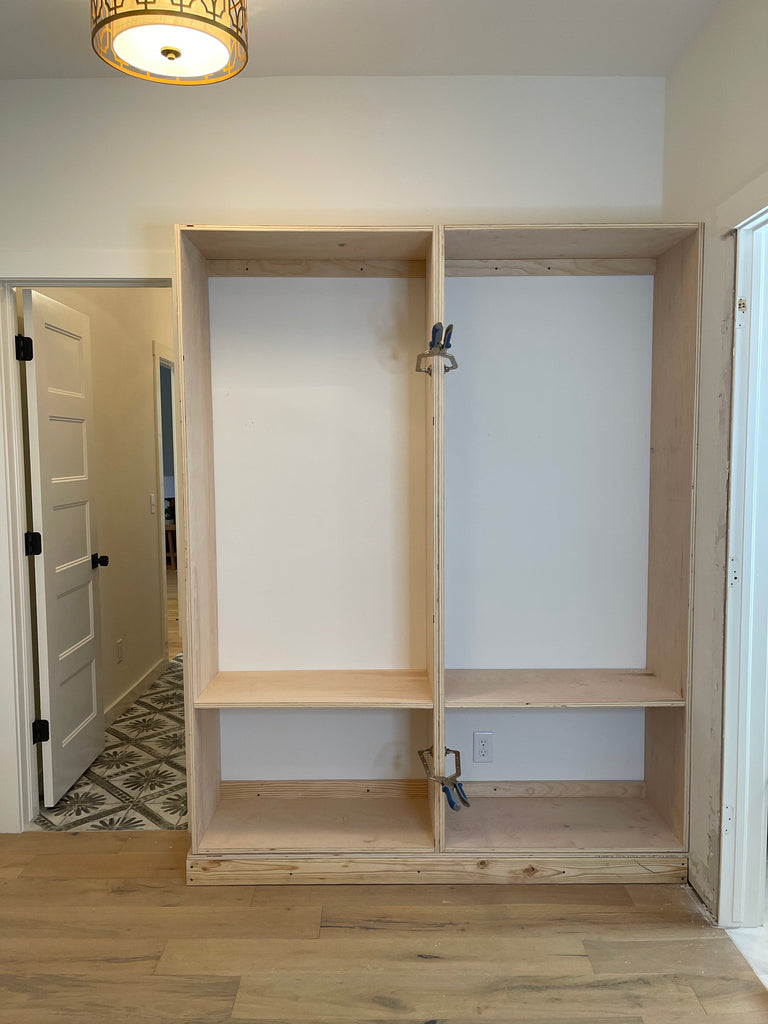 Once everything was clamped together and all square I used brad nails to secure everything together. The built ins were tightly fit, so it didn't take much to secure everything together.

Once you screw a few screws into the studs, the built ins will stabilize and become nice and secure.
Step 7: Add Additional Shelving
Once the built ins were all secure, I started adding additional shelving. Now, a lot of people asked why I didn't just build the whole cabinet and then put it into place. If that's the avenue you want to take, by all means, its your choice to do so.
Personally, I like to build once I'm actually in the space, so I can make design choices on the fly; also, being that I build alone, its always easier for me to build within the space as well, but again this is your project so do what you feel is best.
 The first thing I needed to decide with the shelving was whether I was going to make the shelves adjustable or stationary. I personally don't like adjustable shelves, so I just decided to make my shelving permanent.
I attached the shelving to the built in with a Kreg Jig on a 3/4" setting and used 1 1/4" pocket hole screws to attach.
In order to hide the pocket holes, I made sure to place the shelving in a way that would hide them. If the shelve was taller than me, I placed the pocket holes on the upside of the shelf and if the shelf was shorter than me, I placed the pocket holes on the bottom of the shelf.
Step 8: Add Trim to Built Ins
Trimming out Cabinets
With all of the shelving in place, it was time to start adding the trim. The trim is what really makes the shoe built in look fresh and clean . I used 1x2 select pine boards to trim out the shoes built in.
To attach the trim I used wood glue and used my brad nailer to secure it with 2" brad nails.
Fluted Casing
Once the main trim was underway, I thought it would be cool to add a cool design to the side, so I found this cool fluted casing to add to the shoe built in.
The cool part about this fluted casing is that it's double sided. So you can choose which design you want to go with.
 I attached the fluted casing to the shoe built in using wood glue and a brad nailer. If you have a finish nailer, this would work better for this type of casing, but unfortunately, mine was in storage during this project, so I had to make the brad nailer work for the time being.

Once the fluted casing was in place, I used spackling, caulk and wood filler to fill all of the nail holes and cracks within the shoe built in.
Step 9: Build and Attach Drawers
Now on to the fun part; drawers! I saw a lot of excitement around this part because a lot of you guys want to build drawers but don't necessarily know how, so here is a little insight into how I installed them.
Install Drawer Slides
First, I installed the 12" drawer slides. With the built in only being 15" wide. 12" was more than enough for my shoe built in.
Because my shoe built in had a lip with the added trim, I first had to add in a scrap board to make sure the drawer slide was flush with the side of the drawer opening.

Then I added the drawer slide to the bottom of the drawer opening. I made sure to place the drawer slide 1" away from the drawer opening to make room for my drawer front. When you make your drawers, make sure that you account for the size of your drawer front.
I also find it a lot easier to screw in the drawer slide screws after first drilling in small pilot holes.
To ensure your drawer slides are level, use a little level to ensue everything is nice and straight.
Build Drawers
I used 1x6 select pine to build my drawers for this shoe built in. I screwed pocket holes into the front and back piece, so the pocket holes would be hidden, and then attached the four pieces together.
 Then I attached a 1/4" sheet of plywood underneath and attached it to the drawer with wood glue and a staple gun and 1" staples.

Install Drawers
Once I had the drawers built, I added the drawer slides to the drawers. I placed the pull out slide pieces to the bottom of the drawers and then screwed them into place. Once both slides were on, I slid the drawer into the opening.
 Build Drawer Fronts
With the drawer in place, I then measured the opening in order to get the accurate measurements for the drawer front. I built the drawer front with select pine. I used a pine board underneath and 1x2s to trim it out.

Once the front was built, I used playing cards to get even spacing around it. Once I had the accurate spacing, I nailed in two brad nails to hold it in place while opening the drawer open and then drilled to screws into the back of the drawer to secure it.
Step 10: Trim out the Shoe Built In
Once the drawers were installed, I trimmed out the top and bottom of the shoe built in. I placed a 1x4 piece of trim at the top and mitered the corners and added a 4.5" piece of trim on the bottom.
 In order to secure it to the built in at the top, I had to place a few two by twos on top of the built in, so I would be able to nail it into something. Once the trim was in place, I went back through with caulk to seal any cracks.
 and that's a wrap! Now that my shoe built in is all built out, it's time to sand them down and make it pretty. Stay tuned for Part 2 and 3 of my Master Closet to see how I finish it out!
 I hope I was able to answer all of your closet questions, if there is anything I missed, feel free to comment your questions below!