Home Renovation

Where Do I Start? Initial Steps to Get You Going on your Home Reno
Eager to spruce up your home but feeling lost? Dive into this guide to ensure you're not skipping a beat!
Where To Start?
With home renovating, there are multiple ways to carry out the renovation process but this roadmap is specific to how I like to carry out a home renovation. Hopefully, this detailed list can help you organize the journey of your next renovation but to begin, here is where I normally start.
Planning. Build a Plan and Nail Down a Budget.
Build a Detailed Home Improvement Project Plan
The first step in home remodeling is to develop a plan that clearly states the goal for your home renovation. A quick outline of the projects that need to be completed and their priorities.
Your project plan may include the following:
At this point in planning a home renovation, be sure to do some initial investigation into local zoning regulations and permits. You want to make sure your neighborhood is zoned for your home renovations and you need to find out if you’ll need a permit. If you are completing a project that will change the structure of your home or the use of a room, it is likely that you'lle need a permit. Because permits can take time, it's good to know beforehand if you'll likely need one but wait to apply for the permit once you’ve hired a team and have built a project timeline.
You may not always have the luxury of time on your hands but this type of project planning is better to do 6-12 months before your actual project.
Set a Project Budget
The next step in planning a home renovation is to determining your budget and any financing you may need. Your budget will include costs for permits, building materials, labor costs and the cost of interior styling.
Some of these costs may not always be known up front, but do your best to recognize any costs that may be associated with your project.
Steps to Building your Reno Budget:
- Determine a Total Renovation Budget and Finalize Financing if needed. As a rule of thumb, I always set aside at least 10% of my budget for unexpected costs. (If your total budget is $80,000, set aside $8,000 for unexpected expenses)
- Request Cost Estimates from Professionals. - The best way to secure pricing is going straight to the professionals. Even if you're tackling a home renovation yourself, there may be many things that you may need to call in a professional to help (electrical work, plumbing, HVAC, etc.)
Here are a few things to consider when choosing your contractors other than pricing:
- Years of Experience: A contractor who’s been in business longer is usually a safer bet.
- Contracting license: If required in your state, make sure your contractor has the proper license.
- References: Request references from your contractor and call them to confirm.
- Payment schedule: Try to stay clear from contractors that require all cost up-front. Be sure to discuss payment terms before the project begins.
In some cases, it’s better to spend a little extra money to make sure you are comfortable with the contractor you're working with.
- Price out all Required Materials - Again, you may not have pricing for every single thing, but try to price out any materials you think you may need for each individual project.
Utilize this Project Budget Template.pdf to help you figure out a budget for each space.
If your cost estimates do not fit in your budget, eliminate projects that are a lower priority. Don't be afraid to request cost estimates from multiple contractors to find the best option for your budget. But beware, the cheapest cost doesn't always imply the best work, so try and get some referral's before committing to a contractor.
The Cleanup Process: Plan Ahead for Waste Removal
Waste removal is often a budget item that is forgotten but very important. If you're tackling a huge renovation, it is likely that you will have a lot of waste in the way. Include the cost of getting rid of debris in your budget and make a plan for how you will get rid of the construction debris.
If you are removing construction debris on your own, do your research ahead of time to decide how you will remove the debris, whether that may be, taking the debris to the landfill on your own, ordering a dumpster, etc.
If you are working with a contractor, discuss with them who is responsible for finding a waste removal solution for construction debris, and what the cost may be if it falls on you.
How to Budget and Save for a Home Renovation
When it comes to home improvement projects, even the most frugal homeowner can get caught up in the excitement of choosing products or get blindsided by unexpected costs and in my experience, every home improvement project will cost more than you think. If you are planning an upcoming renovation, it is important to start thinking about how you can save up to pay for your reno. But if you are wanting to front your renovation with cash, first to make sure its the right fit for you:
Do you have enough in an Emergency Fund?
I would recommend not utilizing your emergency fund to cover home renovation costs. Make sure you have at least 3-6 months’ worth of cash put aside for emergencies before you go dumping thousands of dollars on your home renovation. (If your monthly bills are $2,000 a month, try saving $6k to $12K for your emergency fund first.
Is your Debt Under Control?
If your debt is out of control, it may be best to delay your project and pay off your debt first. Renovating your home can sound really fun, but you don't want the home renovation to create an even deeper hole. Be honest with yourself about where you are in that process. If you have a lot of high-interest debt, let the renovation be the motivation to pay it off!
If you've taken the time to build your emergency fund and have your debt under control, its time to start saving for that home renovation!
How Much Should I Save?
When determining how much you should save, make sure you know your overall budget and project timeline. How you decide to save money is entirely up to you but many homeowners have had success with setting aside a percentage of the expected renovation costs until they reach their budget goals.
Saving 5% to 15% every month is an ideal goal for saving for future projects.
Open up a Separate Account for your Renovations
Creating a savings accounts specifically for home renovation costs is a great way to keep track of your overall budget and helps you from wanting to dip into your emergency savings. Whether 5% or 10%, you can send a percentage of your income directly into this account to help finance the renovation.
- Look for creative ways to save money so you can utilize those funds for your home improvement savings plan.
Pros and Cons to Saving for a Reno
Pros
- You don't have to pay back any money
- Credit Score won't be affected
- No High Accruing Interest
Cons
- Timing may be delayed
- Project may cost more than expected
Home Renovation Financing Options
To determine whether financing is the right fit, consider the following:
- What is your monthly budget and are you able to make another payment?
- Will the project increase the value of your home?
- What is your Project Timeline?
If you are in good financial health and you are confident that the project will boost your home’s value, the extra cost of financing could be worth it. Before you pursue financing, be sure you have a good understanding of your project's total cost.
Good Article https://www.bankrate.com/loans/home-improvement/how-to-pay-for-home-improvements/
Credit Card
If you can take advantage of a no-interest or low-interest promotion, applying for a credit card may be a viable option to finance your home renovation.
Home Equity Line of Credit
Sometimes people will take out a loan out against their own home to finance their renovations. I wouldn't suggest this if you plan on moving soon.
Home Remodel Loan - There are different loans out there specifically for remodeling homes.
Personal Loan/Discover Personal Loans - Many banks offer personal loans that you can use to fund your home renovation. Discover is one in particular I have used. Here are some details on it below.
- No Up-front fees: No Origination Fees, Closing Fees or Prepayment Penalties
- Flexible Repayment Terms and Fixed Rates (Terms from 36 to 84 months, Rates from 5.99% to 24.99% APR)
- Get Funds Fast: Funds sent directly to your creditors in as little as one business day after acceptance.
This may seem like a lot, but if you've made it through, you're one step closer to making your home into the place you want it to be. Thanks for reading!

Skim Coating 101
Considering updating those dated orange textured walls? Explore my Skim Coating technique.
The one thing I knew I wanted to change when I first moved into the lake house was these horrid walls. I know some people don't mind the orange peel texture but for whatever reason it is my arch nemesis.
 With my design changes in mind, I knew I couldn't leave the walls as is. So after doing several rooms and making several attempts at skim coating, I finally got a system going and decided to share it with you guys.
I honestly believe the best teacher is to get out there and just do it, but I'm hoping that seeing me do it will at least help you through it.
Materiels Used
Video Tutorial
Skim Coating is one of those processes that you just gotta see live, so be sure to check out this video tutorial to see how I skim coat my walls to get a beautiful finish.
Skim Coating Tips and Tricks to Remember (Referenced in Video)

- Remove all trim and outlet switches for an easier skim coating experience.
- Add water to the joint compound to make it easier to manage before applying to walls.
- Joint compound around your outlets and switches first to make it easier when you use your big joint compound knife.
- The roller is there to help get joint compound on the wall, its ok to get a little messy. Dabbing it on the wall will give you a better result than rolling it.
Once I finish skim coating, I then go back and retexture the walls and then its ready for primer!
Here is a little look into some of the rooms that were skim coated; it may be a subtle difference but I think it makes all the difference in the world.
 It's really hard to see the difference in pictures but in person, I promise you, it's night and a day. Feels like I have fresh new walls.

Hopefully, these little tips and tricks help you on your next skim coating venture! Be sure to DM me any questions here if you need some advice!

Installing Wall Paneling: Entryway Design
"Updating the Home Entryway with some paneling fun!"
I believe that most people judge a home by it's entryway, so I figured why not add some flair to my entryway wall and add some wall paneling. I always love adding wall paneling to rooms because its the easiest and one of the cheapest ways to update a space.
"There are some affiliate links in this post, meaning I get a small commission if you purchase through these links, at no cost to you. Click Here to read my full disclosure."
Materiels
- 1x2x8 Select Pine Boards
- Wood Filler
- Caulk
- Scotch Painters Tape
- Paneling Adhesive
- Benjamin Moore - Swiss Coffee (75% Strength - Matte)
- Brad Nailer
- Brad Nails
- Level
- Miter Saw
The Before
First, let's take a look at the before! Not too shabby, but I knew adding the paneling would only elevate this space even more.
 I decided to go with a more simplistic approach because I didn't want to overwhelm people when they walked in, but it didn't take much to make this space pop.
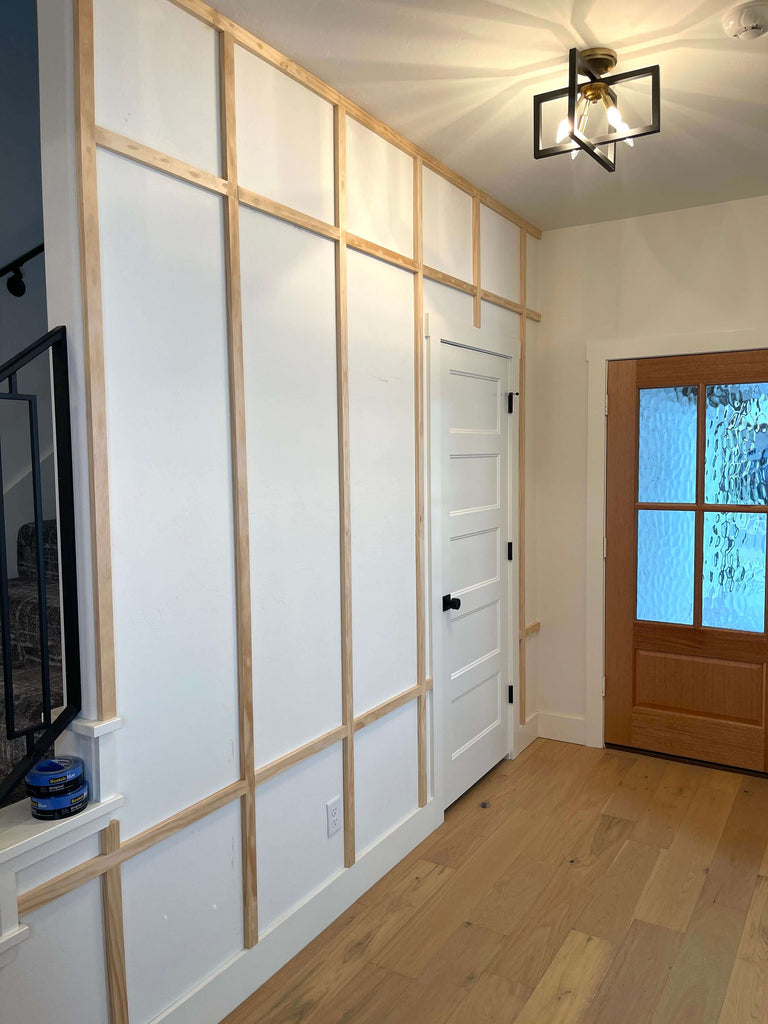
Step 1: Mapping out the Design
The first thing I did was map out my design. I am a visual person, so I always like to use scotch painters tape to visualize my design first. This allows me to make design changes before actually having to commit to them.
 I had two different designs in my head, but ultimately I settled on the more complicated design, and thanks to the tape, I felt confident going into my project that I had made the right choice.

Step 2: Adding the Wall Paneling
Now that the design is all mapped out, one by one I started added the trim where I had taped. I removed the tape where the board should go and then I used my brad nailer and 2" brad nails to attach my paneling to the wall. I opted not to use adhesive this go round because Im pretty sure I'm going to end up changing the design in a few years.
 I went through and installed the vertical trim first, and then started to install the horizontal trim. I cut my trim down with my miter saw for nice clean cuts. I did not use adhesive for the majority of this project, except for one piece to ensure it was flush. Mainly, because I may change up this design in the future and it will be easier to remove.
I used a level to ensure the wood prices were secured evenly.
Step 3: Prepping and Painting
With the paneling installed, it was time to prep the wall. First I went through and filled in all of the nail holes and openings where the boards meet with wood filler, then I went back and used caulk to fill in all of the gaps between the trim and the wall. This ensures a seamless look at the end.  I painted about two/three coats on the paneling once it was ready, using both a roller and paint brush. Once the coats were on, it was finished! This small project definitely elevated this space and I'm so happy with how it turned out!
 The one other thing I really love is the table that I built. It was the first project I made for my new house and I love that it's the first thing everyone can see. Check out the details here on how I built this table!
Frequently Asked Questions
If you want to see the video process of me installing this wall, head on over to my Instagram and check out my "Entryway" Highlight! I had a ton of questions about the install so I figured I'd answer some of the frequent questions here!
Did you nail them into studs or not neccesary?
Typically wall paneling projects such as this one do not require you to utilize the studs. The brad nails or adhesive should be enough to hold the weight of the trim boards.
When you measure your pieces, do you cut exact or leave a little extra to tap in?
I typically try to leave a little extra because wood expands over time.
How did you make the vertical pieces extend to the baseboard?
The boards weren't long enough to span the size of the wall so I cut additional smaller pieces and butted them up against each other to create the illusion of one board.
Will you have to putty fill all the holes?
I always fill all nail holes I create, otherwise they will be seen.
Are your walls textured?
Yes my walls are textured and this project worked out just fine.
Can this type of project be done in a rental?
I probably wouldn't do this type of project in a rental without permission, but I have seen this done using command strips, to make it less permanent.
Well enough talk, let's get to the good stuff, the sources!
Before you head out, here's one last before and after!

and as always, thanks for reading guys! XOXO Ashley

Guest Bedroom Makeover | Installing an Accent Wall
"A guest bedroom your visitors will never want to leave."
As most of you know, I have been settling in to my new home and have been slowly but surely taking my time DIY'ing my way through the house. This guest room project was one of the top projects on my list and I'm so happy to finally share the reveal with you guys!
"This post is sponsored by The Home Depot."
Materials Used
- Brad Nailer
- Brad Nails
- Paneling Adhesive
- Caulk Gun
- 1x4x8 Select Pine
- 1x3x8 Select Pine
- Wood Filler
- Caulk
- Paint Extension Pole
- Painters Tape
- BEHR Paint: Black Bamboo
The Before
Before we jump into the guest bedroom makeover, we first have to take a look at where we started! As you can see, my guest bedroom was a plain white room; similar to many of my other bedrooms.

With so many of the rooms in my home being white, I really wanted to go moody in this bedroom, so I decided to do a total 180 and man am I so glad I did. Now let's get into the details.
Step 1: Install the Accent Wall

First, I had to decide on what kind of accent wall I wanted. I decided to go with this particular accent wall design because it was budget friendly.
The best part about shopping at The Home Depot, is knowing exactly where everything is. Although I'm new to the city, with the help of The Home Depot mobile app I always know where everything is. The product locator shows me exactly which aisle and bay things are and I can always check before hand to see if my items are in stock. This always makes my trips more meaningful and saves a ton of time!
To kick off the accent wall, I first started installing the vertical boards. To start, I installed the top pine boards and secured them to the wall by first applying a bead of paneling adhesive all along the back of the board and then attaching it to the wall with brad nails and my brad nailer. I calculated the correct spacing I would need in order for the boards to look even; this is the calculation I used.

In order to achieve the look that I wanted, I decided to install the accent wall with a mix of 1x3 and 1x4 boards. I decided to use select pine because they are a little smoother then regular pine.
Luckily, when I built my house, I had my builder install regular trim boards that are exactly like the boards I will be installing, so there was no need for me to remove the baseboards.
 Unfortunately, the boards weren't long enough to reach the baseboard, but that was an easy fix. I just cut some additional 1x3 boards down to size and secured them to the wall underneath the installed boards.
I must say that my battery powered caulk gun always makes jobs like these that much easier and my Dewalt brad nailer is my absolute favorite.
 Once my boards were all installed, I went back through and filled all of the nail holes with wood filler to make it nice and smooth and then added caulk to each of the boards to fill any crevice openings. I do this to make the paneled boards look seamless with the walls.
  Once that was all dry, I went through and did some light sanding to prep the boards for paint.
Step 2: Paint the Bedroom
This was by far the most exciting part, because if you know me , I am more of a white wall person, so I was so anxious to get this color on the walls! If you are here for the paint color, I'm not surprised because this shade of green was the PERFECT paint choice for this bedroom. Shop this link for the exact color and sheen!
 I went through and painted all of the walls with Black Bamboo using my paint extension pole. I have used this pole a few times and the extension always makes painting a wall seem a lot easier; especially when painting ceilings.
I honestly was unsure whether I wanted to commit and actually paint the ceiling, but I'm so glad I did.
 Once I painted the whole room, I went back through with a paint brush and painted all of the cracks and crevices to complete the painted look.
Step 3: Style the Room
This by far is always my favorite part of a room makeover; styling the room. It took me a little while to find all of the items I wanted but eventually I found some great finds. See some of the goodies I used in this guest bedroom!
All Furniture and Decor Linked Here!
 I really love that they've nailed down a good system. When I arrived for curbside pickup, I hit the "I'm at the store" button in The Home Depot App and someone was right out with my order. Now that is what I call service!
There were a few items I went back and forth on, but then I finally nailed down a design that I loved. Now let's get to the part you've all have been waiting for; the reveal!
The Final Reveal
Well here it is, the long awaited guest bedroom reveal. Moody was definitely the way to go and I think I hit the nail on the head; now accepting all guest!

I really wanted to create a space my guest would love and maybe just not even want to leave. As a girl who lives alone, I always welcome guest, so why not give them a reason to not want to leave.
 I've always defined my personal style as a mix of three design styles; I call it "modern boho glam", and this room was a direct reflection of that personal style.
 I love using rich and bold patterns and love rooms that show character and this room was no different! The best part is this makeover was something I was able to knock out in a weekend!
 But I can't go without saying that The Home Depot had so many good options to choose from; I mean the arched mirror, the bold pillows, the bed, everything just made my accent wall come to life!
 This particular color shows up so differently in the light vs. in the dark. In the light, the green really shines through and at night it reads more black; I assume that's why they call it black bamboo!
 Talk about a transformation; this room doesn't even look the same! I am so happy with how this guest bedroom makeover came out. I am so glad that I decided to go moody because now this room definitely feels like a getaway spot.
 One of my favorite spots in this guest bedroom is this little reading nook. This was too good of a space to let it go to waste, so I figured why not turn it into a little reading space that my guests could chill out in.
 It's always a good makeover when the space looks nothing like the before picture! I hope you guys enjoyed this short project and I look forward to many more with you guys!
 As always, thanks for reading, XOXO Ashley.

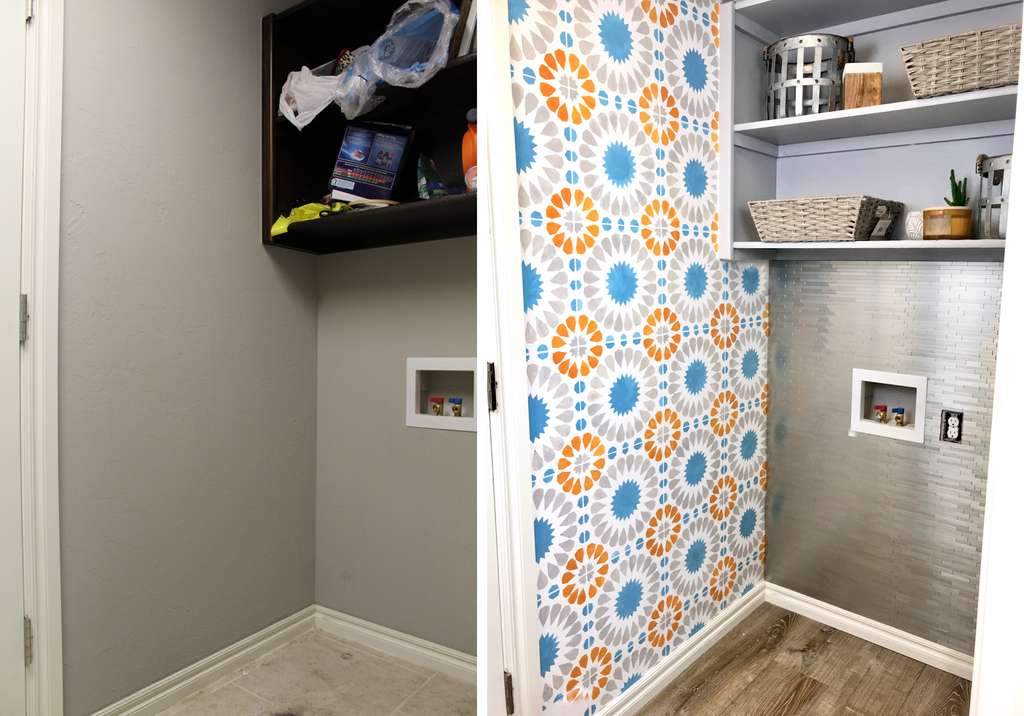
Wall Stencil | Cordelia Tile
"This Cordelia Tile Wall Stencil is cutting edge."
I knew this wall stencil would be the main feature of my laundry room makeover, so I knew I had to go big or go home. This isn’t my first rodeo with a stencil, so I knew going in that eventually during this project I would hate myself for choosing such a tedious option, but I’m glad I stuck with it, because I love how the wall stencil came out.

Materials
- Cordelia Tile Wall Stencil- CuttingEdgeStencils
- Stencil Brush - Cutting Edge Stencil
- Painters Tape
- Behr Marquee Paint - Flaming Torch
- Behr Marquee Paint - Silver Bullet
- Behr Marquee Paint - Below Zero
- Behr Marquee Paint - Ultra Pure White
I really love how well the wall stencil colors contrast with my new vinyl flooring. I was a little unsure about it in the beginning, but I couldn't be more happier with how it turned out.

Tape off Wall

The first step for my wall stencil project was taping off the wall. I used some painter’s tape I had to go along the edges of the wall and shelving unit. You want to make sure you use a good brand of tape to ensure you have clean lines once it is removed.
Paint Wall
Once the tape was placed on the wall, I began painting the wall I was stenciling in white. This was the color I wanted to show through the stencil colors. I used Behr Marquee Ultra Pure White for this. I applied it using a regular paint roller.
Apply Wall Stencil

Once the paint was dried, it was time to apply the stencil. I started with each individual color and started to fill in the stencil with the colors I wanted. I used Cutting Edge Stencils stencil brushes and I must say, they have been the best brushes that I have tried so far, when it comes to a stencil brush.
When applying paint to a wall stencil, it’s extremely important to make sure you don’t use too much paint. Otherwise, you will get a lot of bleed through. It may take a little longer to stencil but the finished product will be much better in the end.
Clean Stencil
Throughout applying the stencil, I would often clean off the paint, to make sure the stencil didn’t become hard with dry paint. IT was super easy to clean off. I would place the stencil in the tub, let hot water run over it for 1 minute and the paint would wipe right off. I cleaned it for every 12/14 times I painted the stencil on the wall, and then once after I was finished.
Be sure to check out the final reveal here!