Watch this walk-in closet built in system come to life!
I turned two cramped, separate closets into one streamlined walk-in sanctuary and Modular Closets made it possible. In this built-in makeover, I replaced an awkward layout and wasted dead space with flexible, ready-made components that fit my layout and lifestyle. The result is a cohesive, custom-looking closet without the lead time or cost of a full custom carpentry job.
In this post, I'll walk through the planning, product choices, and installation highlights that helped me merge two closets into a single, organized space. Whether you're working with odd dimensions, a tight budget, or a DIY timeline, my before-and-after photos and practical tips will show how modular systems can deliver big impact and everyday functionality.
The Before | Planning the Layout
Let's walkthrough what I saw and how I decided to completely rethink this space.
When I first looked at these closets, I knew right away something felt off. Technically, it’s “two closets,” which sounds great on paper… but in reality? It just wasn’t working. Each side felt cramped in its own way; one had shelves but no real hanging space, the other had a rod but wasted a ton of vertical room. And that open shelving in the middle? It was basically stealing space from both sides.
So I started asking myself: Do I want to work around this layout or create a better one? And the obvious choice here was to merge them into one.
The Vision
I didn’t want two small, awkward closets anymore. I wanted one big, functional space that actually made sense for real life.
I pictured:
One long, uninterrupted hanging section
Shelving that goes all the way up
A layout where everything is visible and easy to reach
Basically, I wanted this to feel less like two boxes… and more like a custom closet.
Bringing It to Life
The biggest shift here was realizing that the center divide wasn’t helping, it was hurting. Removing that wall was the key to unlocking the full potential of the space.
Once that’s gone, everything changes:
The room immediately feels bigger
You gain flexibility to design the layout however you want
You’re no longer stuck with two separate, limited storage zones
Instead of splitting items between two closets, everything lives in one organized system. And trust me, that makes a huge difference in everyday use.
Once we committed to combining the closets, there was no turning back. The first step? Demo. We tore out the center divide and stripped everything down to the studs so we could really see what we were working with; this is where the transformation started to feel real.
With everything opened up, you could immediately tell how much wasted space that middle wall was creating. What used to be two tight, awkward closets suddenly felt like one wide, functional area with so much more potential.
From there, we reframed the entire opening to create a single, centered closet with one doorway instead of two. This part was key, not just structurally, but visually. One clean opening instantly made the space feel more intentional and way less cluttered.
We also made sure the new framing was designed with the end goal in mind: maximizing storage. That meant thinking ahead about where rods, shelves, and future built-ins would go so everything would line up perfectly.
Blending Old With New | Drywall & Skim Coating
After reframing the closet, the next step was making everything look like it belonged together, not like a patchwork of old and new.
We started by hanging fresh drywall in the newly framed areas, closing everything up and finally giving the space solid walls again. This is always one of those turning points in a project where it starts to feel like a room again instead of a construction zone.
But here’s the thing, the existing bathroom walls had a heavy orange peel texture, and if we left it as-is, the new drywall would stand out immediately. So instead of trying to match the old texture (which rarely turns out right), we went the opposite direction.
We skim coated. If you're interested in how we got it done, check out our tutorial here.
A thin skim coat across the existing walls helped smooth everything out and bring the entire room to a consistent finish. It’s a bit of extra work upfront, but it makes a huge difference in the final look. Instead of seeing where the old walls stop and the new ones begin, everything blends seamlessly.
We added drywall in the closet area and got them ready for the closet system.
Before I bought anything, I measured both closets carefully and sketched out how I wanted to use the combined space.
I took those measurements to the modular closet company's design tool, which let me visualize different configurations in 3D. This step saved me from costly mistakes and helped me see how the pieces would actually look in my space.
The Products I Selected
I chose a system with adjustable shelving, hanging rods, and drawer inserts. The modular approach meant I could mix and match components, some sections are all shelves, others combine hanging and shelving, and one corner has deep drawers for off-season storage. The neutral finish blended seamlessly with my walls, and the hardware was minimal and modern.
I love that modular Closets has so many options to choose from and the modular system allows you to chose what best fits your space.
Installation and Final Touches | Why I Chose Modular Over Custom
Custom built-ins are beautiful, but they come with a hefty price tag and if you're building one yourself, it just takes time and I didn't have much time to get this project done. Modular closet systems offer a middle ground: they're affordable, available now, and designed to adapt to almost any space. When you choose quality components and plan thoughtfully, modular systems look intentional and built-in, not like a kit you assembled in a weekend.
I opted to go with the Vista System in White Oak and used the following selections:
Installation was surprisingly straightforward, but the prep work we did earlier made all the difference.
First, I located and marked all the wall studs, this is critical because the entire system needs solid support. From there, I installed the vertical panels, making sure everything was level and evenly spaced across the full width of the closet.
Once the main structure was in place:
Shelves were locked into position
Hanging rods were installed at the correct heights
Drawer units were assembled and slid into place
Piece by piece, it started to come together.
Why This System Works
What I love most about going modular is how intentional everything feels. Every section has a purpose, and nothing is wasted.
Instead of a basic rod-and-shelf setup, this system gives:
Defined zones for different types of clothing
Better organization that actually stays manageable
A built-in look without fully custom pricing
And because it’s modular, it leaves room to adjust later if needs change.
If you're considering a closet upgrade, modular systems are worth exploring. They're flexible, affordable, and deliver results that feel custom without the custom price tag.
"Discover the transformation of a formal dining room into a hidden pantry."
"There are some affiliate links in this post, meaning I get a small commission if you purchase through these links, at no cost to you. Click Here to read my full disclosure."
The Before
First, let’s take a look at the before picture of the space. Now, you may be thinking this doesn’t look like a pantry at all; well it wasn’t. This was actually a formal dining room but I decided to transform it into a hidden pantry instead.
One reason being, this room barely got any use and where the pantry was originally, just didn’t fit well with the house. It made a lot more since this way.
Here is a view of the original pantry. As you can see, it’s kind of in the middle of the kitchen, and it was blocking the view of the breakfast nook, so moving this definitely was the best move .
The Design Process
Now let’s dive into the design process, funny story, the way the pantry looks now is actually not how I had originally designed it. Originally, I had found this awesome red marble checkered floor, and I was so excited about using it. I even went as far as to purchasing the marble floor, which was very expensive might I add, but I just couldn’t commit to it when I saw it in the space it just didn’t feel right to me and even though I purchased the floor, I felt like I needed to make a change.
So that’s when I came up with the design that you guys see now. Once I rendered it up in my design software, I just knew that it was it. I was in love with it and if you haven’t seen a lot of my rooms already, I really love green, so the green really just sold it for me and the original design probably would have looked nice, but I just felt like this was it for this house.
In the end, I’m glad that I decided to go with this design. This is another reason why I do like rendering up my designs before I dive into my renovations
The Demolition
Now, with the design plan all mapped out, it was time to dive into the demolition. Unfortunately, once we assessed all the materials, I made the decision to replace all of the drywall. I knew that there was a chance from the initial inspection, that there was existing damage before I bought this house, so just to be safe, I ended up taking down all of the existing drywall and adding new drywall in to make sure that everything was good to go.
We also had to end up jackhammering the floor in the kitchen because I really wanted to add an additional sink in the hidden pantry. I felt like having an additional huge pantry without a sink would just be a bad call, so my plumber was able to jackhammer the floor and find the existing plumbing to the kitchen sink and was able to hook up an additional sink off of that.
Then we demoed the tile floors, which was super easy to get up, and then started rebuilding everything. This process really didn’t take long. It took about a week for us to take down all the drywall, get the floors up and replace the drywall back and mud and texture so that we were ready for paint.
Painting the Room
Next up was paint! Again, I was excited for painting because I absolutely love the color green. I didn’t realize until I moved into this lake house just how much I love it. I have three rooms already that were green. I actually had to change the color of a room because I was realizing that there was way too much green in this house.
I’ve actually used this color before, you can check that out here. this was a big reason why I decided to go with it this time because I’ve already used it, so I knew exactly what I would be getting. I did end up going with eggshell because it is a pantry and I knew there’d be a sink in here, so I wanted the walls to be a little more durable. Usually, I am a matte girl but again I wanted it to be durable. I used my favorite rollers and paint stick and used my favorite brushes to cut in.
The Tile Installation
I wanted to make sure I did all of the wall painting before I installed the floors because I couldn’t risk messing up these amazing marble checkerboard tiles. I had my tile guy install these tiles in a checkerboard pattern because I knew it would be the perfect match to the green cabinets. It was laid exactly as I had designed it in my rendering above, but no one could prepare me for the actual result because it looked way better in person.
I actually partnered with RIAD TILE on this project and I had such a great experience working with them. These tiles are gorgeous and they have so many other amazing selections to choose from. I’m definitely eyeing a couple of other tiles for the kitchen now.
If you're interested in these exact tiles you can find them here:
I decided to go with a black grout because I felt like that would give it a more seamless look and I was right. Once I was able to see it all finished and grouted, I was extremely satisfied with the result.
Once the tile was layed, we made sure to seal the tiles so that they could last overtime and then it was on to setting the cabinets.
Cabinet Install and Painting
Now let’s get into the cabinet setting and painting. First, we had to start by setting all of the cabinets and this really was pretty simple process. Once we got the cabinet in to place, we simply attached it to the wall using 3 inch wood screws.
You want to make sure when you are attaching your cabinets to the wall that you are using studs, if you need help finding studs this is my favorite stud finder. I usually have great success using it. It always puts me right on the stud.
Once all the cabinets were attached and set, then I started the painting process. Now, don’t be alarmed by all of these steps in this process. Yes, it is a lot and it took a lot of work, but you must follow all of these steps in order to get a nice and clean finish.
But let me preface this by saying, if the paint guy is giving you a high quote, it’s probably worth every penny. I was quoted $5500 and before I started painting, I was telling myself, there’s no way I’m paying that but after I actually painted the cabinets and did all of the steps that it takes to get the type of finish that I want, I realized quickly that $5500 would’ve been worth paying. But if you're still like me and you still wanna save money, follow these steps and you should be just fine!
Step One : Sanding
Sanding is one of the most tedious and unenjoyable steps, but probably one of the most important, if you want your cabinets to have that smooth finish. First, I sanded my cabinets down and normally when I’m sanding, I start at a lower grit because the lower the grit, the harder the surface and then I work my way up. I typically start with a 80 grit sandpaper to get the rough surfaces sanded down and then I go in again with a 180 grit sandpaper and then again with the 220 grit. If it sounds like a lot, it is, but skipping these steps will compromise your smooth finish. This is the time when you really want to give it a good sanding.
Step Two: Priming
Again, another important step to a great finish. After sanding, I wipe the cabinets down with a damp cloth to remove all of the dust and then I go in with a primer. This is the primer that I typically use on most of my projects. It usually takes two coats for good coverage, so I just went in and did two nice coats of primer.
Step Three: Sand Again
I know you’re probably thinking, but we just sanded, but listen, sanding between coats is the secret to a nice smooth finish, so just stick with me here. Once that primer is all dry, you’re going to go in again and sand. This time you’re going to go straight to the 220 grit and then again with the 320 grit. This doesn’t have to be a hard sanding. You can just lightly sand each cabinet down and you should be able to feel the softness with your hand. Trust me, you'lle know when it's sanded good. Then don't forget to wipe any of the excess dust off of the cabinets, you can use a microfiber cloth to do so.
Step Four: Paint Your Cabinets
Now you’re gonna go back in and actually paint the cabinets with the color that you have chosen . Anytime I am painting cabinets, I always use a high gloss paint because it will be the most durable for your cabinets. I actually like using Sherwin-Williams paint when I’m doing cabinet painting because they have a really good grade of paint and they do color matching, so I was able to color match the color to the black bamboo. I used the bamboo color match on the bottom cabinets and I used 7634 Pediment on the top cabinets in the All Surface Enamel Paint Hi-Gloss. You are going to repeat this painting process twice. I painted the color onto the cabinets once, and did a light sanding with a 220 and again with 320 grit and then painted them again with the same color. The two coats should give you the result that you need.
Once these steps are complete, you should be good to go. Some people like to use a clear finish and that may be needed based on the paint that you use. This is another reason why I like using this particular brand of Sherwin Williams paint because that’s usually not needed when I paint with it.
Finishing Touches
Now, for my favorite part, adding in all of the finishing touches, here is a list of all of the additional products that we used to bring this pantry to life.
First, I want to talk about these amazing lighting choices from Rejuvenation. These were gifted for this pantry and I absolutely love how the overhead lighting was a simple but complimenting choice and the sconces were the perfect addition to have above the floating shelving.
Rejuvenation also provided me with the floating shelving which was really nice to not have to build these. They were super easy to install and they coupled really well with the arched cabinet. I honestly feel like the arch cabinet is one of the stars of the pantry. It definitely stands out on its own and I’m glad that I decided to leave it natural wood because the mix of textures and colors just really elevated the space.
I talked to briefly about the hardware above, but the silver hardware pieces really brought everything in the pantry together, again I am a gold girlie, and I know some people mentioned that I should’ve chosen gold, but I just feel like for this space the silver just worked, especially with the appliances being silver.
I also decided to add in this touchless faucet from Kohler, and then we put in a dishwasher as well because what’s a sink without a dishwasher.
Last but not least, was this backsplash tile. It was surprisingly cheaper than most tile options that I use. The only thing that I want to note is that if you’re going to use this tile or really any tile, make sure that you purchase the tile all at once.
I purchased it in two batches and it seemed like I got different colors in each batch. I actually ordered it three times and each time the colors were different. So if you notice the varying colors, that’s why it looks like that. Luckily, I was able to get away with it after I grouted it, but just make sure that if you are going to buy tile, that you try to buy in excess, just in case you’re going to need more.
Once all of the finishing touches were done and in place, the pantry was officially complete.
The Final Reveal
Here is the final result! I am in love with every detail, every choice; this pantry far exceeded my expectations. Not only does it look exactly how I rendered it, but it’s even better in person. Everything came together so beautifully and although it took a lot of work, I feel like I definitely made the right choice with turning my formal dining room into a hidden pantry.
It has gotten so much more use now and it feels way more functional for the space. The star of the show hands down are these checkerboard floors, they make such a bold statement and the green couples nicely with it.
I also love how the silver hardware grounds everything. Typically, I like to use gold hardware when I'm using green but this time the silver just felt like the better choice here and I was right. This rejuvenation hardware was so beautiful.
Every single additive just elevated the space, from the floating shelves to the arched cabinetry to the backsplash tile. It just works.
I hope you guys enjoyed reading about the process of how I brought my pantry to life and as always thanks for reading.
I've never been more excited to rip out a bathroom in my life. When I first moved into the lake house; I knew the guest bathroom was the first space I wanted to tackle. I couldn't leave my guest hanging; so we got straight to work.
The Before
It was obvious that this house had a 90s theme of interiors and in some cases it felt a little but older, so I knew I wanted to change everything about this bathroom. I really wanted to modernize everything, so I came up with a cool design that I knew would make this bathroom pop.
This bathroom is separated by a door which I kind of loved because I knew I could use two separate colors without it feeling weird. I've always wanted to try black in a bathroom, so I knew this would be the perfect opportunity to do so.
There was a huge cabinet in this bathroom, which I knew would be awesome for storage but I also feel like it took up so much space. So I decided to remove it all together because I knew the open space would make this guest bathroom feel more luxurious.Once I had an idea of a design in my head I rendered it on my design software and this is what I came up with.
Now for the fun part, the demolition! I saved a lot of money by doing the demo on my own. If you're looking to save and don't want to do everything, doing the demo can be an opportunity to save some dollars.
Here are the main demo tools that I used for this project:
Once demo was all done, I had the walls skim coated to give them a fresh new look and then went in with primer and started to paint the bathroom.
Here are the paint colors I went with:
Behr Marquee - Swiss Coffee - Eggshell
Behr Marquee - Private Black - Eggshell
I think going with two colors was the perfect choice for this bathroom. Even though black is a dark color, only painting it black in the toilet area really brought a moody vibe to the space without it feeling too dark.
I knew that the white oak vanity would be the perfect match to go with all of this black and I was right! I decided to stain the cabinet in this natural stain so that it would keep it's natural white oak look.
This cabinet was custom built my a local woodworker and man is she a beauty.
Tile Info
I decided to contract the shower and floor tile work out for this project because I had three other projects going on all at the same time.
Here are the tile options I went with for this bathroom remodel:
The shower and floor tile turned out great but I decided to knock out the backsplash on my own to save a little money and I'm glad I did. It turned out great and I was able to save a little money on the backend.
Choosing grout always makes me nervous because I think it can change the look of tile so much. For the grout I decided to keep it simple here and go with Bright White and it looked awesome!
Once everything was all installed, I started going in and adding all of the final hardware touches.
This hands down has to be one of my favorite bathroom remodels. Everything came together so seamlessly and I really do love the way it came out.
This backsplash was absolutely the showstopper of this remodel. I love to make a statement with my renovations and this splash is definitely making one. This coupled with the really tall mirror made this space feel twice as big. Removing that storage cabinet really was the best call.
I didn't know at first if the black would be too much but I am really glad I stuck with my gut. Going with black in just the toilet area was the perfect touch of black to not make this bathroom feel too moody and this tile is so beautiful.
Going with the different tile design gave it character and it really stands out.
I would say that this remodel was a success and all of the choices came together beautifully. If you're talking a bathroom renovation, don't be afraid to go bold and as always, thanks for reading guys!
Transforming an aged bedroom into a masculine home office for my husband.
As most of you know by now, my husband has officially moved in and we've been chatting about what space he's wanted. So we finally decided on the extra spare bedroom upstairs.
"There are some affiliate links in this post, meaning I get a small commission if you purchase through these links, at no cost to you. Click Here to read my full disclosure."
The Before
This room has served as my dumping ground since I moved into the lake house, so I definitely had my work cut out for me, but it was the perfect spot for Josh's new man room.
Video Tutorial
Painting the Room
I allowed my husband to pick out the color he wanted for his office, and of course he picked the loudest color he could find. I'm not usually a red person, so I knew this room would be a bit of a challenge, but I was up for it.
First, I painted all of the walls with the Benjamin Moore Regal Select in Country Redwood (Eggshell) and then went back and painted the ceiling with Benjamin Moore Regal Select in Baked Terra Cotta (Eggshell).
I always like using these roller brushes when I'm painting because they always give me a nice smooth finish.
Since the red was so bright to me, I decided to add a mural to the back wall to bring some fun to the room. Josh is a color person like me, so I knew this would be a great addition to the room.
When I am doing murals, I always like using these brushes because they make cutting in and painting shapes easier, in my opinion.
Now I did get a little carried away at first and I wasn't really loving the color combos for the mural, so I decided to change up the colors midway and finally found the perfect color combos.
Here are the colors that I ended up going with from Benjamin Moore:
HC-42 Roxbury Caramel
HC-41 Richmond Gold
HC-40 Greenfield Pumpkin
HC-184 Cottage Red
CSP-575 Ice Fog
CSP-50 Rainstorm
2083-20 Cranberry Cocktail
CSP-450 Bewitched
1030 Brandy Cream
1598 Silver Lake
The new colors saved the day because it turned out exactly how I had envisioned it.
Adding Oak Wall Slat Paneling
Even though I knew the mural would be a huge focal point of the room, I also wanted to add some more texture by adding in these oak wood slats. I absolutely love these slats because they are so simple to install and they really give the space a drastic look.
I used a brad nailer and 2" brad nails to install them to the wall. I would also recommend using liquid nails for the best results. I opted not to used liquid nails here just in case I want to change things up but liquid nails will ensure the slats stay secure to the wall.
Each slat comes individually in a box and I used four boxes to do this side wall in the man room.
Adding Personal Touches
Once the painting and paneling was done, I started going in and adding the personal touches. Like this fun rattan console, it was super affordable and didn't take much time to assemble. Josh actually picked this console out himself and I must say it was a great choice.
My husband also mentioned that he really wanted his college jersey framed, so I found this black frame to be able to showcase his jersey. I knew adding in all of the personal touches would make this room really special.
Josh is a pretty big guy, so I decided to get him the Shaquille O'neal Office chair and it was a good mix of comfortable but also stylish for the room. To go with the chair I got this really cool desk from homary. I love that it was super unique.
The Reveal
Here is the final reveal of my husband's man room! I am so excited with how it turned out and I'm even happier that Josh absolutely loves it! I love pushing the envelope when it comes to my room transformations, and this room was no different.
This unique desk really was the icing on the cake to this fun room. It's uniqueness really brought a fun element to the space and the office chair was really the perfect match for it.
I also love how this checkered rug brought a regal feel to the room.
I was able to showcase so many sentimental pieces on Josh's wall with this gallery wall and of course, I had to add in a few pictures of us. Can you spot them?
I had already had these chairs previously at my last house and Josh really likes them, so he convinced me to put them in his room. Now they are indeed a splurge, but luckily the side table wasn't as pricey.
I am a firm believer that you can make magic when you couple the right things together and both the mural and the oak slats were showstoppers in this room transformation. The oak slats really brought a masculine element to the room, while the mural made it fun.
I personally love the new pendant light I was able to add here. Josh mentioned to me that he loves wall art with skylines and bridges so I put up this wall art set just for him.
Welp, that wraps up yet another room transformation. Thanks for reading guys!
Upgrade Your Movie Room with a DIY Dry Bar for the Ultimate Gameday Experience!
When I moved into this house, I must admit that I was not enthused at all about this extra bonus room. At the time it really served no purpose and I wasn't really sure what to do with it. Then I thought; movie room, and it was the perfect fit for this space!
The Before
I think we can all agree that this room looked like an old basement room before. It was in need of a much needed makeover.
Painting the Room
Colors Used
Main Color - Behr Premium Plus - Flat - Cracked Pepper
Bar Cabinet - Behr Premium Plus - Flat - Everyday Greige
Mural Colors - Behr Dynasty - Dragonfly, Back to School, Enamored
Flooring Install
I knew the floors needed a change because they were a dark gray. So I decided to use some leftover flooring that I had and it was the perfect color match to the Cracked Pepper.
For more information on the vinyl flooring, see my install in the studio here.
Paneled Wall
This paneled wall was probably the most exciting part of this makeover because I have been dying to try out these wooden panels from the Wood Veneer Hub and they didn't disappoint. They were super easy to install and the quality of these panels were A1.
I was able to cut these wood panels down with a circular saw and used a jigsaw to cut out the outlet hole.
DIY Dry Bar Installation
I opted to use some in stock cabinets to help create my bar. I piked two sizes that I knew would fit in and decided to make it look like a built in.
In order to screw the two cabinets togethere, I used my handy dandy cabinet jig to help me get the job done. This clamp allows you to screw the two cabinets together from the side.
Once the cabinets were together, I started working on making it look built in and attaching it to the wall.
Styling the Room
Now for the fun part; styling the room. I couldn't wait to start using this room for my movie nights. I knew I wanted a big comfy couch up here, so I was able to find this huge mustard sectional and some other cool finds to go along with it.
I love how the movie room turned out, it was a complete shift from where we started. The real showstopper are these wooden panels . They really give the movie room a sleek feel.
I also love that I got a chance to add some of my personal art to the movie room with this wall mural. It was the perfect touch to make this movie room feel fun and cozy.
This view really shows off the fun in this space and the added dry bar really was the perfect addition this little nook. It adds a lot of fun to the space and I love not having to go to the kitchen to grab a snack.
I also am glad that I decided to go moody; I love the feel of the room when the lights are turned down.
"Discover Kitchen Renovation Ideas to Transform Your Lake House Kitchen"
I have been so excited about this kitchen refresh, mainly because this lake house kitchen looked a hot mess. It was so outdated, and even though I have big plans for a full gut Reno; I decided to do a quick refresh to make things looks a little better I the meantime.
Looking at these before photos, you can probably imagine why I was so anxious to get this kitchen refresh done. This kitchen was so outdated and needed some love. I can't even believe the house was built in 98' because it's giving 70's. But the worst the before, the more room for improvement.
I knew the wallpaper would be my most tedious task; but luckily with a few small changes, I knew we could turn this kitchen around in no time. The plan is to update the paint, add new appliances, change the backsplash and hardware and paint the cabinets. It may sound like a lot, but it's a lot less than a traditional Reno and just what we need to give this space a refresh.
I hadn't planned on the windows getting changed, but I got a lucky surprise when I got new windows installed and that definitely added to the feel of the new space, so we will touch on that a bit as well.
Now that's enough of the before; lets get into how we transformed this space.
Painting the Walls
I say it all the time but paint really has the ability to transform a space drastically and it's usually not that expensive. If you are looking for a quick way to really change a space on a budget; start with paint.
With painting the kitchen walls a crisp white, that made the space feel a lot more open and much brighter. This change alone did wonders for the kitchen. I decided to go ahead and switch out that older light above the sink and it was the perfect little light for the space.
Painting Cabinets
Next up was painting the cabinets. Now, I know hat you're thinking; no prep work? Because I know I will be doing a full kitchen remodel soon, I didn't worry about doing all of the prep work I normally would have done since I will be getting rid of these cabinets soon, however this paint really held up well even without the prep.
I decided to paint the island in Behr Premium Plus Paint: Hi-Gloss in the color potting soil, and I must say, this was definitely the better color of the two, than I painted the other existing cabinets in Behr Premium Plus Paint: Hi-Gloss in the color patio stone. These colors are very similar but I loved that potting soil had a brighter green tone. Either way, both colors were amazing.
For most of the cabinets, we removed the hardware and doors and used a roller to paint the main cabinets and then used a paint sprayer to spray the doors. You can either use a brush or sprayer but a sprayer will give you a smoother finish.
Without the regular prep, we were able to fully cover the cabinets with three separate coats of paint. Once the paint was all dry we added the hardware knobs and hardware Pulls to finish the cabinets out.
Window Installation
Now the surprise part of this Kitchen refresh was the window installation. I knew that I was getting knew windows but they came early and I am so glad they did because this really was the icing on the cake to this kitchen refresh.
Next up, was the appliances install and I am so happy to have some amazing friends over at Cafe Appliances who were kind enough to send me over a new set of appliances. This is my second time having cafe appliances and I am definitely a fan. They just have that sleek look that can turn any kitchen into a designer kitchen.
Here is the exact list of the appliances I recieved:
Café™ ENERGY STAR® 27.8 Cu. Ft. Smart 4-Door French-Door Refrigerator in Matte Black - Moderne Brass Handles
Café™ Dishwasher Drawer in Matte Black - Moderne Brass Handles
Café™ Professional Series 30" Smart Built-In Convection Double Wall Oven in Matte Black - Moderne Brass Handles
Café™ 30" Touch-Control Electric Cooktop
I opted to go for their new brass hardware knobs because I knew it would match my hardware perfectly. If you already have cafe appliances, you can order another color hardware to switch things up if you'd like.
I didn't really want to spend money on new countertops since I was planning on ripping most of this out in the future, so we were able to rip the old sink out and put this new one in without damaging the countertops.
Backsplash
With everything else complete, the last major step was installing the backsplash. We ripped out the old backsplash and replaced the drywall in the spots that were unsalvageable and then started installing the new backsplash.
I had this tile leftover from another project and new it would be the perfect tile for this refresh.
I used this Backsplash Tile - Chloe Tile in my bathroom but in the color black and absolutely loved it, so I knew it would be a good fit in here and I was right. Eventually with the big Reno, I plan on bringing the tile all the way up the wall; but for now we just took it up to the window.
Once the tile was installed, we grouted it with Frost by Mapei and she was complete.
The Final Reveal
Now here it is; the finished kitchen. This refresh came out better than I ever could have imagined and I feel so much better about using my kitchen now that it feels a little more like me.
I feel like I can take my time with the bigger Reno now because the kitchen doesn't remind me of the 70s anymore.
Even though I did have some pricey additions, I'm hoping this refresh shows you that it doesn't take much to bring your kitchen to life. Remember, a little bit of paint can go a long way!
The Kohler sink and faucet were a really nice addition to the refresh as well and I am so glad Cafe Appliances finally pulled the plug and released a brass finish line!
Upgrade Your Home with Andersen Windows for a Whole New Look"
I think most people can agree that windows are always a major upgrade; and with Andersen Windows; you don't have to give up style for functionality. Today, I am excited to share my process of getting my new windows installed while sharing some good tips on how to pick out windows for your own home!
"This post is sponsored by Andersen Windows"
Andersen Window Selection Guide
Now, I am no window expert, but luckily, I had a lot of help and direction from this amazing Window Selection Guide. If you need some help narrowing down your options, the Window Selection Guide is just for you!
Sometimes half the battle is knowing what options exist; and I really love how Andersen breaks down all of the options for you in this guide. It really takes the guessing game out of the window buying process.
The guide is full of detailed information that covers these three major questions you may have about your window selection process. If you have any of these questions in your head; this guide is just for you.
1. What type of windows do you want?
The first step in the window selection process is knowing the different types of windows and how they work.
2. What look are you going for?
Details like size, color, grilles, and hardware collectively create a look. Let's learn about all of the options Andersen has to offer.
3. What are your needs for energy efficiency?
Understanding glass types and glass upgrades is fundamental to selecting optimal windows for your climate and geographic location.
Window Installation
Now let's talk about my own personal window installation. Once my window order was placed and delivered, they were ready for install; which brings me to my next point, the Andersen Certified Contractor program can help you find the right contractor.
I didn't really have a clue as to who would be a good fit for window installation; but I was happy to find that Andersen provides local contractor recommendations based on your area. This allowed me to find a contractor quickly and after the installation; I was very pleased with their recommendation.
If you too are having issues finding an installer, head over to their website here to see their recommendations!
I opted to go with two separate styles of windows within the 100 Series - some incorporating colonial grilles and some without leaving the glass unobstructed.
I was also glad to hear that Andersen Windows does specialty windows as well, to help replace my oddly shaped window in the front. Just look at the difference these windows made compared to the older windows!
These picture windows were the perfect style for my lake house because I have an amazing view in my front yard. You want to make sure you pick something that best fits your needs and the needs of your home.
It took roughly three days to install all thirty-two of my windows and I was very happy with my selections. Windows can be a pretty pricey purchase; so you want to make sure you are making selections that you will be happy with in the end.
After seeing the windows in a few of my rooms, I immediately knew I had discovered the perfect window solutions for my homes unique style. These black windows were the perfect addition to my new home.
If you are toying with the idea of new windows be sure to check out the Window Selection Guide to make your window buying process a breeze.
I have been super excited to share this oak slat wall with you because it is hands down one of my favorite feature walls to date. I have been obsessed with slat walls ever since I've seen them around and have been dying to do my own rendition of one and I finally got the chance.
"This post is sponsored by Weaber Lumber."
My good friends over at Weaber Lumber sent over these fun Oak Wood slats; a new product that they just introduced. Their sleek lines have an architectural quality that is super sophisticated. You can use them to create a multi-dimensional effect for a modern update. Learn more here.
There are some affiliate links in this post, meaning I get a small commission if you purchase through these links, at no cost to you. Click Here to read my full disclosure.
To prep for the oak slat installation, I first had to paint the wall. If you are installing these slats as I did, you will be able to see the wall behind the slats so you will want to paint the wall a color that matches your walls or a darker color to be more appeasing to the eye. I painted the wall with Behr's Sonora Rose in Matte.
Oak Slat Install
I am super excited to be sharing this new product with you guys. My friends over at Weaber Lumber reached out to me to try there new Oak Wood Slats that will be coming soon nationwide and man am I in love. I have been wanting to do a wall paneled wall for a while and this was the perfect product to get it done.
Here is a little info about what comes in each box:
Solid Oak
Actual Size – 1/4” X 1-1/2” X 36”
37 Slats Per Carton
1qty Spacer to provide the option for 1/2″, 3/4″ & 1-1/2″ Spacing
One Box Covers 20.625 SQFT based on 3/4” Spacing
I opted to use one of the oak slats as my soccer but they provide a spacer that gives you an option to choose the spacing that works best for you.
Once the wall was fully painted, I began installing the oak wood slats. I am attaching them to the wall by applying a small amount of paneling adhesive to the bak and then attaching it to the wall with 2' brad nails and my brad nailer.
I love that these were really simple to install; but made a really huge impact to the space. I was able to install two full rows and then had to cut the bottom slats down for them to fit the bottom. If you would like a more even, uniform look; measure your wall beforehand to figure out what cuts you would need to make it even on the top and bottom.
The best part about that slats is that they are refinished; so once you install them on the wall; the only thing left to do is filling the nail holes. i used a fit-stick to go back and fill all of the nail holes. I tried to keep the holes to only three to eliminate having to fill too many holes.
Overall, creating this oak slat accent wall was a really simple project and something that you can easily knock out in a weekend. Now, lets take a final look at the space.
Oak Slat Wall Final Reveal
I can assure you that the pictures don't do it justice; but this oak slat wall totally elevated this space.
This accent wall coupled with the wallpaper was the perfect mix to bring some texture and fun to the space. If you're looking for a product to help create a fun accent wall, these Weaber Lumber oak slats are perfect. You can use them in so many different ways to create awesome spaces.
Welp that wraps it up, thanks for reading guys, as always XOXO Ashley.
If you've followed me for a while, you know that I am no stranger to a fun wallpaper; so I was super excited to get to install this lovely wallpaper that I found. But to make things even better, this wallpaper collection happens to belong to a really good friend of mine David Quarles IV and I'm happy to get to feature it in my home.
There are some affiliate links in this post, meaning I get a small commission if you purchase through these links, at no cost to you. Click Here to read my full disclosure.
I always like taking a look at the before so we can see just how much of a transformation we are getting and man was this a major transformation.
This room was just a plain white room, and I knew I really wanted to infuse it with some color; so I decided on this bold wallpaper.
The Wallpaper Selection
David Quarles IV created a wallpaper collection in partnership with Chasing Paper and I am so thankful that they have sponsored this wallpaper for this project. If you're interested in checking out the wallpaper I installed, it is called Ruth's Garden in Rose.
Wallpaper Installation
I'm normally used to installing peel and stick wallpaper, so this was my first time using the wallpaper paste and I must say; it was a lot easier to handle on the wall than peel and stick. Now there was a lot more prep work, but I found it to be fairly easy getting the wallpaper installed.
The first thing we did was roll the wallpaper paste on the back of the panel; we found it a lot easier to just lay the panel on the ground and roll it; this method worked really well for us.
Once the adhesive sat for a second we started installing the panel on the wall. I always like to install the panel so that and inch of it goes past the ceiling line so that I can cut a straight line after the install. For the first panel, I made sure to use my laser level to ensure the first panel was straight; if it's not straight you will be able to tell later when you go panel by panel so be sure to take your time and make sure that first panel is correct.
Once the first panel was up, the rest really was a breeze. Cutting around the window got a little tricky but no too bad and the wallpaper was looking AMAZING! So happy with my choice!
The wallpaper went so well with the paint color and oak slat wall; I just couldn't wait to get it all finished.
Now it's time for the reveal! I won't leave you completely hanging, so here's a little sneak peak! Now head on over to the Dining Room post for the final reveal!
"New vinyl floors are in the building; and it feels so good."
If you guys have been following along on my journey to get my studio together; than you're going to love this project because Cali Floors is really helping my transform this studio space.
I always like to look at the before photo first, just so I can soak in just how big the transformation is. This studio space was only just a room of studs when I bought this house but now with the completion of the flooring it is a fun, creative space where I can bring my ideas to life.
Flooring Info
I decided to go with these beautiful Cali Floors in DOVER BEACH because I wanted a similar look to the wood floors in my last house. I was able to order a few samples first and then ultimately decided to go with the Dover Beach color.
If you are interested in these floors but don't want to commit first you can order a few samples with the code "FREESAMPLE" and check out the flooring in person before pulling the plug.
The good thing about these floors are that they are 100% waterproof and simple to clean; being that I will be utilizing this space for my office I wanted something super durable. It's protective wear layer helps prevent scratches and it also features a built-in underlayment cushion for quieter rooms.
Process
Now let's talk about the installation process. Luckily, with the click-lock planks installation was a breeze. I was able to install the flooring right out of the box. I really loved that the planks were extra-large as well, at 60” long, 9” wide, and 3/16” thick because it really made the space look and feel luxurious.
I first started out by laying the green CALI Complete underlayment. This all-in-one underlayment is designed for moisture and vapor protection for all subfloors and floor types. It was easy to lay down and makes me feel that much better about floor protection.
I utilized the Ryobi flooring cutter to cut the boards and they cut them with ease; this lightweight saw cut down on floor installation time for sure. I was Abe to knock out this flooring project in two days with the help of my friend.
Once I was able to get all of the flooring installed, I started to work on the dropdown. I first used liquid nails to attach the flooring to the dropdown step and then added a cap piece to cover the edge.
I waited to get all of the furniture in before doing this part of the flooring so I didn't mess up the stair nosing but I was so excited to get this part of the flooring done; it was the missing piece.
Installation Video
Seeing is believing; so check out this short clip of me installing the floor in my studio space.
Final Reveal
Without further a due, here is the moment you guys have been waiting for; the final flooring reveal. Man O Man, this pace has come a long way from the day of studs. I am so grateful for Cali floors for helping me bring my studio to life and am really excited about all of the fun tasks I will get to do on my new vinyl flooring.
The best part of it all is; not only does it look amazing but it's practical and durable as well. So I'm getting the best of both worlds with this new vinyl plank flooring.
The color of the vinyl planks couldn't have been the more perfect color for this space; it goes along so well with all of the vibrant colors in the studio.
This is definitely a project that I was excited to get finished because it really helped me bring my studio space to life; now I'm ready to tackle all of the upcoming projects that I have in the works.
This open space was the perfect spot to install this vinyl plank flooring; and with all of the photoshoots and filming I will be doing up there; these floors have been the perfect match.
For those of you who have been following along, you know that I have been working hard on the lake house to get her transformed, so this post is long overdue.
But I’m happy to share that the patio area got a little facelift. I was able to set up this awesome set from Frontgate with cushions and pillows made with Sunbrella Fabric, and it was the perfect addition to have poolside.
Outdoor Furniture featuring Sunbrella
One of the top things I look for when it comes to outdoor furniture is durability. With my furniture being outside and being exposed to the sun, I always want to make sure I get pieces that will stand the test of time.
In any season, durable fabric can make life so much easier, so Sunbrella was a perfect fit. Their outdoor fabric is designed to endure the elements of nature, but the great thing is that you don’t have to give up your style! It is beautifully made with tons of color options
Other Sunbrella Fabric features include:
Cozy and Comfortable Fabrics
Fade Proof & UV Resistant
Weather, Mold and Mildew Resistant
Easy to Clean and Stain Resistant
I look forward to hosting many cookouts and parties at the lake house, and I feel good knowing that I have a patio set that will stand the test of time.
Sunbrella Fabric Solutions
Sunbrella carries a wide selection of fabrics, colors, styles, patterns, and textures that work in a variety of applications. Sunbrella has ideal solutions with fabrics that fit your needs for all different types of projects. Learn more about Sunbrella here.
I just recently was able to finish a headboard project for an indoor project utilizing Sunbrella’s fabric and it turned out awesome! So whether you have an outdoor/indoor project, or residential or commercial, Sunbrella has got you covered.
Shop my Outdoor Furniture
My favorite piece in the bunch is hands down, this patio chair. I just love how the wicker couples so well with the Sunbrella Rain Fabric Cushion. It's such a comfy chair to sit in.
It works so well with the Palermo Sofa. I always love to mix and match furniture pieces and these two were the perfect match for each other. If you would like to shop my exact furniture pieces in this set up, see the list below.
"Having the right tool will make any Home Renovation go smoothly"
Sometimes home renovations require a lot of work, but having the right tools will always make things go smoothly. Here are my top must have tools when renovating a home. I promise you, it will make life easier when renovating a home.
First up is my handy dandy trim puller. Now, normally Im not big on fancy gadgets but I can promise you this trim puller is worth every penny.
Normally, I would jus use a crowbar to remove trim but this tool makes trim pulling so much easier. Whoever came up with this design is a genius, because this tool has made life so much easier.
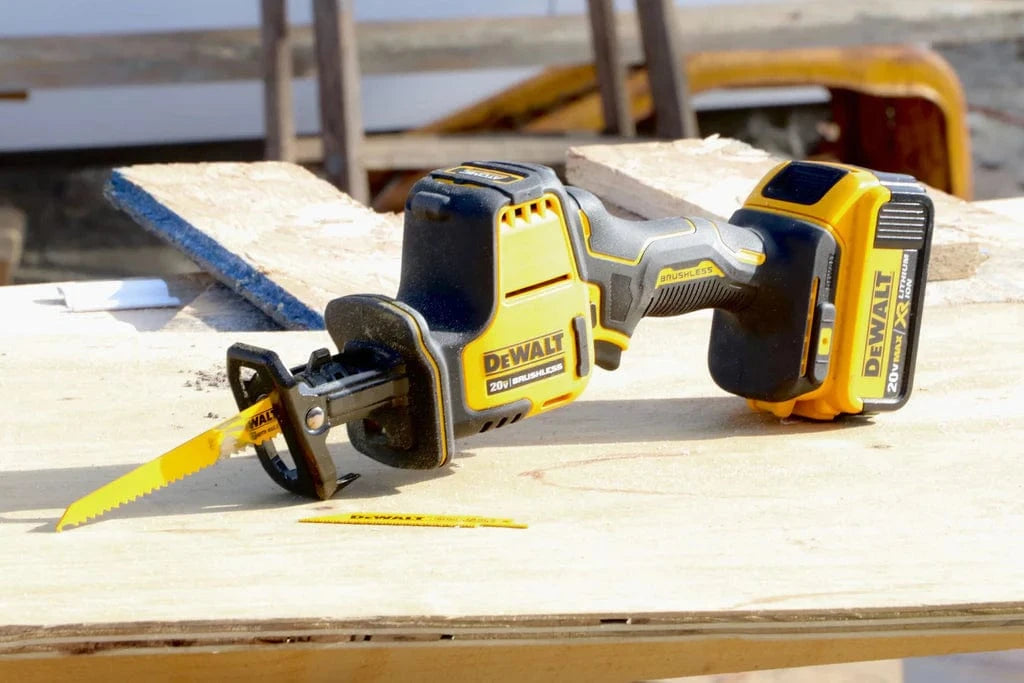
2. Reciprocating Saw
Since I started the Lake House Renovation, the reciprocating saw has probably been one tool I've used on almost all of my projects. I love the versatility of this tool and it will literally cut through anything; tubs, wood, you name it.
You will want to have this tool handy. Here is a tool review for one of my recommendations for a good recipe saw.
3. Paint Sprayer
Im normally one who doesn't mind pulling out a paint roller, but in a renovation, you become very acquainted with paint, so having a nice paint sprayer comes in handy.
Most people that know me, know that Graco is my favorite brand of paint sprayer. I just had the opportunity to use the new cordless sprayer and I must say it's pretty amazing. Only thing is, its pretty expensive, so I'm leaving links for my top favorites.
Drill is probably one of my most used tools, outside of renovations and inside of renovations. I have a lot of recommendations, but I like my Dewalt drill because it's lightweight.
If you are looking for a good beginner drill, here are some of my recommendations.
For Ryobi drills, I am recommending the hammer drill because it gives you a little more power for drilling and a little more versatility with it being a hammer drill. I have tried Ryobi's cheaper drill models and for me they just don't make the cut. Being that the drill is one of the most used tools, you want to make sure you get something solid. Check out my full tool review here.
This Ridgid Drill is a beast of a tool. I have been using this drill for about a year and have had very good success with it. With its 1,3000 lbs. of torque RIDGID's Hammer Drill/Driver is an industry leader and features over 100 settings for dialing in with it's micro clutch. This is an excellent drill with great power and torque. It is a little heavier than my other drills, but the power and performance outweighs the annoyance of the weight. Check out my full tool review here.
This Dewalt Drill has also proved to be a pretty good fit for me. It is a little pricey but DEWALT has always been a reputable brand and its something that will last you. This 20-Volt cordless tool is ideal for most drilling/fastening applications and it's high-speed transmission features two speed settings.
5. Brad Nailer/ Finish Nailer
The brad nailer is another tool that most may not consider an "essential" tool but for me, this tool has been very helpful and pleasing in my woodworking journey.
Brad nailers are mostly used detailed applications such as trim work, cabinetry and moldings. They are designed to fire brad nails ideal for binding wood trim.
This Ryobi Brad Nailer nails up to 1700 nails per charge and is compatible with the 18V Ryobi. battery system. It features AirStrike Technology, which eliminates the need for noisy compressors, bulky hoses, or expensive gas cartridges
I have also had good experiences with this DEWALT brad nailer, in my opinion, the Ryobi Brad Nailer is just as good, but if you are looking to keep the same brand, this brad nailer is also a good recommendation. The only difference from the Ryobi brad nailer is that it doesn't fire right away when you pull the trigger.
If you are more a pneumatic person. This Ryobi Pancake compressor set is a great option for a beginner, specifically because it comes with a compressor, which can be used for a ton of other things. It comes along with a brad nailer and a finish nailer all in one, so you are getting a lot of bang for your buck. I bought this set a while ago, and even though I have cordless nailers, I still get use out of the air compressor.
6. Miter Saw
Compound Miter Saws would probably be most next used tool in my shop. They are very similar to circular saws in that they make the same rip and cross cut as a circular saw, but the miter saw is fixed in an arm or a track, making it more accurate.
The Ryobi 12" Sliding Miter Saw was the first saw that I ever bought and it was the first saw I ever operated. For a girl who had never built anything, I had a pretty smooth experience. If you are a beginner woodworker who plans on doing woodworking as just a hobby I would recommend this saw. I specifically love that it comes with a laser. The laser allows you to see exactly where the blade would be cutting, which was very helpful for me as a beginner. Although, I had great experiences with this miter saw, over time, I noticed that it wouldn't out-stand the wear and tear I would be putting on it. If you are looking to get heavily into woodworking, I wouldn't recommend this miter saw but if you are a beginner hobbyist who wants to just dabble, this is a great option.
This Ridgid Miter Saw is what I currently use and man is she a beast. I personally love that it has a 70 degree bevel capacity. It doesn't have a laser but it does have a shadow light that allows you to see where the blade will hit which is just as good in my opinion. I also have the Ridgid Miter Standwhich in my opinion is the best I've ever seen. It allows you to break down the saw and move it around with ease. It is also compatible with other models if you opt for another saw. The Ridgid miter saw Runs neck and neck with the Dewalt Miter Saw, but you can’t beat Ridgid’s Warranty. Check it out more in detail in this video below.
This DEWALT is a little cheaper than the RIDGID but still a solid choice. I've used it a few times and have had a great experience with, it does not have a laser or shadow light, which was very helpful to me as a beginner woodworker, but I don't have too many bad things to say about it. I bought this saw for my dad who does construction often and he loves it.
Although I think corded Miter Saws are a much better option. I had the opportunity try out this cordless Miter Saw and was super impressed. If you are someone who travels a lot with your tools and need a cordless option, I would highly recommend this saw. It is a bit pricey but worth it in my opinion. Check out the video review here if you're interested.
When pulling up floors, I promise you, the hammer drill will be your best friend. This thing is a beast and can handle just about any floor. Do yourself a favor and splurge on this tool if you plan on taking up any floors anytime soon.


 Once we committed to combining the closets, there was no turning back. The first step? Demo. We tore out the center divide and stripped everything down to the studs so we could really see what we were working with; this is where the transformation started to feel real.
 From there, we reframed the entire opening to create a single, centered closet with one doorway instead of two. This part was key, not just structurally, but visually. One clean opening instantly made the space feel more intentional and way less cluttered.
 We also made sure the new framing was designed with the end goal in mind: maximizing storage. That meant thinking ahead about where rods, shelves, and future built-ins would go so everything would line up perfectly.


 One reason being, this room barely got any use and where the pantry was originally, just didn’t fit well with the house. It made a lot more since this way.
 Here is a view of the original pantry. As you can see, it’s kind of in the middle of the kitchen, and it was blocking the view of the breakfast nook, so moving this definitely was the best move .
 So that’s when I came up with the design that you guys see now. Once I
 We also had to end up jackhammering the floor in the kitchen because I really wanted to add an additional sink in the hidden pantry. I felt like having an additional huge pantry without a sink would just be a bad call, so my plumber was able to jackhammer the floor and find the existing plumbing to the kitchen sink and was able to hook up an additional sink off of that.
  Then we demoed the tile floors, which was super easy to get up, and then started rebuilding everything. This process really didn’t take long. It took about a week for us to take down all the drywall, get the floors up and replace the drywall back and mud and texture so that we were ready for paint.
 I did end up going with eggshell because it is a pantry and I knew there’d be a sink in here, so I wanted the walls to be a little more durable. Usually, I am a matte girl but again I wanted it to be durable. I used my
 I decided to go with a black grout because I felt like that would give it a more seamless look and I was right. Once I was able to see it all finished and grouted, I was extremely satisfied with the result.
 Once all the cabinets were attached and set, then I started the painting process. Now, don’t be alarmed by all of these steps in this process. Yes, it is a lot and it took a lot of work, but you must follow all of these steps in order to get a nice and clean finish.

 Once these steps are complete, you should be good to go. Some people like to use a clear finish and that may be needed based on the paint that you use. This is another reason why I like using this particular brand of Sherwin Williams paint because that’s usually not needed when I paint with it.
 I talked to briefly about the hardware above, but the silver hardware pieces really brought everything in the pantry together, again I am a gold girlie, and I know some people mentioned that I should’ve chosen gold, but I just feel like for this space the silver just worked, especially with the appliances being silver.
  I also decided to add in this touchless faucet from Kohler, and then we put in a dishwasher as well because what’s a sink without a dishwasher.
  Last but not least, was this backsplash tile. It was surprisingly cheaper than most tile options that I use. The only thing that I want to note is that if you’re going to use this tile or really any tile, make sure that you purchase the tile all at once.


 Everything came together so beautifully and although it took a lot of work, I feel like I definitely made the right choice with turning my formal dining room into a hidden pantry.
  It has gotten so much more use now and it feels way more functional for the space. The star of the show hands down are these checkerboard floors, they make such a bold statement and the green couples nicely with it.
 I also love how the silver hardware grounds everything. Typically, I like to use gold hardware when I'm using green but this time the silver just felt like the better choice here and I was right. This rejuvenation hardware was so beautiful.
 Every single additive just elevated the space, from the floating shelves to the arched cabinetry to the backsplash tile. It just works.

 This bathroom is separated by a door which I kind of loved because I knew I could use two separate colors without it feeling weird. I've always wanted to try black in a bathroom, so I knew this would be the perfect opportunity to do so.
 There was a huge cabinet in this bathroom, which I knew would be awesome for storage but I also feel like it took up so much space. So I decided to remove it all together because I knew the open space would make this guest bathroom feel more luxurious.
 Once I had an idea of a design in my head I rendered it on my design software and this is what I came up with.
 Now for the fun part, the demolition! I saved a lot of money by doing the demo on my own. If you're looking to save and don't want to do everything, doing the demo can be an opportunity to save some dollars.

 I think going with two colors was the perfect choice for this bathroom. Even though black is a dark color, only painting it black in the toilet area really brought a moody vibe to the space without it feeling too dark.
 I knew that the white oak vanity would be the perfect match to go with all of this black and I was right! I decided to stain the cabinet in this
  The shower and floor tile turned out great but I decided to knock out the backsplash on my own to save a little money and I'm glad I did. It turned out great and I was able to save a little money on the backend.
  Choosing grout always makes me nervous because I think it can change the look of tile so much. For the grout I decided to keep it simple here and go with Bright White and it looked awesome!
 Once everything was all installed, I started going in and adding all of the final hardware touches.
 I didn't know at first if the black would be too much but I am really glad I stuck with my gut. Going with black in just the toilet area was the perfect touch of black to not make this bathroom feel too moody and this tile is so beautiful.
  I would say that this remodel was a success and all of the choices came together beautifully. If you're talking a bathroom renovation, don't be afraid to go bold and as always, thanks for reading guys!


 Since the red was so bright to me, I decided to add a mural to the back wall to bring some fun to the room. Josh is a color person like me, so I knew this would be a great addition to the room.

 Each slat comes individually in a box and I used four boxes to do this side wall in the man room.
 My husband also mentioned that he really wanted his college jersey framed, so I found this
  Josh is a pretty big guy, so I decided to get him the
  This
This  I was able to showcase so many sentimental pieces on Josh's wall with this gallery wall and of course, I had to add in a few pictures of us. Can you spot them?
 I am a firm believer that you can make magic when you couple the right things together and both the mural and the oak slats were showstoppers in this room transformation. The oak slats really brought a masculine element to the room, while the mural made it fun.
 Welp, that wraps up yet another room transformation. Thanks for reading guys!


 I knew the wallpaper would be my most tedious task; but luckily with a few small changes, I knew we could turn this kitchen around in no time. The plan is to update the paint, add new appliances, change the backsplash and hardware and paint the cabinets. It may sound like a lot, but it's a lot less than a traditional Reno and just what we need to give this space a refresh.
 I hadn't planned on the windows getting changed, but I got a lucky surprise when I got new windows installed and that definitely added to the feel of the new space, so we will touch on that a bit as well.
 Now that's enough of the before; lets get into how we transformed this space.
 With painting the kitchen walls a crisp white, that made the space feel a lot more open and much brighter. This change alone did wonders for the kitchen. I decided to go ahead and switch out that older light above the sink and it was the perfect
  I decided to paint the island in Behr Premium Plus Paint: Hi-Gloss in the color potting soil, and I must say, this was definitely the better color of the two, than I painted the other existing cabinets in Behr Premium Plus Paint: Hi-Gloss in the color patio stone. These colors are very similar but I loved that potting soil had a brighter green tone. Either way, both colors were amazing.
 For most of the cabinets, we removed the hardware and doors and used a roller to paint the main cabinets and then used a paint sprayer to spray the doors. You can either use a brush or sprayer but a sprayer will give you a smoother finish.
 Without the regular prep, we were able to fully cover the cabinets with three separate coats of paint. Once the paint was all dry we added the
  For more information on my window installation, be sure to check out my post on
 Kohler also sent me a matching
  I didn't really want to spend money on new countertops since I was planning on ripping most of this out in the future, so we were able to rip the old sink out and put this new one in without damaging the countertops.
 I used this
  Once the tile was installed, we grouted it with Frost by Mapei and she was complete.
 I feel like I can take my time with the bigger Reno now because the kitchen doesn't remind me of the 70s anymore.
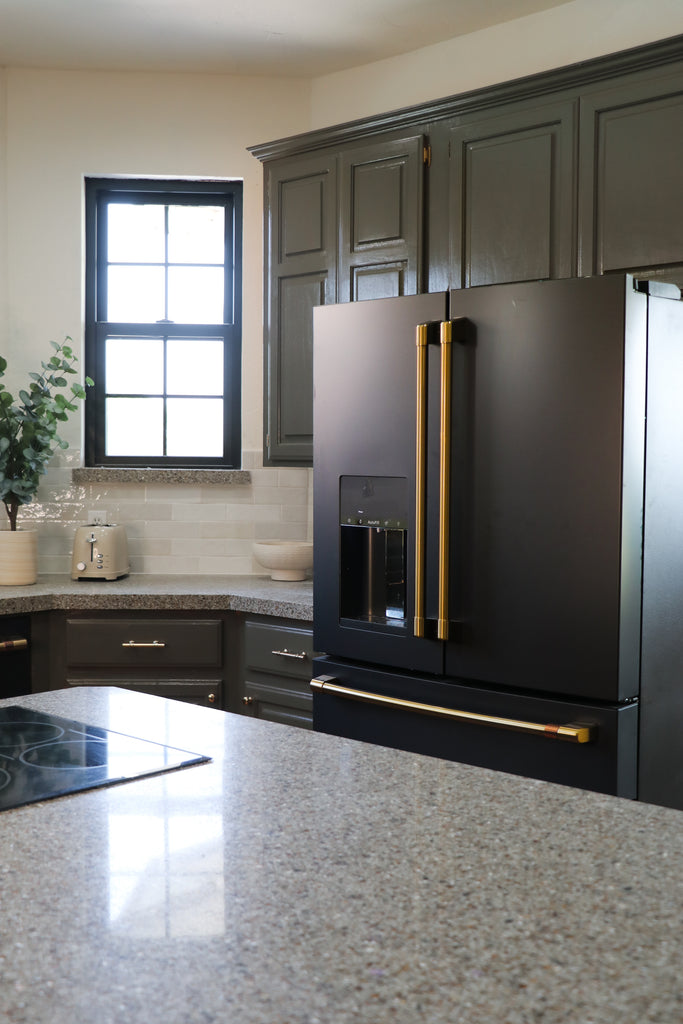 Even though I did have some pricey additions, I'm hoping this refresh shows you that it doesn't take much to bring your kitchen to life. Remember, a little bit of paint can go a long way!
 The Kohler sink and faucet were a really nice addition to the refresh as well and I am so glad Cafe Appliances finally pulled the plug and released a brass finish line!


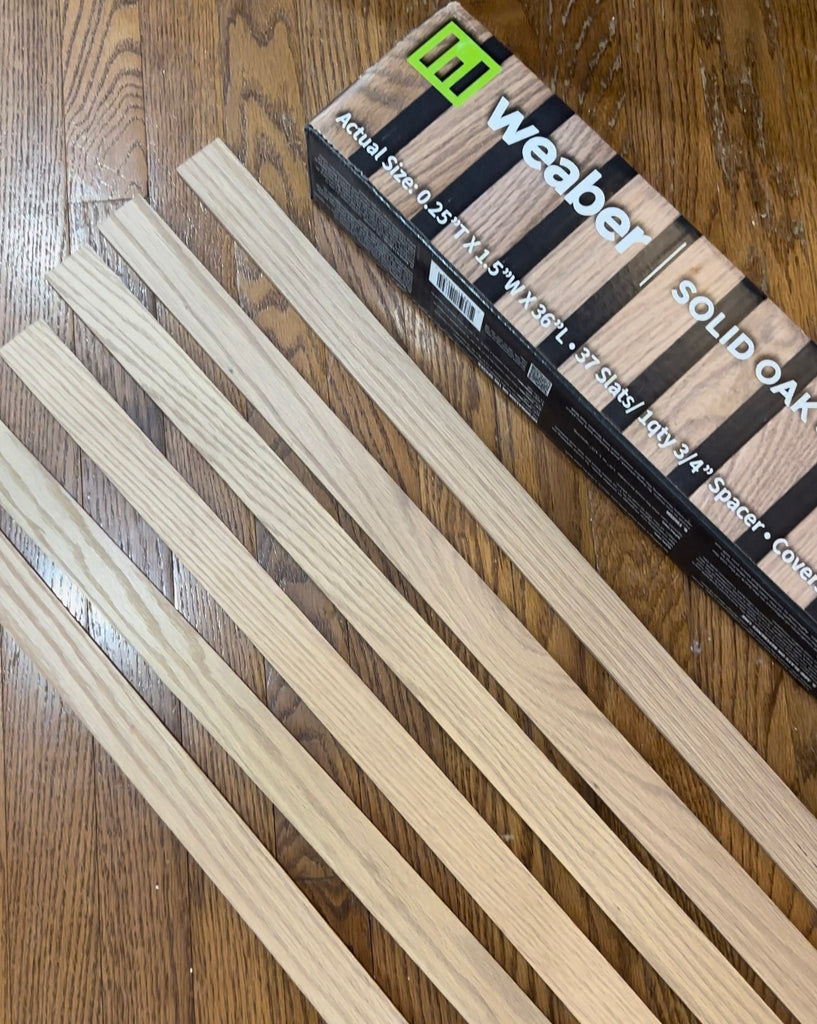 Once the wall was fully painted, I began installing the oak wood slats. I am attaching them to the wall by applying a small amount of paneling adhesive to the bak and then attaching it to the wall with 2' brad nails and my brad nailer.
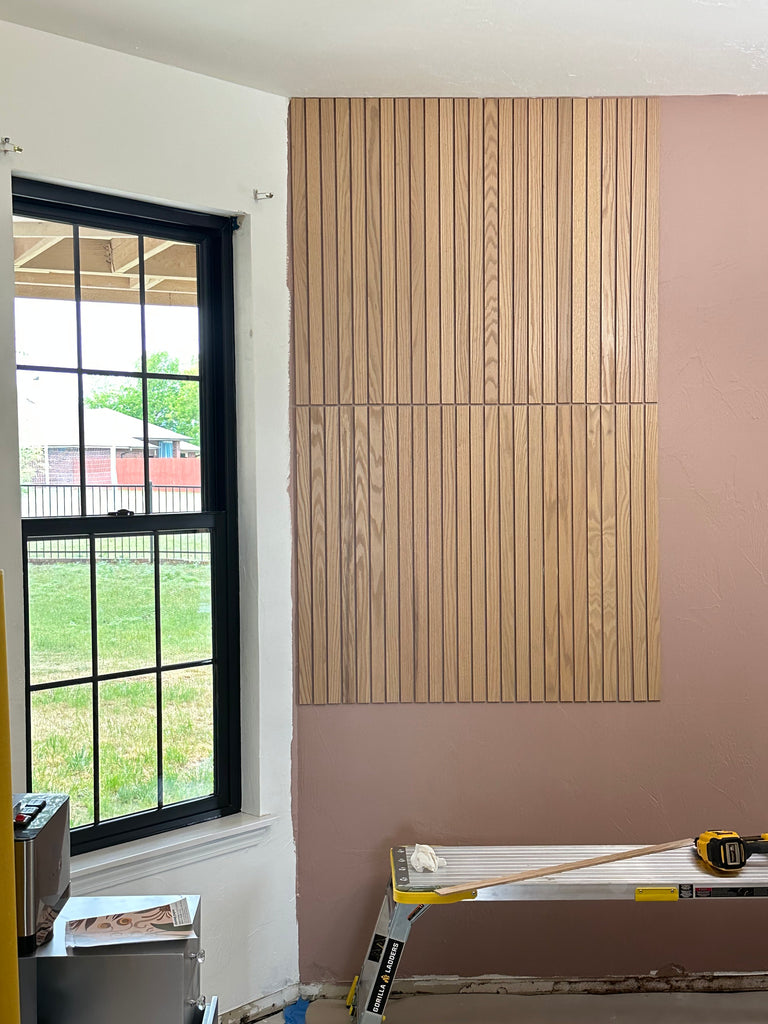
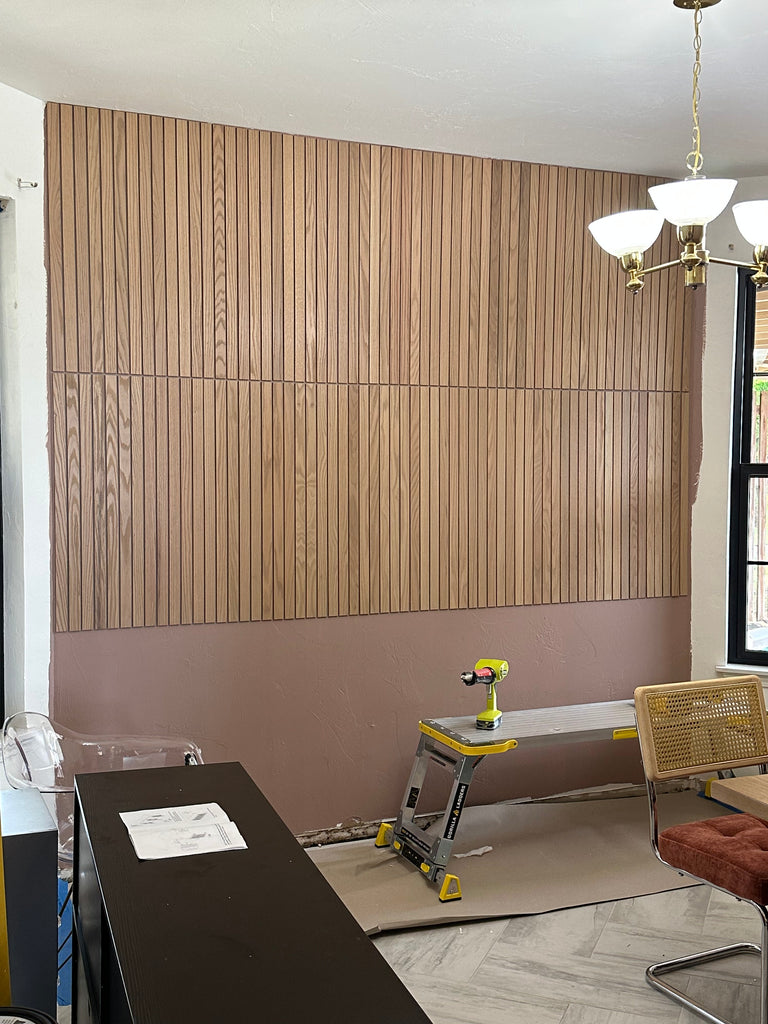


 The first thing we did was roll the wallpaper paste on the back of the panel; we found it a lot easier to just lay the panel on the ground and roll it; this method worked really well for us.
 Once the adhesive sat for a second we started installing the panel on the wall. I always like to install the panel so that and inch of it goes past the ceiling line so that I can cut a straight line after the install. For the first panel, I made sure to use my laser level to ensure the first panel was straight; if it's not straight you will be able to tell later when you go panel by panel so be sure to take your time and make sure that first panel is correct.
 Once the first panel was up, the rest really was a breeze. Cutting around the window got a little tricky but no too bad and the wallpaper was looking AMAZING! So happy with my choice!
 The wallpaper went so well with the paint color and oak slat wall; I just couldn't wait to get it all finished.
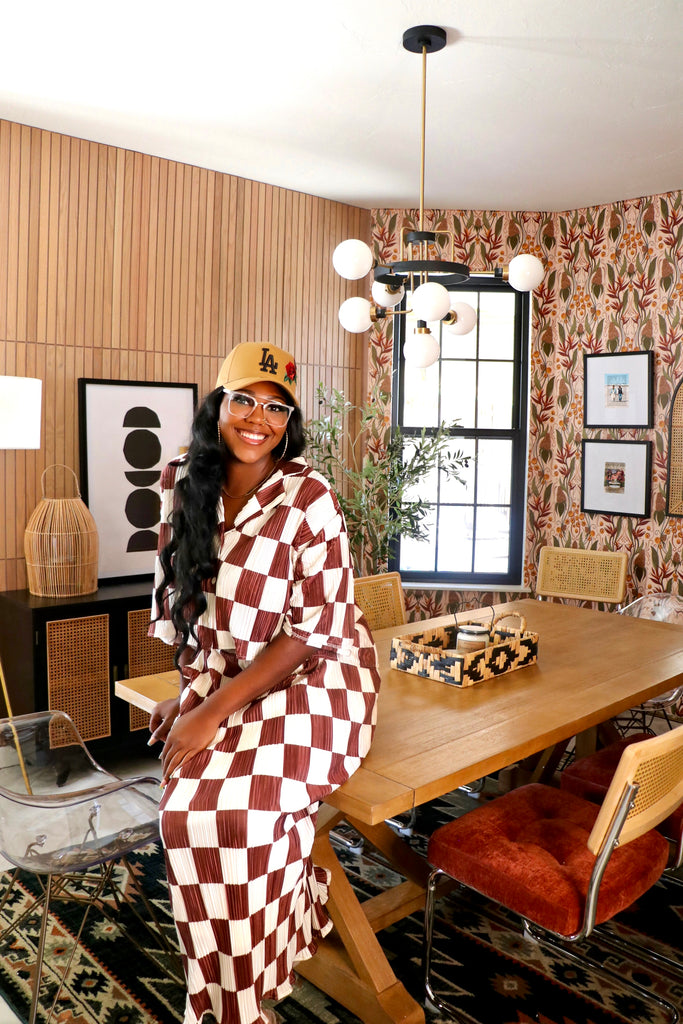


 If you are interested in these floors but don't want to commit first you can order a few samples with the code "FREESAMPLE" and check out the flooring in person before pulling the plug.

 I utilized the Ryobi
  I waited to get all of the furniture in before doing this part of the flooring so I didn't mess up the stair nosing but I was so excited to get this part of the flooring done; it was the missing piece.


 As Always, Thanks for reading guys. XOXO Ashley