
Projects

Magazine Shelf Rack
''Grab those magazines, Ive got a magazine shelf rack perfect for your space."
This review is sponsored by the Home Depot as a part of The Home Depot's Pro-Spective Campaign.
I don't know about you, but in my house I never know where to put my magazines and as a result they always end up all over the place. But today, I'm putting a stop to that with this DIY magazine shelf rack. Now I don't have to worry about wasting 30 minutes looking for my magazine, I know I'm not the only one. 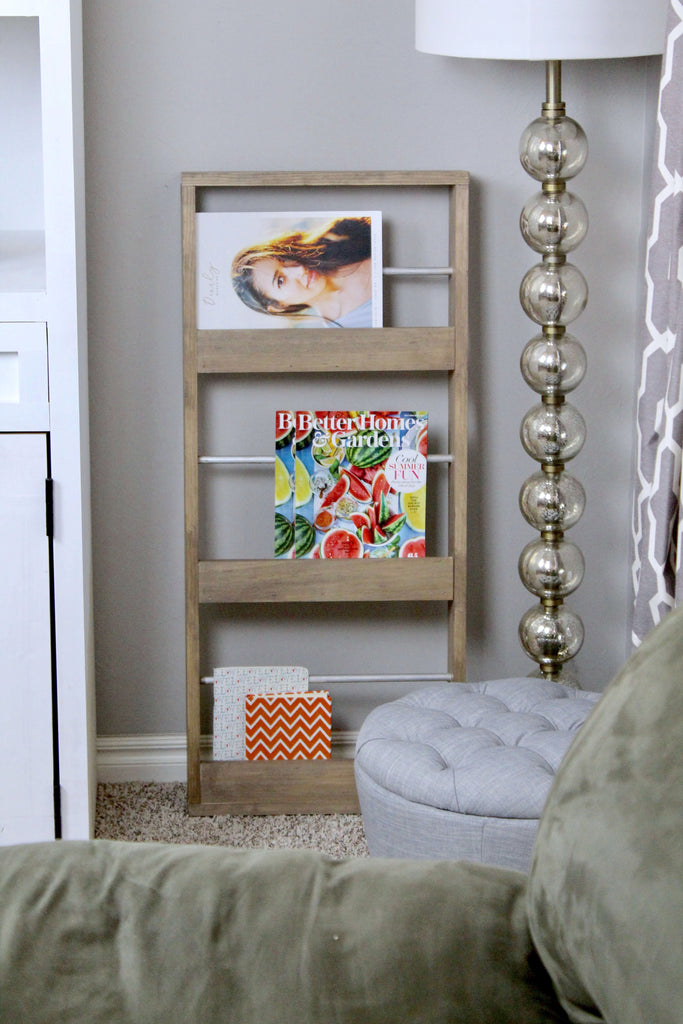
- 1x4 Lumber - 2
- 1x3 Lumber
- 1/2" Aluminum Rod
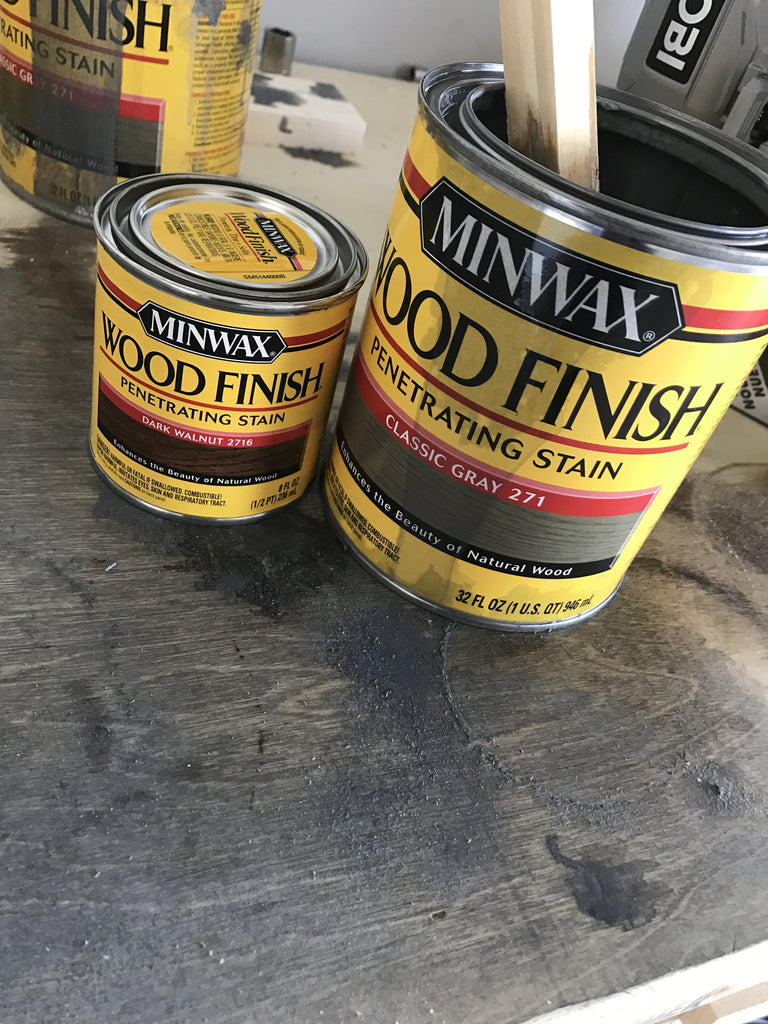
- Rustoleum Briarsmoke
- DAP RapidFuse
- Makita SubCompact Reciprocating Saw
- Diablo Metal Cutting Blade
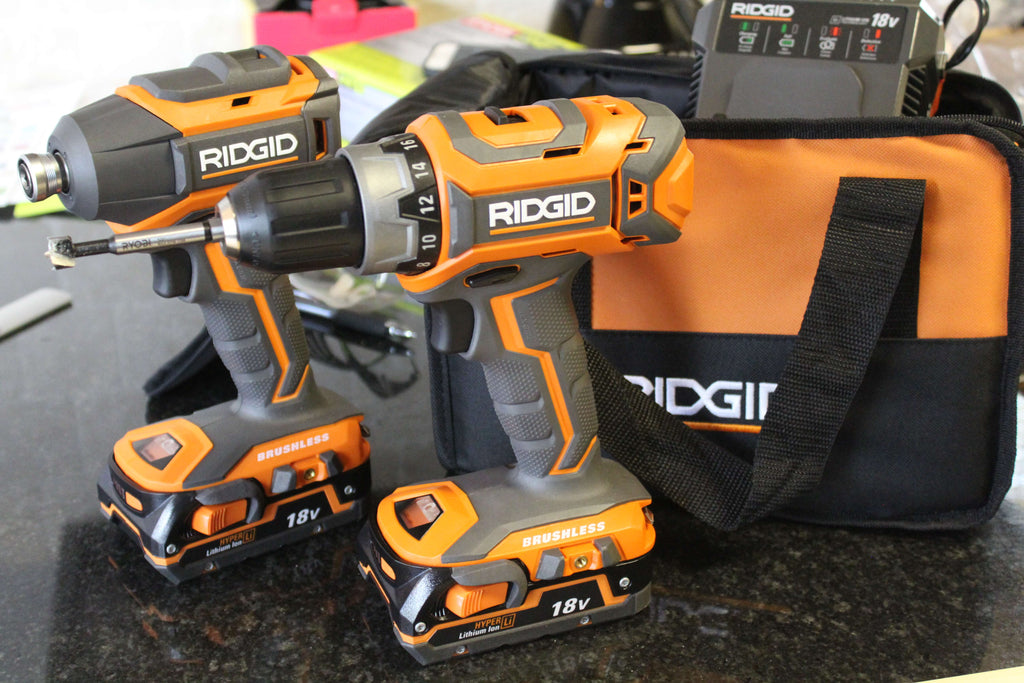
- RIDGID Drill/Driver
- Ryobi Brad Nailer
- Forstner Bit
- Vise Clamp
Dimensions
3 - 1/2" Rod Pieces - 16"
2 - 1x4 Side Pieces - 37 1/4"
2 - 1x4 Top/Bottom Pieces - 16 14/16"
3 - 1x3 Front Braces - 15 1/4"
2 - 1x3 Shelf Supports - 15 1/4"
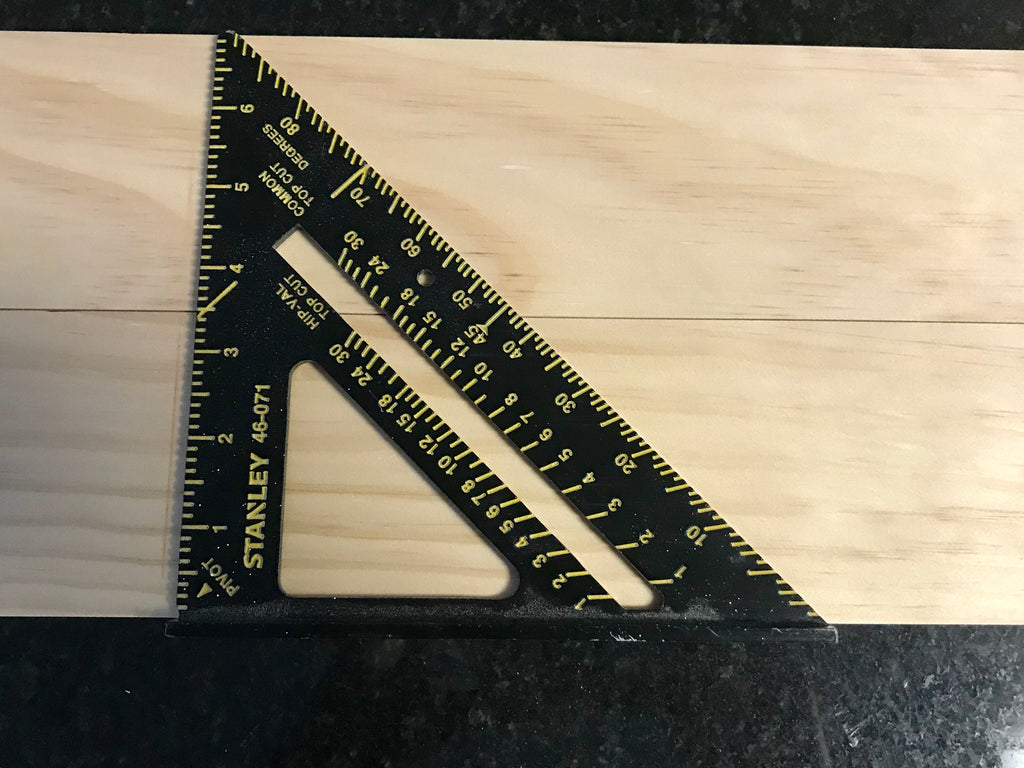
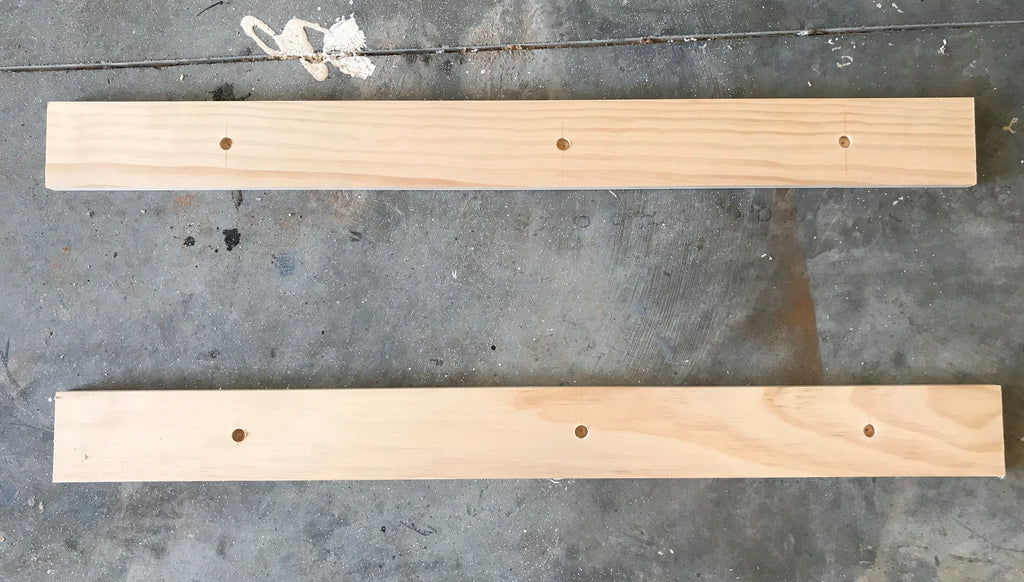
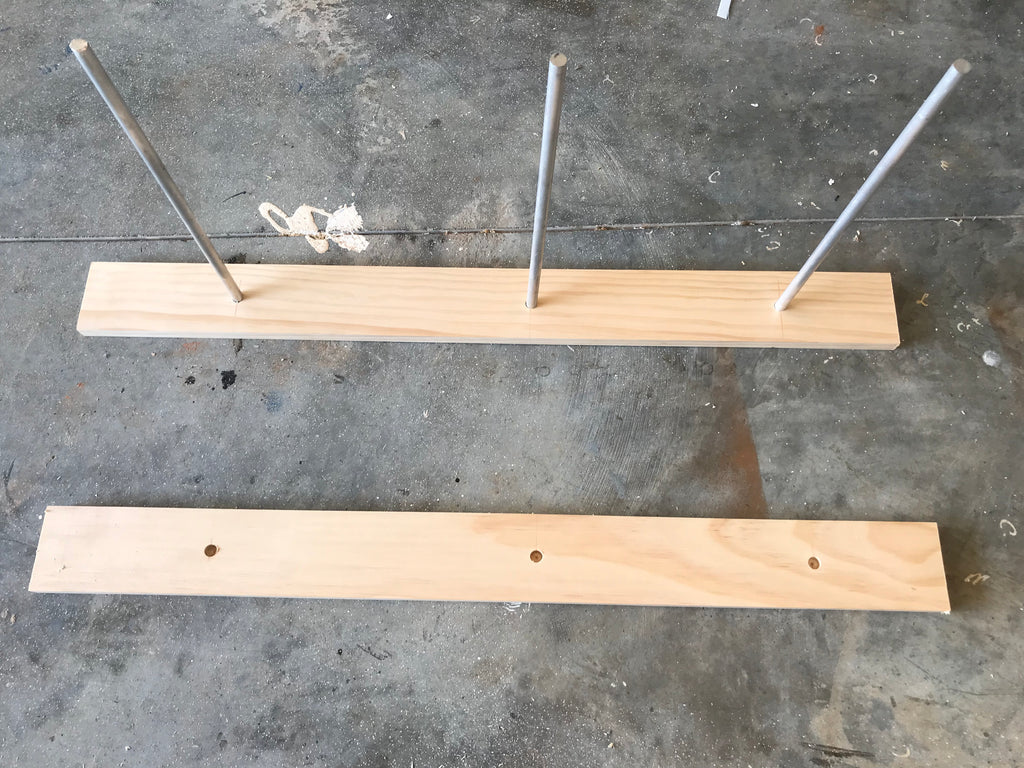
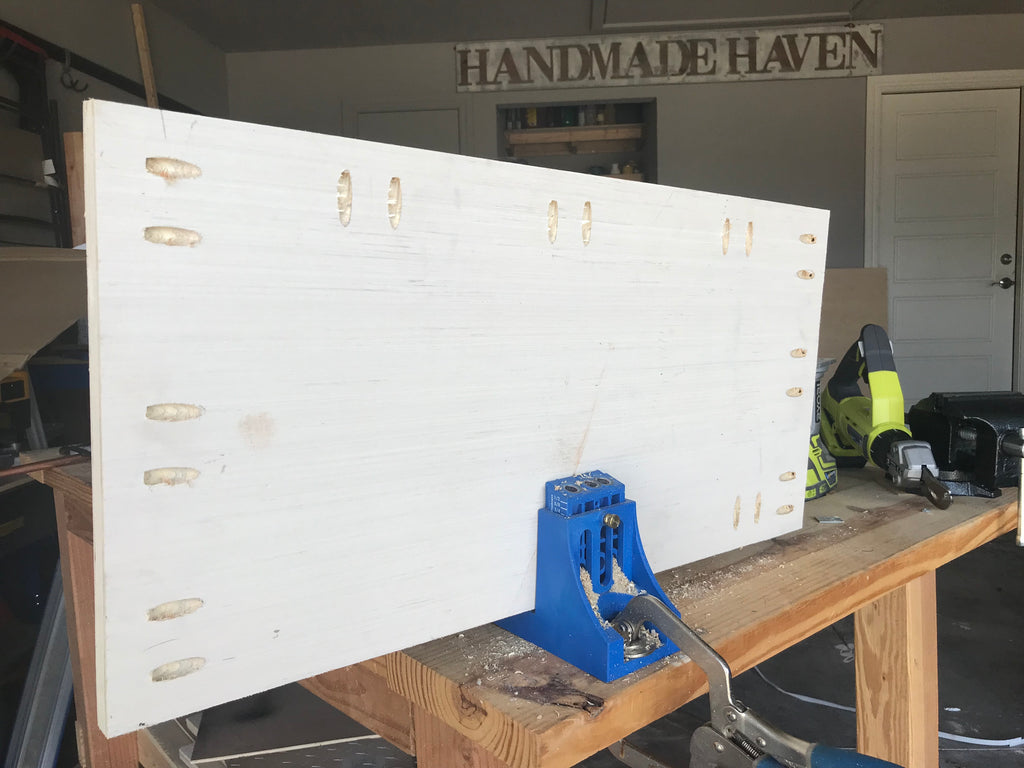
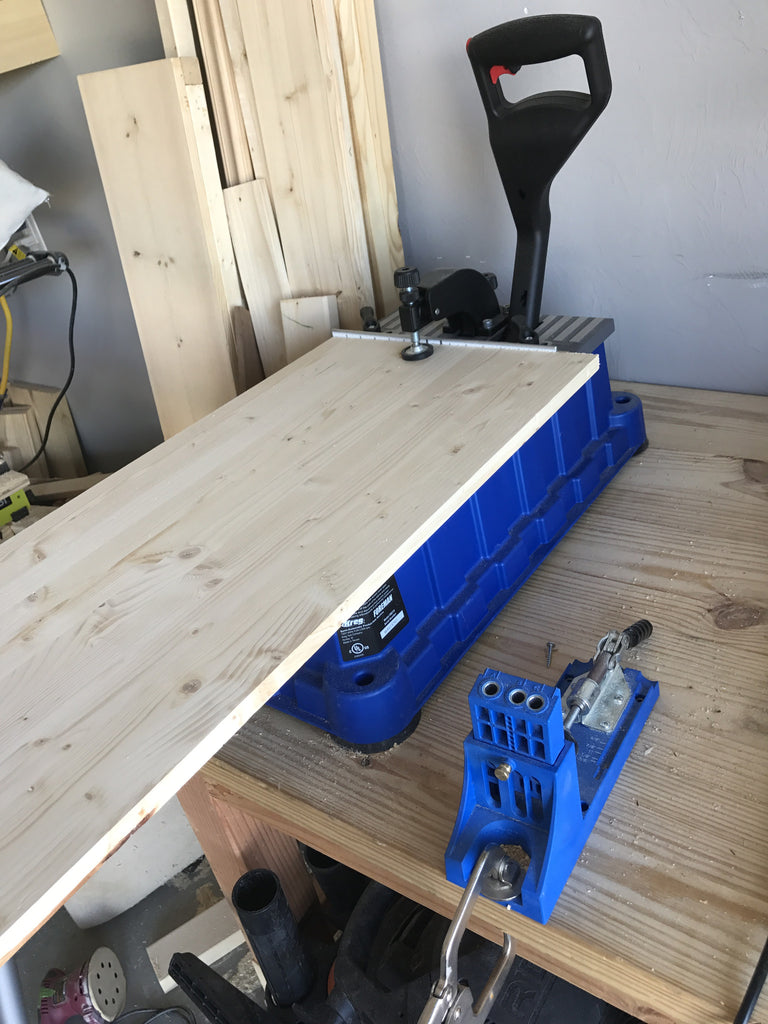
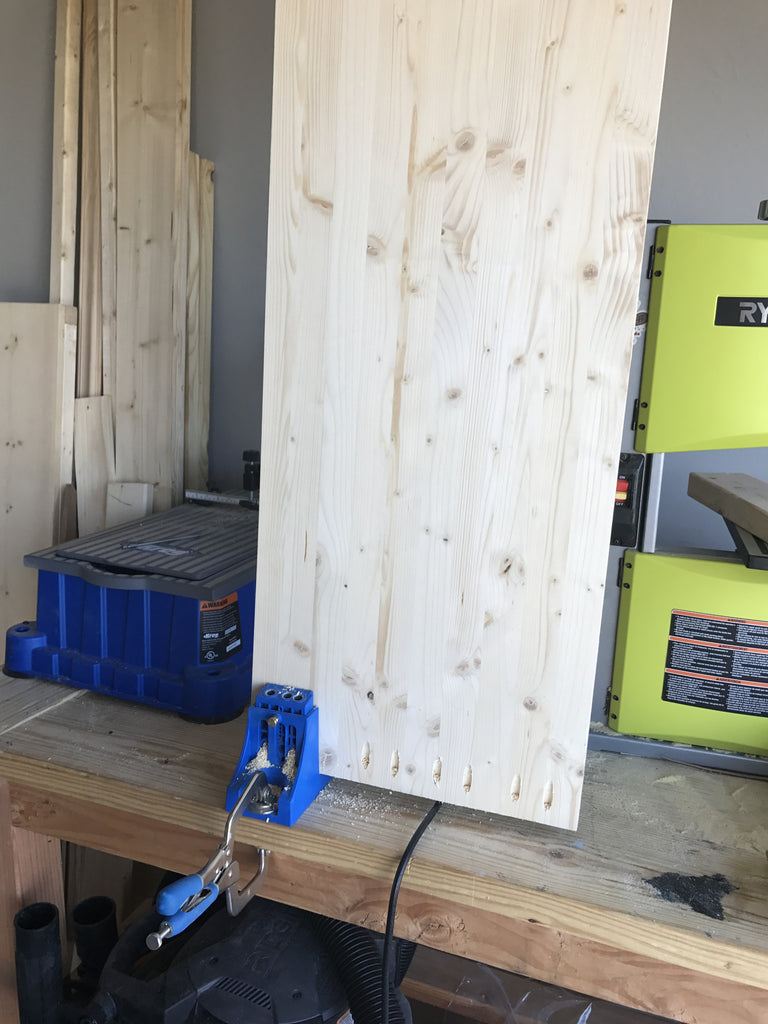
Step 1: Drill Holes for Aluminum Bar
The first thing I did after cutting the lumber down to size was to start making the lines for the hole placement. I used a speed square to make sure the lines were all aligned. This is probably the most important step, because if the holes aren't in the exact spot on both boards, your aluminum boards will be off.
I was excited to finally rid my living room of random magazine displacement but I was also excited to use my new RIDGID Brushless 18 V Drill/Driver and Impact Driver Combo Kit. Ridgid has always impressed me with it's Lifetime warranty and it's brushless technology is at an entry level price point.
This RIDGID Drill/Driver kit comes packed with two 1.5 Ah batteries and brushless motor technology that increases performance and runtime. The drill/driver has two speed settings that help match power to the task, so it was the perfect tool to use for this quick step.
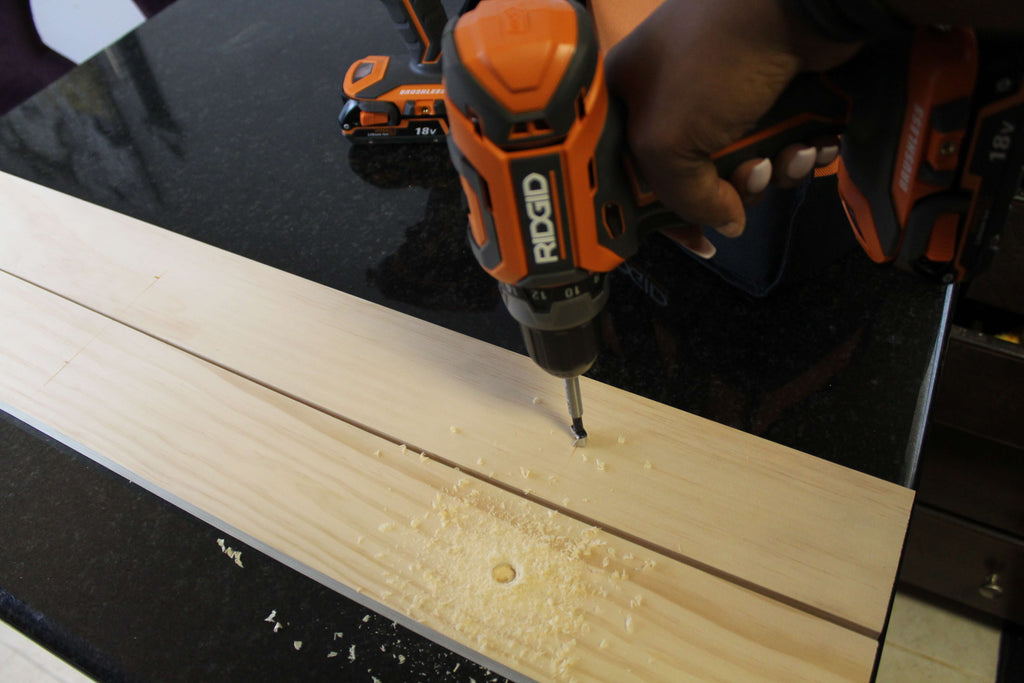
I used a 1/2"Forstner Bit to drill the holes. This is one bit that I don't use often, but glad I have it when I do, and Ryobi sells a great set for cheap at Home Depot.

Once you make the line marks for the holes, you've done the hardest part. I drilled the six holes in less than three minutes. It was just that simple. As long as you sit the tip of the forstner bit right on the line mark, the holes should line up perfectly.
Step 2: Cut Aluminum Bar to Size
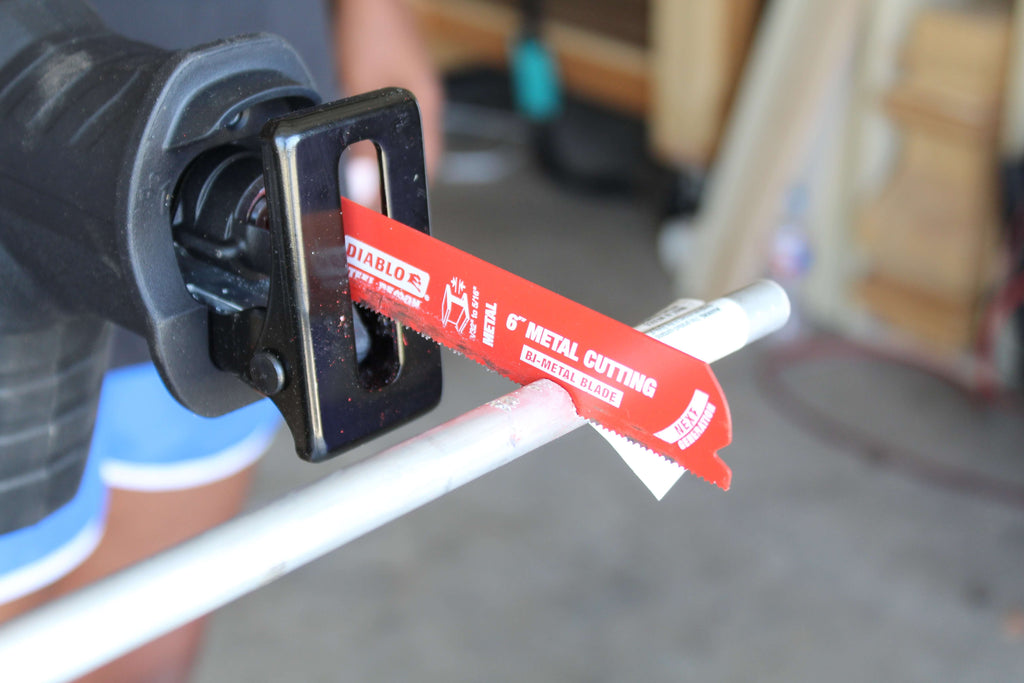
I always enjoy when I get to use materials other than wood in my project. I got the 1/2" Aluminum Rod to use for my magazine rack and it was the perfect addition to the project. To cut the aluminum bar down, I used my Makita SubCompact Reciprocating Saw coupled with my Diablo Metal Blade. It has a compact design thats only 12-1/2" ;one and weighs around 6 lbs with the battery. Its lightness and brushless motor makes it a much easier choice to pick up in the shop.
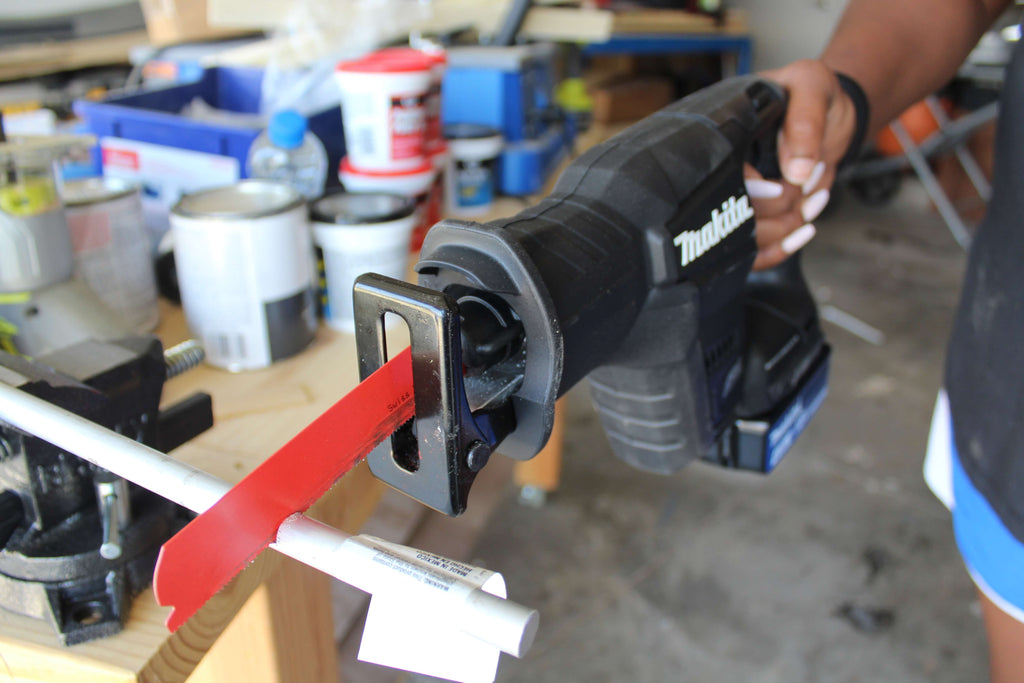
This Diablo Metal Cutting Blade went right through the aluminum bar like butter. My Diablo Blade set includes three nail-embedded wood blades and three metal-cutting blades. These blades have a non-stick coating that protects against heat damage and corrosion; and as you can see this aluminum rod was no match for this Diablo metal blade. In order to hold the bar securely in place I used my Vise Clamp and cut down my three bars in no time.
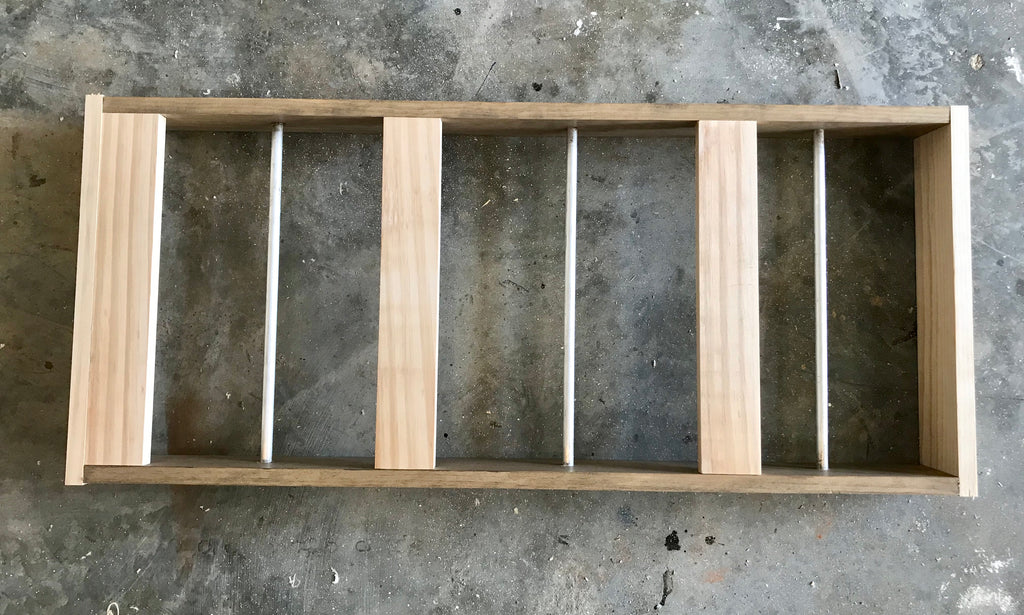
Step 3: Attach Aluminum Bar
To attach the three aluminum bars to the two sides of the DIY magazine rack, I put a little DAP RapidFuse glue into three holes on one side of the magazine rack, let that sit or five minutes.
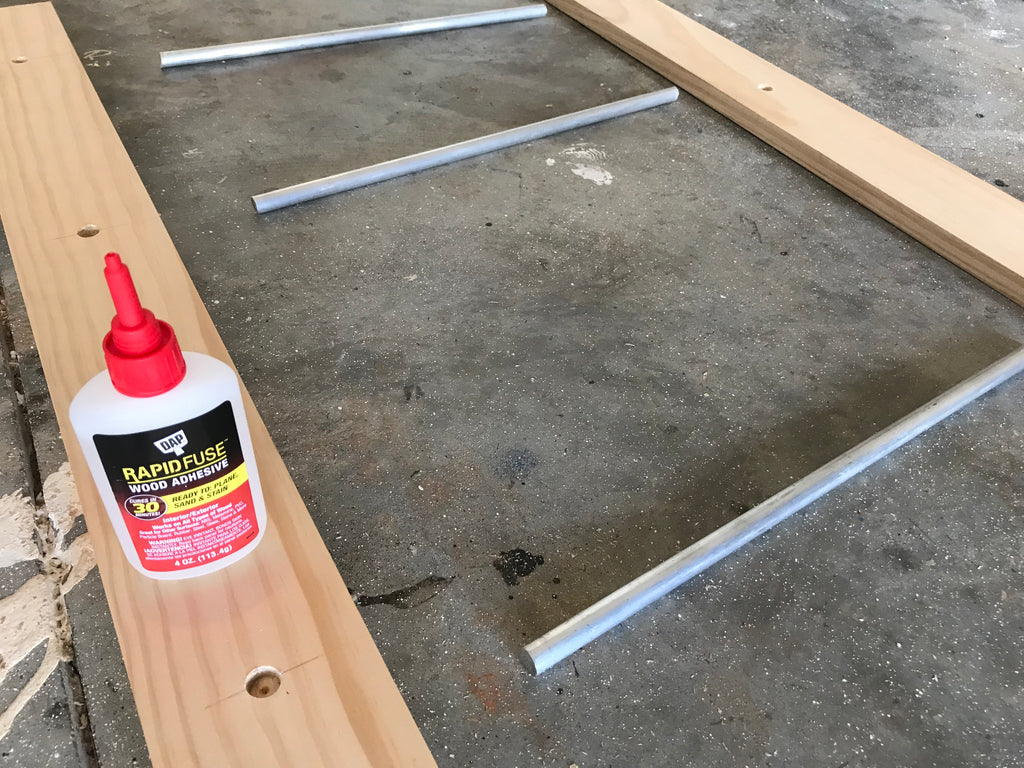
Then put some glue into the other three holes and attached that to the other end of the aluminum bars, and let it sit for another five minutes.
I placed the holes in the middle of the side pieces to keep me from loading this thing up with two many books, but if you want more room for more magazines, feel free to move the holes to the back.
Now I don't know if this ever happens to anyone, but halfway through the project I thought, why not just make this into a mini blanket ladder? haha so I tried it out but after taking a couple photos, I decided to keep going with my original plan, but I had to at least show you guys what it looked like. Surely, I'm not the only one this has happened to, right?

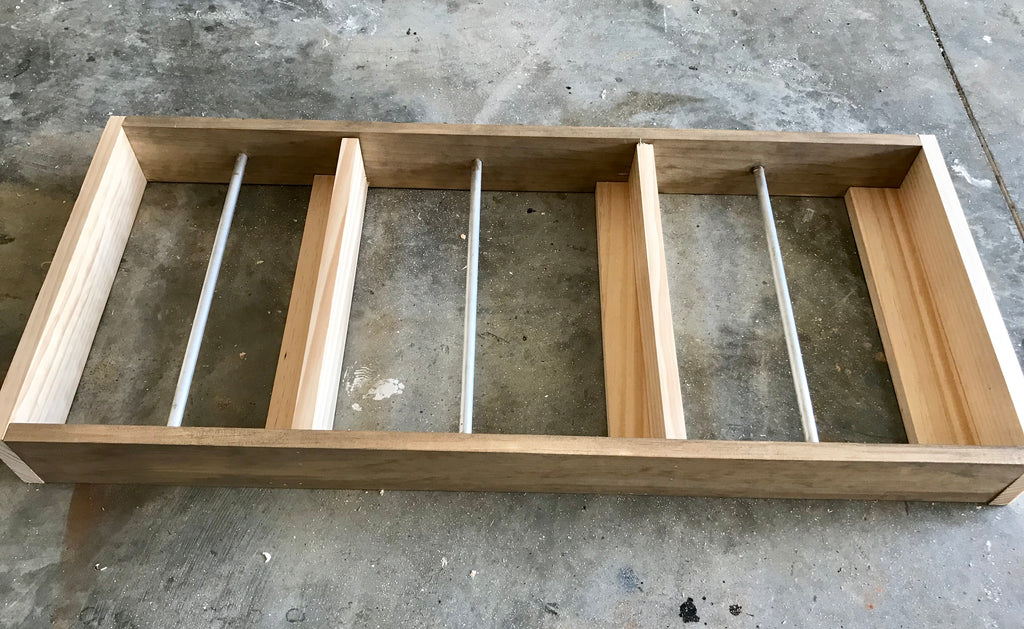
Step 4: Attach Additional Wood Pieces to Magazine Rack
After the experimenting was over, I began adding the front braces to the magazine rack with wood glue and brad nails.
Next I added the two shelf supports to the back of the magazine rack using wood glue and brad nails. This was the last step of the process.
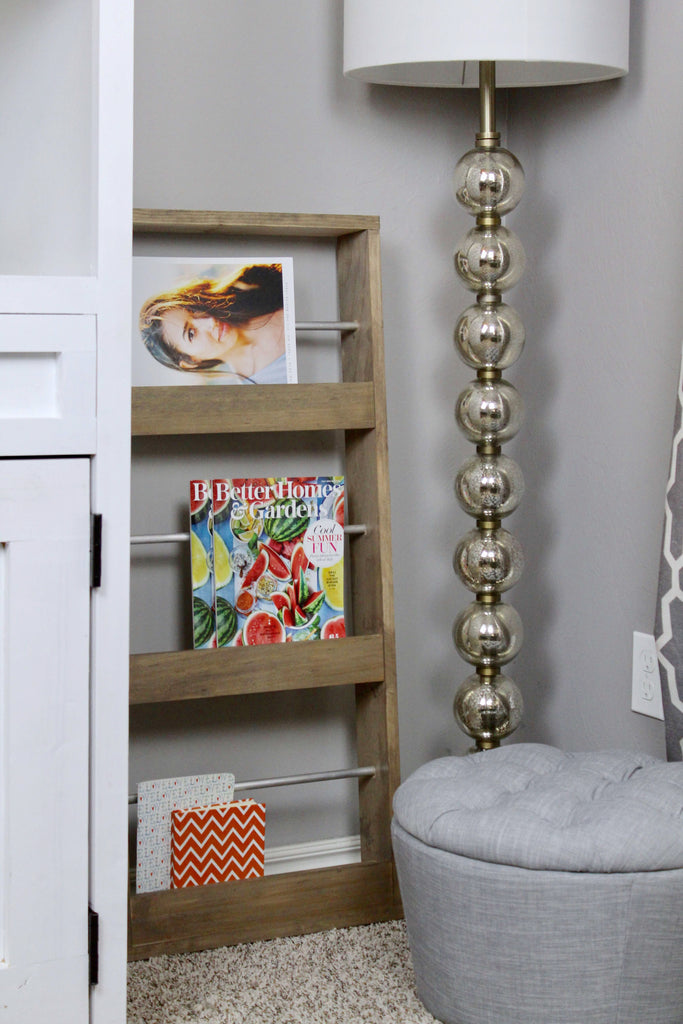
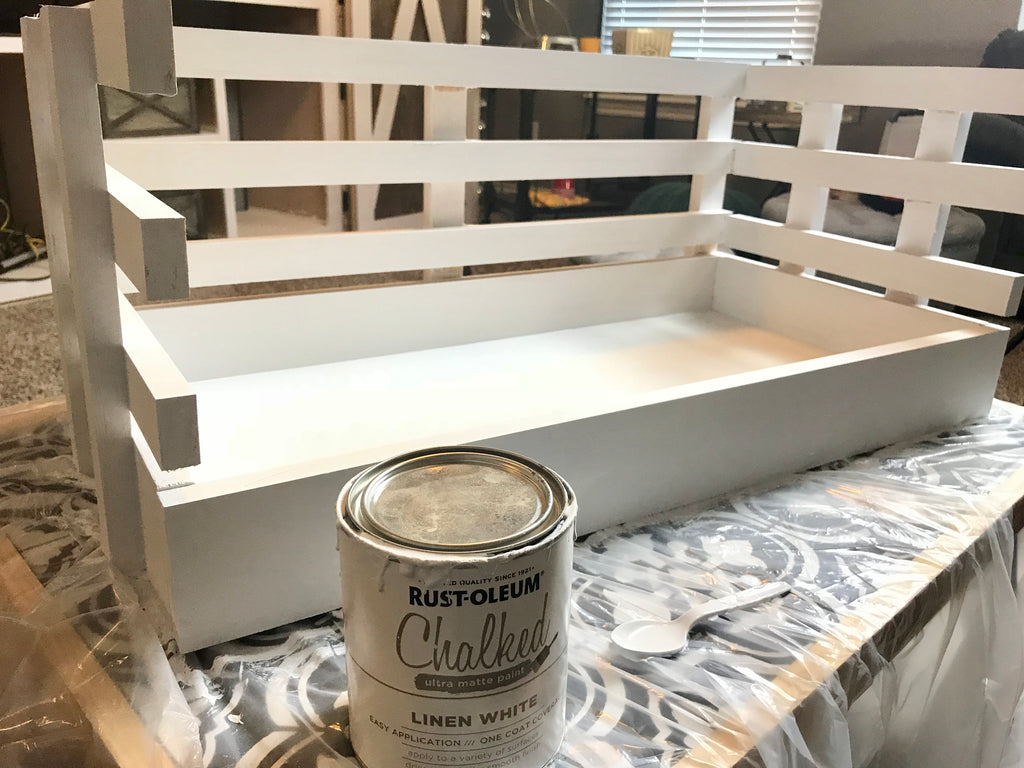
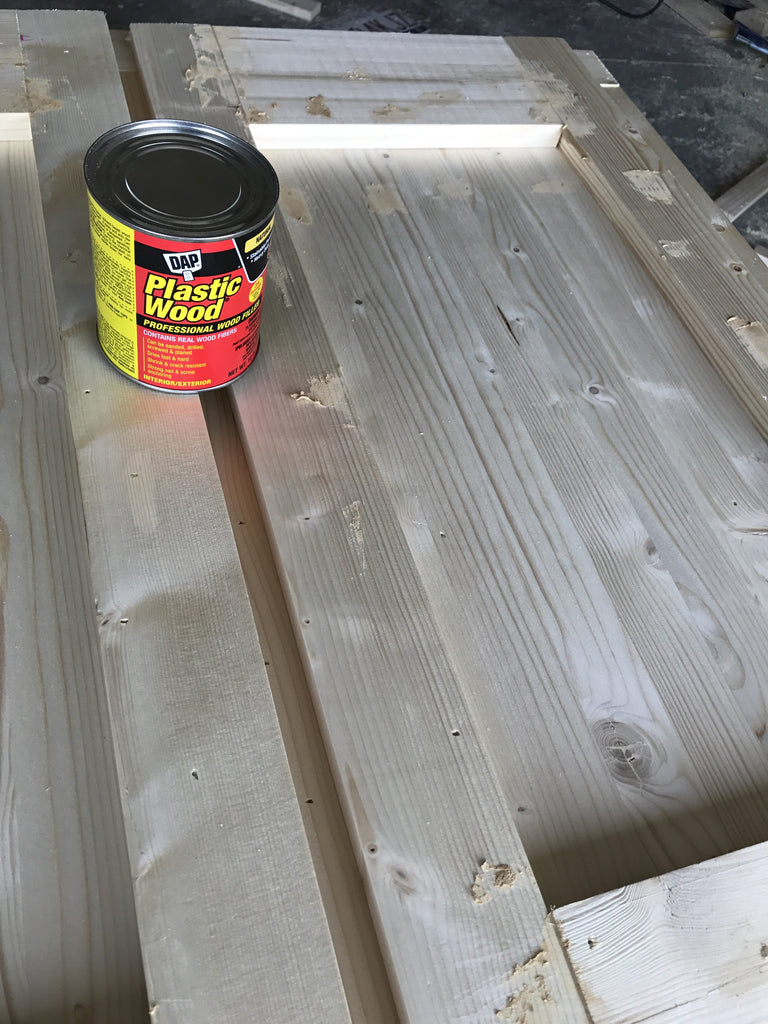
After I finished building the magazine rack, I filled the holes with DAP wood filler and then coated the magazine rack with Rustoleum Briarsmoke.
Thanks for reading guys! XOXO Ashley
I acknowledge that the Home Depot is partnering with me to participate in the THD Pro-Spective Tool Review Program. As a part of the program, I am receiving compensation in the form of products and services, for the purposes of promoting The Home Depot. All expressed opinions and experiences are my own. My post complies with the Word of Mouth Marketing Association (WOMMA) Ethics Code and applicable Federal Trade Commission guidelines.

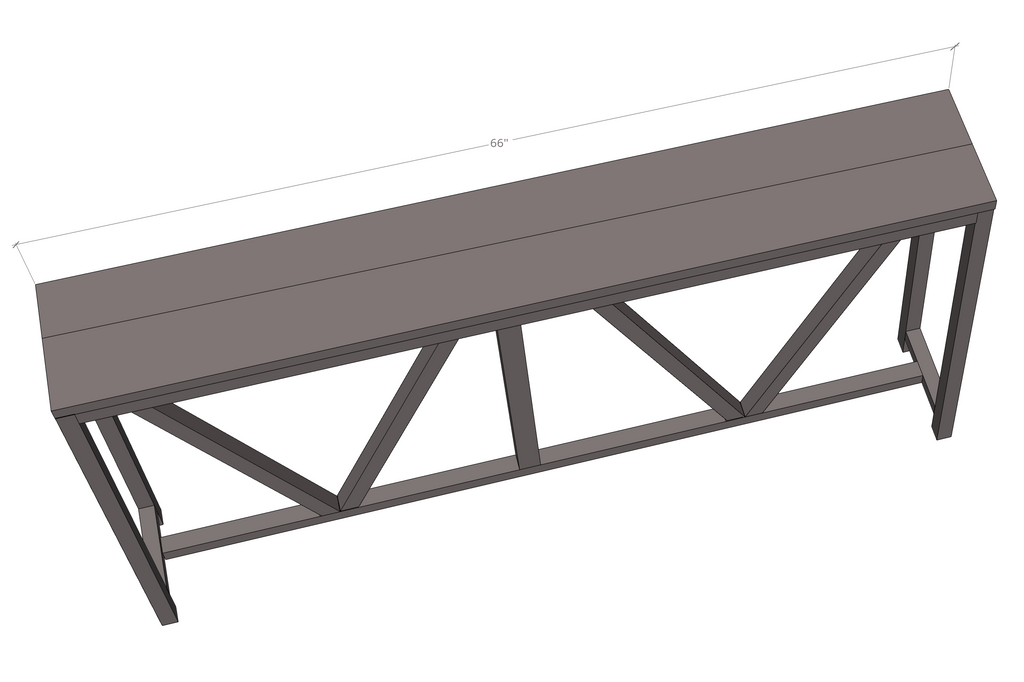
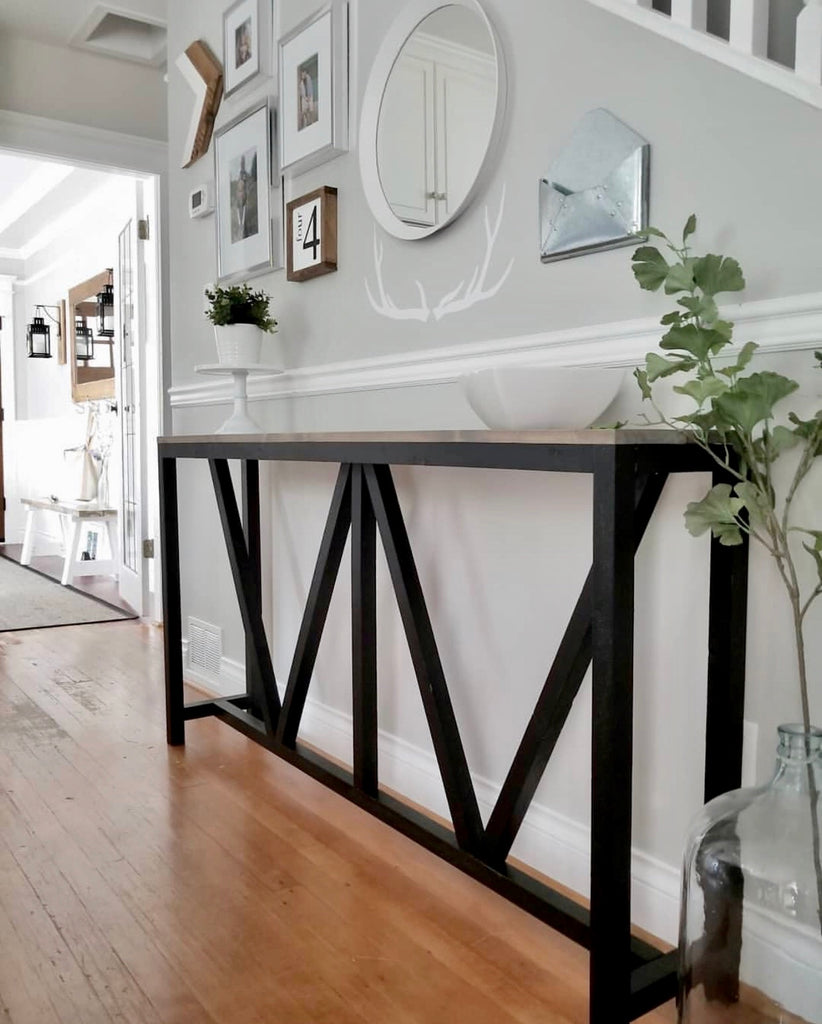
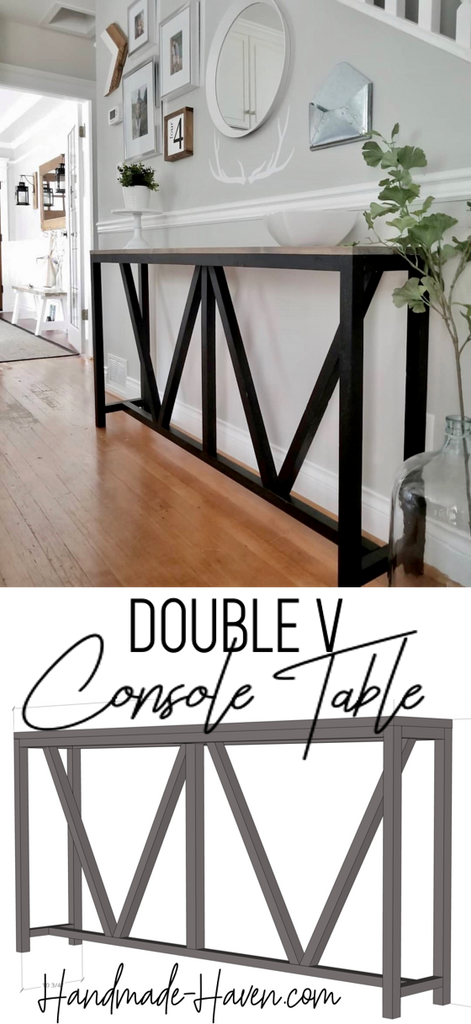
Farmhouse V Console Table
"This Console table is giving farmhouse a whole new meaning."
It's been a while since I've been able to feature a fellow builder, so I was super excited to partner up with Kelly from paisleyandwilliam to bring you the free plans for this Farmhouse V Console Table. But before you check out the free plans, be sure to go give her a follow on Instagram.
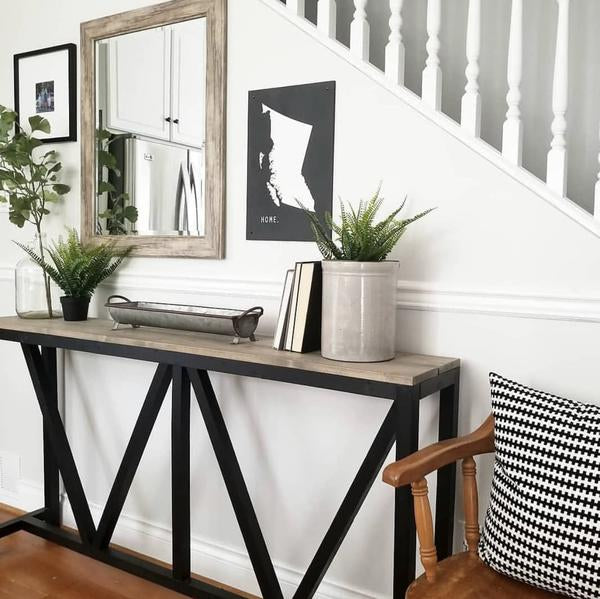 Console tables are probably one of my favorite kind of builds because it never takes too much work and it can really bring your entryway to life, and even better, this one was super cheap to make. I just love how this V console table looks in Kelly's entryway.
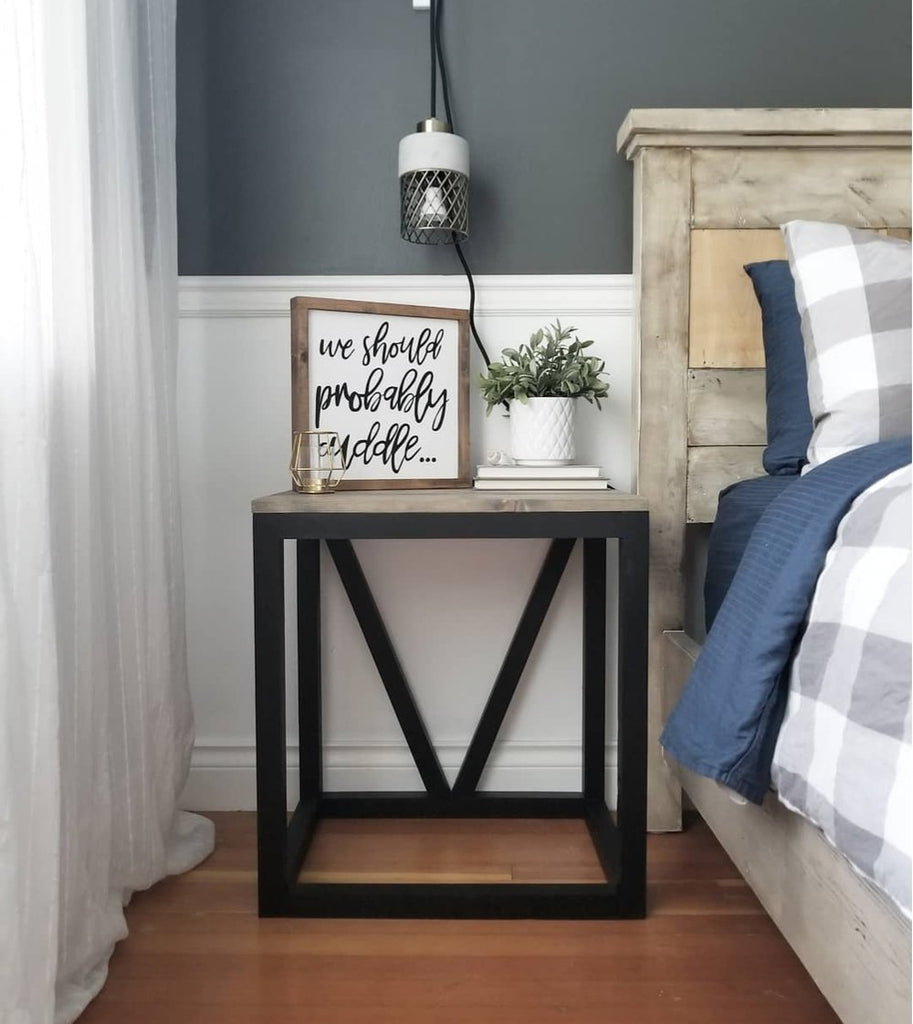
Kelly and I also partnered up together to bring you the free plans for this V Side table, so be sure to check it out when you’re done!
There are some affiliate links in this post, meaning I get a small commission if you purchase through these links, at no cost to you. Click Here to read my full disclosure.
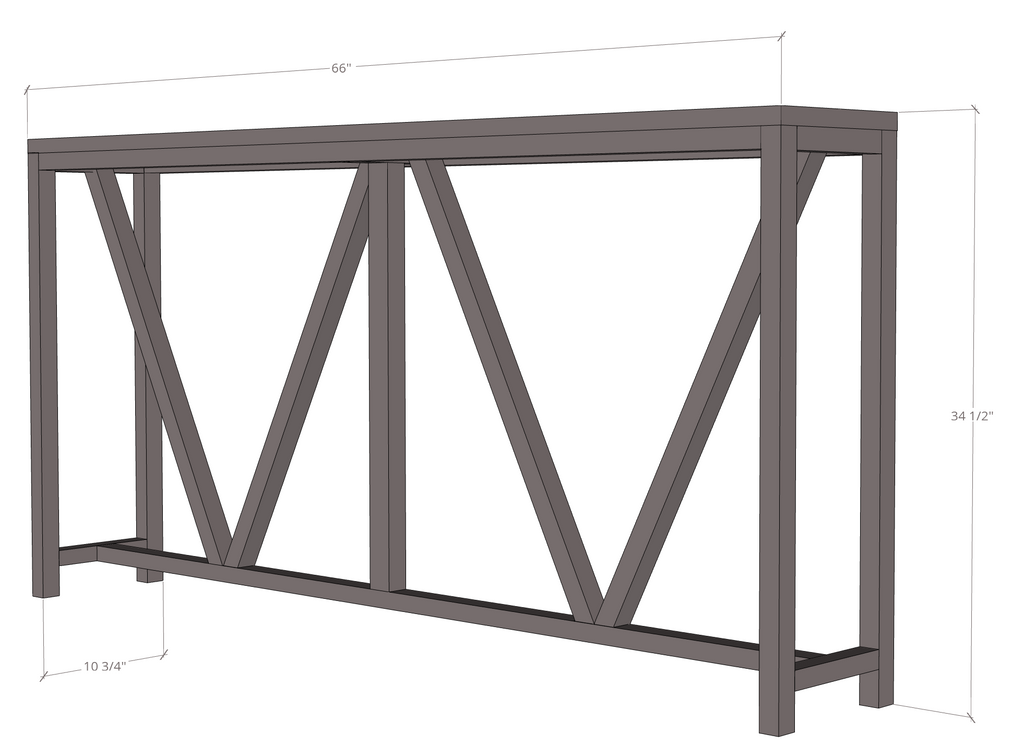
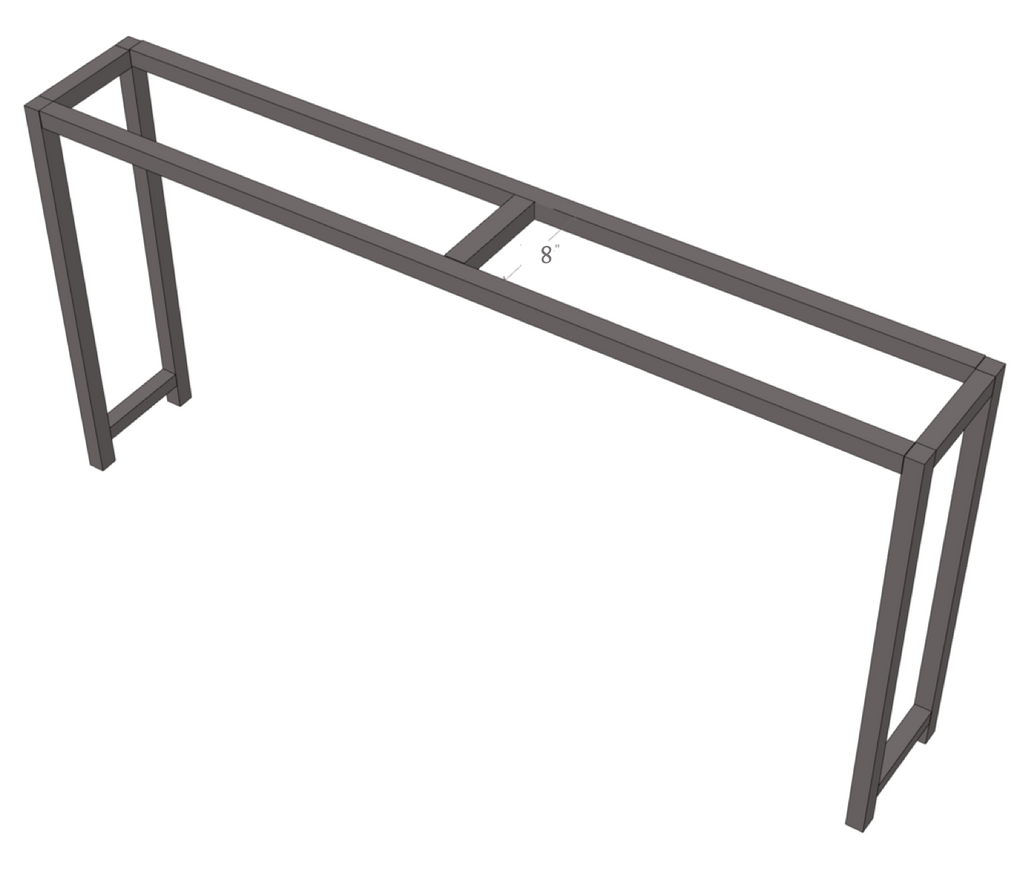
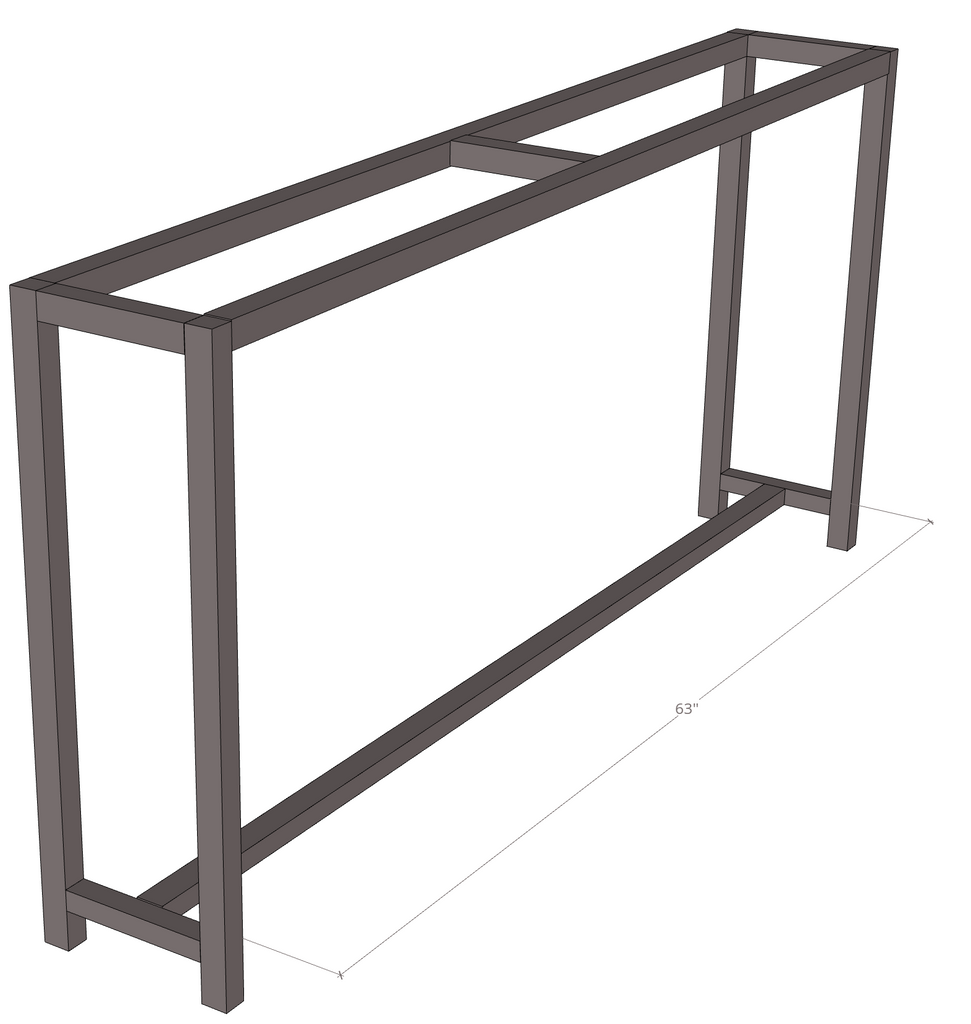
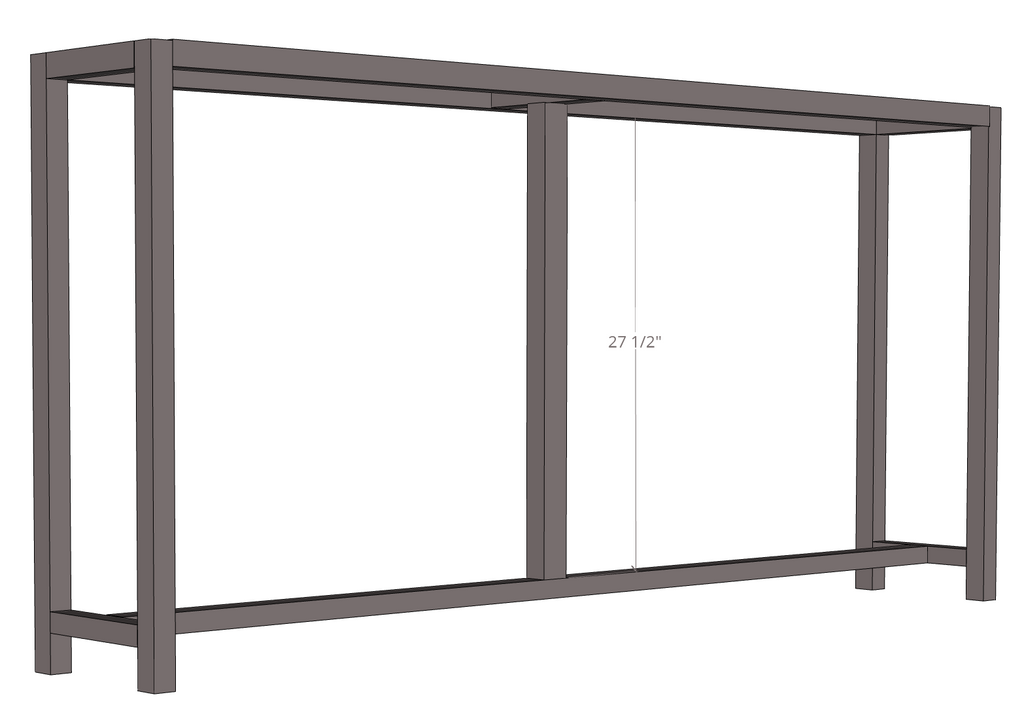
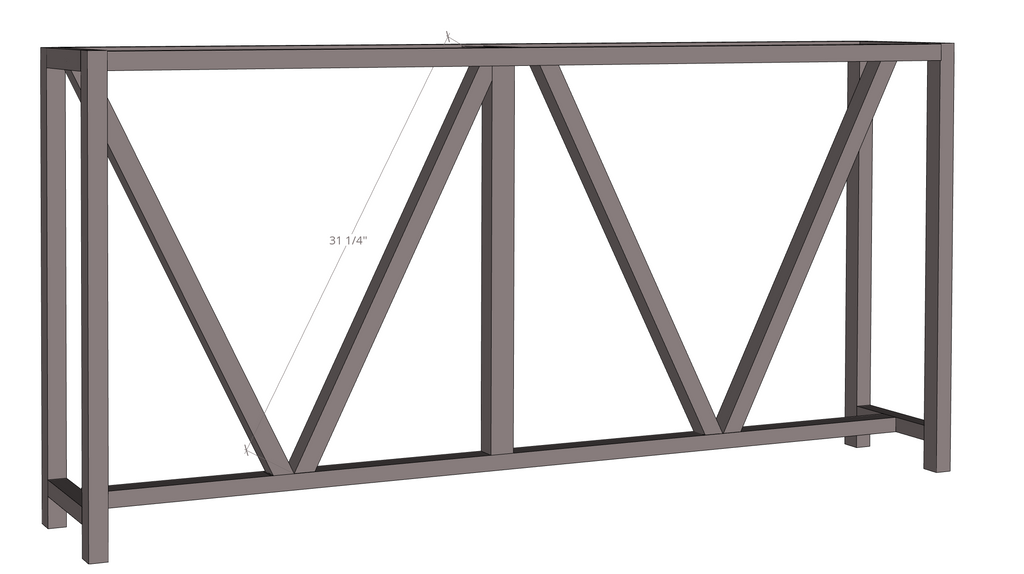
Dimensions
Materials
2 - 1x6 @ 8ft.
8 - 2x2 @ 8ft
Cut List
2 - 1x6 @ 66" (top)
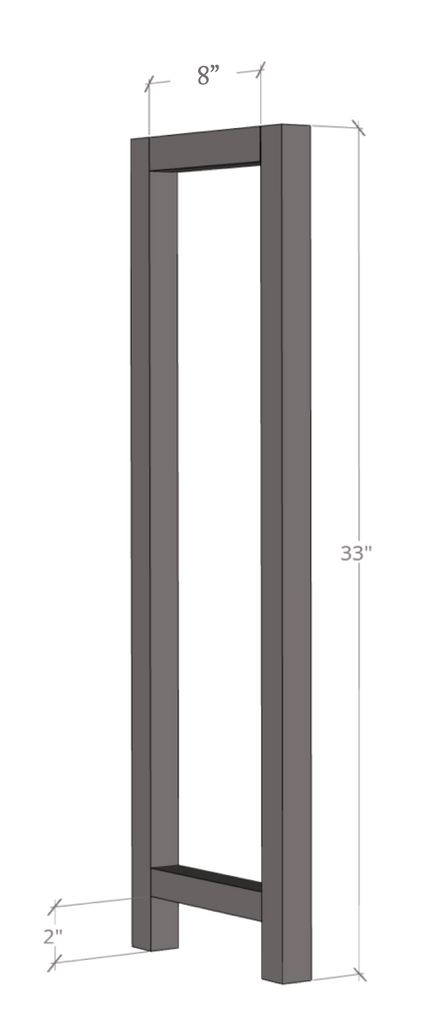
4 - 2x2 @ 33" (legs)
3 - 2x2 @ 63" (supports)
5 - 2x2 @ 8" (supports)
4 - 2x2 @ 31 1/4" (V Pieces) @ 26 degrees
1 - 2x2 @ 27 1/2" (mid support)Step 1:
Attach the 2x2 supports (8") to the 2x2s (33") using a Kreg Jig K4 Pocket Hole System on a 1 1/2" setting, with 2 1/2" Pocket Hole Screws to attach along with Wood Glue. There should be a 2" spacing from the bottom support piece and the floor. Repeat step for the other side of the farmhouse console table. Note: The pocket holes on the supports should face down on the bottom support and inward on the top support.
Step 2:
Attach the 2x2 supports (63") to the assembled console table sides using a Kreg Jig K4 Pocket Hole System on a 1 1/2" setting, with 2 2 1/2" Pocket Hole Screws to attach along with Wood Glue. Note: Be sure to face the pocket holes upward. This will be hidden once the top is placed on the console table.

Step 3:
Attach the 2x2 middle support (8") to the assembled console table sides using a Kreg Jig K4 Pocket Hole System on a 1 1/2" setting, with 2 1/2" Pocket Hole Screws to attach along with Wood Glue. Note: Be sure to face the pocket holes upward. This will be hidden once the top is placed on the console table
Step 4:
Attach the 2x2 bottom middle support (63") to the assembled console table sides using a Kreg Jig K4 Pocket Hole System on a 1 1/2" setting, with 2 1/2" Pocket Hole Screws to attach along with Wood Glue. Note: Be sure to face the pocket holes downward.
Step 5:
Attach the 2x2 middle support (27 1/2"") to the assembled console table sides using a Kreg Jig K4 Pocket Hole System on a 1 1/2" setting, with 2 1/2" Pocket Hole Screws to attach along with Wood Glue. Note: Be sure to face the pocket holes to the back.
Step 6:
Attach the 2x2 V braces (31 1/4") to the assembled console table using a brad nailer along with wood glue. Alternatively, you can pre-drill small holes and use wood screws to attach.
Step 7:
After assembling the top together using a Kreg Jig K4 Pocket Hole System on a 3/4" setting, with 1 1/4" pocket hole screws to attach along with Wood Glue, attach the 1x6 tabletop to the assembled console table sides using wood screws from underneath the console table base.
Step 8: Fill all seen pocket holes with wood for a clean look. For help on how to easily fill pocket holes, check out my technique here.
and that wraps it up. Kelly did a great job on this build and now you can make one too.
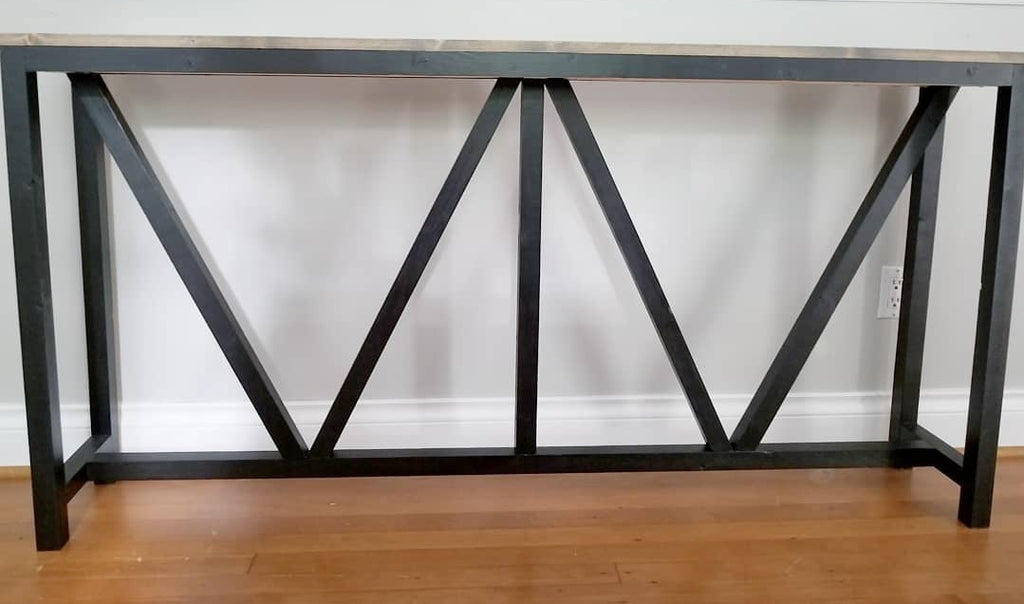
For the finish Kelly used Rustoleum Ultra Cover Black paint for the bottom of the base and a mix of Minwax stains for the top (Minwax Gray and Minwax Special Walnut)
Be sure to share your go with Kelly and I. I absolutely love this farmhouse console table, I think my house needs one.
Thanks for reading guys, XOXO Ashley


DIY Toy Cart
Who said toy carts can’t be stylish?
This DIY toy cart build may come as a surprise to some of you because I myself don’t have any kids; but fortunately I have plenty of nieces and nephews that will put this to good use and it was fun to build something a little different for a change.
This post is sponsored by Build Something.
When I saw this picture on Pinterest, I immediately thought “I want to build that,” but I don’t really have a use for it. But I decided, why not? So here we are!
There are some affiliate links in this post, meaning I get a small commission if you purchase through these links, at no cost to you. Click Here to read my full disclosure.
The best part about this DIY toy cart is that I am sharing the free plans on Build Something. But before you head over, be sure to read through my build process and check out how I was able to apply a restoration hardware finish.
To assemble the base of my diy toy cart, I used one of my top 5 favorite tools, the Kreg Jig Master System. This is one tool I recommend any builder to have, the use of pocket holes has completely changed my building experience and I can’t get enough of it.
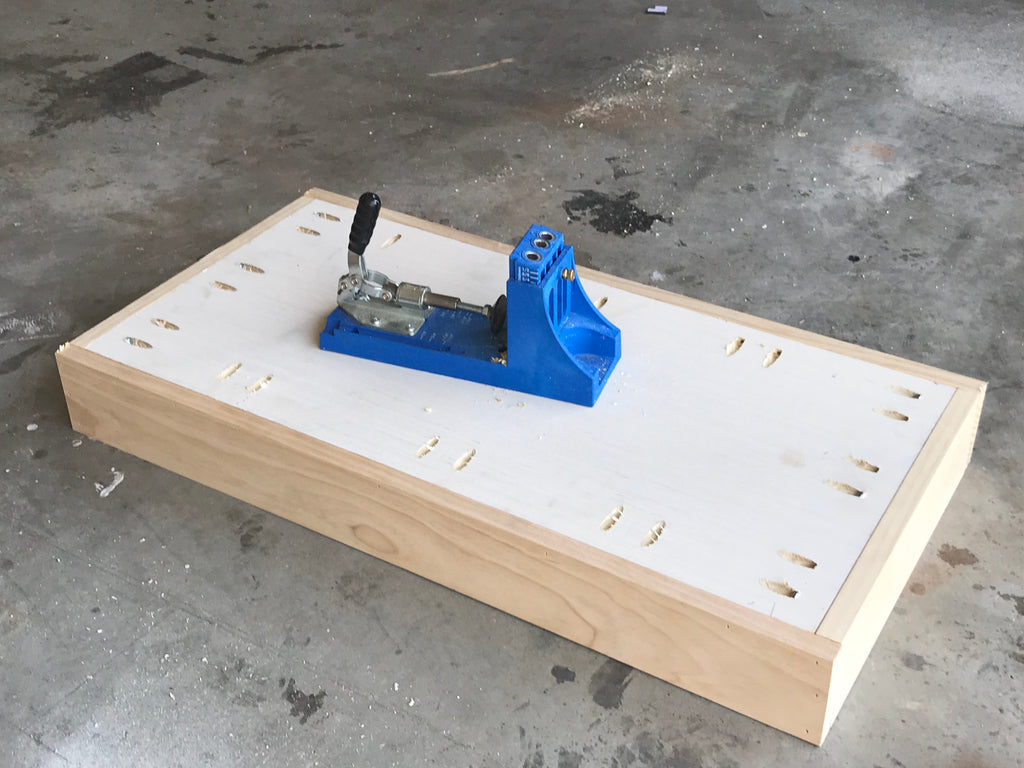
The Kreg Jig master system comes equipped with all the extra pieces to take your joinery to the next level. For any beginner woodworkers, I would definitely recommend as a must have in the shop.
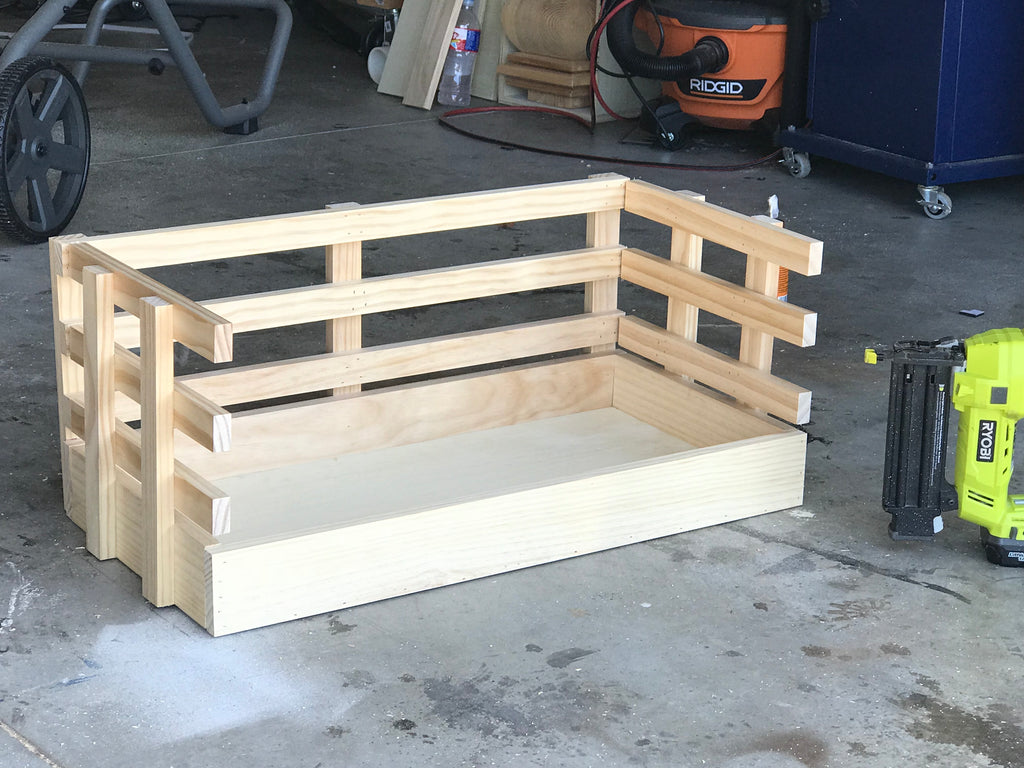
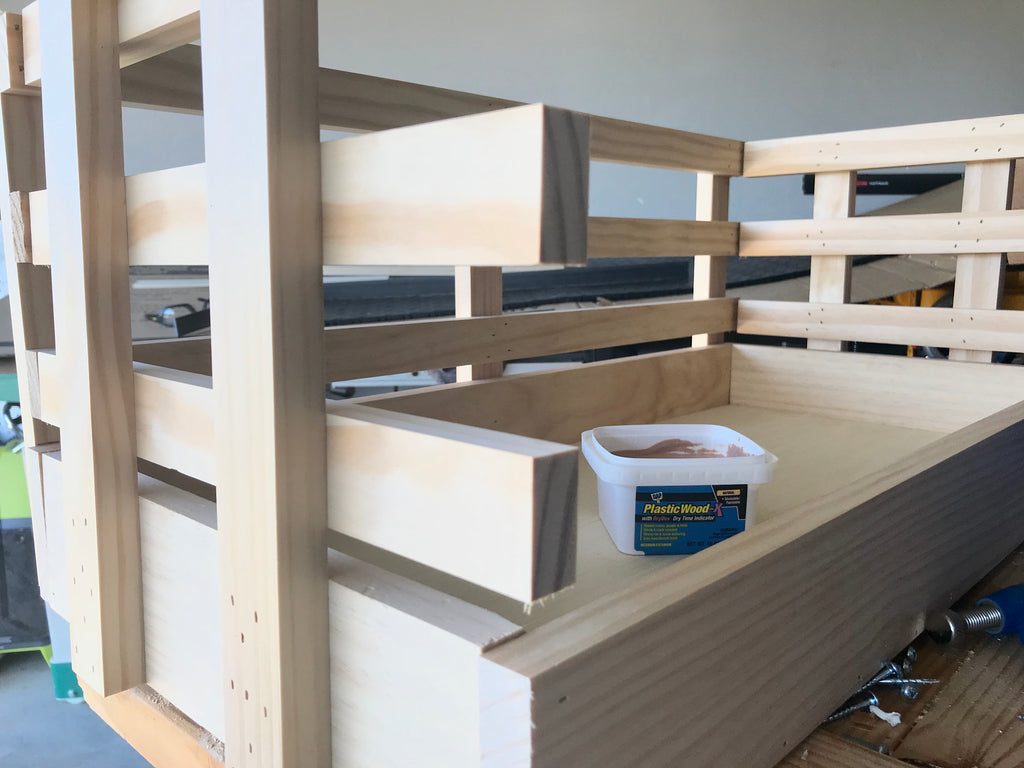
Once I assembled the DIY toy cart, I filled in all of the brad nails holes with DAP wood filler. This is one of go to products because it just gets the job done. I use this wood filler for all of my woodworking projects.
I also love these oversized casters. I really think it made the toy cart looked beefed up. This is like the King Kong of all toy carts!
RESTORATION HARDWARE FINISH
This by far is one of my favorite finishes. I have applied it to a number of my builds and I don’t see myself getting sick of it anytime soon. It gives it sort of an industrial restoration hardware feel, and it was super simple.
The first thing I did was coat the whole toy cart with white chalk paint. I don’t think it makes a difference what type of chalk paint you use. I have tried Annie Sloan and Rustoleum and each worked great. Rust-Oleum’s chalk paint is a bit cheaper so that would be my recommendation since it will be used as the bottom layer.
When applying the chalk paint be sure to apply it evenly and eliminate any bulk up of paint because it will show through after applying the gel stain.
Chalk paint is always my go to because it’s thick and it drys quickly (working on my patience!)
After the chalk paint dried I started applying a light coat of Gel Masters - Walnut Stain using a dry cloth. This is a gel stain that you wipe on and it gives the wood a restoration hardware look.

After the stain drys, I sealed it with Old Masters finish and WAAAA-LAAAHHH!
Be sure to go check out the free plans on Build Something, Kreg’s project plans site.
I love how this little toy cart came out and I partially want to keep it for myself.

and be sure to make your kiddos day by making your own little DIY Industrial Rolling Toy Cart. They will thank you for it.
Thanks for reading guys, XOXO ASHLEY


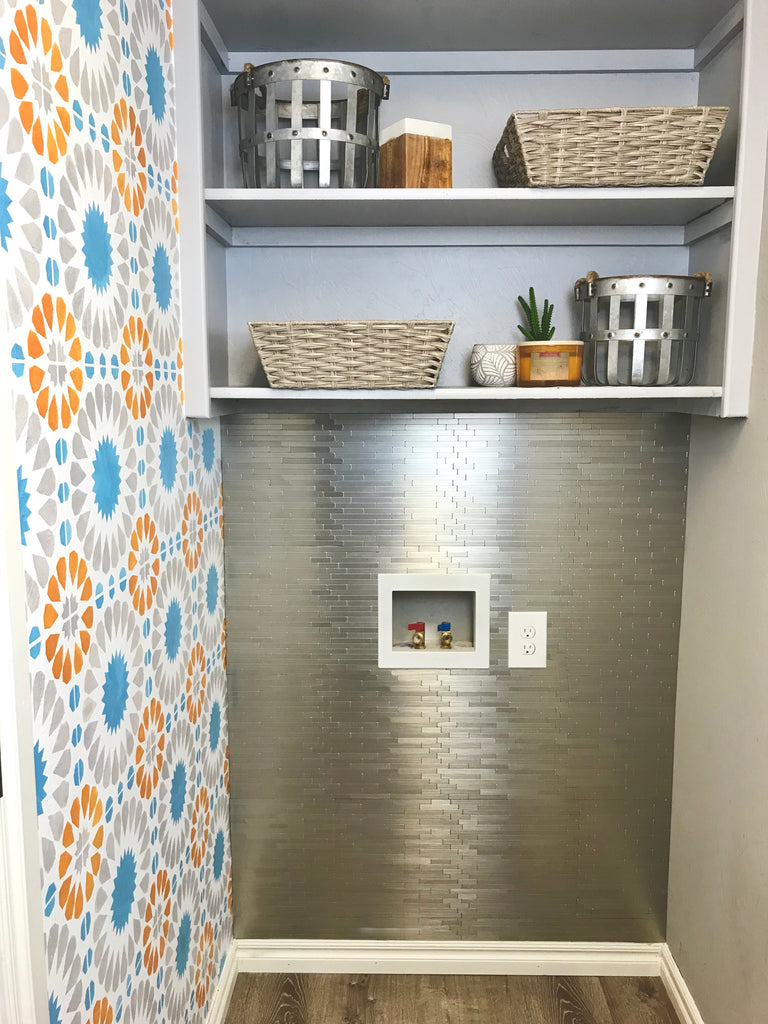
Laundry Room Makeover
Never seen a Laundry Room Makeover look so good; and yes I’m biased.
This post is sponsored by The Home Depot.
My laundry room has been on my To-Do list since I moved in to my house three years ago. I brought my house brand new but a lot of my rooms were and still are cookie cutter. Don’t get me wrong, I loved the grey tones and the style of it, but as a creative blogger, the grey walls and bland tile just wasn’t cutting it for a sister.
So I am so excited to finally be sharing the final review with you guys. With a little bit of paint and some elbow grease, I was able to totally transform this room with less than $400. Keep this between us, but the original planned budget was $200. If you are wondering, “How on earth did you blow the budget by $200?” Well…read on and find out.
There are some affiliate links in this post, meaning I get a small commission if you purchase through these links, at no cost to you. Click Here to read my full disclosure.
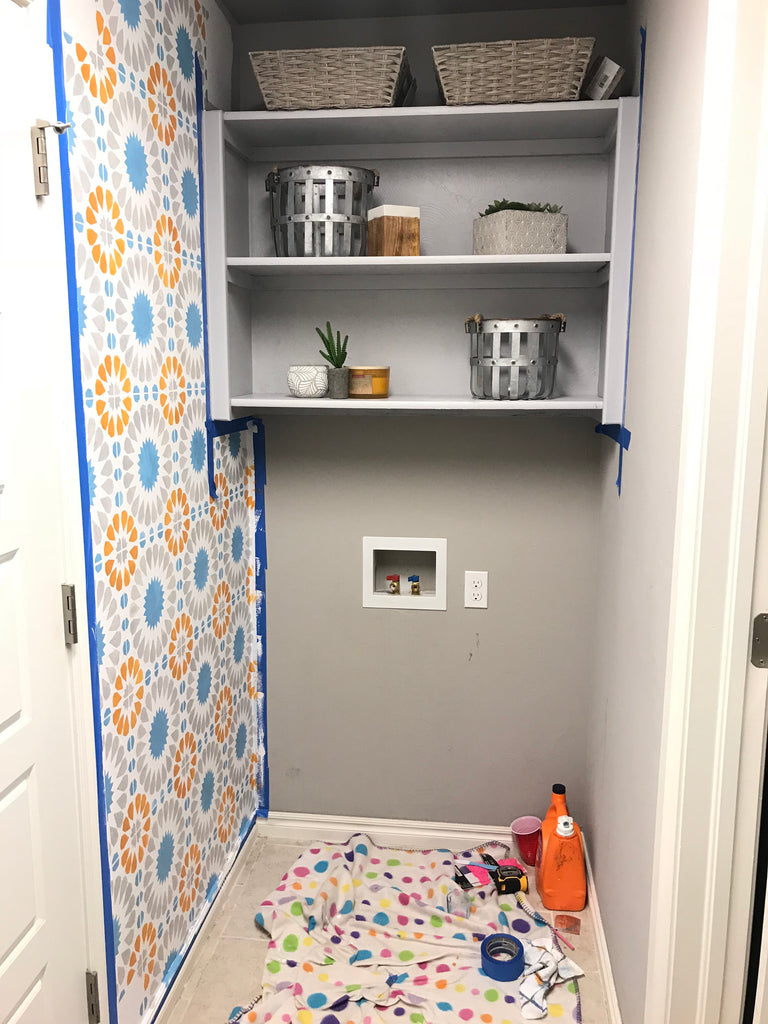
STENCILED WALL
The first step in the laundry room makeover process was the stenciled wall. I knew this was going to be both a great idea and horrible idea. Why do you ask? Because everyone knows stencils look awesome, but the road to get there; not so pretty.
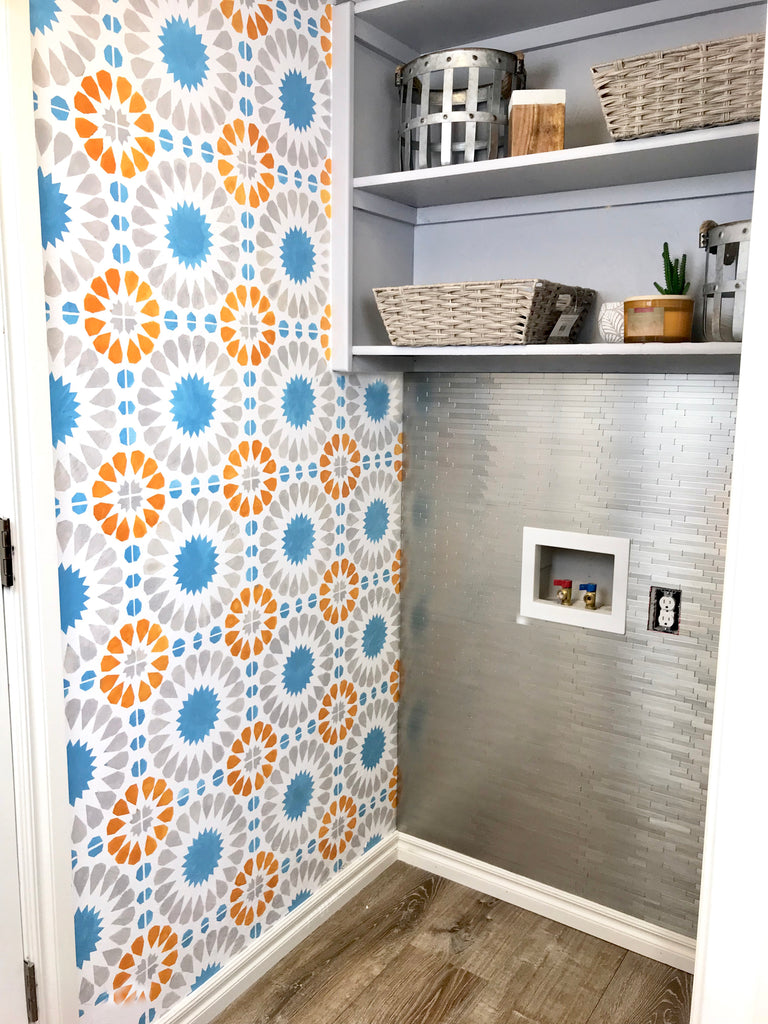
I can surely attest to that because halfway through stenciling the wall, I was questioning myself, saying, “What in the world were you thinking?” Fortunately I stuck with it and was able to ‘Get Ur Done,” and I’m so glad I did because I love the way it turned out! For all the details on how I created this stenciled wall check out my Laundry Makeover – Stenciled Wall Post.
PAINTED CABINETS
I am always amazed by how a little paint can go a long way. Painting my laundry room storage cabinets really lightened up the room and made my laundry room feel a little bigger.
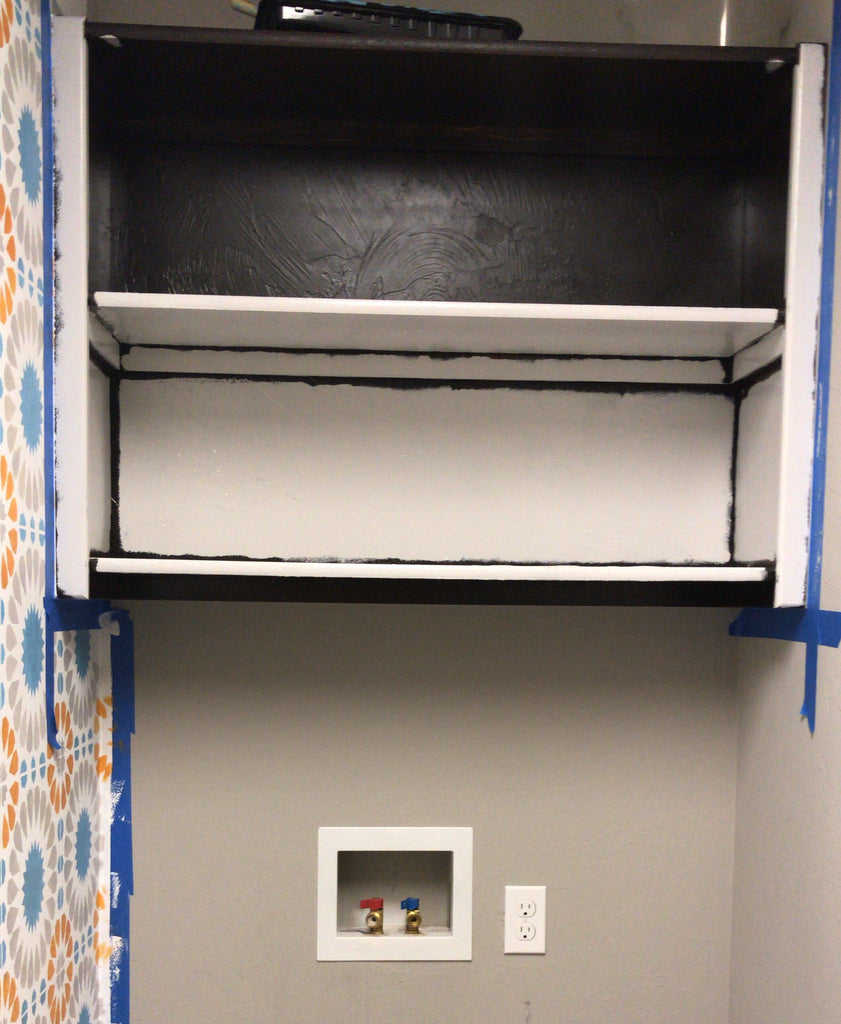
Now this is one thing just about anyone can do to update a space. I used Grey Behr Paint to coat these cabinets. Details for paint is listed in the Stencil post.
VINYL FLOORING INSTALL

The tile in the laundry room was probably the one I was most anticipating covering up. For a while now I have been secretly wanting to replace all of the tile in my kitchen and laundry room. Unfortunately, this vinyl flooring didn’t get to the kitchen but I was happy to get this vinyl flooring in my laundry room.
I knew this vinyl flooring would make a difference but I was pleasantly surprised just by how much the flooring made a difference, and for my first time installing vinyl flooring, it was very easy to install. The great part was it only cost me about $115 for materials to install. Sounds like a win to me. To check out all the details of how I installed the flooring, check out my post here: Installing Vinyl Flooring
Peel and Stick Tile
Now I’m sure by now you’re still wondering, were did you go over budget, well the time has come; the Peel and Stick tile!!!! This part of the laundry room design was not planned at all, but after painting the cabinets and the stencil, it was clear that the plain grey wall behind where the washer would go was just to plain for me, and if you really know me; you would probably agree.
So at the last minute I found this peel and stick tile from Home depot and it was the perfect addition to the laundry room. I lucked out on this one and just happened to walk down the right aisle and WAAAAA-LAAAAH; I struck gold.

To check out all the details of how I installed the peel and stick tile; check out my post here: Peel and Stick Tile.
UPDATED APPLIANCES
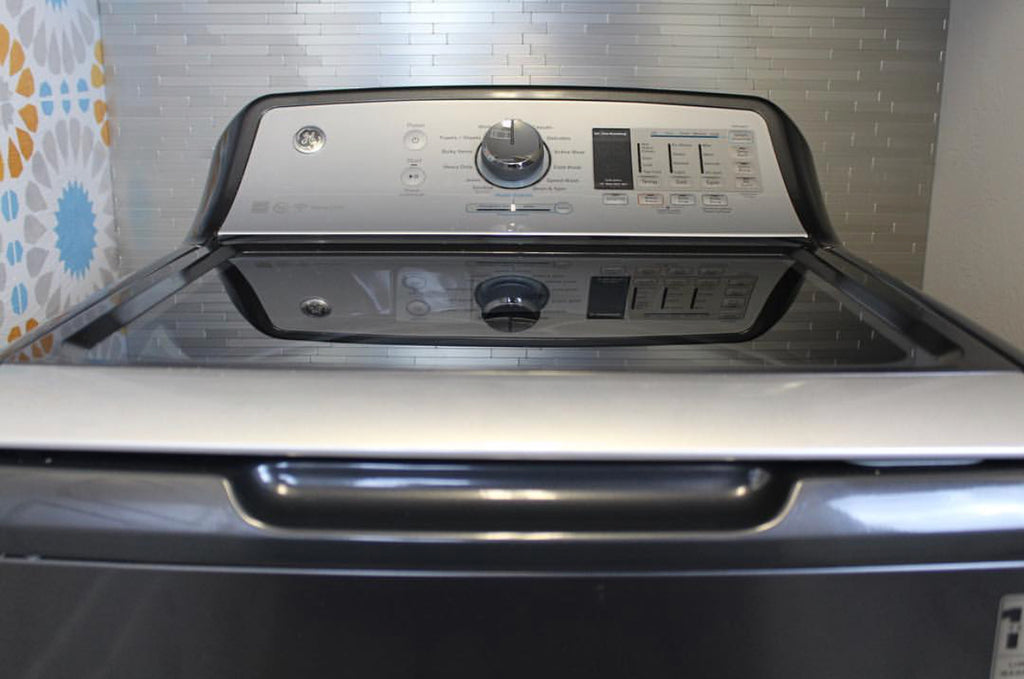
With any makeover, updating appliances is always a great way to make the space really look updated and modernized. Thanks to my friends over at Home Depot, I was able to pick out a great new GE washer and dryer addition to my laundry room.
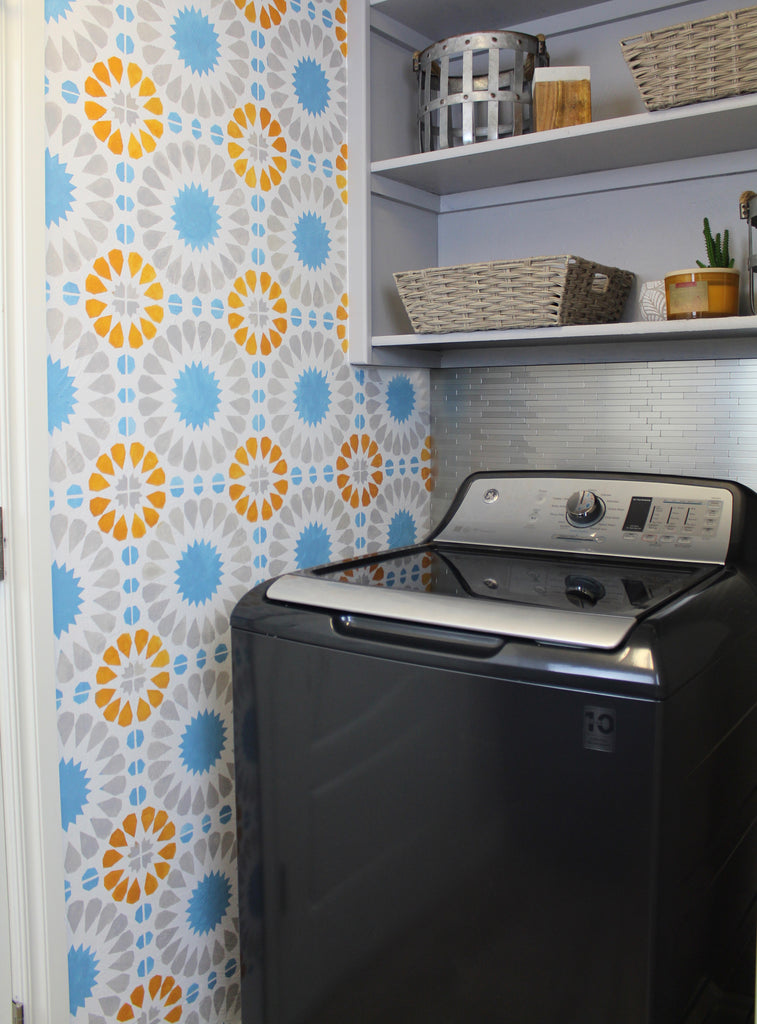
My old washer and dryer were on its lasts leg, so these new GE appliances were right on time, and the difference that they made in the newly designed laundry room was like Night and Day. I really love the Diamond Grey Finish. Check out my post on the Home Depot Blog to read up on why I chose these particular GE laundry appliances.

Let’s check out some more of my laundry room before and after pics. I’m more than satisfied how everything came out.
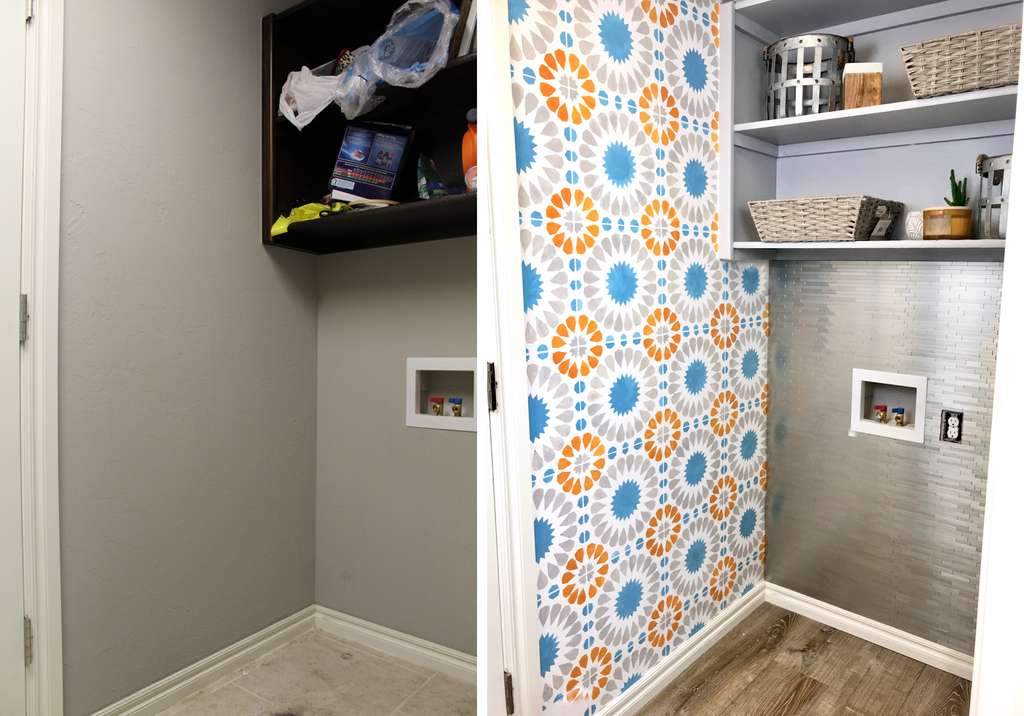
and although I went a little over budget, I couldn't have been happier with the final outcome. I think the extra money was well worth it, and even thought the wall stencil was a bit tedious. Im in love with how it came out.

DIY Zinc Flower Pot
Zinc Flower Plot from a Plain Metal Bucket? No Way!
I have been dying to add a little design to my front doorway, and I knew this would be the perfect project to get it jump started. This Zinc Flower Pot was so fun and easy to make and it definitely exceeded my expectations.
This review is sponsored by the Home Depot as a part of The Home Depot's Pro-Spective Campaign. 
Not only was this a fun project, but I was able to complete it in less than two hours. I'm a sucker for a quick project. I have had this project in my mind for a little over a year, so it's about time I actually got it done.

I have a lot more plans for making my doorway look more appealing but this little DIY zinc flower pot really made big difference.
There are some affiliate links in this post, meaning I get a small commission if you purchase through these links, at no cost to you. Click Here to read my full disclosure.
Materiels
Amy Howard At Home Zinc Solution
Rustoleum Chalk Paint - Linen White
Paint Brush/Roller
Trash Bag/Cup/Cloth
Tools Used
So let's take a quick look at where we started. Can you believe this is how the metal pail looked before? I mean I can because I made it haha but if I didn't I would totally be surprised.

Luckily for you guys, I video'd the process of making the pot, but for those of you who like to read, Im sharing all of the details below!
Now let's get to it!
Step 1: Clean the Pail
So the first and probably most important step is to clean off the pail. The Zinc solution works a lot better when the pail is completely clean and free of grease. One thing you want to make sure you do also is to get all of the sticky solution off of any stickers stuck to the pail.
Is it just me, or does anybody else hate when stores put labels on an item in the worst spot possible. How about putting the sticker on the bottom? So I don't have to spend 30 minutes trying to get the sticker off. Anywho! thats my rant for today.
To help get the stickers completely off, I used windex and that seemed to help a lot.
Step 2: Apply the Zinc Solution
I was so ready for this step because I have been wanting to try this Zinc Solution out for a while. It's been sitting in my house collecting dust and I finally decided to try it out.
To apply the solution, I poured a little bit in a red solo cup and used a regular was rag to apply to the bucket pail.

When I first started applying the solution, I realized it wasn't really turning colors, but after about 2 or 3 minutes of the solution really settling in, I could tell the pail was starting to turn color. So patience, young grasshopper, the solutions works.

I applied the solution for about 10 minutes and it didn't take a lot of it to turn the pail. If I had to guess, I could probably do this project to 6 or 7 pails of this size with one bottle of solution, if not more.
Step 3: Tape off Lines
After applying the Zin solution to the zinc flower pot, I let it sit for about 25 minutes and then started applying the frog tape. I have always had good experiences with frog tape while painting walls, so I figured it would be good for this project.

Big lessons learned for this part of the project was the ridges on the pail. I didn't press down the tape well enough in the ridges and I got some bleed through because of it. AKA I was rushing from the excitement of wanting to finish. Don't be like me! Take your time and get that tape down right!
It also may be easier to tape the pail if you are trying another design as well.
Step 4: Paint Pail Bucket
After taping the zinc flower pot down, I starting painting the pail bucket with chalk paint. I opted to use chalk paint because its thick, and it drys quickly. I am a lover of chalk paint also, so I may be biased.

I have always had a good experience with Rustoleum chalk paint and it is a little cheaper than my beloved Annie Sloan so I would definitely recommend it for people looking for chalk paints.
Step 5 : Drill Drain Holes
Because I plain on potting this bucket pail, I wanted to add a couple of drainage holes to the bottom. So I used my Makita Impact Driver coupled with my Bosch Carbide Drill Bits to get the job done.

The Makita Impact Driver has a powerful brushless motor that delivers 1,500 in.lbs. of max torque and runs cooler and more efficiently for longer life and the Bosch Multi-Purpose Carbide Drill Bits are used for multi-purpose applications like tile, masonry, wood, metal and concrete. Their sharp diamond-ground edges help deliver high drilling speed on hard materials like this bucket pail. It defintely did it's job here.
and the last and final step....Pot the plant and Enjoy!
I wouldn't be happier with how this DIY Zinc Flower Pot turned out. I'm sure this won't be the last one I make and I hope you guys enjoyed this project. Leave a comment below and let me know what you think?

If you enjoyed this project, don't forget to Pin it!

Thanks for reading guys! XOXO Ashley
I acknowledge that the Home Depot is partnering with me to participate in the THD Pro-Spective Tool Review Program. As a part of the program, I am receiving compensation in the form of products and services, for the purposes of promoting The Home Depot. All expressed opinions and experiences are my own. My post complies with the Word of Mouth Marketing Association (WOMMA) Ethics Code and applicable Federal Trade Commission guidelines.

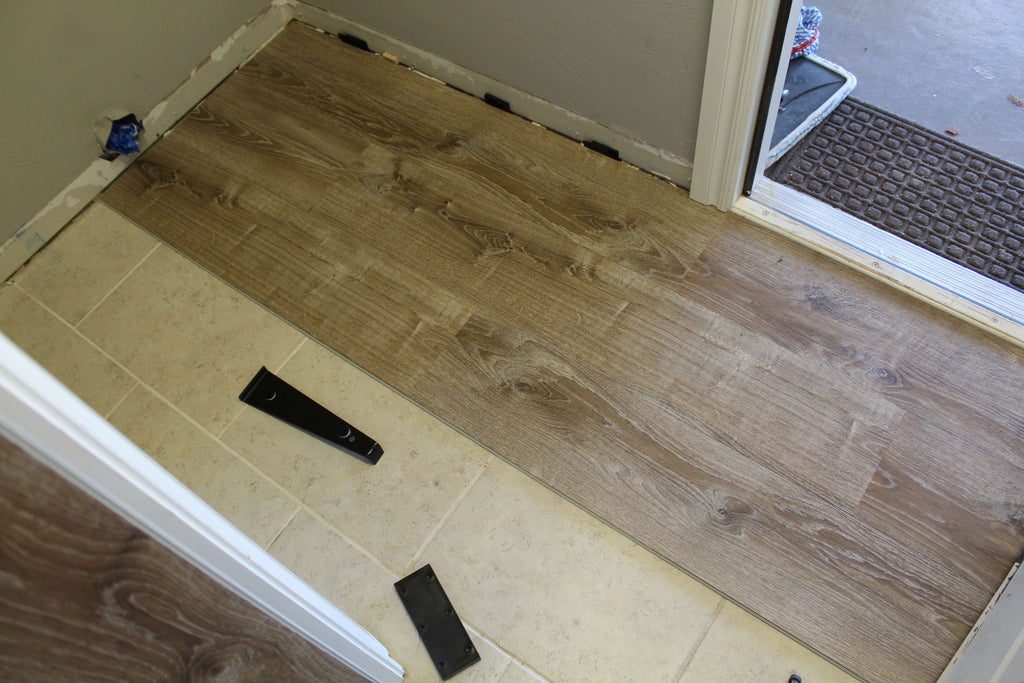
Installing Vinyl Flooring
A Vinyl Flooring Install that dramatically changes a Laundry Room Makeover.
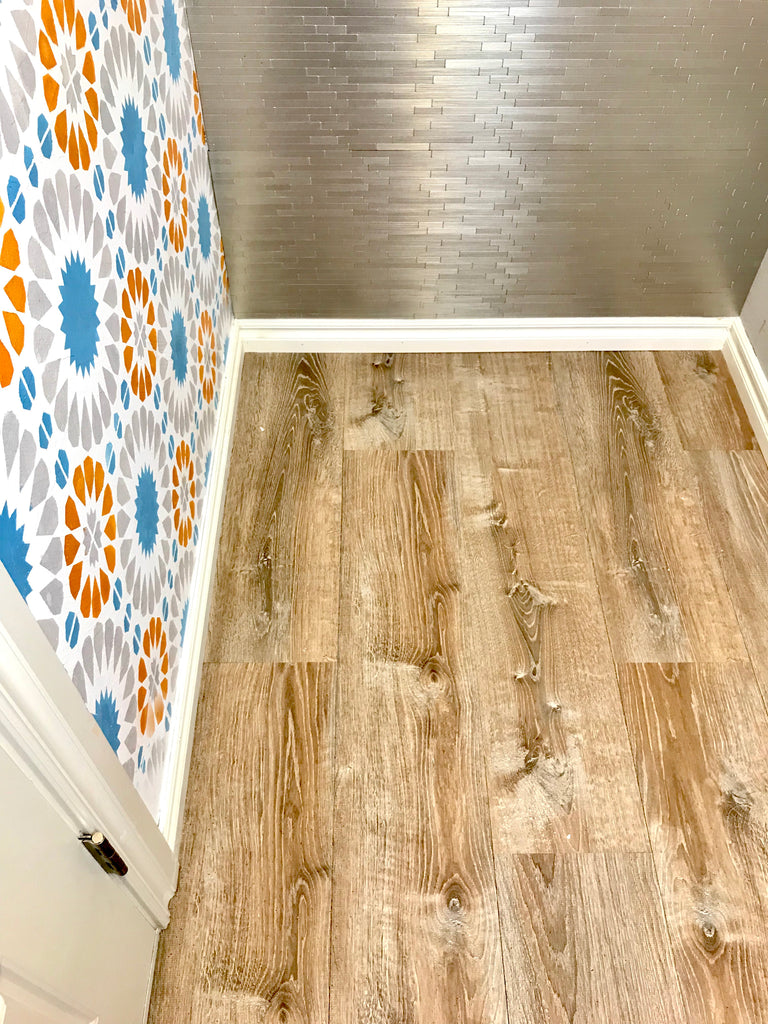
I am glad I finally got the chance to set some time aside to start my laundry room makeover. Even though its a really small room, I really wanted to transform the room, so I decided to install this vinyl flooring, that was a good price and easy to install.
This post is sponsored by the Home Depot as a part of The Home Depot's Pro-Spective Campaign.
The original floors in my laundry room were builder grade tile floors. They match the tiles in the kitchen and after three years of looking at them, I was definitely ready for a change.
 There are some affiliate links in this post, meaning I get a small commission if you purchase through these links, at no cost to you. Click Here to read my full disclosure.
Check out this vinyl flooring installation video below to see how I installed the flooring and then read on for more details on the install.
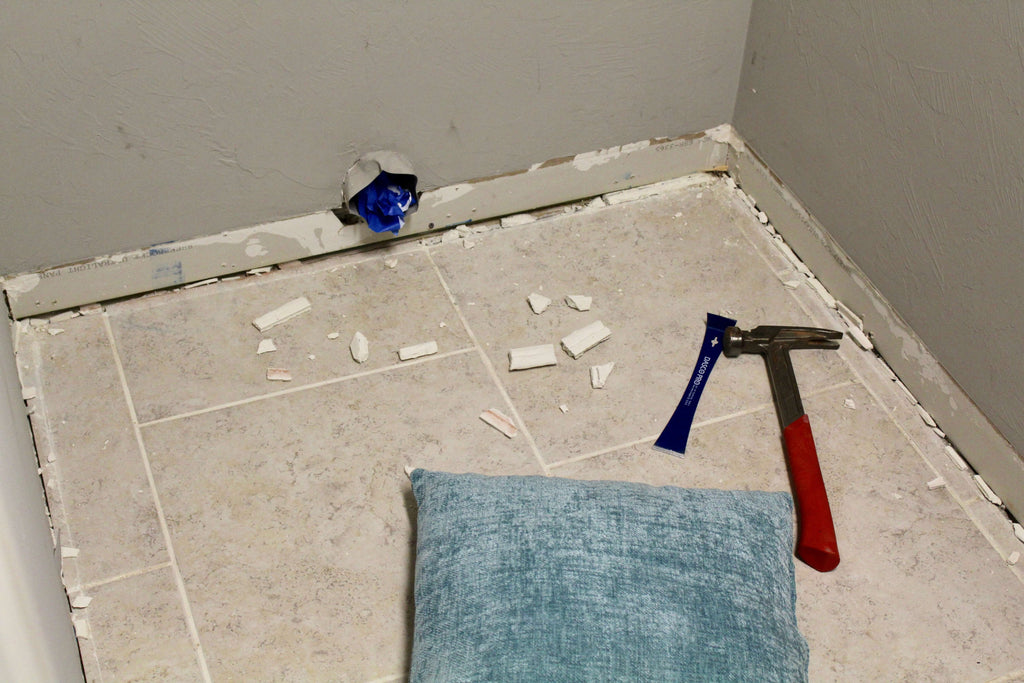
Removing Baseboards

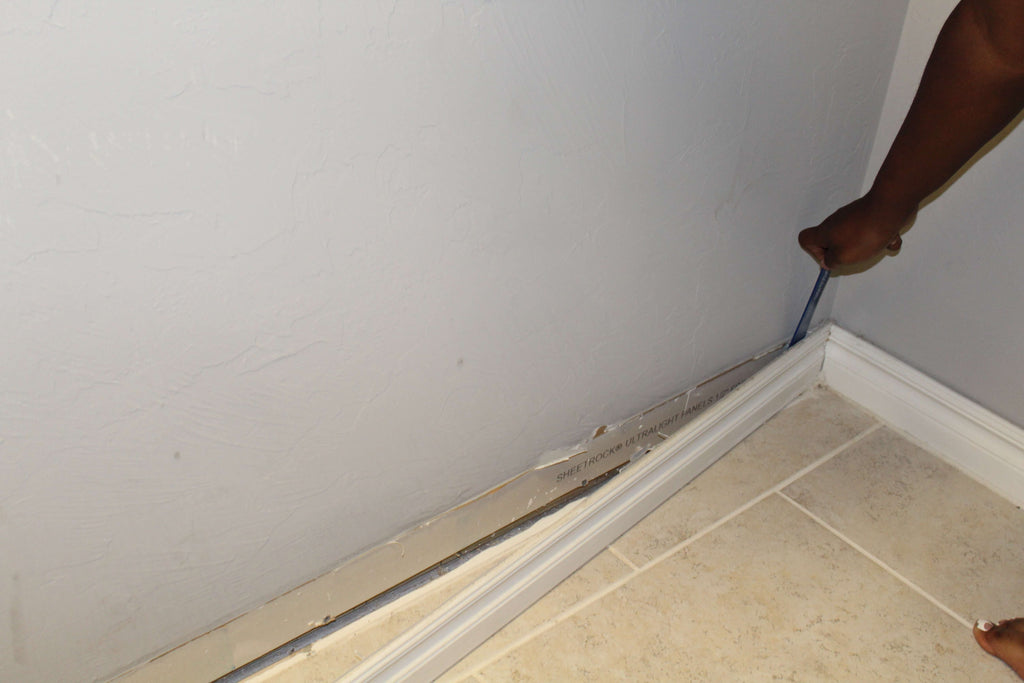
Cutting the Door Casing
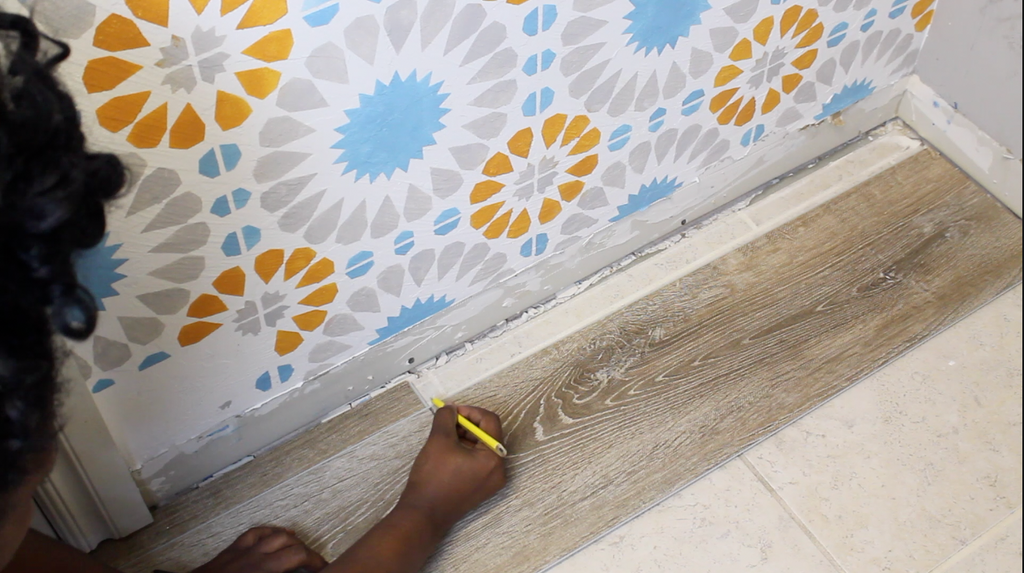
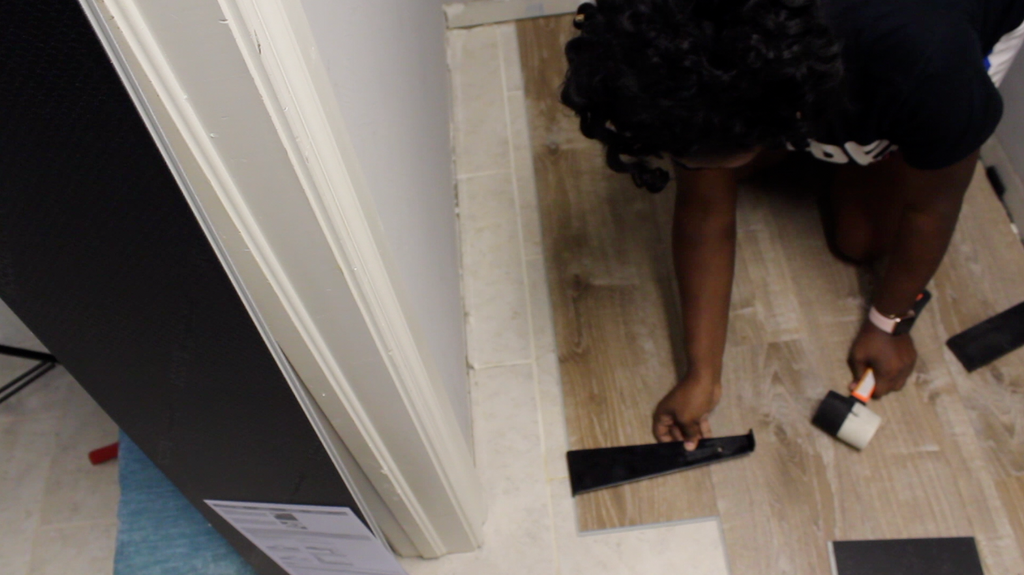
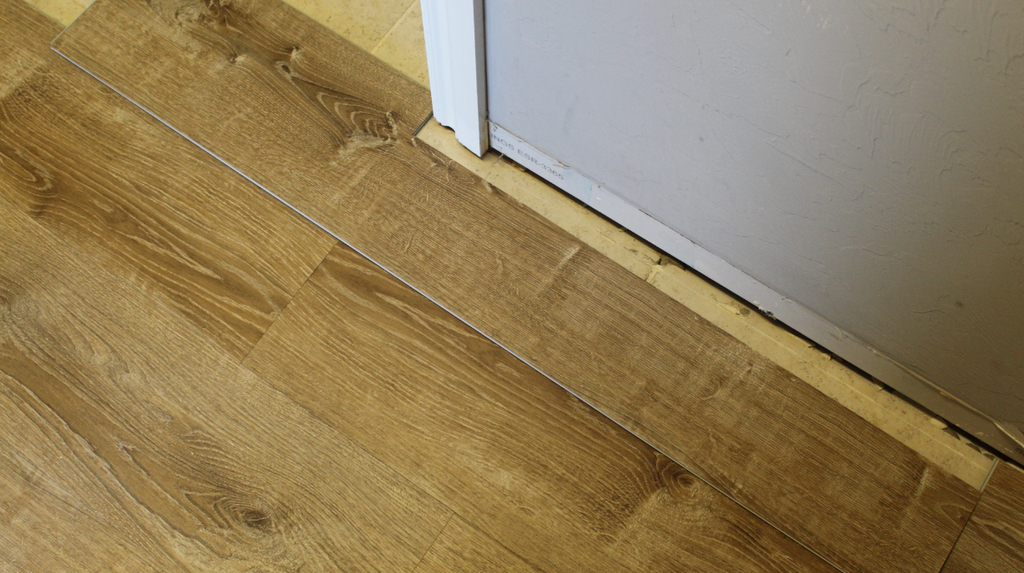
In order for the vinyl flooring to sit but up against the wall and be flush with the existing tile floor, I needed to cut the door casings off. To make sure I cut off enough of the door casing, I first laid down a piece of the vinyl flooring and marked where I should cut.
Once my markings were made, I utilized my Dremel MultiMax Oscillating Tool to cut the casings. This was a very simple step in the process. I know it may seem scary to cut into your door casings, but with this Dremel it really was a piece of cake.

Cleaning The Floor
Although I am covering the tile flooring with the new vinyl flooring, I still wanted to clean up the tile before covering it up; just in case I ever want to remove the flooring. Before mopping the floor, I used my Ryobi Stick Vac to pick up all of the dirt and debris. To clean up all of the big dirt spots on the floor, I used my Dremel Versa Power Cleaner and I was really impressed with how it works. When cleaning my floors I always have spots that are hard to clean up so this little tool definitely came in handy.
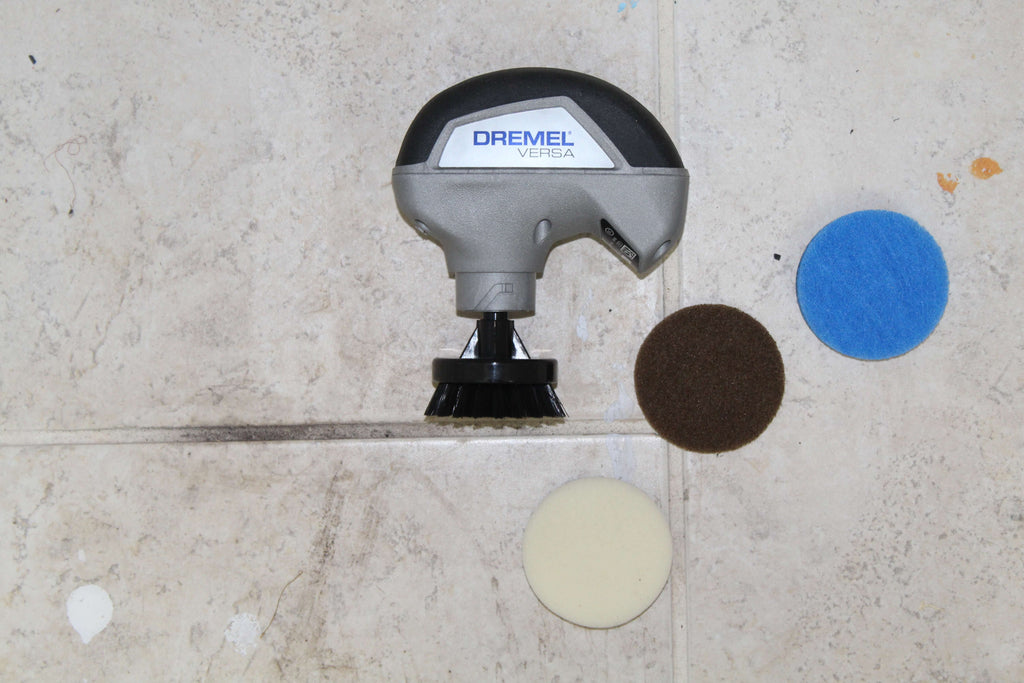
Right now the Dremel Versa Power Cleaner is the fastest cleaning tool and holds a charge for a while. I love that this cleaner is cordless, so I'm not bogged down by the cord. Be sure to check out the video above to see it in action. It does come with four accessory pads for wet and dry cleaning and they are really easy to change out. The attachment pieces are $10 a piece which can get pricey but I think the Dremel Versa Cleaner is worth it. Im hoping Dremel will have a change of heart and drop the price of those attachments. (hint, hint)
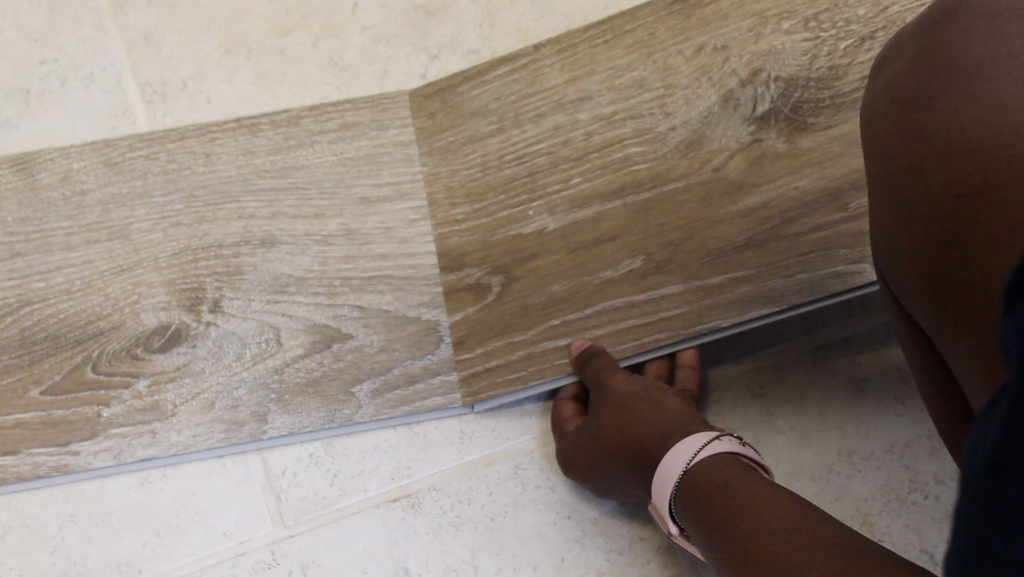
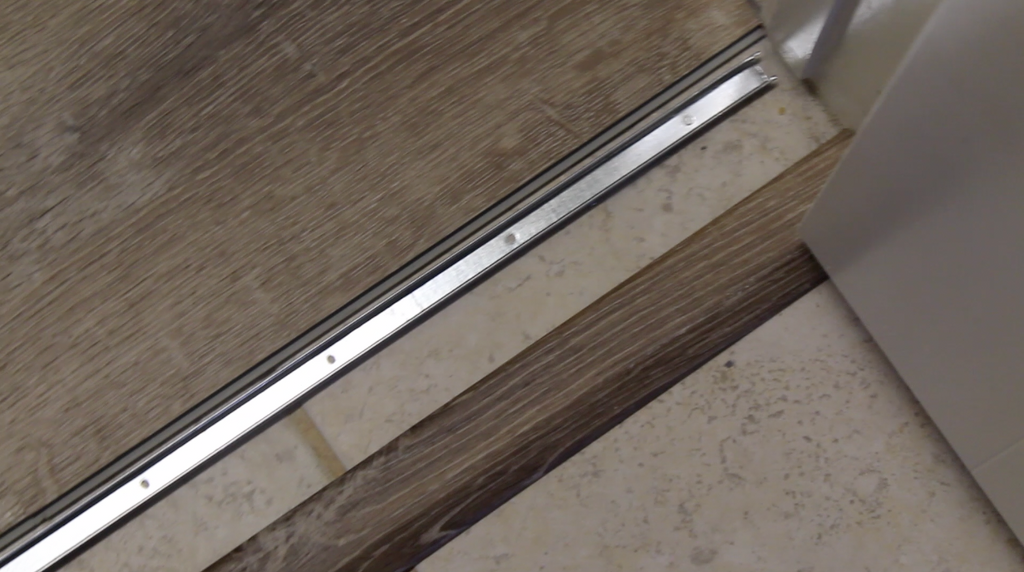
Installing Vinyl Flooring
I chose this LifeProof Vinyl Flooring because it is referred to as "floating flooring," meaning it doesn't have to be nailed or glued to the subfloor. This would be perfect for someone who doesn't want to mess up their existing floor.

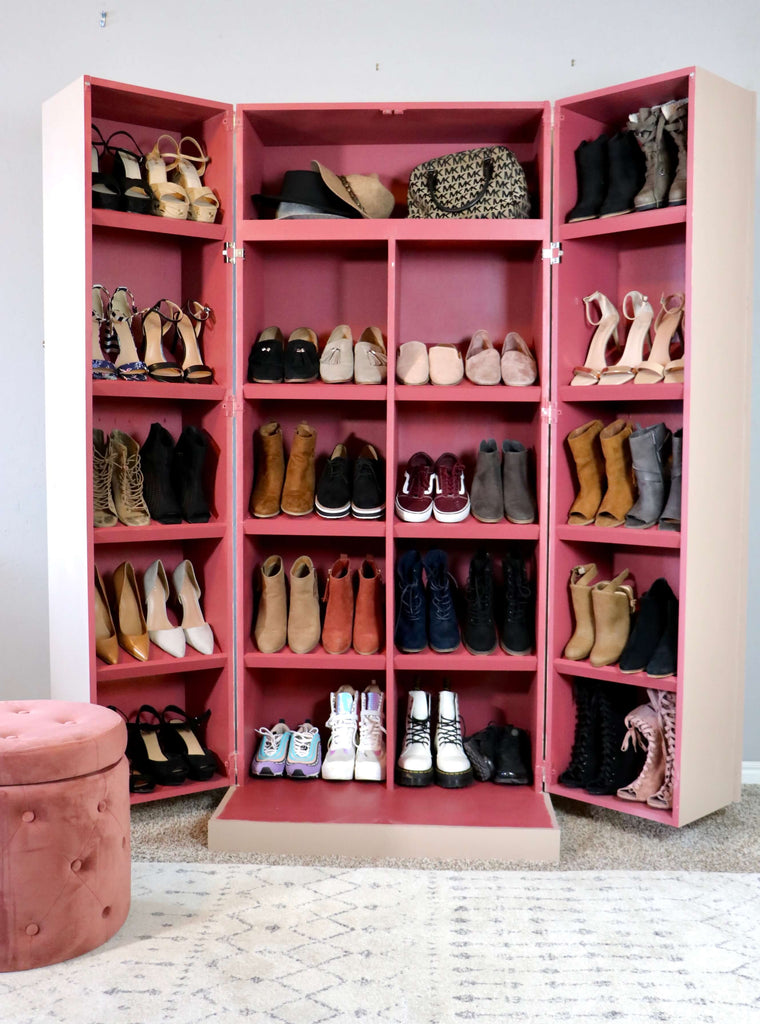
Hidden Shoe Cabinet
Hidden Shoe Storage never looked so good with this shoe cabinet.

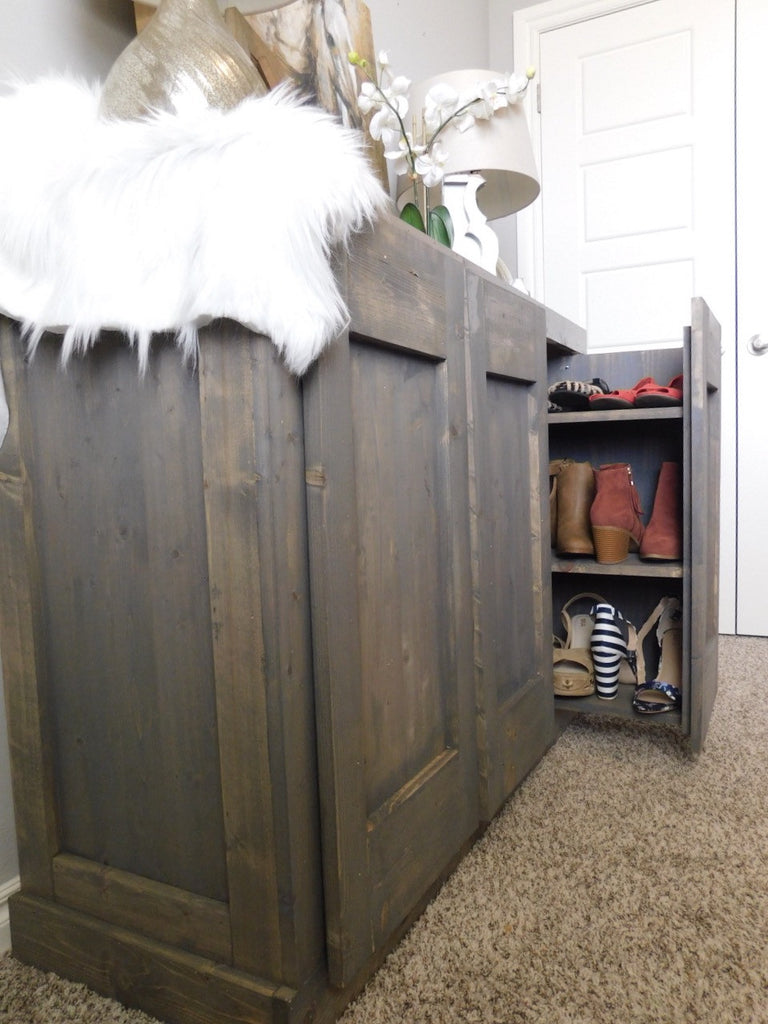
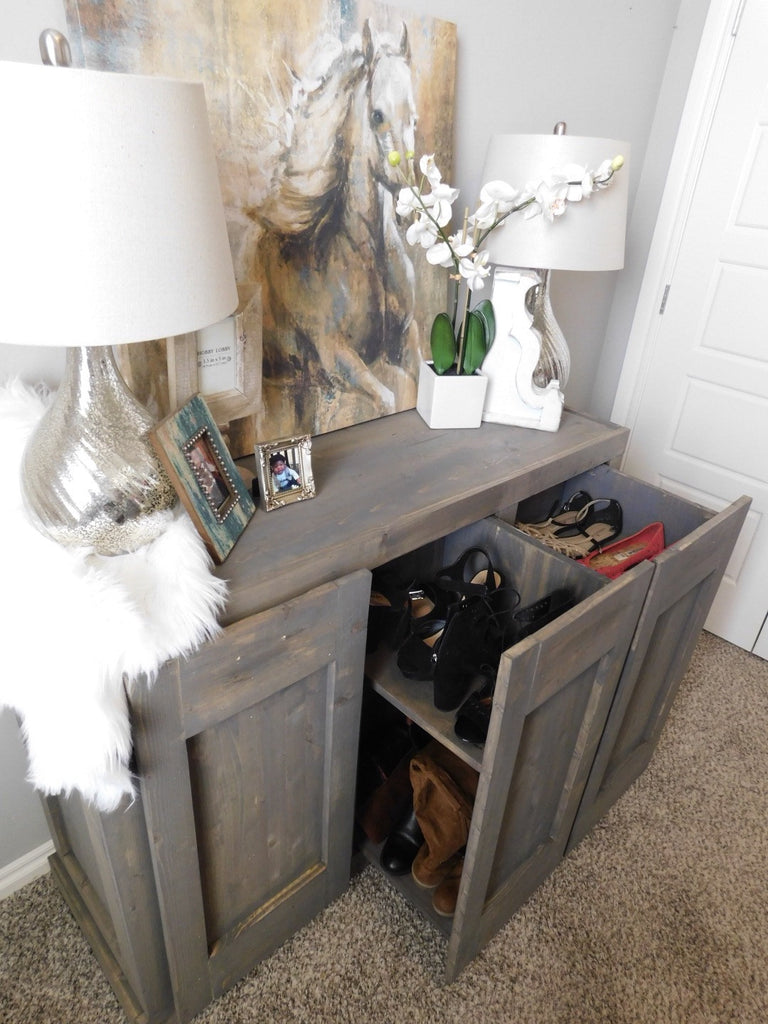

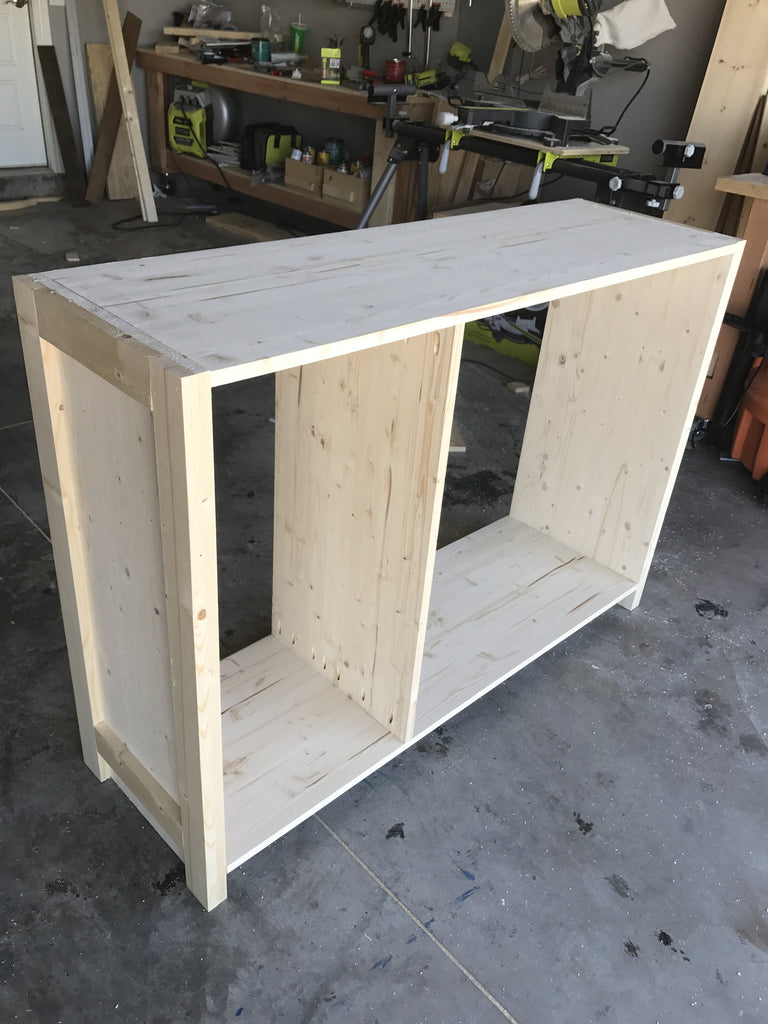
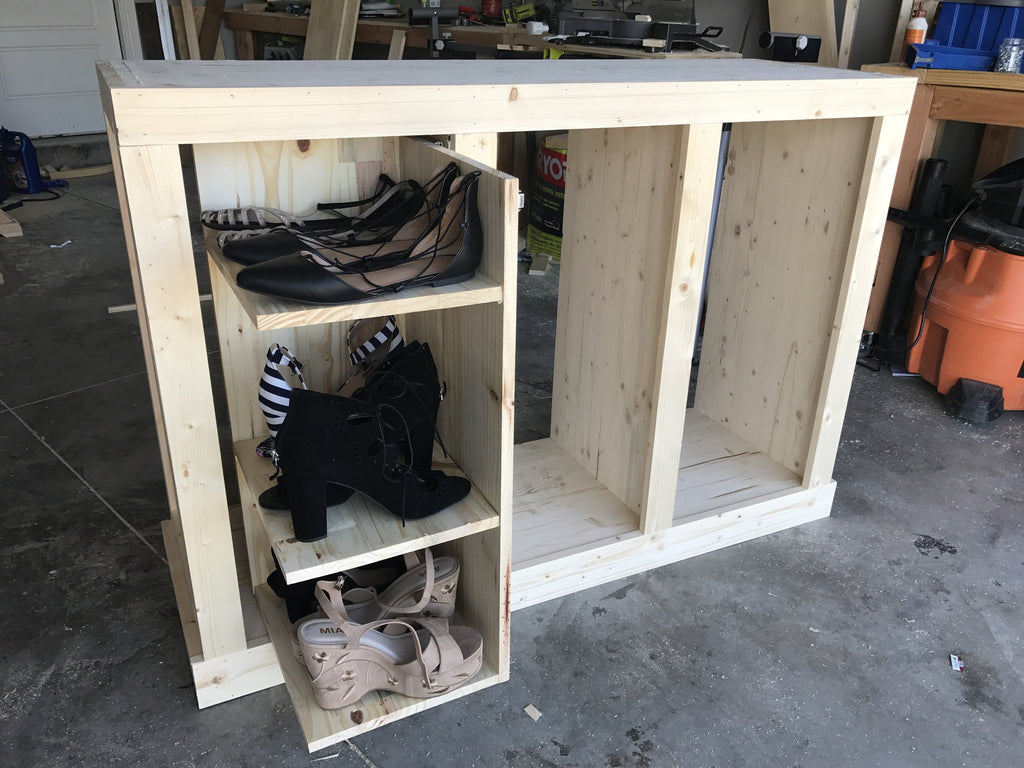
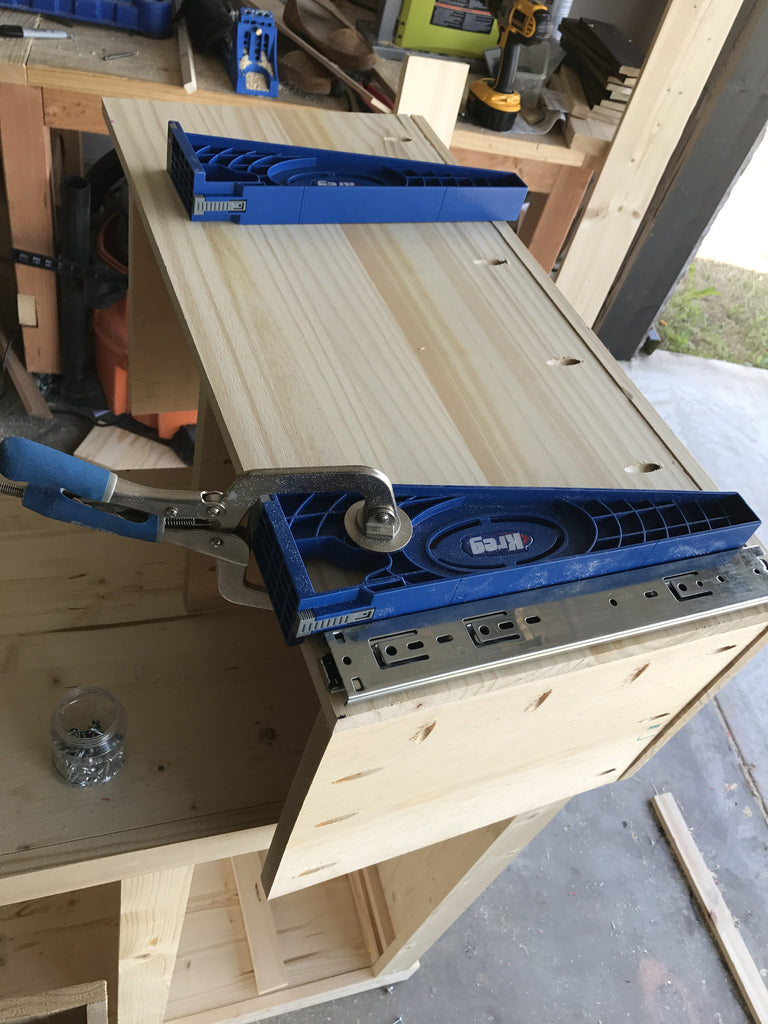
Now, head on over to Build Something for the FREE PLANS!

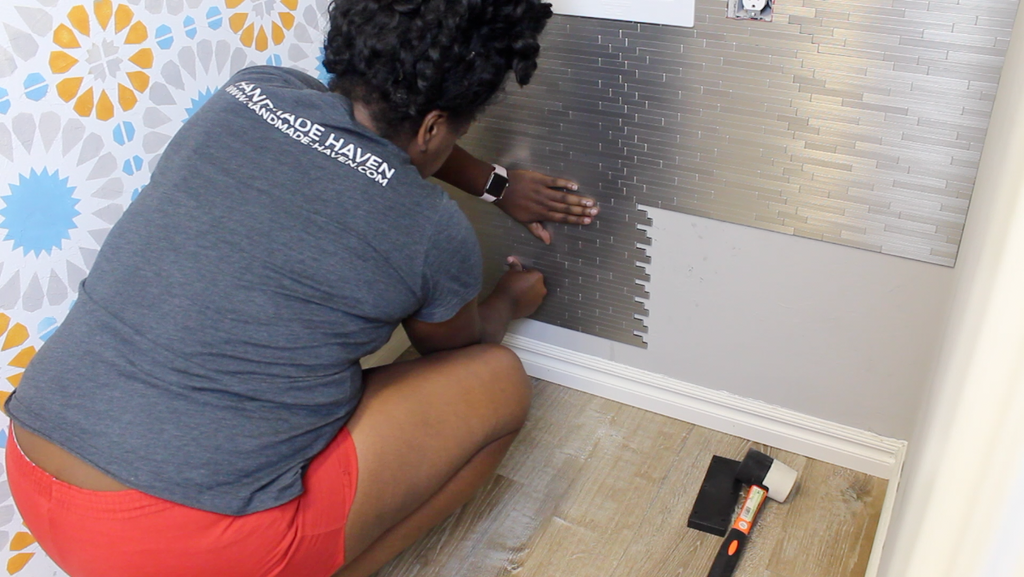
Peel and Stick Tile
Who knew Tile could look so good with peel and stick.
There are some affiliate links in this post, meaning I get a small commission if you purchase through these links, at no cost to you. Click Here to read my full disclosure.
Originally, I was thinking about doing regular tile, but I was a little hesitant because my time limit on trying to get this finished up was pretty short. As I was looking at some tile at The Home Depot, I discovered this Peel and Stick Tile and I knew immediately that's what I wanted to use.
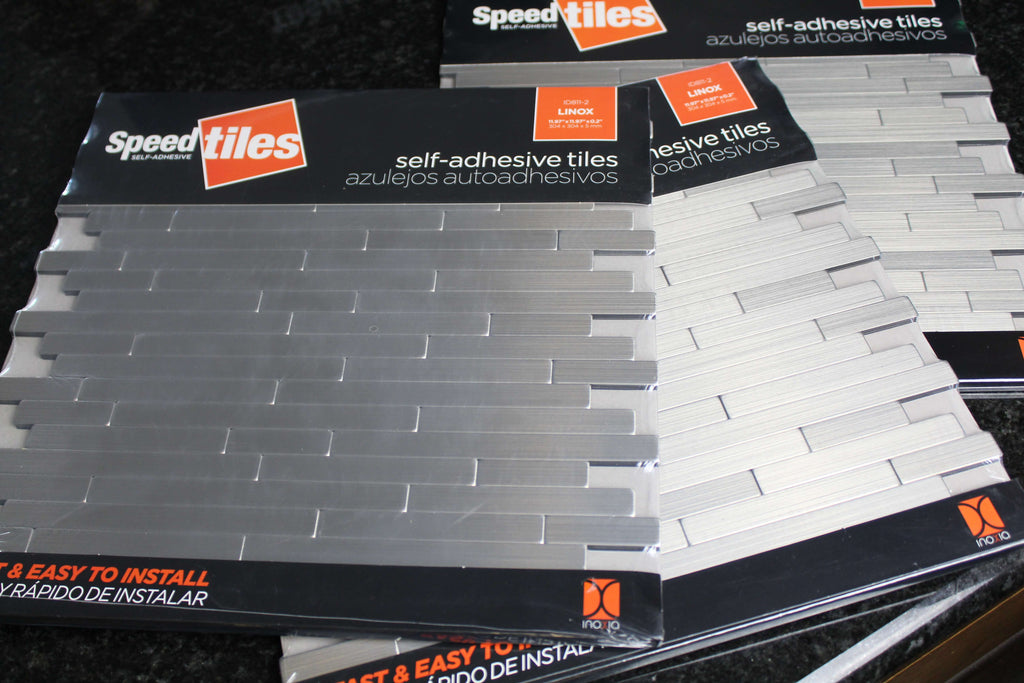
They had four options to choose from in the store but it was clear that this Linox Peel and Stick tile was made for my project and I was so glad I found it because I knew it would be way quicker than trying to hassle with real tile.
Check out this installation video below to see a quick overview of how I installed this peel and stick tile.
Materials Used
- Outlet Cover
Tools Used
- Square Block
- Bandsaw
- Screwdriver
Step 1: Remove Backing from Peel and Stick Tile
Before applying the speed tiles to the wall, I first removed all of the plastic from the tiles. Be sure not to remove the white sticky backing until you're ready to place the tile on the wall.
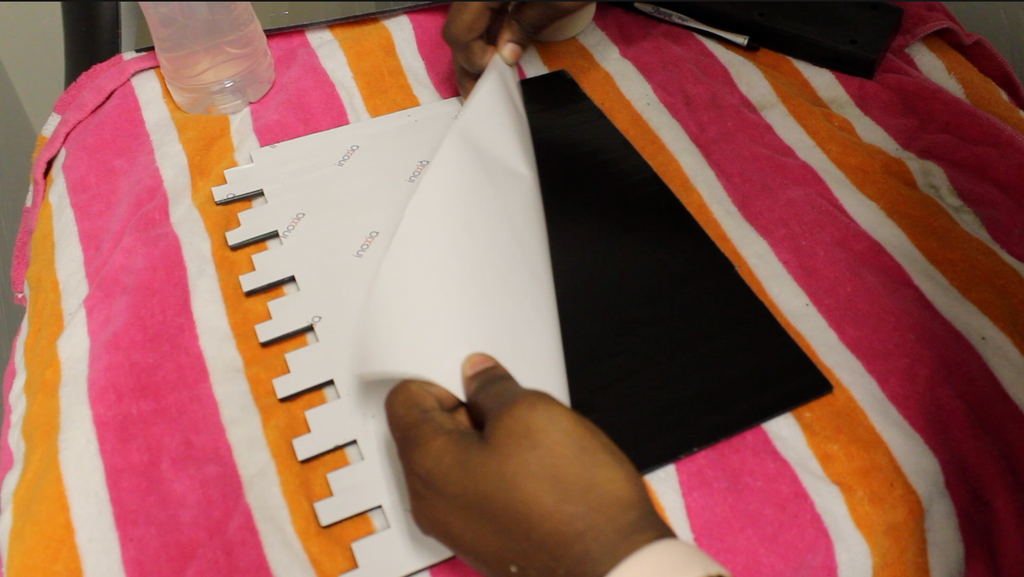
Once you are ready to begin, one by one remove the sticky back from the Linox Speed Tile.
Step 2: Add soap water to peel and stick tile
Once I was ready to apply the peel and stick tile to the wall, I applied some soapy water to the back of the tile. The soap water is used to help move the tile while applying it to the wall. This step definitely helped me a lot because I had to maneuver some of the tiles after sticking it to the wall.
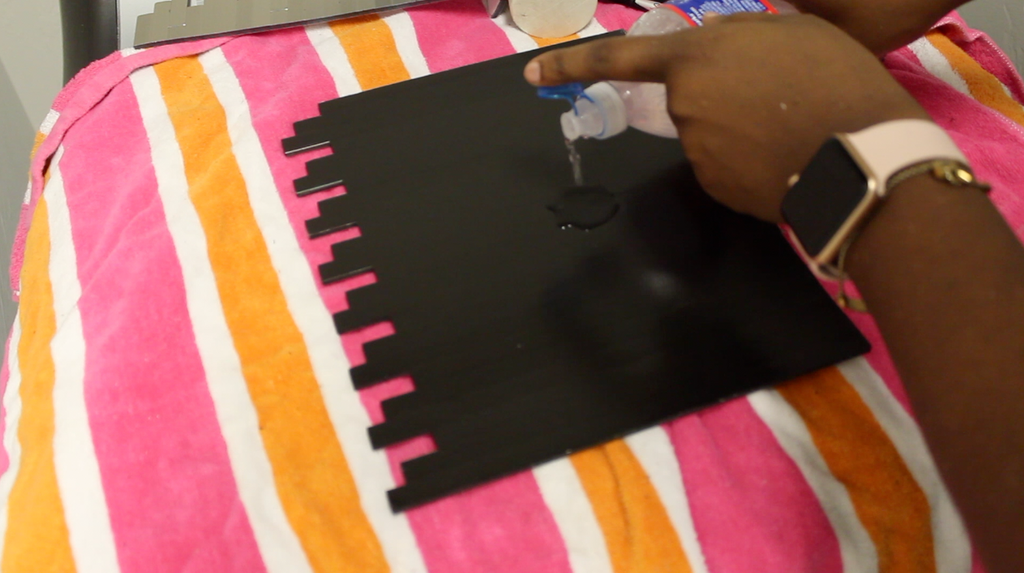
You don't have to put a whole lot of water on the back, just enough to where the whole tile is covered. I used a bottle of water and dropped two tablespoons of dishwashing soap and that worked great for me.
Step 3: Apply to Wall
After adding the water to the tile, you want to place the tile on the wall right after. The water dries pretty quickly once it's on the wall, so don't be slow to apply.
I started from the top and worked my way down. The most important thing to remember is to make sure you start your tiles even. If you don't, your tiles will not line up evenly and you will have trouble aligning your tiles.
I did actually mess up two tiles and had to pry them from the wall. I was able to get them off but these tiles really stick to the wall good. Some of the drywall came off with it, but fortunately I was able to take the misaligned one off and replace it with another.
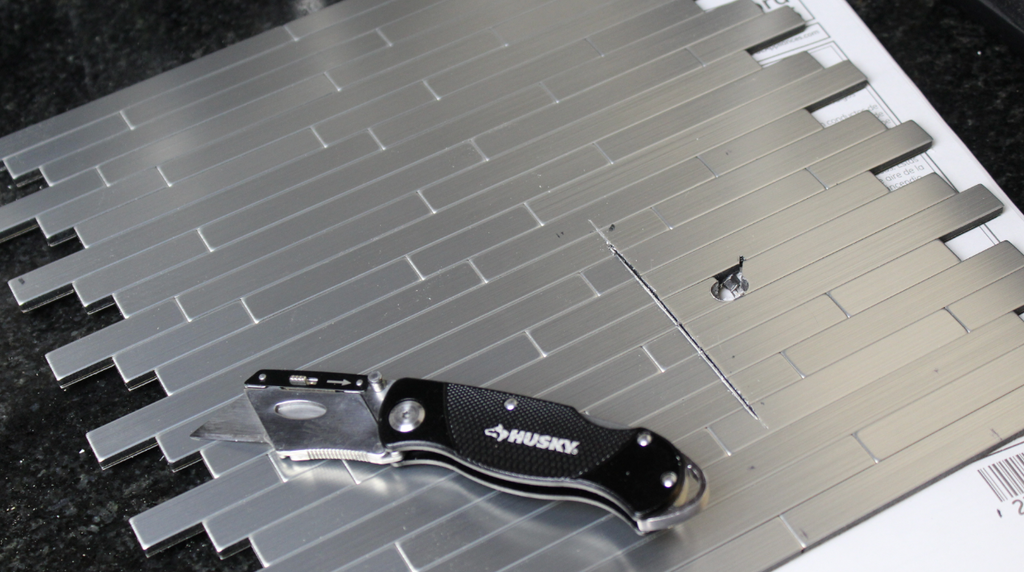
To cut around the outlets, I used my Husky Utility Knife to cut a square out of the tile. I did attempt to use a jigsaw because the utility knife was tedious, but because of the weight of the tile, the jigsaw was breaking off more than I needed to cut.
Once I got the outlet all cut out, I added Outlet Spacers for the outlet so that the outlet cover could go over top of the speed tiles. I was a little worried how the tiles would look without removing the baseboards, but it turned out great without removing them, so if that's a concern, no worries!
I would love to show you more photos, but it gives so much of the laundry room away all ready! So you'lle just have to wait for the big reveal!
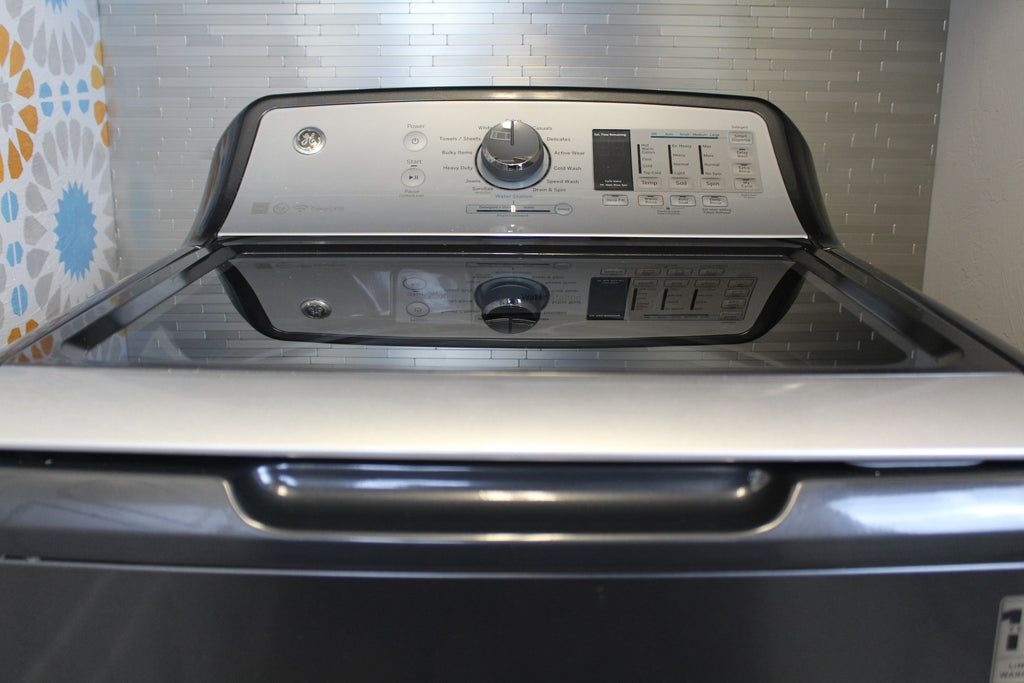
I really love how the peel and stick tile looks up against my new washer and dryer I received from my friends over at the Home Depot. It really makes the chrome finish pop.
Be sure to check out the final reveal here!
Thanks for reading, XOXO Ashley.

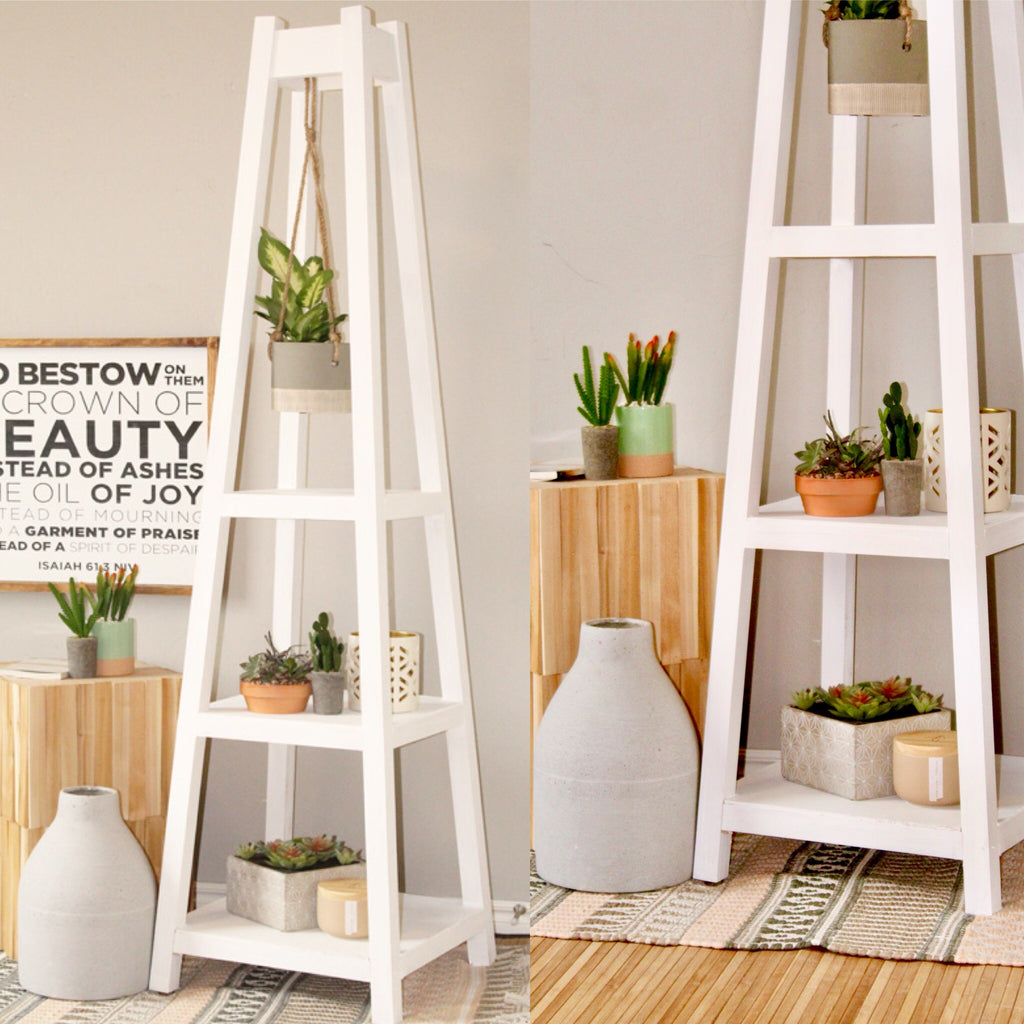
DIY Plant Stand
A DIY plant stand on a whole new level.

Both tools are part of the DEWALT 20-Volt Max system and are compatible with all 20-Volt Max batteries, chargers and accessories and the kit is backed by a DEWALT 3-year limited warranty The combo kit comes packed with the DEWALT Impact Drill and Driver, two DEWALT batteries, a battery charger and a carrying bag; sounds like a steal to me.
I also really like using this DEWALT 20 Compartment Organizer. I have a hard time staying organized without tools like this, so I'm glad to have this organizer in my shop. I really like the removable dividers and the added carry handle. Additionally, the latches on the side enables stacking to other DEWALT units and for the price you can't beat it.
Hopefully you guys enjoy watching me build this cool plant stand and be sure to check out the plans below!
Tools Used:
Materials:
Cut List:
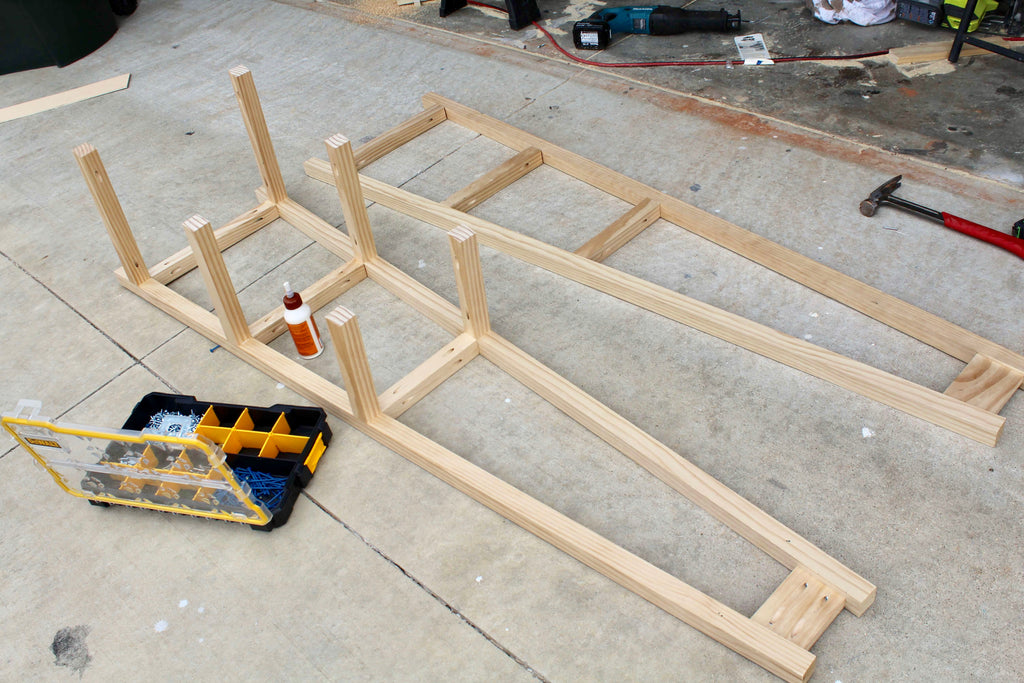
Step 1: Cut the bottom of the four (6ft) 2x2s at a 5 degree angle using a 12” Ridgid Sliding Miter Saw
Step 2: Attach the bottom, middle and top slate to the two 2x2 slides using a Kreg Jig on a 1 1/2" setting, with 2 1/2" pocket hole screws to attach along with wood glue.. Repeat step for the other side of the DIY plant stand. Repeat this step for the other side of the plant stand. Note: Slates should be cut at a 5 degree angle.
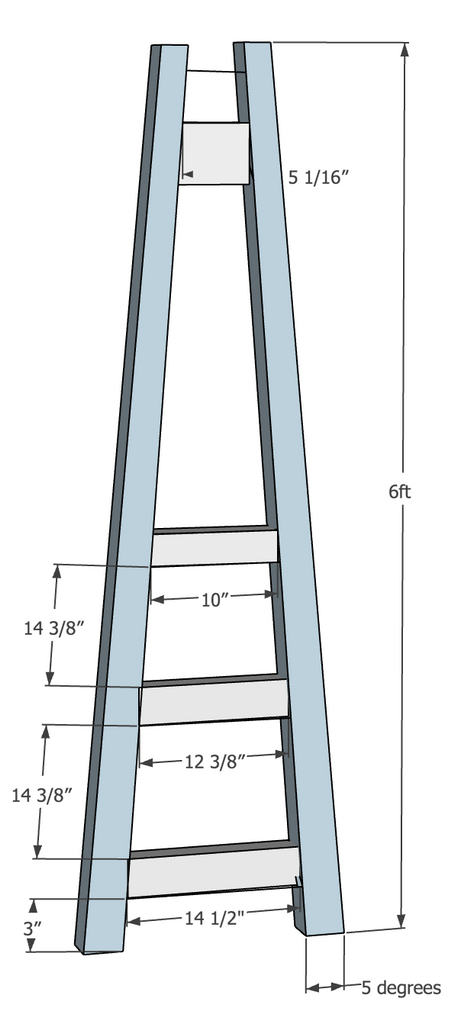
Step 3: Attach the top (5 1/16") 2x2 top piece to the 2x2 sides using a Kreg Jig on a 1 1/2" setting, with 2 1/2" pocket hole screws to attach along with wood glue.. Repeat step for the other side of the DIY plant stand. Repeat this step for the other side of the plant stand. Note: Top piece should be cut at a 3 degree angle.
 Step 4: Attach the (14 1/2") bottom, (12 3/8") middle and (10") top 2x2 side connectors using a Kreg Jig on a 1 1/2" setting, with 2 1/2" pocket hole screws to attach along with wood glue.. Then attach the last two (5 1/2") top pieces to finish up the DIY plant stand frame. Note: Connector side connectors should be cut a 5 degree angle.
 Step 5: Using a Bandsaw cut out the notches on the plywood shelving, and add the shelves to the plant stand using wood glue, a brad nailer, and brad nails. I had to cut the shelving in half in order to fit it into the plant stand frame. If you use wood filler to fill in the crack you will barely be able to notice that the shelving top is cut in two.
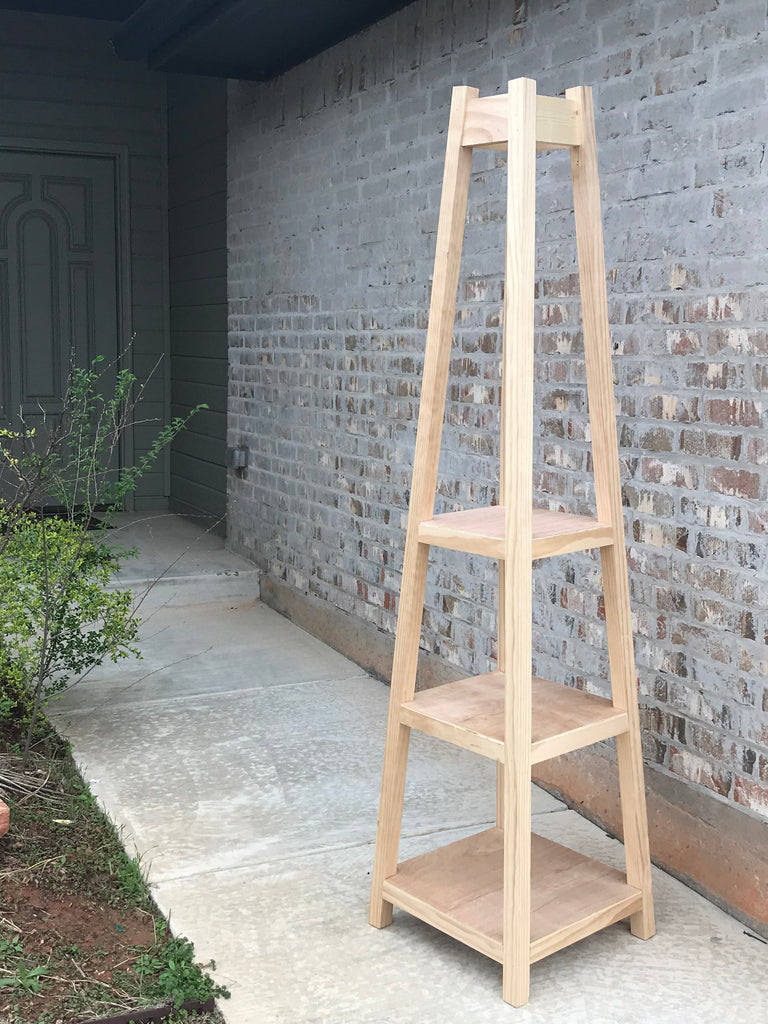 I loved how simple this planter was, and love even more how it turned out. This was the perfect weekend project and I think I may have to build me a couple more. Just a little secret this DIY plant stand was initially supposed to be a coat rack but after some feedback on Instagram, the project got changed.
 I love that this project was originally meant for something else but evolved into something else. HA, a day in the life of Ashley.

and even better I added some hooks later on to turn it into a DIY coat rack! Check it out here.


Thanks for reading guys! XOXO Ashley
I acknowledge that the Home Depot is partnering with me to participate in the The Home Depot Pro-Spective Campaign. As a part of the program, I am receiving compensation in the form of products and services, for the purposes of promoting The Home Depot. All expressed opinions and experiences are my own. My post complies with the Word of Mouth Marketing Association (WOMMA) Ethics Code and applicable Federal Trade Commission guidelines.

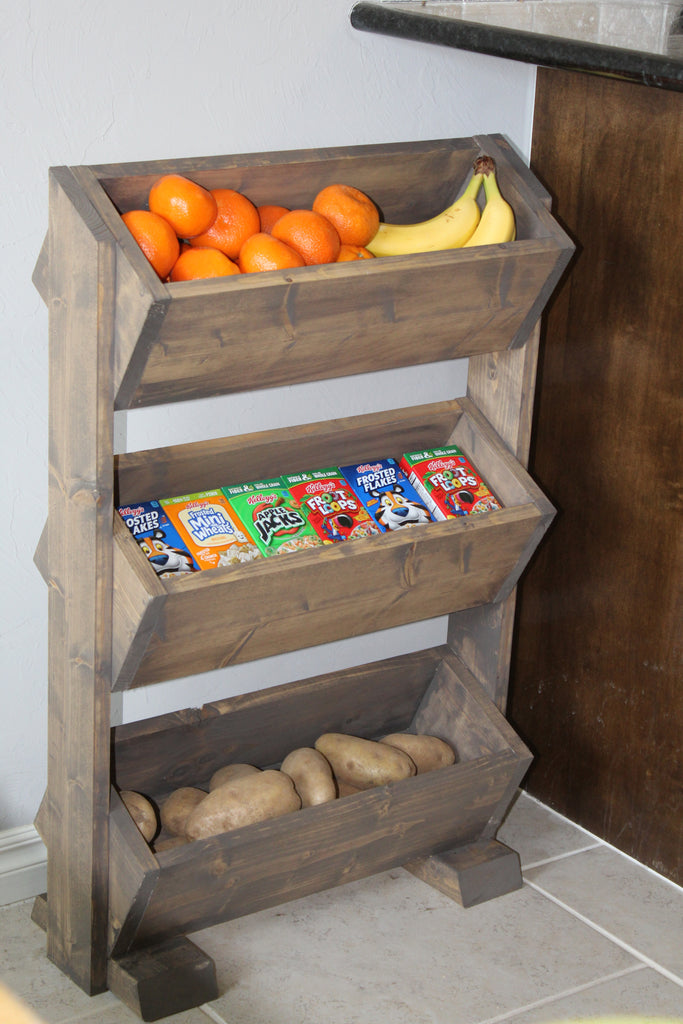
DIY Produce Stand
The perfect produce stand for the kitchen.
I found this DIY produce stand on Pinterest and thought it was so cute. This is where I found all the measurements for this project. So if you want to recreate this project, go check it out.
I never know where to put my produce in my kitchen, so this DIY produce stand created the perfect spot for it.
One thing that's special about this project is that it was the first build to kick off my new Series to show off how to build quick and easy DIY projects.
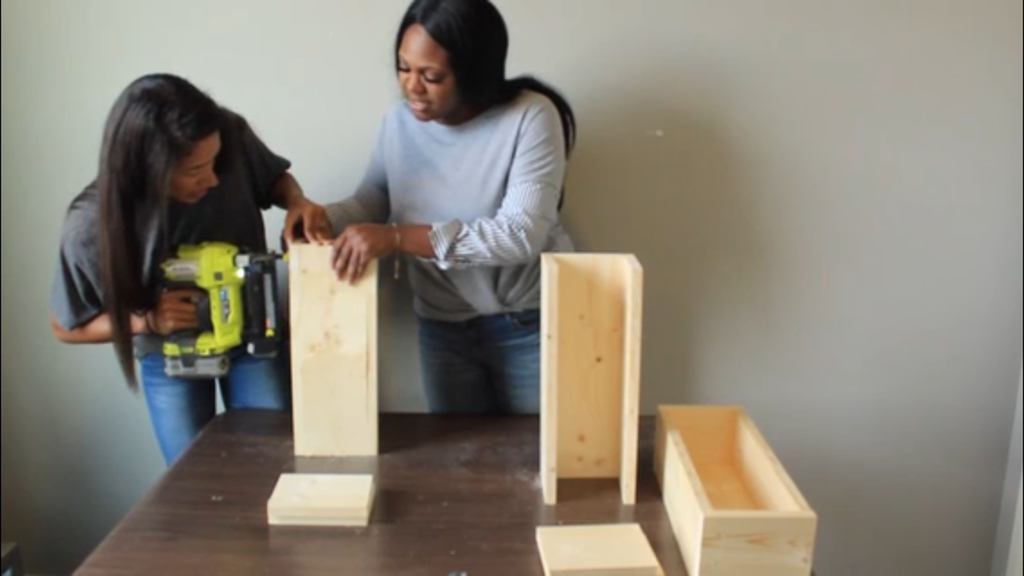
My friend Emily was so brave to be my first guest and she did Great! and I cant wait to share it with you guys. This project took us about 25 minutes to build.
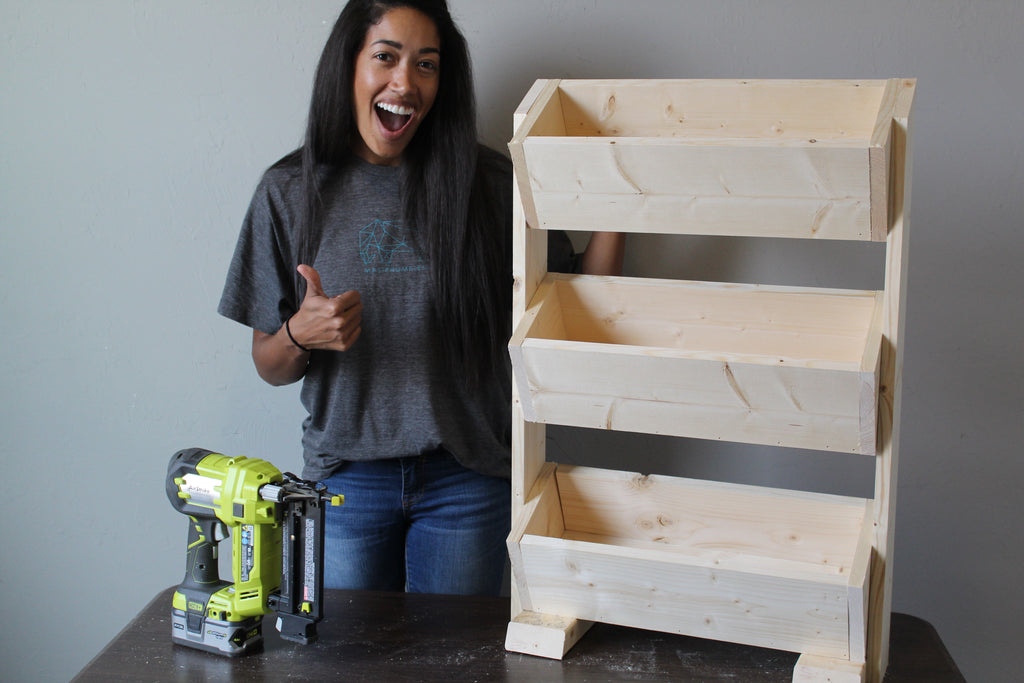
She doesn't have much experience building, but with my help she was able to knock it out of the park. So if you are new to woodworking, this is the perfect project to try! I used Rustoleum Briarsmoke for my project. If you want to build this project check out Over the Big Moons Blog.
Hope you enjoy.
Thanks for reading Guys.

Sliding Barn Door Media Center
A living room media center with barn door hardware to die for!
This post is sponsored by Build Something and Artisan Hardware.
For months I have been staring at a half finished console and I just couldn't take it anymore! So I decided to take action and build a massive 10 foot Media Console. Go Big or Go home right? and I am in LOVE.

The best part is that I am sharing the free plans today on Build Something, Kreg Tool's site for free project plans. That's right, you too get to add some pizzazz to your living space! I love that I can hide my TV behind these doors. I think I may need a bigger TV now! The TV pictured is 50" but this media center can fit a 65"!

Be sure to head on over to Build Something for the free plans, but before you go, check out my process of building this lovely media center.
There are some affiliate links in this post, meaning I get a small commission if you purchase through these links, at no cost to you. Click Here to read my full disclosure.

This was such a fun build and I really enjoyed trying out some new Kreg tools as well. This was my first time using the Kreg KMA2900 Multi-Mark Multi-Purpose Marking and Measuring Tool and I instantly fell in love. It came in handy while cutting out the notches on the bookcase sides. This is a must have for the shop.

To rip all of my plywood I used the Kreg KMA2700 Circular Saw Track and the Kreg KMA2685 Circular Saw Guide. These two tools are a great alternative to an expensive track saw and the setup takes only a minute or so.
For all my pocket holes I used the Kreg K4MS Jig Master System . This is easily one of my top three favorite tools. I've used it on 95% of my projects and I recommend it all the time.

All of the materials I used on this build were from my local Home Depot. I used Purebond Plywood for the bookcases and select pine for the 1x. Its a little more expensive but a little nicer than regular pine.

Even though I managed to get this built by myself, I would definitely recommend having a second person to assist. Especially when lifting the top brace onto the two bookcases. This thing is huggeeeeee. The pictures don't do it justice.

I think I went back and forth almost ten times when trying to decide on a design for the middle media stand and finally decided on this design. Some good word of advice is to make sure your media stand fits in before constructing the whole thing. Lesson Learned!

One of my favorite and most stressful parts of the build was constructing the doors. I really loved the design I went with but I just couldn't decide on what to do about the color of the doors. I tried three options and finally settled with the two-tone.

I used Behr Ultra Pure White for the X, and Varathane Briarsmoke for the back of the doors. I am 95% in love with it but still not completely sold. So we will see if it stays this way!

But I can't go without talking about this hardware from Artisan Hardware! This is the Horseshoe Barn Door Hardware and it gives me al the feels! I also loved these barn door pulls. Simple but sheek!

If you need a little help on how to install this hardware, check out this video tutorial on how I installed mine.
and the best part is there's a giveaway!!!!
That's right I have partnered up with Artisan Hardware to give one lucky winner the hardware of their choice! So don't miss your chance.
a Rafflecopter giveawayand the winner is Brittan Ornstein!
One final look before you go?

Now head on over to Build Something for the free plans!
Thanks for reading guys. XOXO Ashley

DIY Modern Shim Side Table
Who knew shims could look so good on a side table?
This review is sponsored by the Home Depot as a part of The Home Depot's Pro-Spective Campaign.
When I first came up with the idea to use shims for this side table I was nervous it wouldn't turn out as I envisioned, but Im so glad I took the risk because I am absolutely in love!

The cedar shims I used look so good together and to my surprise I didn't even need to stain them like I originally had planned. Even better it took less than an hour and under $50 to make. I think I know a deal when I see one and this was a steal!

Materials Used
2x4 1/2 sheet of MDF
3 packs of Cedar Shims
Wood Glue
1 1/4" Pocket Hole Screws
1/4" Oak Plywood
Tools Used
Lets Get into it!
One exciting thing about this project was trying out this Milwaukee Cordless Compact Brushless Hex Impact Driver and kit. This impact driver delivers over 50% more run time than drivers with brushed motors and provides great control, and is perfect for work in tight spaces, which came in handy on this project. I also like that for only $99 you can buy the kit which includes the impact driver, charger and battery. Not a bad deal for a tool I think I will get a lot of use out of.

Step 1: Assemble the Box
I used my Milwaukee Impact driver to assemble the box. I drilled 6 holes on each side using my Kreg jig and then screwed the sides together with 1 1/4" pocket hole screws. I cut the box sides to an even 12" for all four side from the 2"x4" mdf sheet.

Step 2: Add Top and Bottom
Using my brad nailer and wood glue, I attached two 1/4" pieces to the top and bottom. It should cover the whole top of the box. (Measure and cut ass necessary)
I must say this next step was my favorite and most anticipated part. Not only was I anxious to see how the shims would look but I also wanted to try out this Dremel 3-Tool Combo Kit., because whats better than 1 tool? THREE! This combo kit comes with the Multi-Max, Saw-Max and Rotary Tool; everything you'll need to restore, repair, remodel, cut, sand and much more.

What I really love about this kit is that with the assortment of different attachments and accesories you can use them in a variety of jobs around the home, workshop or job site; including your new side table. (wink wink...see what I did there)
Step 3: Adding Shims

First I had to cut the shims down so that two lines of shims could fit on the sides of the assembled box. I measured the height of the box, divided by two and cut the shims down to size using my saw max. Being that the shims are small and delicate this was the perfect tool for the job.

Next I started adding the shims to the box using wood glue and my Makita Pin Nailer. If you don't have a pin nailer and you do a lot of projects with trim and moulding, I would highly recommend one.
The pin nailer leaves much smaller holes and with using the pin nailer I actually didn't feel the need to fill the holes on this project, whereas with a brad nailer I probably would have, because the nail holes are significantly bigger.

I made sure to add the shims to the opposite sides first ,so that the corners wouldn't have gaps. Once I applied all the shims, I used my Dremel rotary tool to sand out the rough spots. The shims aren't perfect, which in my opinion gives it character but there where a few rough spots I felt needed sanding. These shims are really delicate so using the Dremel rotary made it easy to sand without damaging the shims.
and WAAAAAA-LAAAAAH! I love how it turned out. I think I might have to make a matching coffee table.

Thanks for reading guys!
I acknowledge that the Home Depot is partnering with me to participate in the The Home Depot Pro-Spective Campaign. As a part of the program, I am receiving compensation in the form of products and services, for the purposes of promoting The Home Depot. All expressed opinions and experiences are my own. My post complies with the Word of Mouth Marketing Association (WOMMA) Ethics Code and applicable Federal Trade Commission guidelines.