
Projects

DIY Console Table
"A DIY Console Table perfect for your entryway"
I think I've said this several times, but consoles are one of my favorite things to build. It's probably one of the things I've built the most, so it's only right that I bring you a new design today.
"This post is sponsored by the Home Depot"
 This design was one I really loved so I decided to make a matching side table along with it. Be sure to go check that out next here.

"There are some affiliate links in this post, meaning I get a small commission if you purchase through these links, at no cost to you. Click Here to read my full disclosure."
Now let's get to it!
Dimensions

Materiels
- 8 - 2x2x6'
- Project Panel - 15.75" x 48" (Actual Width - 15 7/8" x 48")
- 2 1/2" pocket hole screws
- Wood Glue
- Brad Nails
- Varathane Stain
- DAP Wood Filler
*See Detailed Plans for Cut List*
Tools Used

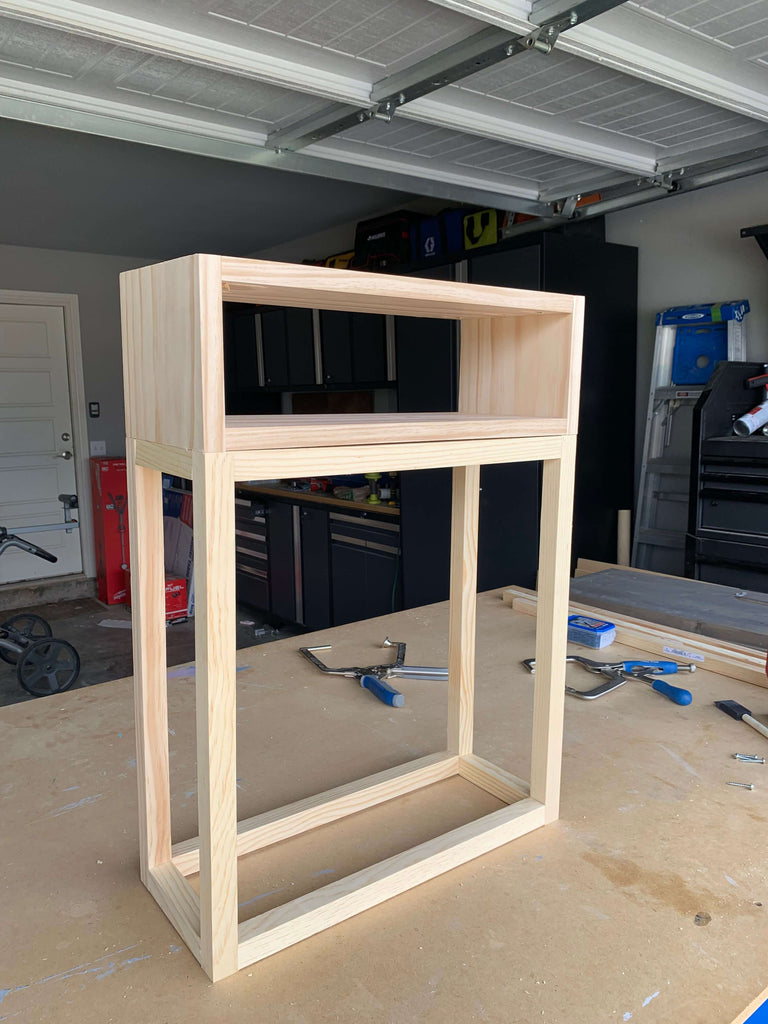
STEP 1: ASSEMBLE CONSOLE TABLE SIDES
The first step was cutting all the wood to size. I used my Cordless 10 in. Miter Saw to cut all of my 2x2s and it worked wonders. The best part about this saw is that its cordless. I don't have to worry about plugging it in which for me is a HUGE DEAL, because I have limited outlets in my shop.

It delivers up to 400 cuts per charge and features dual bevel with nine detents and and easy access bevel lever. Check out this quick setup video for my new Milwaukee Cordless Miter Saw.
Once the wood was all cut down for the console table sides, I clamped the side 2x2s together with my Kreg Right Angle Clamp and then attached the pieces together using a Kreg Jig on a 1 1/2" setting, with 2 1/2" pocket hole screws.

The pocket holes should be facing down on the bottom stretcher and facing up for the top stretcher so they are hidden.
STEP 2: ATTACH CONSOLE TABLE SIDES
Once the two console table sides were assembled, I attached the middle stretchers using a Kreg Jig on a 1 1/2" setting, with 2 1/2" pocket hole screws.
 Once I attached one of the stretchers, I turned the console on its side to make it easier to attach the stretcher pieces. My Kreg Right Angle Clamp always comes in handy with the assist.
STEP 3: ATTACH V BRACES
In order to cut the V braces for the console table, I first measured my 2x2 against the console and made markings on where to cut, I then adjusted my miter angle on my cordless Miter Saw to 35 degrees and then cut both ends of the 2x2.

After cutting the V braces, I attached them to the assembled side table using my Milwaukee Brad Nailer. I nailed down the brad nails through the top and bottom into the v braces to secure it into place.

Then I added the additional top stretcher pieces to the console using a Kreg Jig on a 1 1/2" setting, with 2 1/2" pocket hole screws.
STEP 4: ATTACH CONSOLE TABLE TOP
Once the console was built, I attached top to the assembled base using mybrad nailer and 2" brad nails.

STEP 5: PREP, PAINT AND STAIN
Once the console table was all finished, I filled the nail holes with wood filler and then sanded her down. I painted the bottom of the side table black and the top I stained with Varathane Stain and I absolutely love the color combination.

and that's that. Let's take another look.

This fun easy console was the perfect addition to my wall. 

DIY Side Table
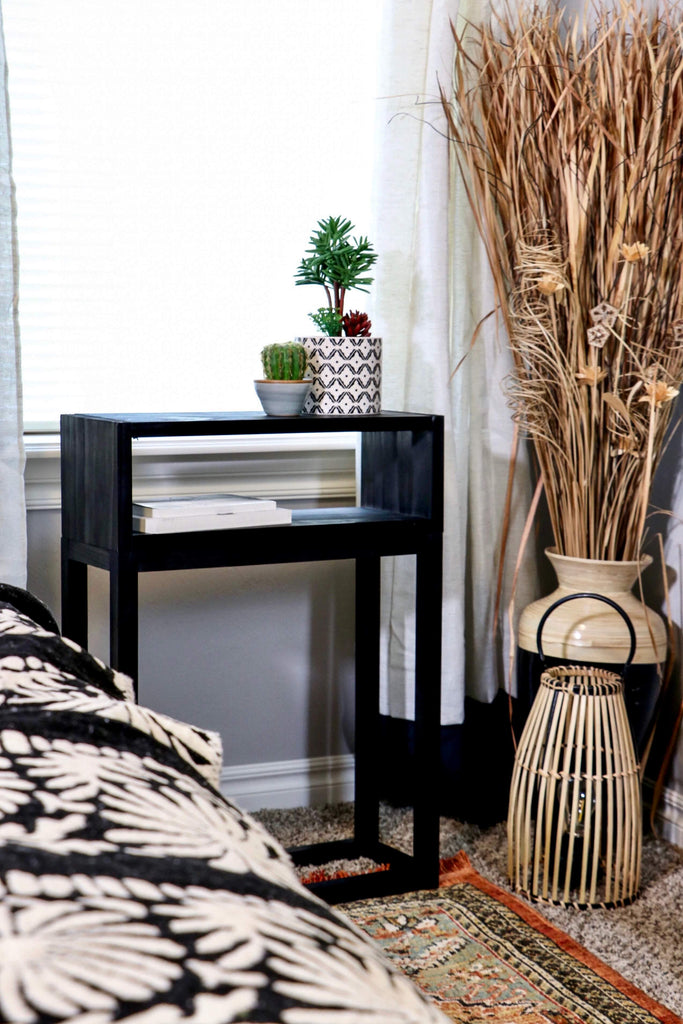
"A simplistic modern side table perfect for the living room"
I love all things simplistic, so I decided to create this fun modern DIY side table for my living room and I love how it turned out. A year or so ago, I transformed my living room wall with some triangular patterns and this side table was the perfect addition to go along with it.
"This post is sponsored by the Home Depot"
 Lucky for you, I am sharing all of the details on the blog today and I've got some even better news. I loved this design so much that I decided to create the same design on a bigger console and I have a tutorial for that too here.
There are some affiliate links in this post, meaning I get a small commission if you purchase through these links, at no cost to you. Click Here to read my full disclosure.
Now let's get to it!
Dimensions

Materiels
- 5 - 2x2x6'
- Project Panel - 19.75" x 48"
- 2 1/2" pocket hole screws
- Wood Glue
- Brad Nails
- Varathane Stain
- DAP Wood Filler
*See Detailed Plans for Cut List*
Tools Used
Step 1: Assemble Side Table Sides
The first thing I did was cut all of the wood down to size. I used my Cordless 10 in. Miter Saw to cut all of my 2x2s and it worked wonders. It delivers up to 400 cuts per charge and features dual bevel with nine detents and and easy access bevel lever.
The best part about this miter saw is that its cordless, so I don't have to worry about plugging it in which for me is a BIG DEAL, because I am limited on outlets in my shop. Check out this quick setup video for my new Milwaukee Cordless Miter Saw.
Once I cut all of the wood down for the side table sides, I clamped the 2x2s together with my Kreg Right Angle Clamp and then attached the pieces together using a Kreg Jig on a 1 1/2" setting, with 2 1/2" pocket hole screws.

I made sure that the pocket holes were facing down on the bottom stretcher and facing up for the top stretcher so they would be hidden.
Step 2: Attach Side Table Sides
Once the two side table sides were assembled, I attached the middle stretchers using a Kreg Jig on a 1 1/2" setting, with 2 1/2" pocket hole screws.
 Again, making sure the pocket holes were facing up and down to remain hidden.
Step 3: Attach V Braces
Now for the tricky part. In order to cut the V braces for the side table, I turned the bevel on my cordless Miter Saw to 21 degrees and then cut.

After cutting the V braces, I attached them to the assembled side table using my Milwaukee Brad Nailer. I nailed down the brad nails through the top and bottom into the v braces to secure it into place.

Step 4: Cut and Attach Side Table Top
Once the side table was built, I cut down the project panel with my Milwaukee Rear Handle Circular Saw. This saw generates the power of a 15A corded circular saw and delivers up to 570 cuts per charge, it also features an electric blade brake. This was the perfect tool to cut down my project panel.

I used a scrap board to make sure my circular Saw stayed straight and then just cut across the board and in 3 seconds, I had my side table top.
Step 5: Prep, Paint and Stain
Once the side table was all finished, I filled the nail holes with wood filler and then sanded her down.
 I painted the bottom of the side table black and the top I stained with Varathane Stain and I absolutely love the color combination.

Now let's take another look at the DIY Side Table.
I hope you love it as much as I do and I can't wait to see you guys tackle it on your own.

Entryway Hall Tree Bench
"A modern touch on a Hall Tree Bench"
A few months back I built a cool hall tree bench and absolutely loved it, so I decided to create the same bench with a slightly different design.
"This post is sponsored by the Home Depot"
I couldn't be more happy with the way this new design turned out, so of course I had to share all the details with you guys, but be sure to check out my other DIY hall tree bench when you get a chance.

This hall tree bench is the perfect combination of storage and style and will surely have all of your guests interested. So let's get into the details.
There are some affiliate links in this post, meaning I get a small commission if you purchase through these links, at no cost to you. Click Here to read my full disclosure.
Dimensions

Materials
- 10 - 2x2 @ 6ft
- 1 - 1x8 @ 6ft
- 1 - 1x10 @ 6ft
- 2 - 1x2 @ 6ft
- 2 - Panel Boards - 17.5" x 39"
- 2 1/2" Pocket Hole Screws
- 1 1/4" Pocket Hole Screws
- 1 1/2" Brad Nails
- Coat Hooks
- Varathane Briarsmoke
Cut List
*See the detailed plans for the cut list
Tools Used
Step 1: Assemble Hall Tree Bench Base
The first thing I did was assemble the bottom of the Hall Tree bench. I opted to use select pine for this build because it makes the build look so clean, it does drive up the price tag, but it's well worth it in my opinion.

I assembled the hall tree bench base using a Kreg Jig on a 1 1/2" setting, with 2 1/2" pocket hole screws to attach along with wood glue.

I also used my Kreg Right Angle Clamp to assist with the bottom base. To attach the top and bottom shelf of the base, I used my Milwaukee Brad Nailer

Step 2: Assemble Hall Tree Top Frame

I then began assembling the hall tree bench top frame. Most of the outer frame was assembled using a Kreg Jig on a 1 1/2" setting, with 2 1/2" pocket hole screws.

Once I assembled the main frame, I took the long stretcher piece and attached the coat hooks.
Before adding the hooks, I placed them onto the board and marked where the holes were and then drilled little pilot holes into the marked areas. This helps make attaching the coat hangers a lot easier.
 After I attached the coat hanger piece to the assembled frame, I added in the decorative 1x2 trim using my Milwaukee Brad Nailer

This Milwaukee 18-Gauge Brad Nailer delivers clean and consistent nail holes in soft and hard woods. I really like that it feels light in hand and has zero ramp-up time.
 It also features three interchangeable tips. I used 1 1/4" brad nails to attach it to the assembled frame and it worked great.
The assembled hall tree bench frame should look something like this when you're done.

Step 3: Attach the Base and Frame
Once the two parts of the DIY Hall Tree Bench were assembled I attached them together.
I used a countersink bit to drill holes alongside the bottom 2x2's of the hall tree top and inserted 3" wood screws to attach the top of the hall tree to the bottom bench. I then filled the screw holes with wood filler.
and WAAA-LAH, there you have it, a DIY Entryway Hall Tree Bench.
I wasn't able to record this build, but I do have video for a very similar hall tree I made months back. This design is slightly different, but a lot of it is the same. Check out the video for help.
Let's take another look at the new design.
I really love the way this different design came out and I can't wait to see you guys tackle it to.


DIY Modern Nightstand
"A simplistic modern nightstand perfect for the bedroom"
The more I get into building, the more I'm discovering how much I really love the modern look, so I thought why not add some modern flare to my guest bedroom with this DIY Modern Nightstand.
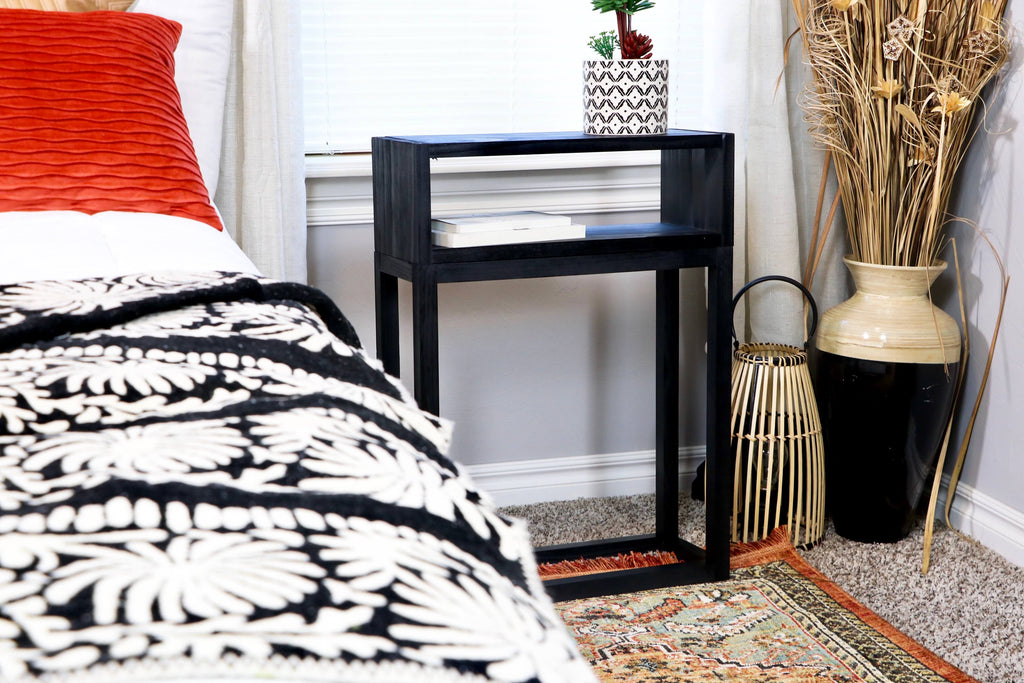 The best part about this build is that it only cost me around $25; now that sounds like a win win. With a few dowels and a pine board, I was able to whip up this nightstand in under an hour. If you're a beginner DIYer, this is the perfect project for you!
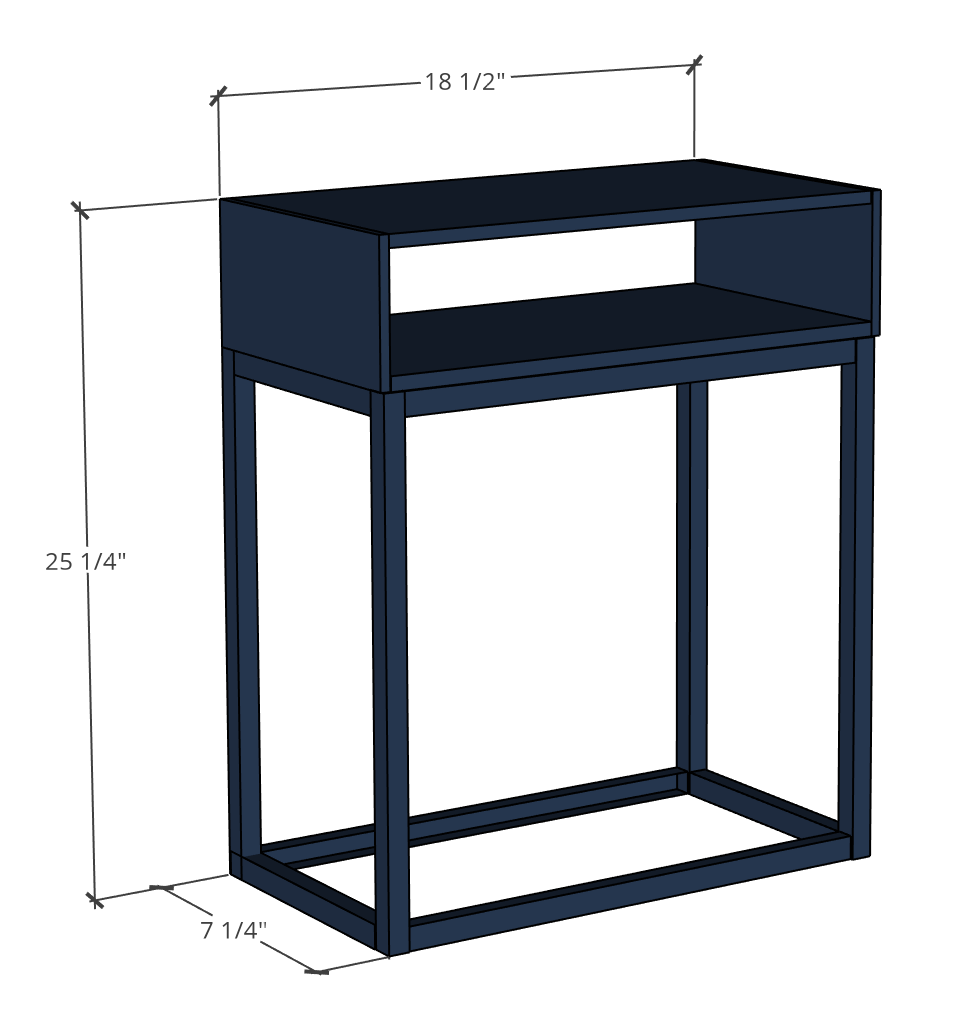
- 1 - 1x8x6
- 5 - 1" dowels
- 1 1/4" pocket hole screws
- Wood Glue
- 1 1/4" Brad Nails
Tools Used
Now let's get into it!
Step 1: Cut Wood to Size
Cut your wood down to size. Here is the cut list you'll need to build the modern nightstand.
- 4 - 1" dowels @ 19"
- 4 - 1" dowels @ 16 1/2"
- 4 - 1" dowels @ 5 1/4"
- 2 - 1x8s @ 17"
- 2 - 1x8s @ 6 1/4"
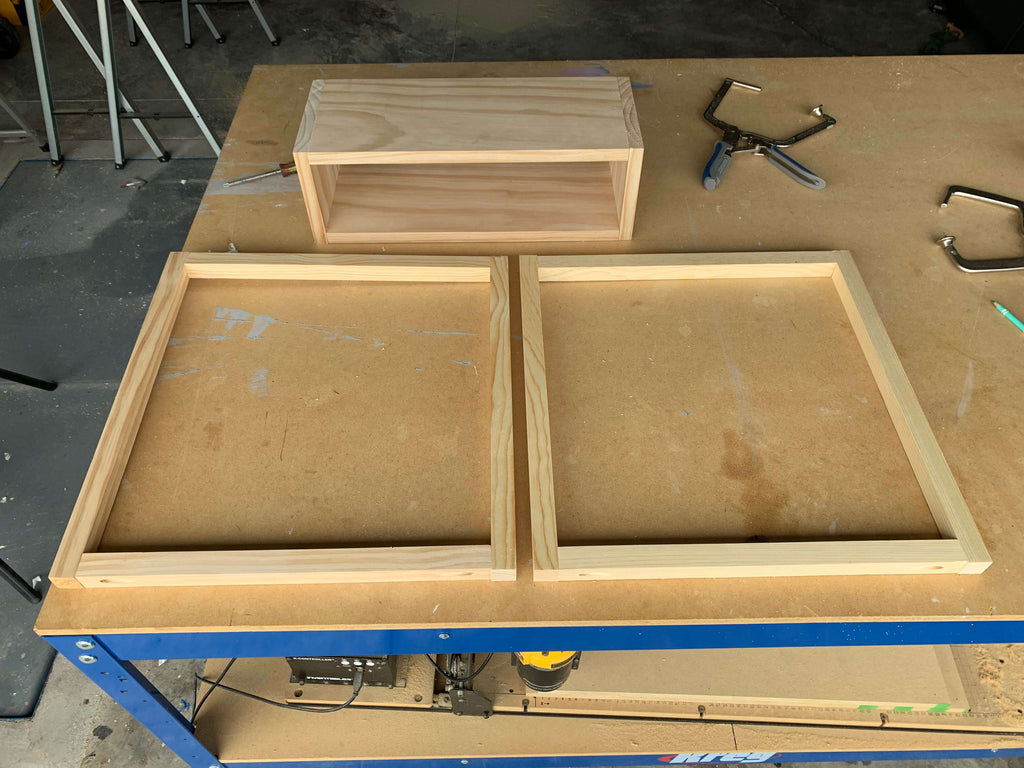
Step 2: Assemble the Modern Nightstand Top
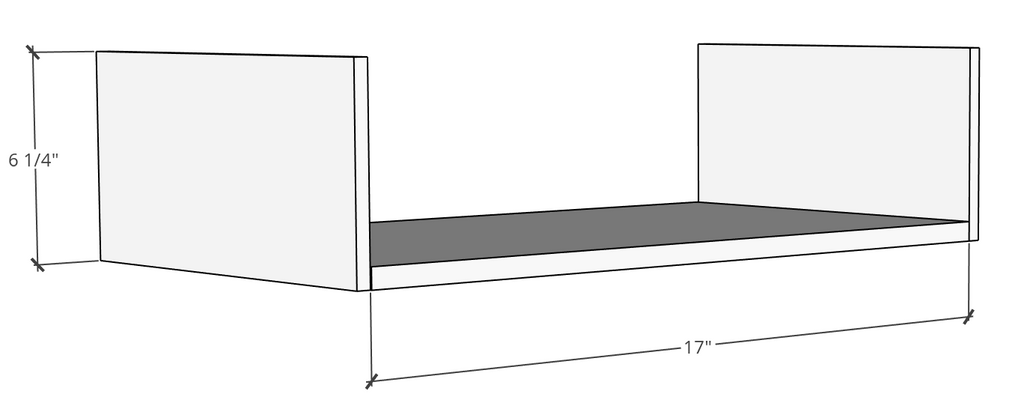
First attach the bottom (17") 1x8 board to the (6 1/4") board using a Kreg Jig K4 Pocket Hole System on a 3/4” setting, with 1 1/4" Pocket Hole Screws to attach along with wood glue.
Then attach the top (17") board. The pocket holes should be facing down when the nightstand top is sitting right side up.
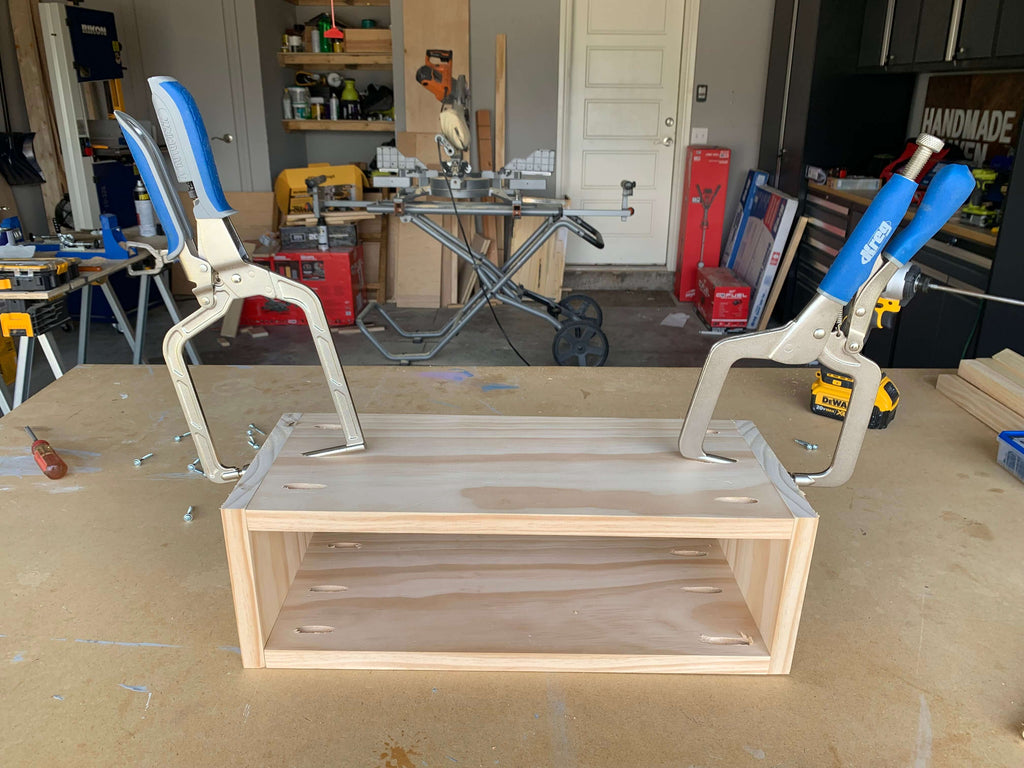 I used my Kreg Right Angle Clamps to help me keep the boards secure while I screwed in the pocket hole screws.
Step 3: Assemble Modern Nightstand Base
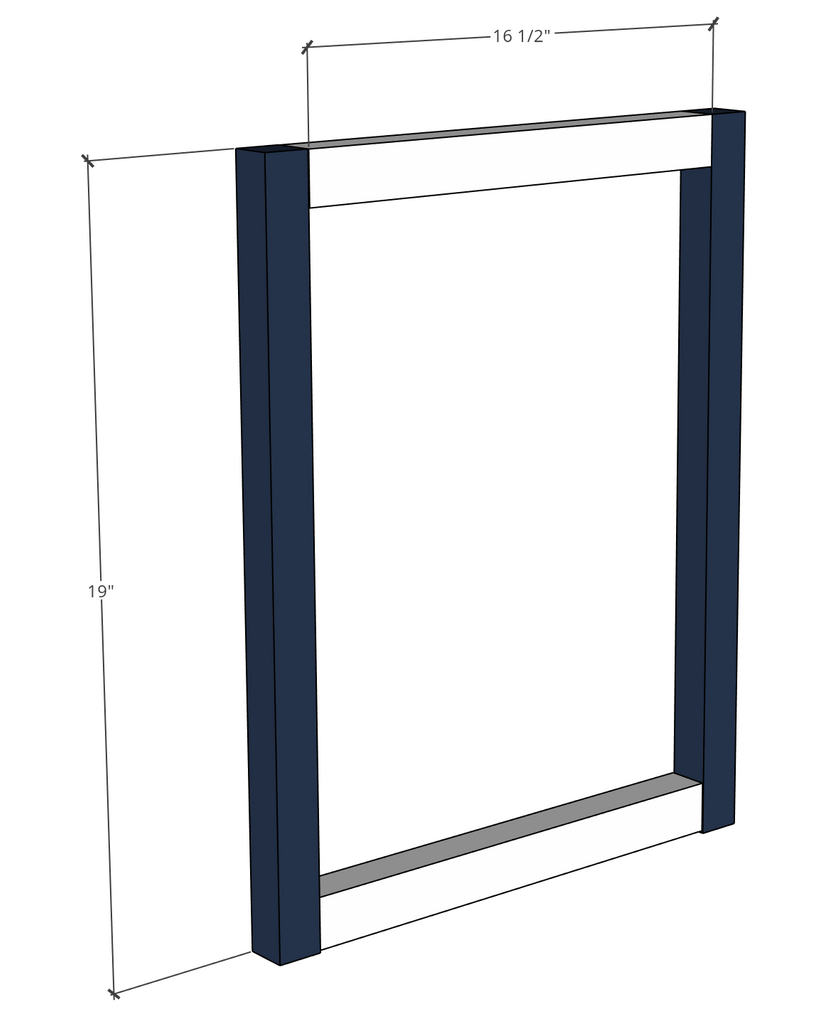
First build the front and back of the modern nightstand base using a Kreg Jig K4 Pocket Hole System on a 3/4” setting, with 1 1/4" Pocket Hole Screws to attach along with wood glue.
 The pocket holes on the bottom (16 1/2") dowel should be facing downward and the pocket holes on the top (16 1/2") dowel should be facing upward. You should now have two completed sides.
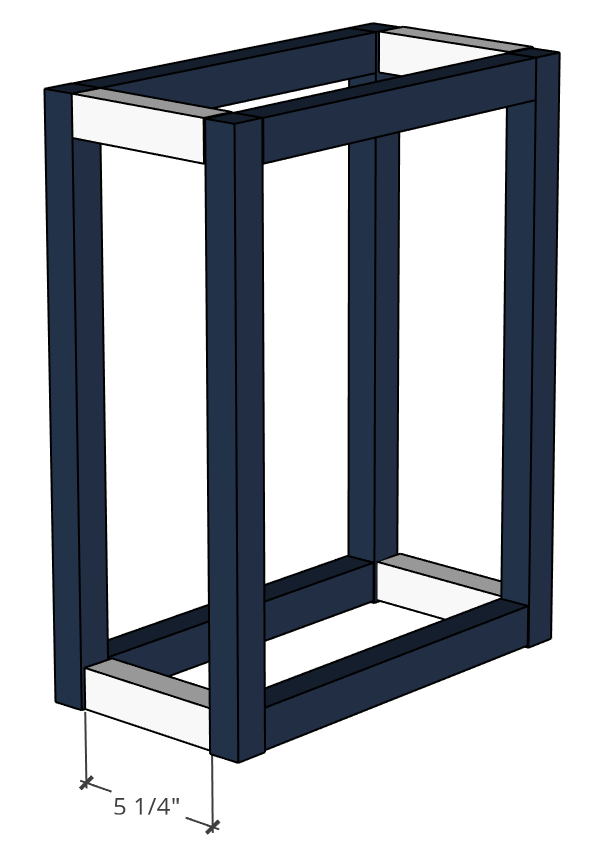
Next, attach the the (5 1/4") dowels to the two assembled sides using a Kreg Jig K4 Pocket Hole System on a 3/4” setting, with 1 1/4" Pocket Hole Screws to attach along with wood glue.
 After attaching the middle dowels, I attached the other side of the nightstand to the assembled base.
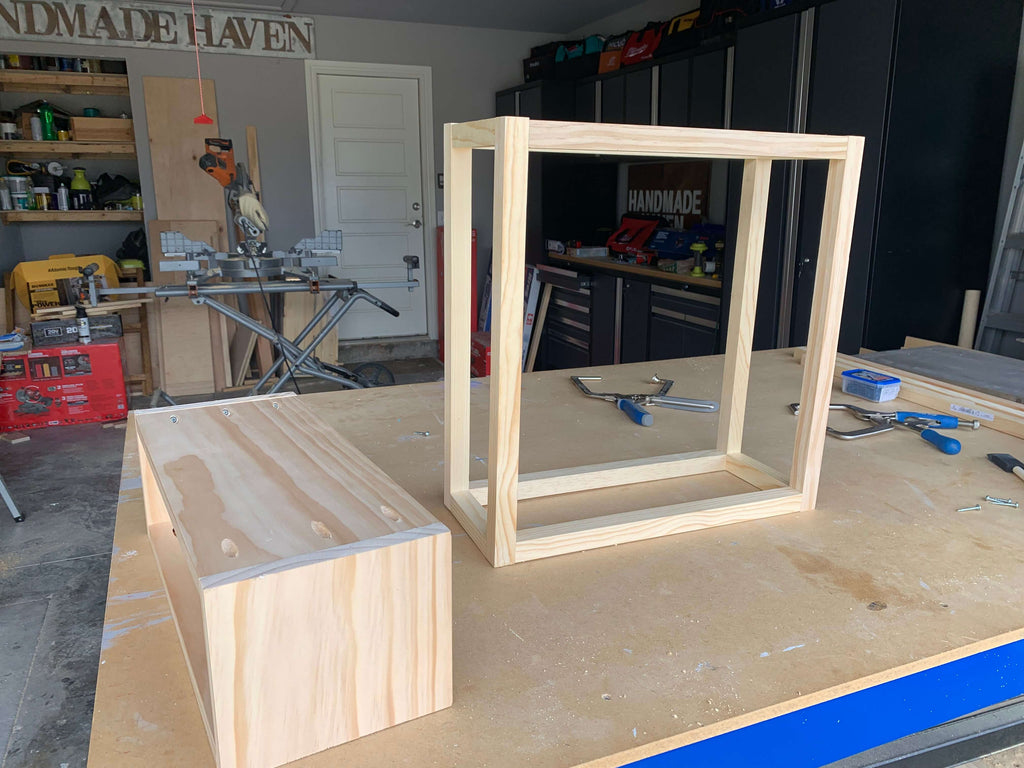
Step 4: Attach Modern Nightstand Top to Base
Now that the base and the nightstand top are all assembled, its time to attach the two. I used 1 1/4" Brad Nails to attach the two together.
and that's a wrap folks. An easy $25 DIY Modern Nighstand. Let's take another look at this beauty.
This was the perfect little addition to my guest room. Hopefully my guest will love it just as much as I do.
Thanks for reading guys! XOXO, Ashley

7 DIY Consoles
"Bring your entryway to life with one of these amazing DIY consoles"
DIY consoles are always ones of my favorite things to build. They are usually quick and easy projects but bring so much style to your home. I have come across 10 amazing DIY consoles that I am sure you will love to.
Double V Console

This Double V Console is giving me all of the farmhouse vibes. This console is perfect for an entryway hallway. The double v look is one your guest won't forget. Check out the free plans here to create your own Double V console.
Industrial Console Cart
 Looking for a console with an industrial feel? Check out this rustic Industrial Console Cart; an easy build you can knock out for a low price. The casters on this baby really makes it pop.
Rustic X Console

This Rustic X console is a quick and easy project that would make your entryway look great. With tons of room for storage, this is the perfect addition to your home.
DIY Modern Console Table
This Modern console table features a lovely design that will make your entryway pop. Check out the free plans here.
Ballard Designs Console Table

Anika from Anika's DIY Life knocked this DIY console out of the park. She built this Ballard Designs inspired DIY console table for a fraction of cost and I love the geometric feel of this console table. If you'd like to re-create this console, check out the tutorial here.
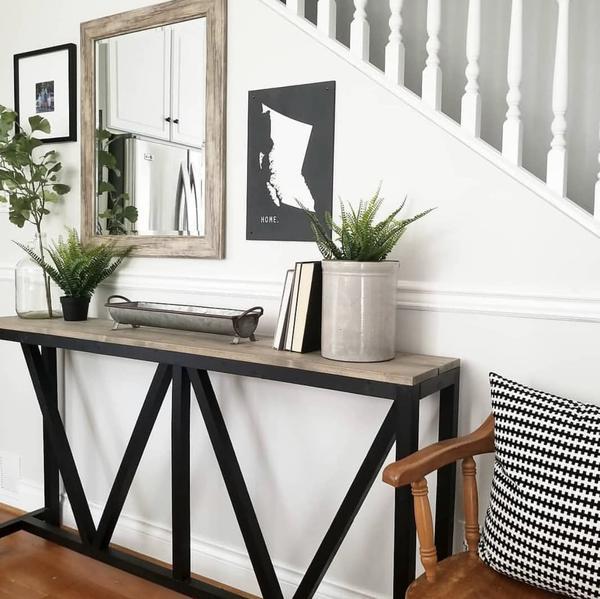
Modern Entry Table

Lindi and Russell transformed this Modern Entry Table for their entryway and I'm loving the black, sleek look. If you're not a builder, and do more repurposing, this is the project for you. Check out this console transformation here.
$20 Modern Farmhouse Console

Ana White always makes impressive furniture and this modern farmhouse console doesn't disappoint. The best part is that she made it with just $20. This is the perfect console to put behind your console.

DIY Ladder Bookcase
Need a fun portable ladder bookcase for the home? Look no more
Hey Guys! Today is going to be a fun day because I am sharing a fun, quick and easy project with you guys. A portable ladder bookcase. I know a lot of friends with apartments and a few friends in school who can benefit from furniture that's easy to move, so I figured why not create something for them.
"This post is sponsored by the Home Depot as a part of The Home Depot's Pro-Spective Campaign."

Trust me, you don't want to miss this one. The best part about this project is that it took me less than two hours to build. Thats right! The perfect weekend project to bring some style to your living room.

Now let's get to it!
Materiels
- 7 - 2x2x6
- 2 - 1x10x8
- Hinges
- Natural Stain
- Behr Paint - Matte Black
- 2 1/2" pocket hole screws
Cut List
- 4 - 2x2s @ 72"
- 10 - 2x2s @ 14 1/2"
- 4 - 1x10s @ 27"
Tools Used
Check out my build video on how I built this ladder bookcase before reading through the detailed steps.
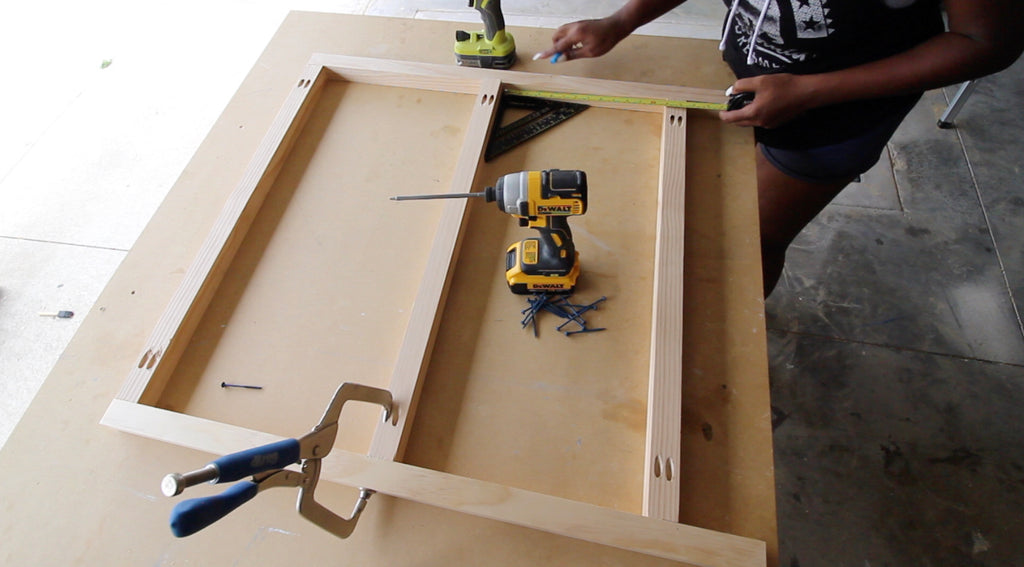
Step 1: Building the Ladders
The first step for this project is creating the two ladders of the bookcase. I began attaching the five (14 1/2") 2x2s to the longer (72") 2x2s using using a Kreg Jig on a 1 1/2" setting.

I attached the 2x2s using 2 1/2" pocket hole screws to attach along with wood glue. I also used my two Kreg Right Angle Clamps to assist with the ladder assembly.
To make sure my 2x2s were lined up correctly, I used my Milwaukee 25 ft. Premium measuring tape. I really love the finger stop tape retraction that you can control with your fingers, a nice finger saver.

The magnetic tip on the Milwaukee measuring tape features up to 9ft. of tape standout with nylon bond blade protection and easily holds to steel studs and EMT.
Here are the measurements for the two ladders.

I used my Dewalt driver to drive in all of the pocket holes. It did great with the joinery process.

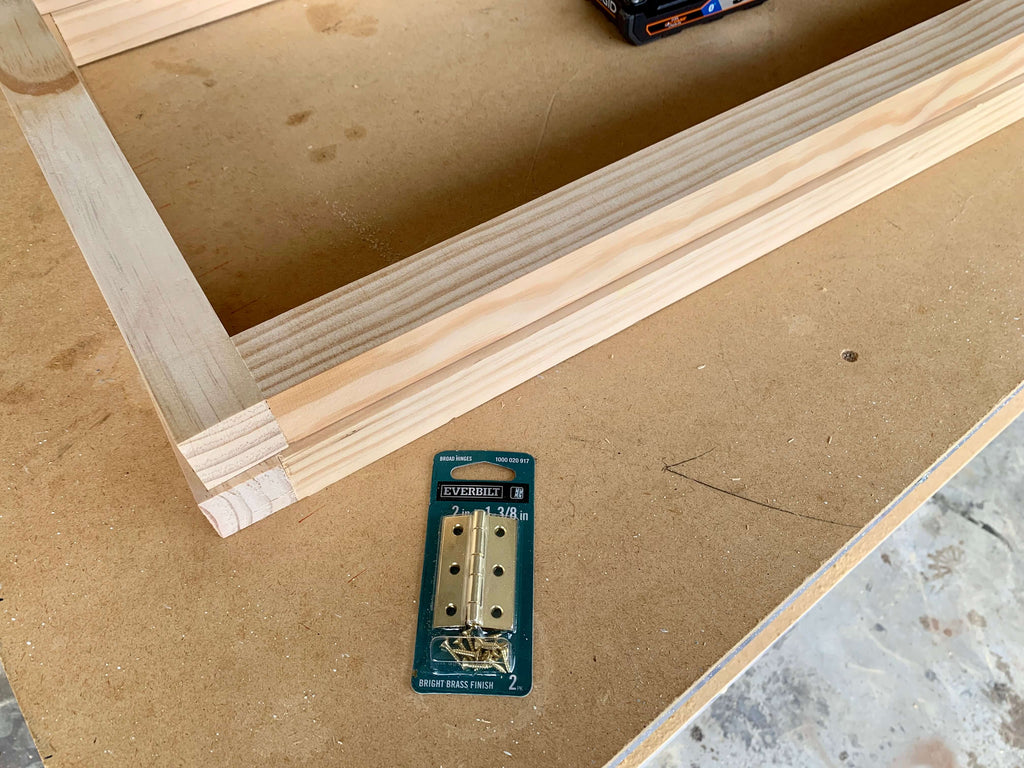
Step 2: Attach Hinges
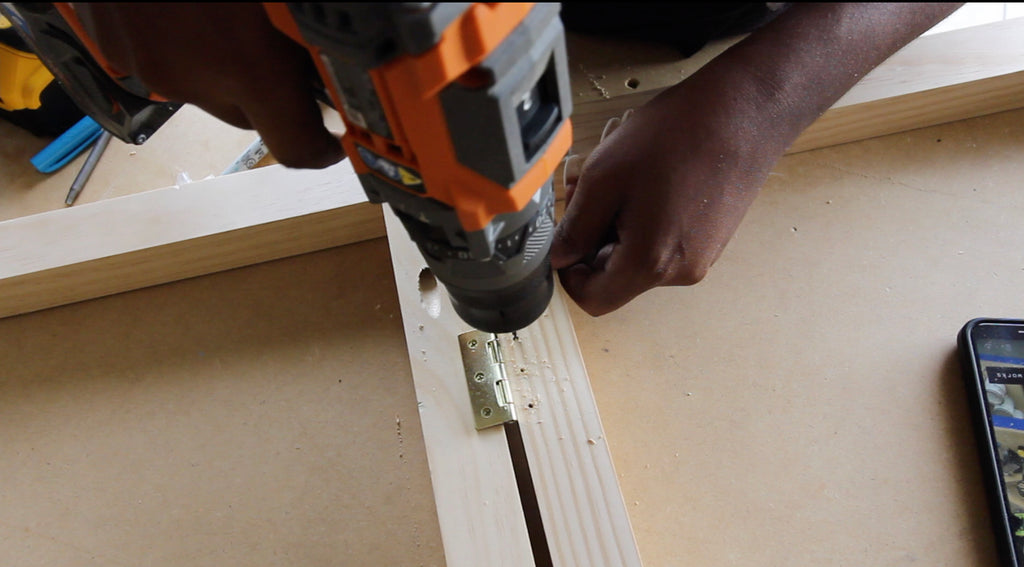
After the ladders were assembled, I began attaching the hinges I am using three Everbilt Black Hinges for this project. I first, used my drill to drill in pilot holes where the hinges will be attached.
These pilot holes will make it a lot easier to screw in the screws for the hinges. 
To screw in the screws for the hinges, I am using my Dremel 4V GO Screwdriver. It is a Push and Go screwdriver that starts with a simple push, making overhead applications simple.

For a little tool, the Dremel 4V GO features superior torque, with 360 RPM to drive screws 2x faster than comparable products. It also features overdrive protection to help prevent damaging surfaces and stripping holes.
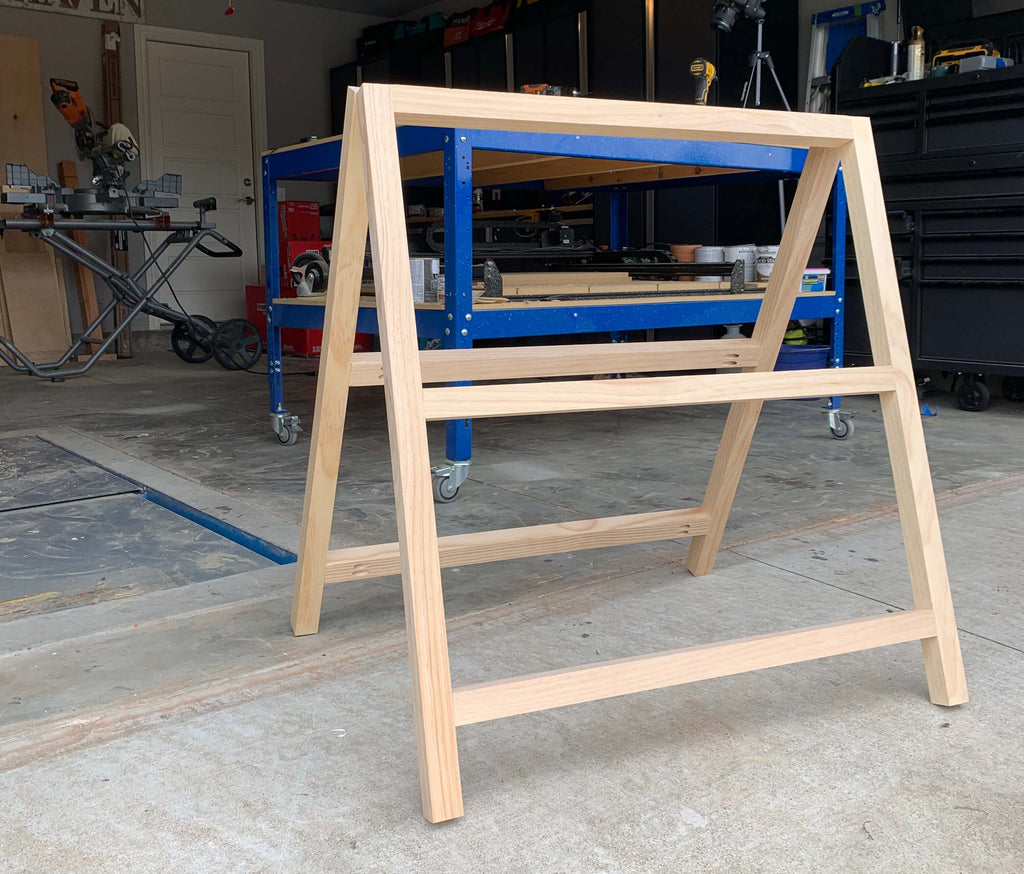
Once the three hinges are attached, the two ladders are now foldable.
Step 3: Add in the Shelving
Now this was probably the easiest step in the process, adding the shelves. I used two 1x10s and cut them down to four shelves using my miter Saw . I cut the shelves down to 27".
 and WAA-LAH! Project Finished.
 This project would be perfect for any renters or people who are looking for portable furniture. It's an easy project you can knock out in a weekend and doesn't take a whole lot of skills to knock out.


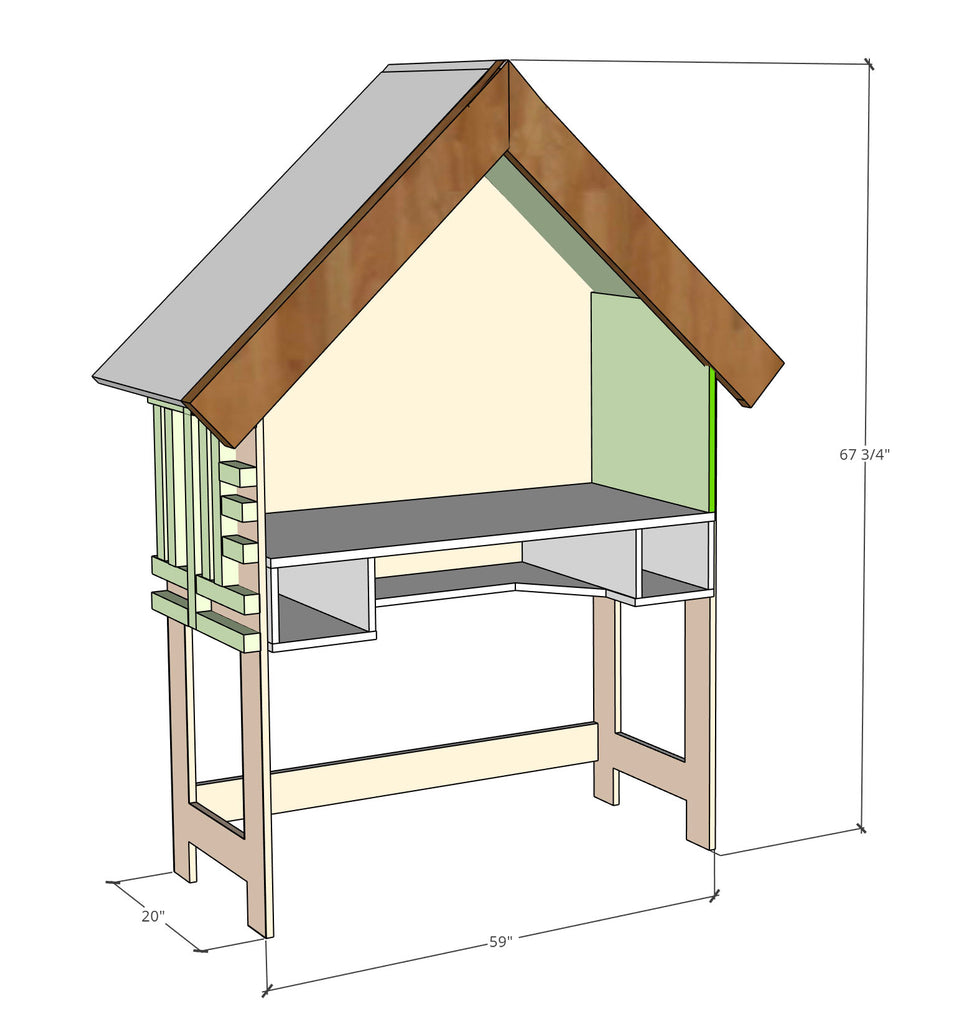
DIY House Frame Kid's Desk
"A modern kid's desk with a house frame all your kids will love."
Normally, I get excited when I get to share a new project with you guys, but I am completely in love with this project. Today, Im giving you guys the 411 on how I built this DIY House Frame Kid's Desk.
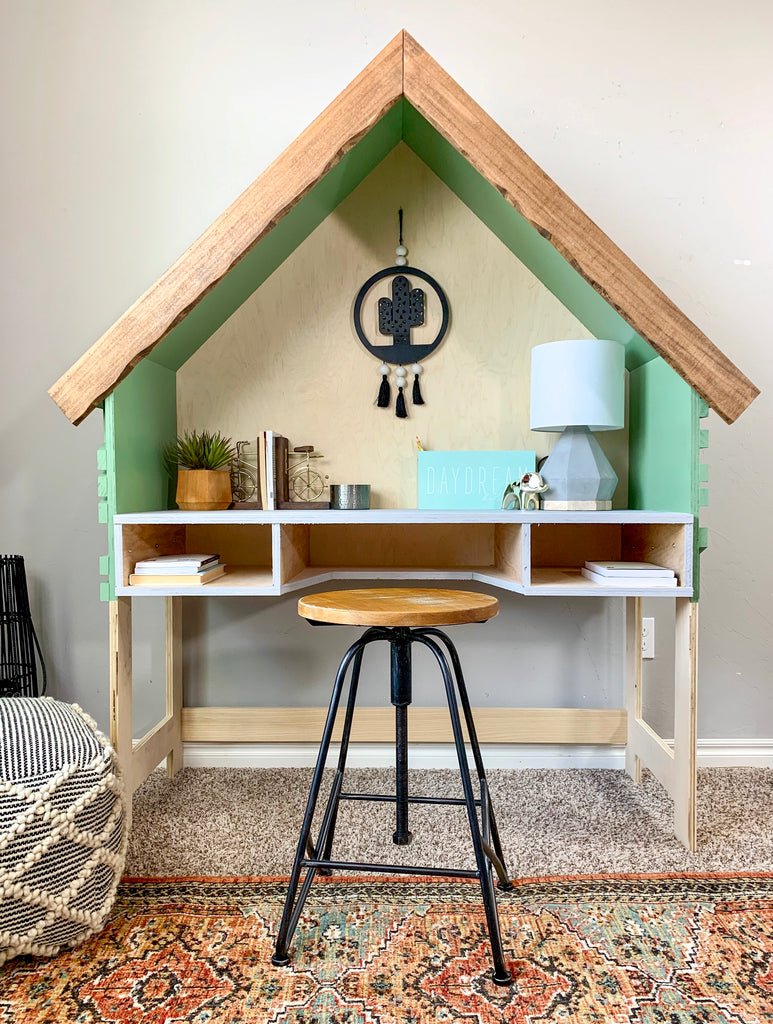
With school back in session for the kiddos, I figured I would make something to inspire the kids to want to tackle their homework. I mean if I had this desk when I was a kid, I may have been way more motivated to get some things done.
I must say, after this build, I surely wish I was a kid again. I was looking on Pinterest one day and came across a similar desk and instantly knew I had to recreate it.
"There are some affiliate links in this post, meaning I get a small commission if you purchase through these links, at no cost to you. Click Here to read my full disclosure."
Now let's get to it!
Dimensions
| Materiels |
| 2 - 3/4" sheet of plywood |
| 2 - 1x4x8 board (poplar) |
| 7 - 1x2x6 board (select pine) |
| Behr Ultra- Laurel Tre |
| Chalk Paint - Parisian Grey |
| Frog Tape |
| Wood Glue |
| Wood Filler |
| 1 1/4" Pocket Hole Screws |
| 1 1/4" screws |
| Brad Nails |
| Varathane Stain - Special Walnut |
*See Detailed Printable Plans for Cut List and Measurements*
| Tools Used |
| Paint Sprayer |
| Drill/Driverl |
| Circular saw |
| Miter Saw |
| Kreg Right Angle Clamp |
| Kreg Clamp |
| Kreg Jig K4 |
| Kreg Jig R3 |
| Kreg 90 Degree Corner Clamp |
| Jigsaw |
| Sander |
| Brad Nailer |
I know that some people are more visual learners, so luckily, I got my process of building this House Frame Kid's Desk on camera.
Check out the video above before reading through the step by step tutorial.
Step 1: Cut out House Frame Backing
The first thing I did for the House Frame Kid's Desk was cutting out the house shaped backing. I cut a piece of 3/4" plywood into a house shape using my rear handle circular saw.
Want to no more? Check out my full tool review for this saw here.
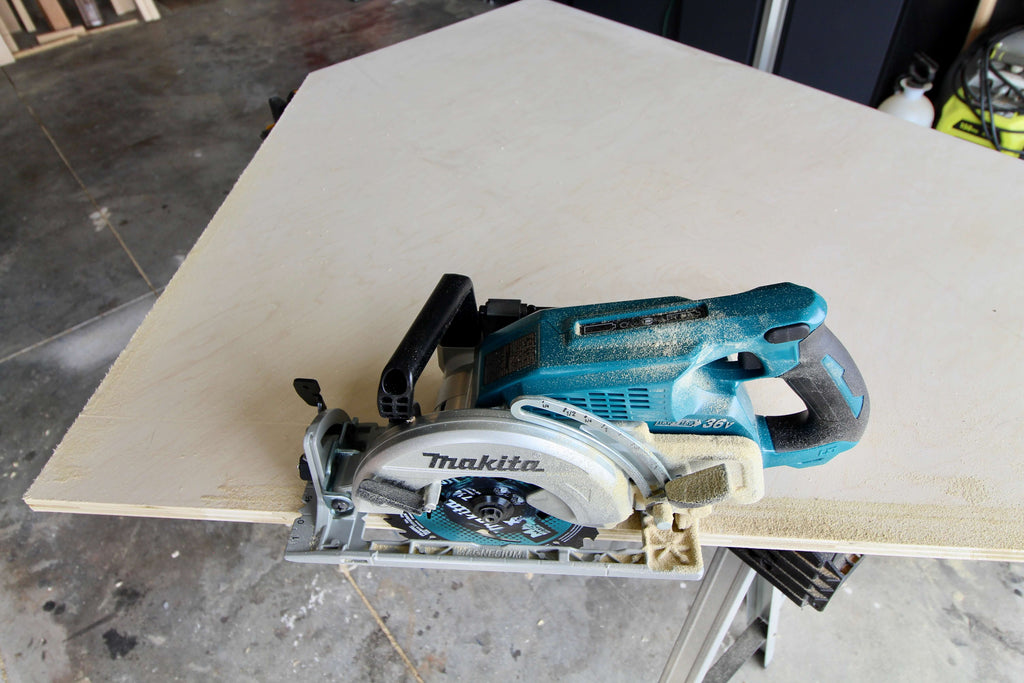
This step was fairly simple because I had the back piece of the house shape kids desk pre-cut when I purchased my plywood.
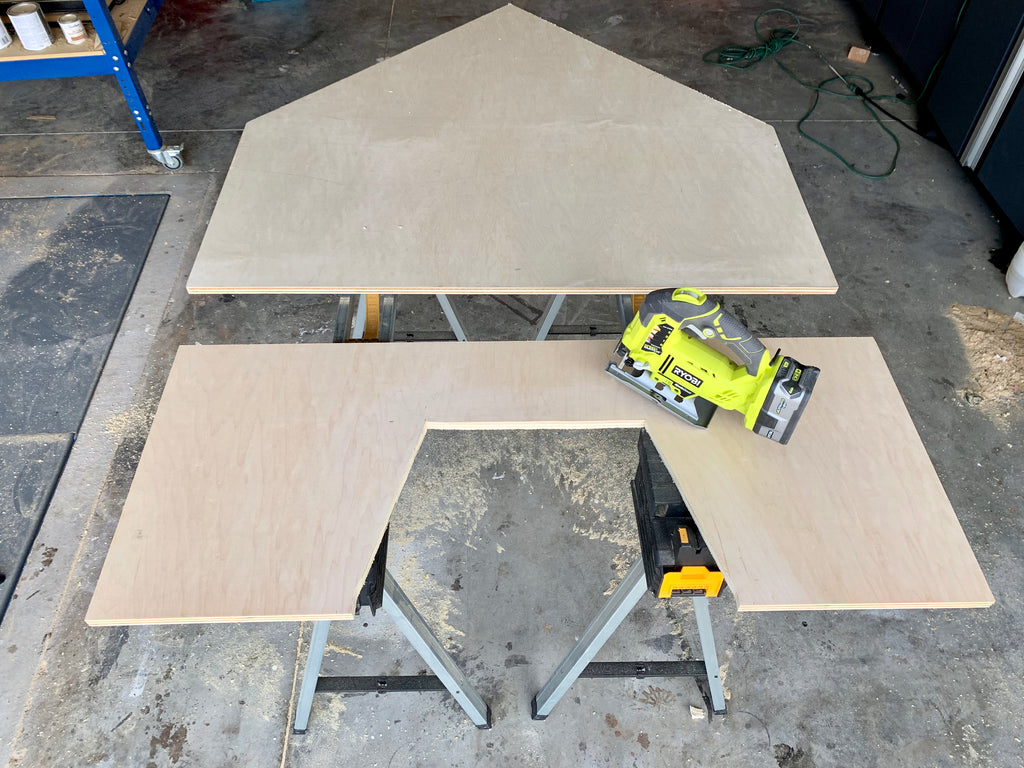
Step 2: Assemble Desk
With the House shape backing cut out, I began to build the desk off of the it. First, I took the bottom plywood sheet for the desk and begin cutting out the U shape with my jigsaw.
Once I cut out the U shape, I used my Kreg Jig on a 3/4” setting to drill pocket holes into the bottom of the desk shelf and attached it to the house shape piece using 1 1/4" Pocket Hole Screws.
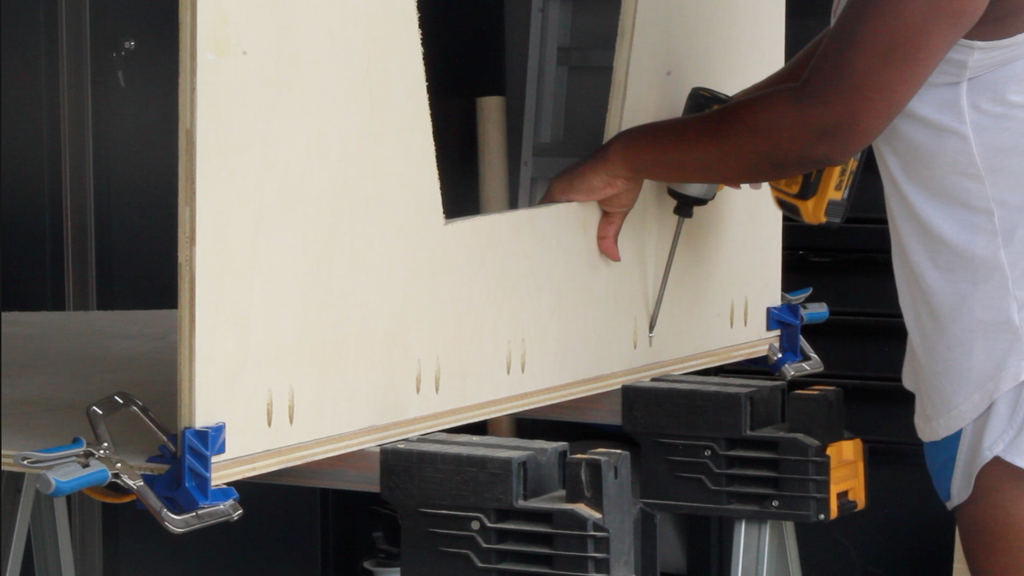
I used my Kreg 90 Degree Corner Clamp to hold the board into place while I screws the board down. These clamps really come in handy when you're building by yourself.
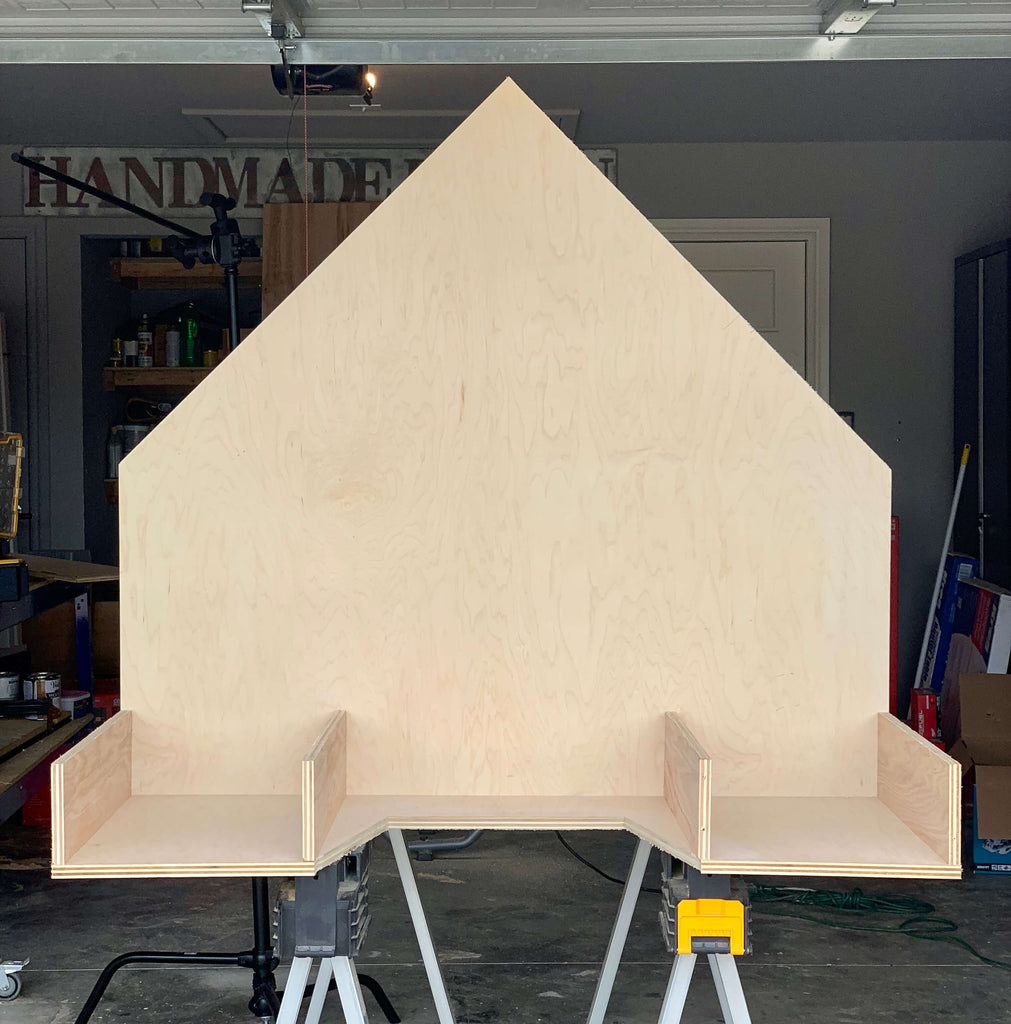
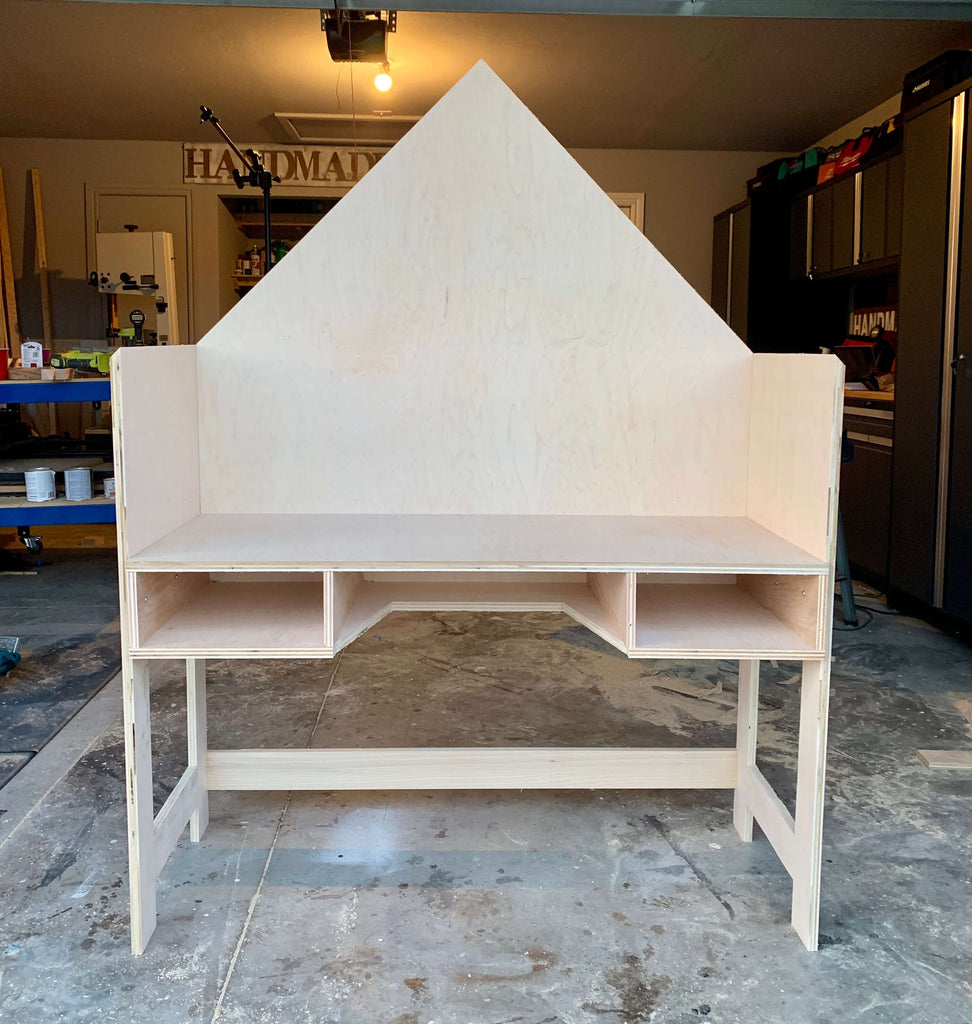
Now your house frame should look a little something like this:

Next, I begin attaching the inner pieces to make the desk openings. I used my Kreg 90 Degree Corner Clamps to secure the front and my Kreg Right Angle Clamp to secure the pieces to the back of the House Frame.
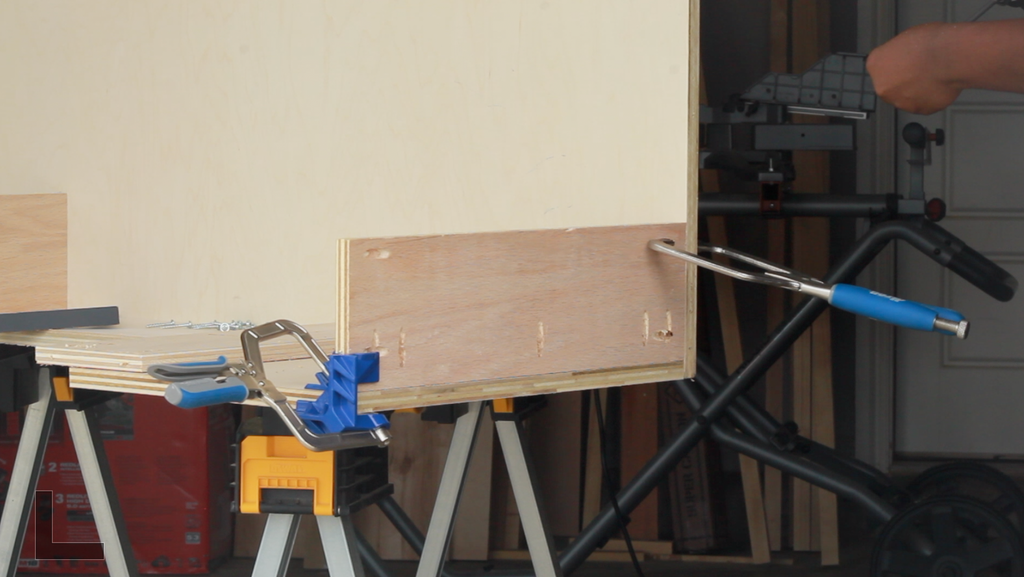
I used my Kreg Jig on a 3/4” setting using 1 1/4" Pocket Hole Screws to secure the pieces down. Now my house frame is starting to take shape.
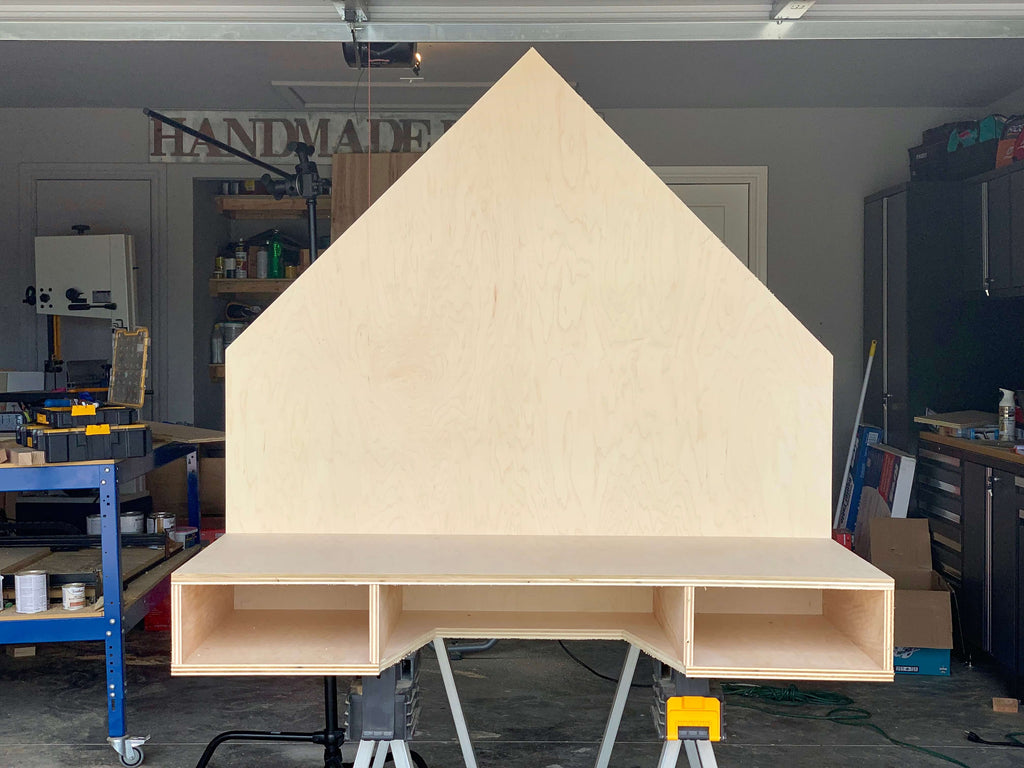
Now the last step to finish the desk portion of this build is adding the top of the desk. I pre-drilled pocket holes under the bottom of the top piece to be able to secure it to the house shaped backing and I secured the sides down using pocket holes on the two sides.
 Again, I am using my Kreg Jig
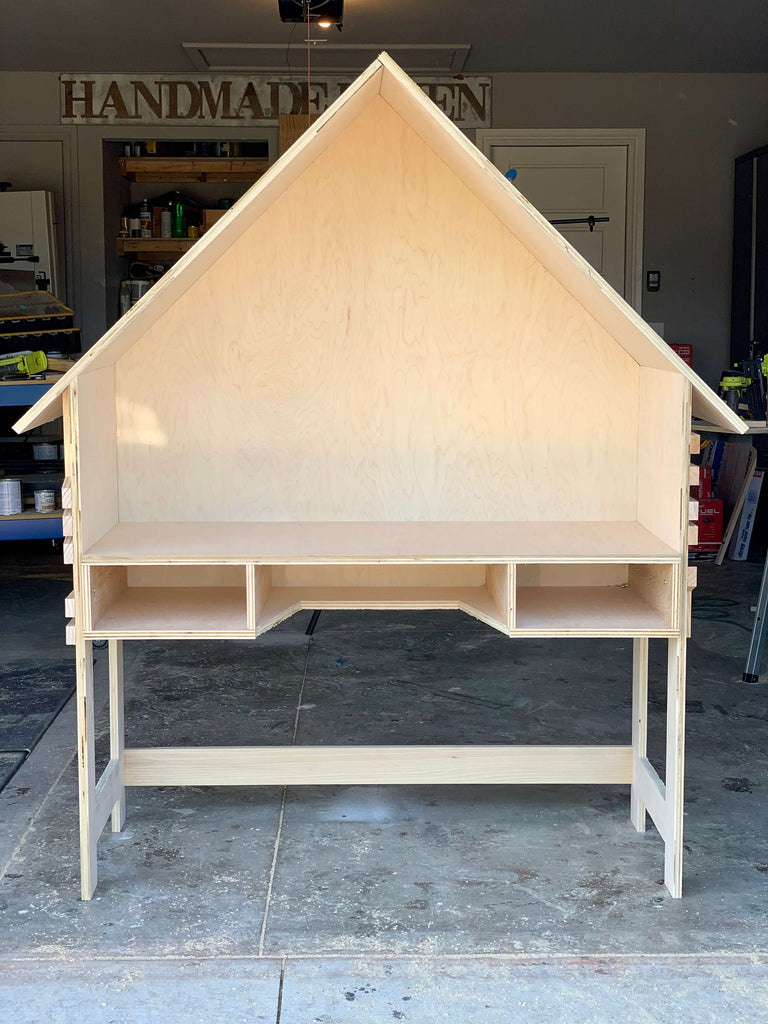
 on a 3/4” setting using 1 1/4" Pocket Hole Screws. Now the desk portion of the DIY House Frame Kid's Desk is complete.
Man this is starting to look so good. Is it just me or does the back of this project look like home base? No? Just me? Ok...moving on!
Step 3: Assembling the Sides and Base
I first started making the cutouts on the sides of the kid's desk using my jigsaw. First I cutout the bottom part of the desk sides and then the inside rectangle.

To cut the inside of the side pieces, I first used a drill to drill holes in the center of the square I was cutting out and then used my jigsaw to make the cutout.
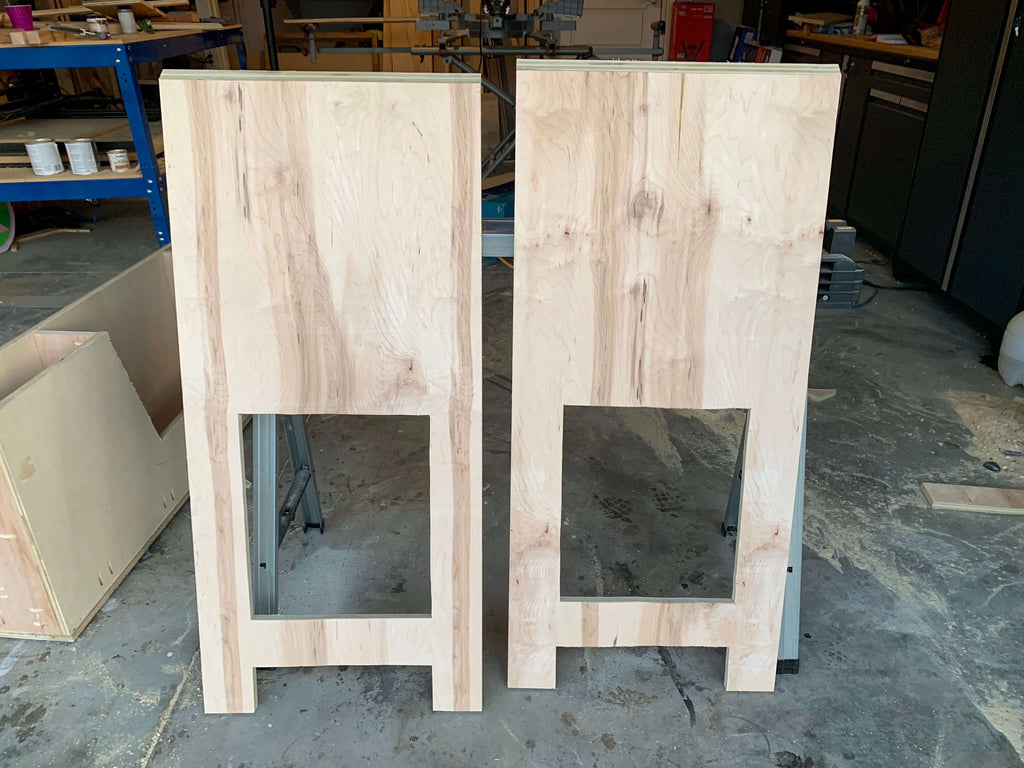
You should have two side pieces with the same exact cutouts. I then used my circular saw to cut the top of the side pieces at 45 degrees. This is an important step, to ensure that the top of the house frame desk will sit evenly.
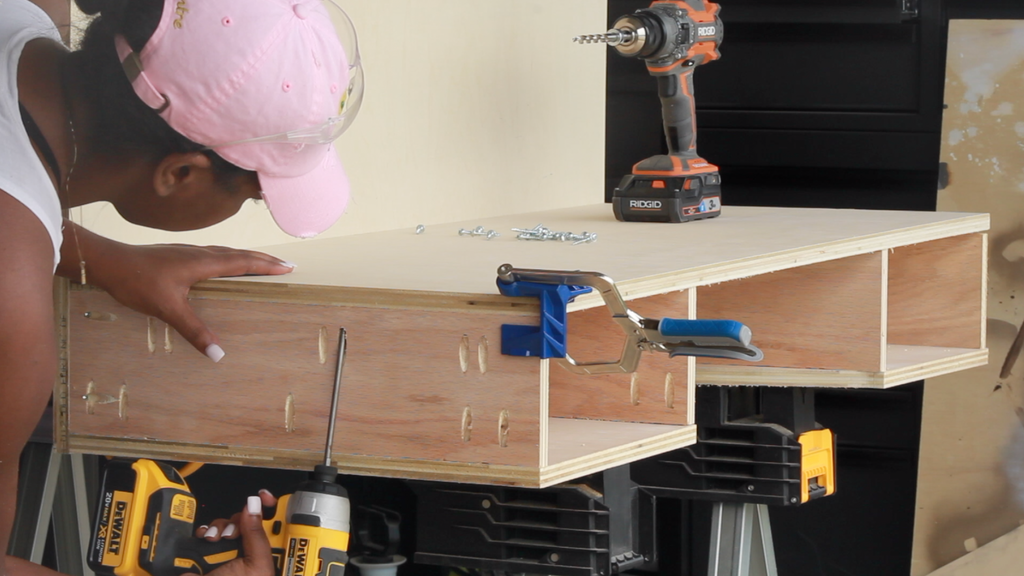
Next, you're going to attach the sides to the assembled house frame desk using pre-drilled pocket holes.
 I used my drill to secure the sides down into place and then drilled in screws through the desk opening to attach the front side of the side piece to the house frame. I did this for both sides and then added a stretcher piece at the bottom for support.
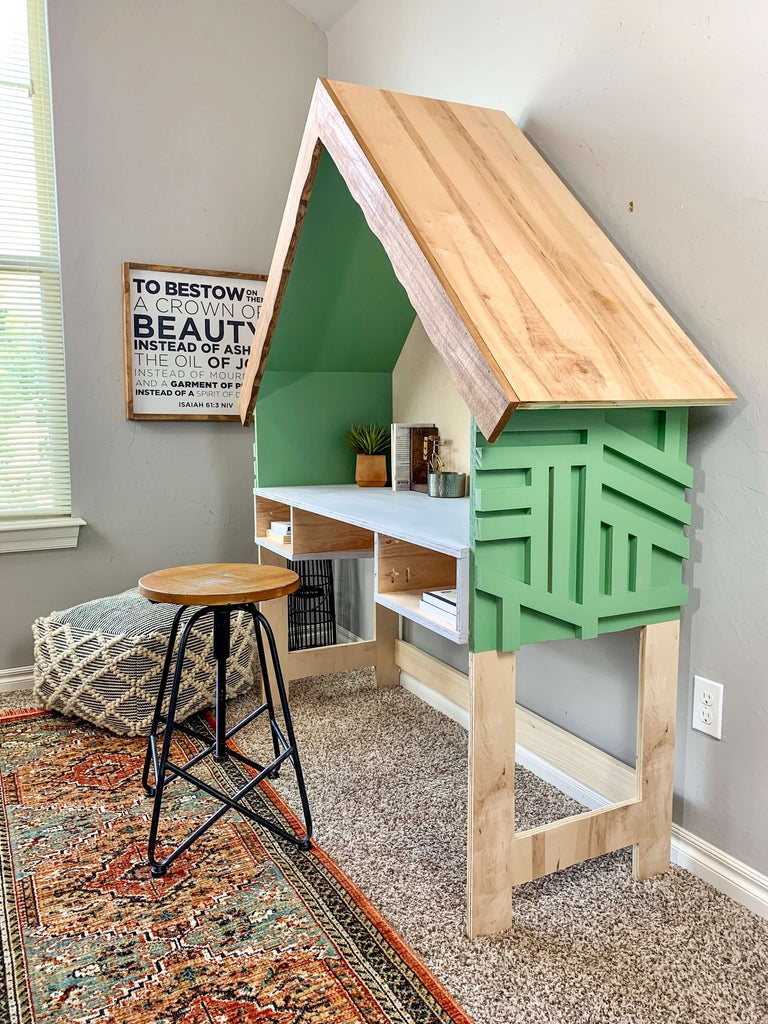
Step 4: Add Decorative Trim
I was loving how the desk was starting to look but I wanted to add something a little extra, so I decided to add some decorative trim to the sides and I'm so glad I did.
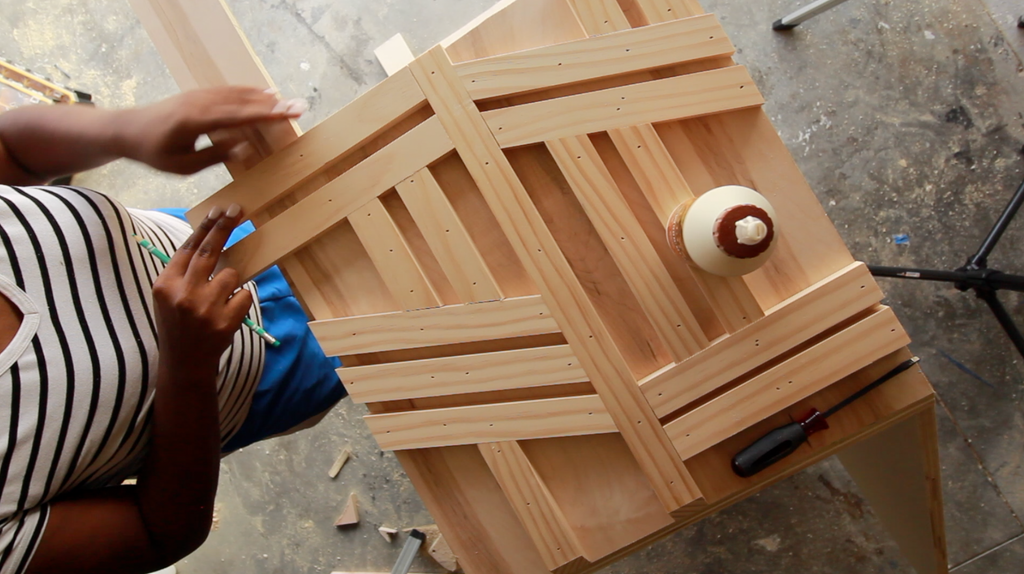
I didn't really have a particular style, I just kind of designed it by what looked good. All of my angles were cut at 22.5 degrees. I measured each trim piece against the desk and cut. I secured the trim down with wood Glue and nailed it down into place with my brad Nailer and 1 1/4" brad nails.
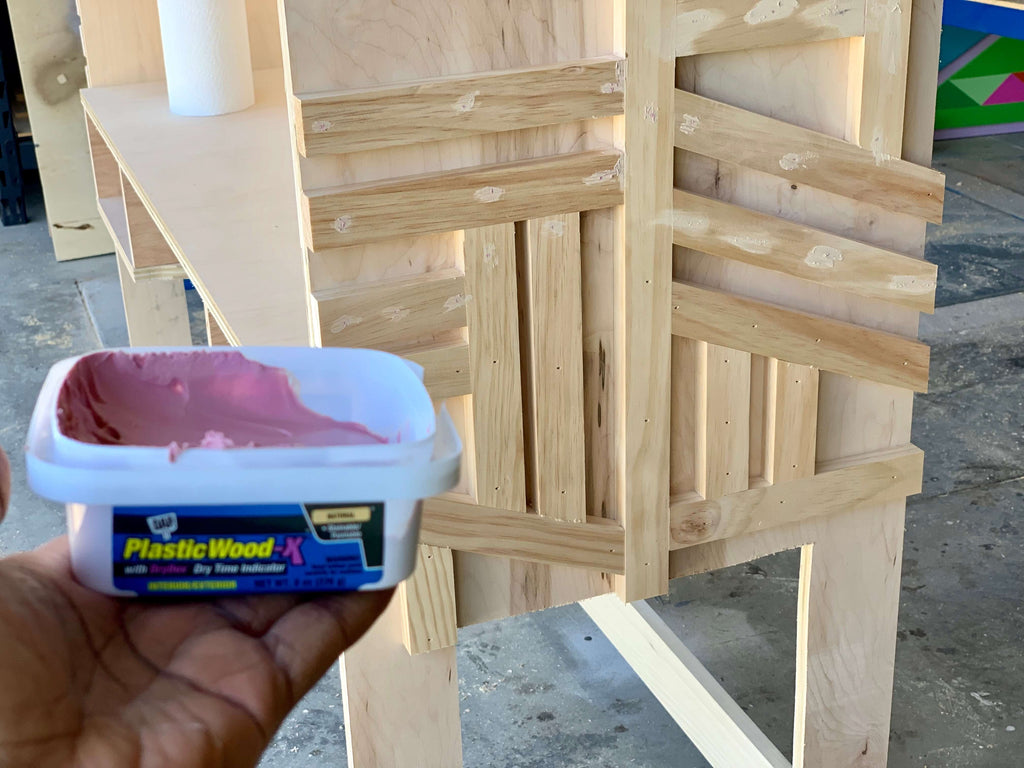 Once the trim was in place, I used my wood filler to fill in the nail holes to have it prepped for painting.
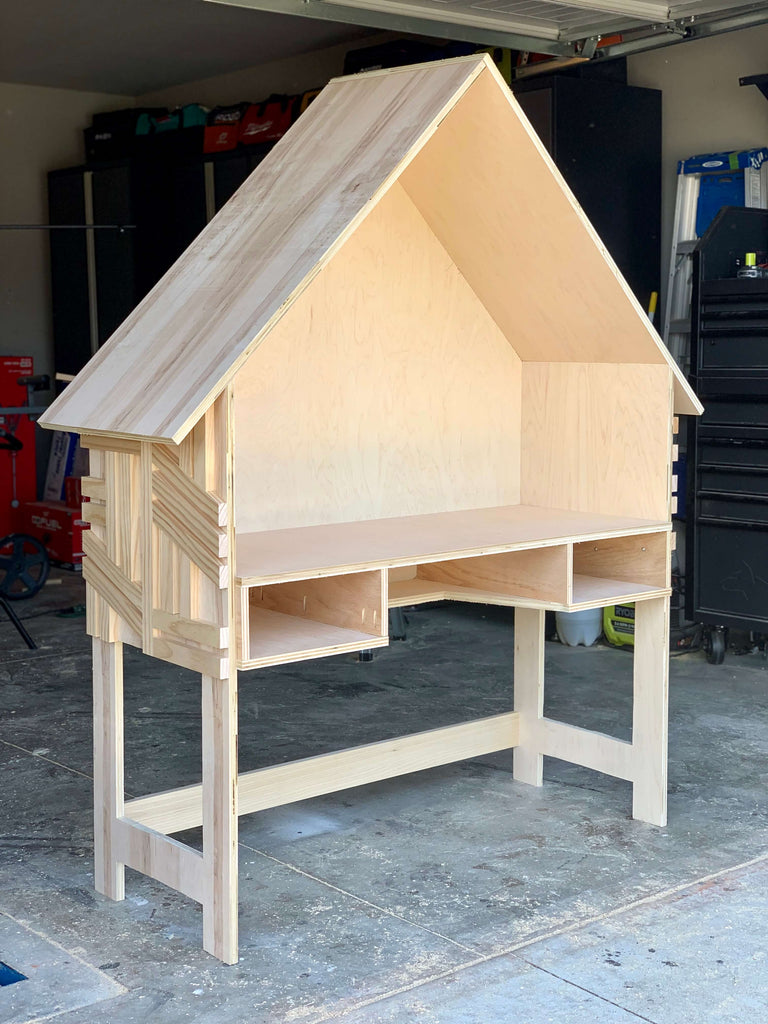
Although the desk looks so good in the natural, I couldn't let it stay like this. But here's one more photo before we get to painting!
Step 5: Painting the House Frame Desk
Before assembling the rest of the desk, I decided to go ahead and paint the desk to make it a lot easier. First I taped off the desk using frog tape and some plastic. I decided to use Behr Ultra - Laurel Tree for the outer part of the house frame desk and Chalk Paint - Parisian Grey for the desk portion.
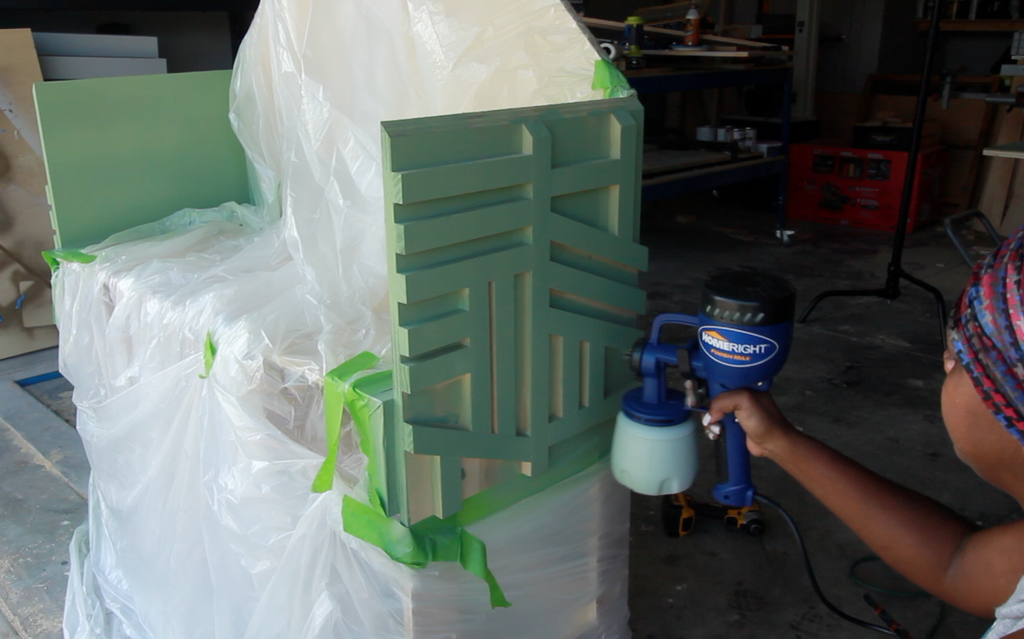
I decided to use my paint sprayer for the outer portion of the house frame because I knew it would be difficult to get in between the decorative trim spaces, and I'm so glad I did.
After the green was done drying I painted the desk using a paint brush.
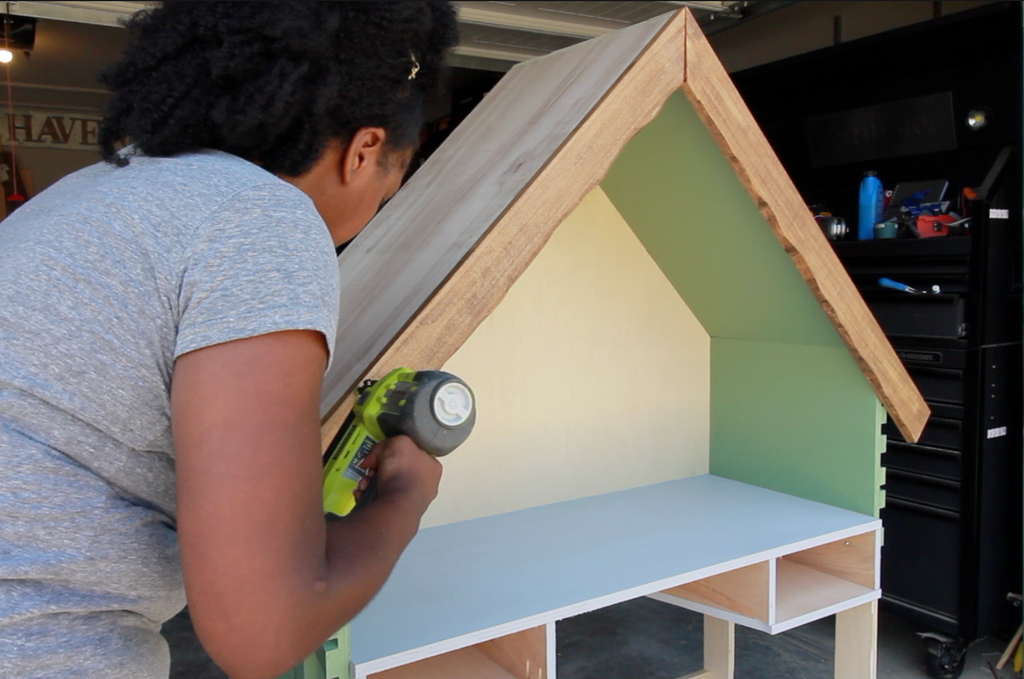
Step 6: Adding the House Frame Top and Trim
With the house frame desk all painted, it was time to add the top pieces. Using pre-drilled pocket holes, I attached the top boards to the the house frame. I secured it down to the back and then used my brad nailer to nail down through the desk sides.
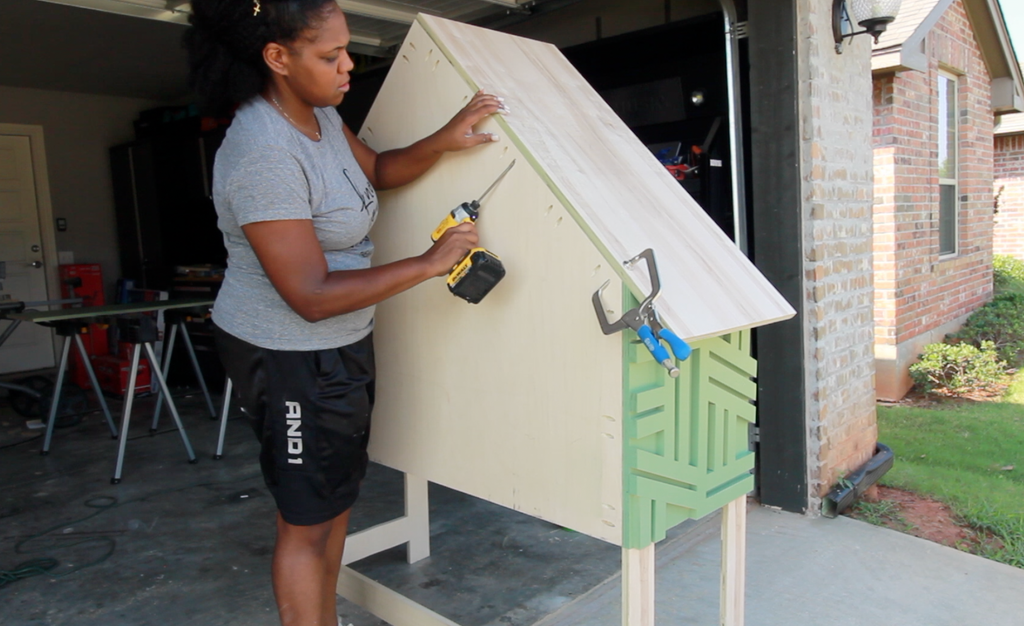
Once both sides were secure, it was time for the last piece of the project; the front trim.
I wanted to make the front a little decorative so I decided to create my own faux live edge board. Live edge can be expensive so I decided to create my own.

First, I began by marking a pattern that I could cut out. I just made a loose wave pattern. It doesn't have to be anything fancy. Then I but my Jigsaw on a 30 degree bevel and began cutting on the line.
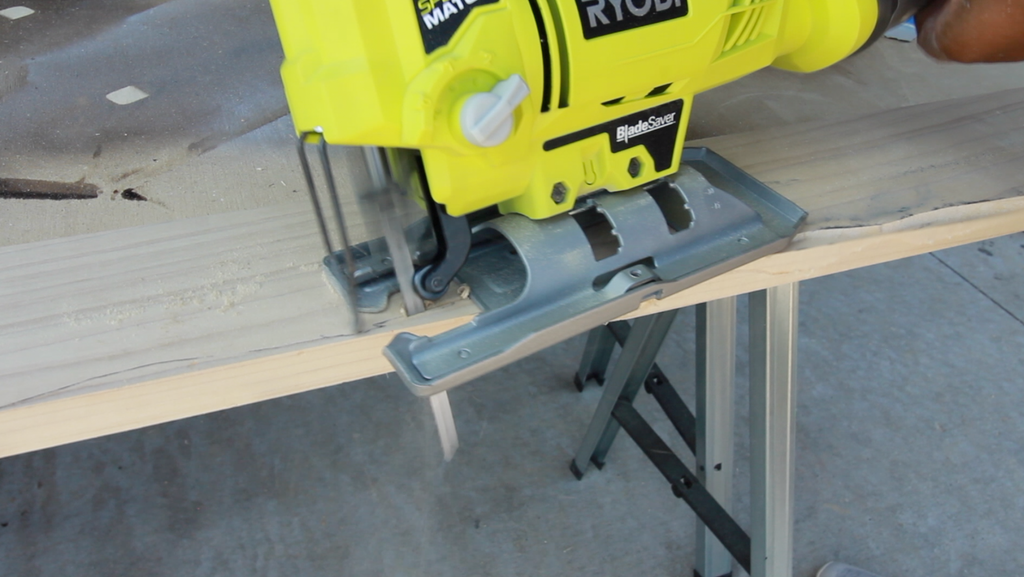
I think this tenchique is so cool, and it really gives the board that live edge look. Once the boards were all cut out, I stained them with special walnut and then attached them to the house frame using my brad nailer and brad nails.
 and that's a wrap folks! I was able to knock this build out in two days and I know the kids are gonna love it!
Now let's take another look at this DIY House Frame Kid's Desk.
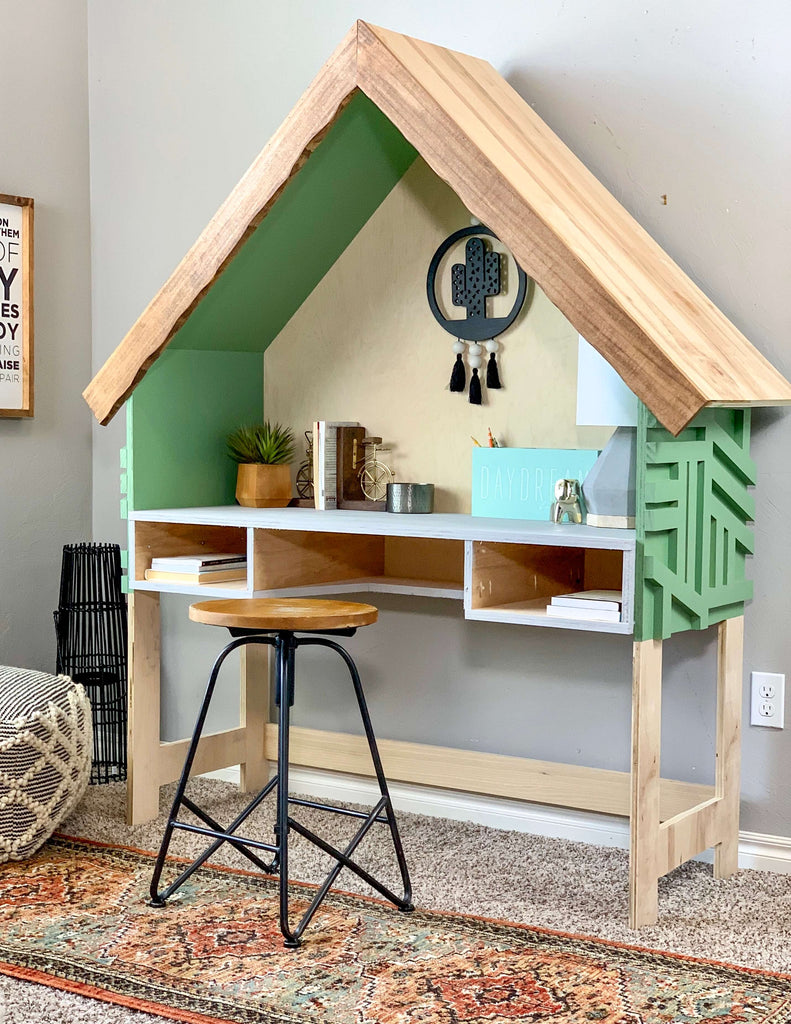
I couldn't be more satisfied with how this kids desk came out and I can't wait to see you guys try it for yourselves.
 This project is the perfect mix of work and play. Get your kids motivated about their school work with this cool House Frame Kid's Desk.

Thanks for reading guys, XOXO Ashley

10 Farmhouse Woodworking Plans
"Giving you all things Farmhouse"
I think it's safe to say that the farmhouse style is steady booming, so I'd figure I'd give you guys a round up of some amazing farmhouse woodworking plans. Why buy it? When you can build it?
These ten woodworking plans will have you farmhouse ready! Whether a beginner builder or experienced. These plans are sure to blow you away. Now let's get into it.
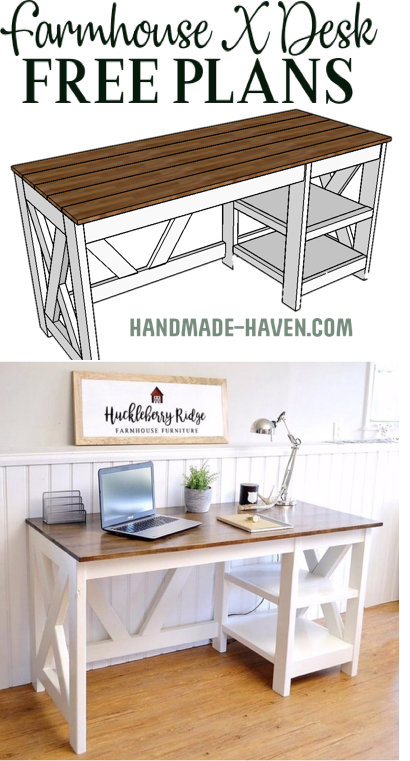
Farmhouse X Desk
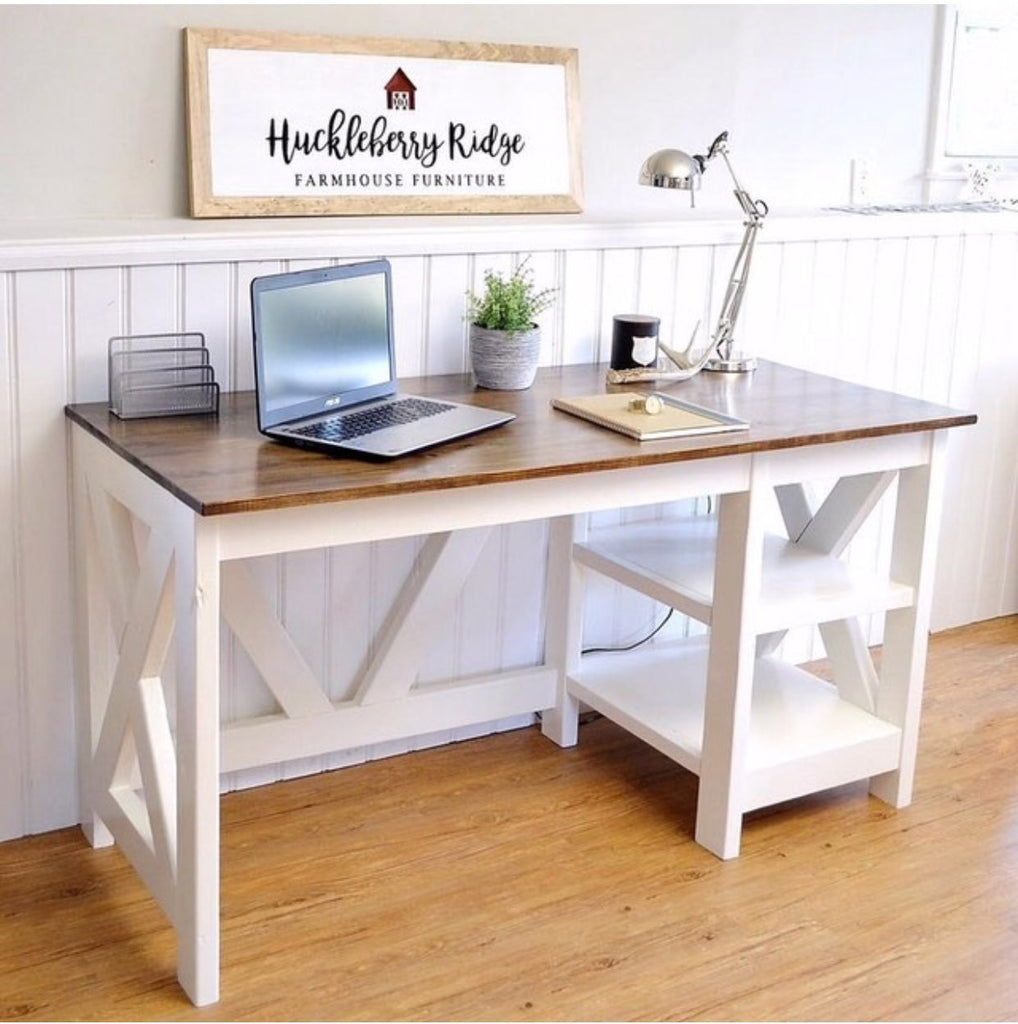
If you're in need of an office desk with a farmhouse feel, this Farmhouse X Desk just may be the build for you. The X trend has been everywhere and it didn't disappoint with this Farmhouse X Desk. Check out the free plans here.
DIY Plate Rack
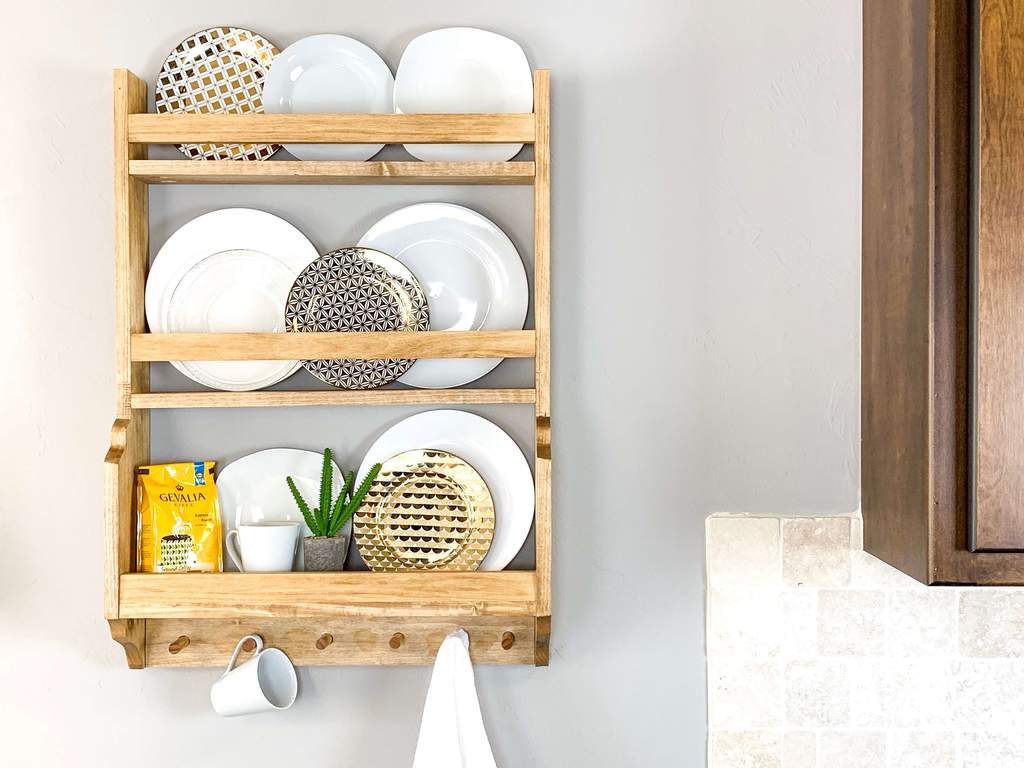
This DIY Plate rack is a great way to display those fancy dishes. If you want to bring a farmhouse touch to your kitchen. Check out the tutorial here on how to re-create this Plate Rack. A fun day project for any DIY-er.
French Farmhouse Dining Table
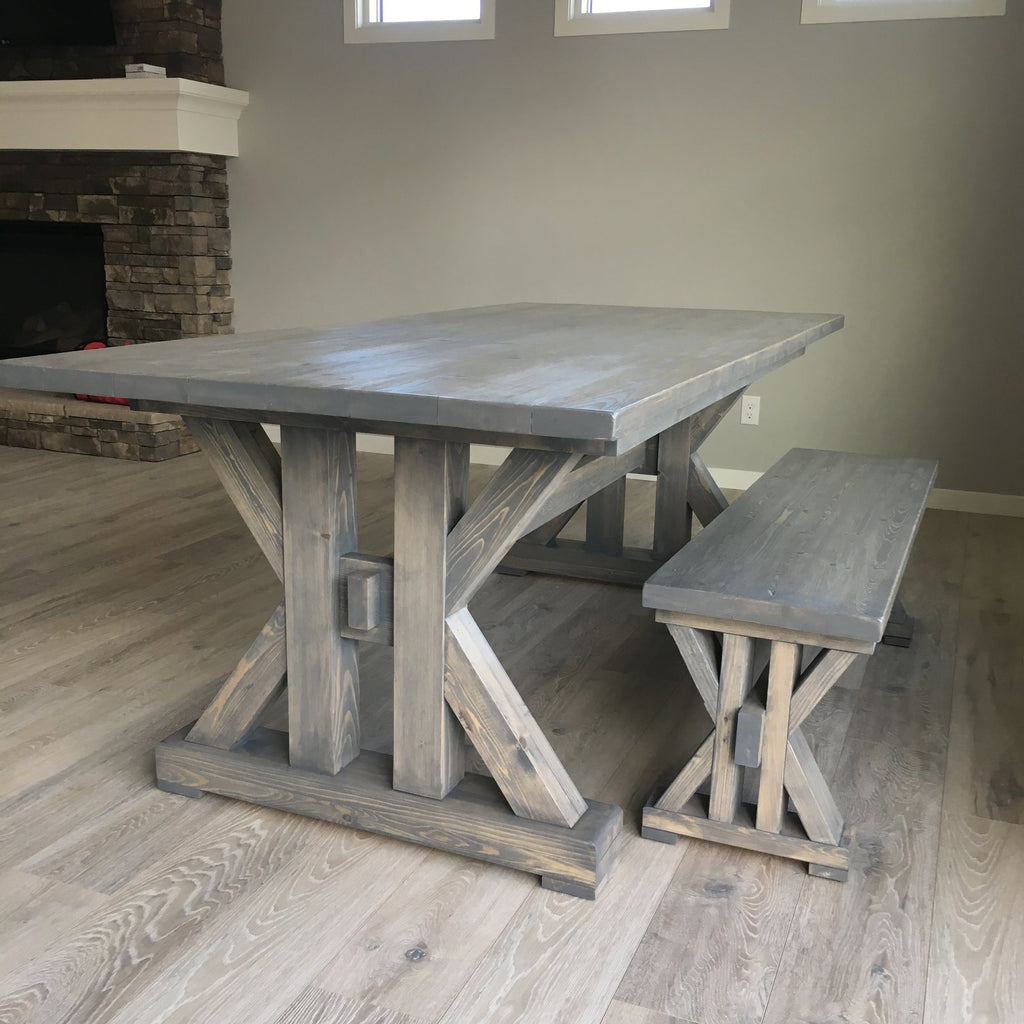
Dine out in style with this French Farmhouse Dining Table. This table design is surely one that will impress all of your dinner guests. Check out the free plans here to get prepped and ready for your next dinner party.
L Shaped Double X Desk
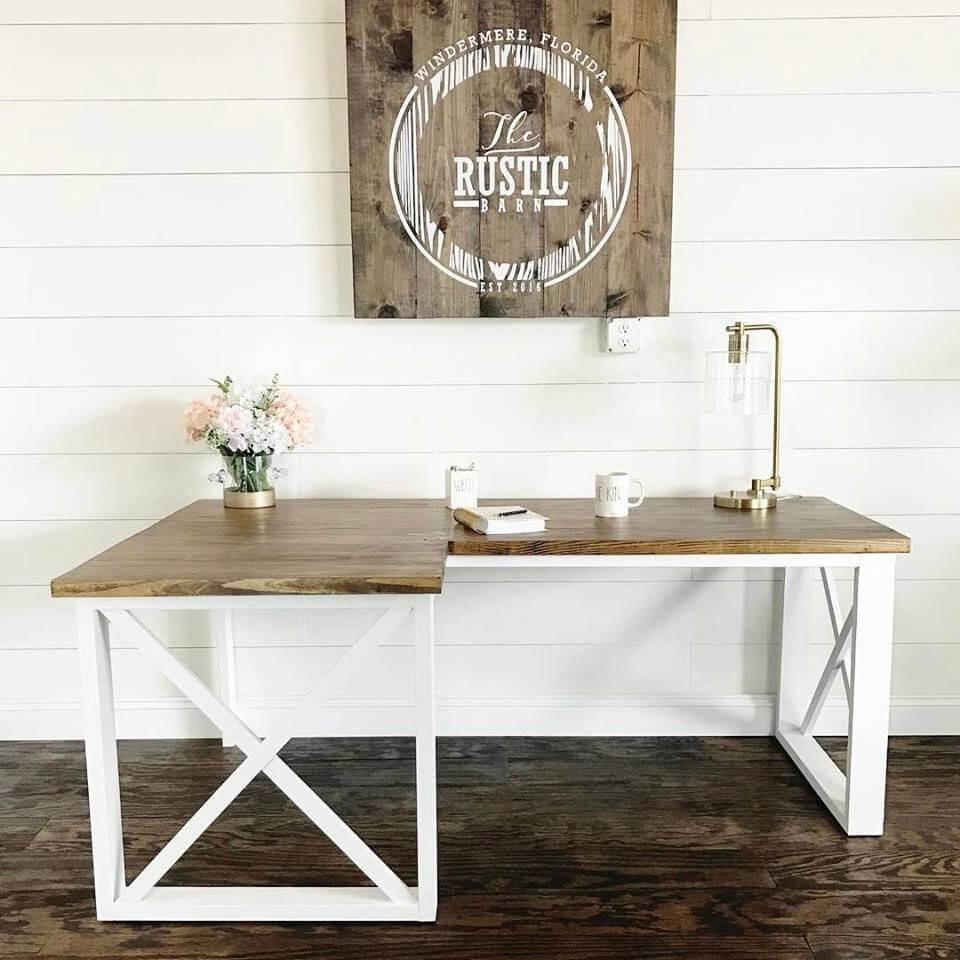
If you enjoyed the Farmhouse X Desk, youlle really get a kick out of this one. The L Shaped Double X Desk is the perfect addition to an office. If you're looking for a bigger area to work, this desk has the space you need. Check out the free woodworking plans here.
DIY Pantry Shelf
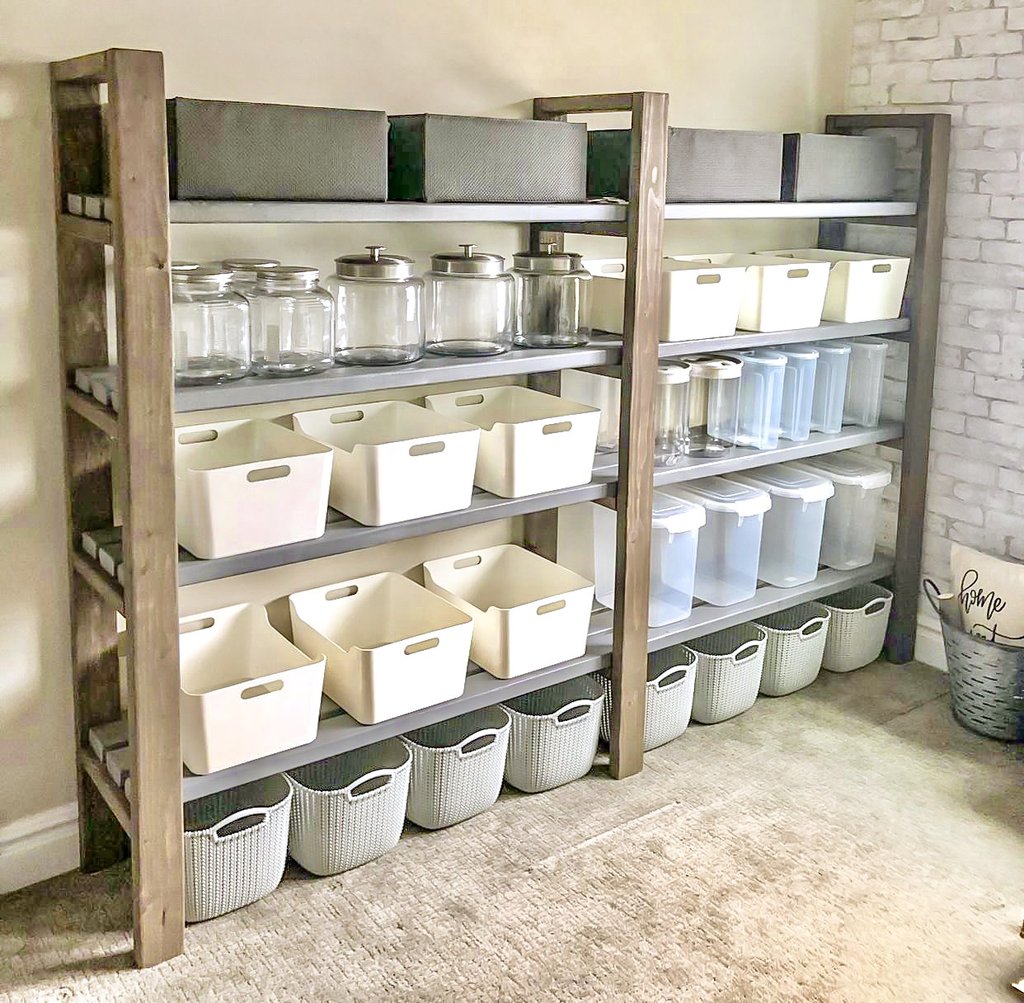
Losing room in the pantry? Well man do I have a solution for you! This DIY Pantry Shelf is the perfect solution for all of your pantry needs. Check out this easy tutorial here to see how this Pantry Shelf was built for less than $50.
Chunky Farmhouse Coffee Table
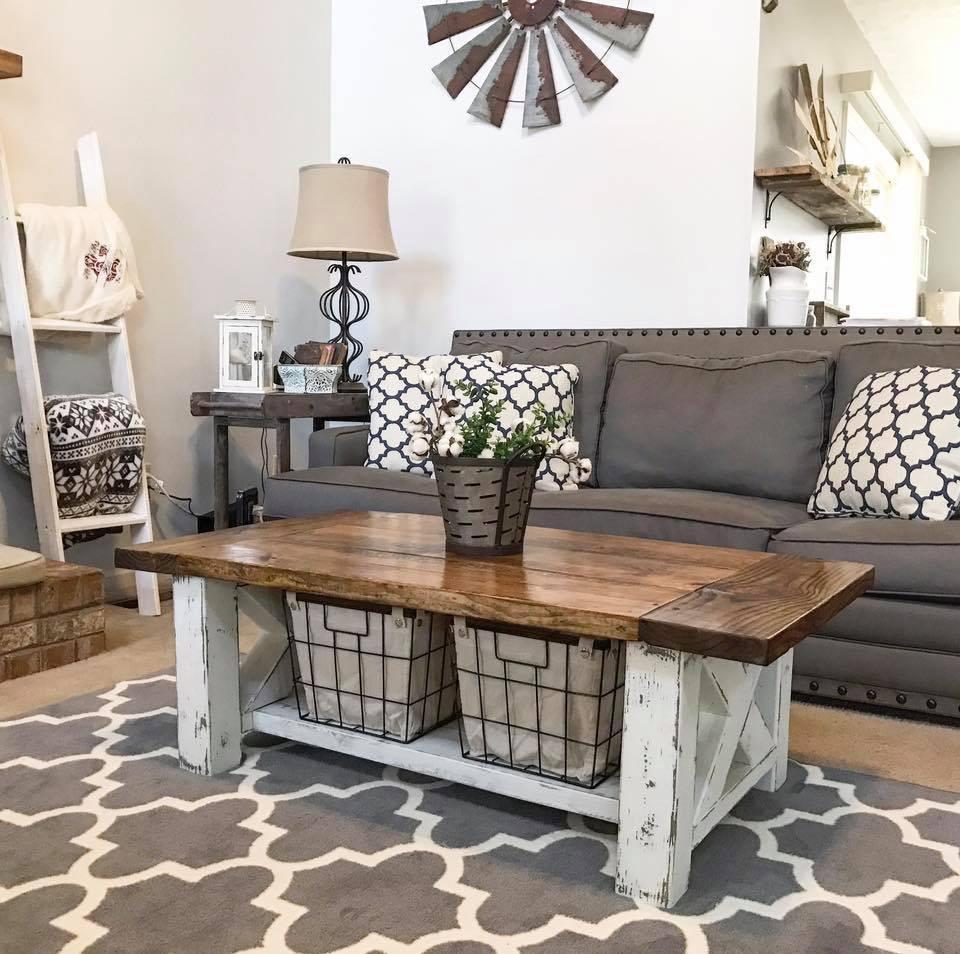
This coffee table has always been one of my favorites. If your living room is looking a little drab, this Chunky Farmhouse Coffee Table will surely bring some pizzazz. If farmhouse is your thing, then youlle want to check it out. Free plans here.
Double V Console
This console is giving me farmhouse vibes with a modern twist. Wow your guests when they walk in with this Double V Console. It's an entryway's dream. Check out the free woodworking plans here.
Sliding Barn Door Media Center
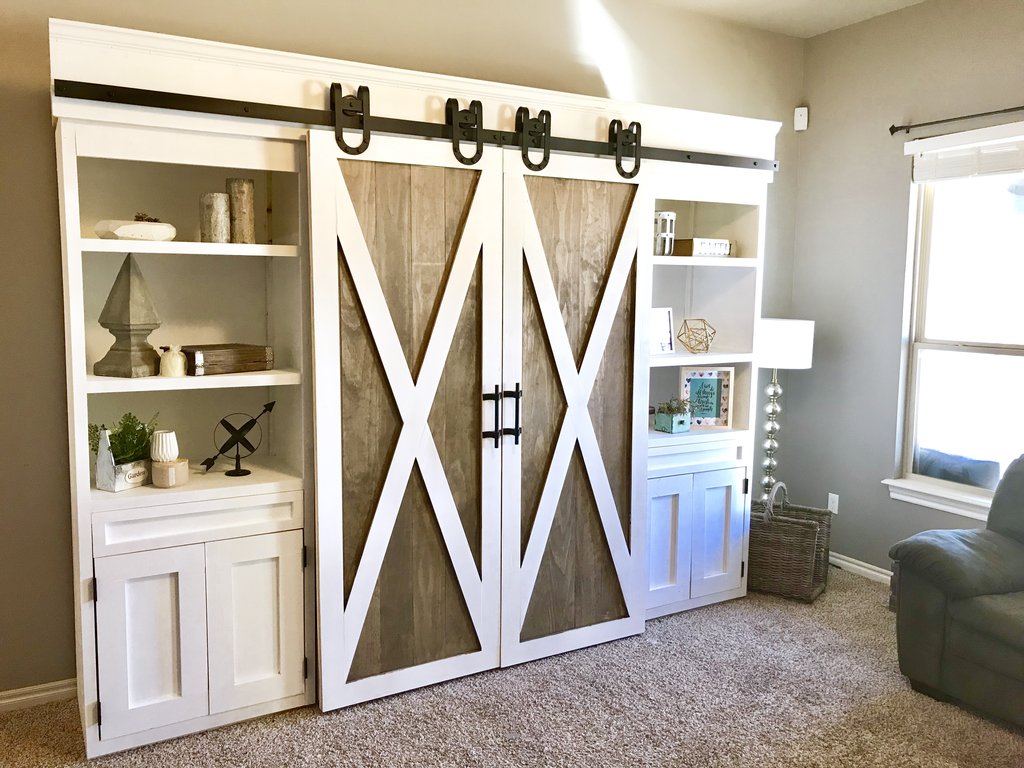
TV storage ever looked so right! This Sliding Barn Door Media Center is a farmhouse dream. If you want this media center to be a great centerpiece in your home. Check out the build plans here to re-create it yourself.
Farmhouse Nightstand
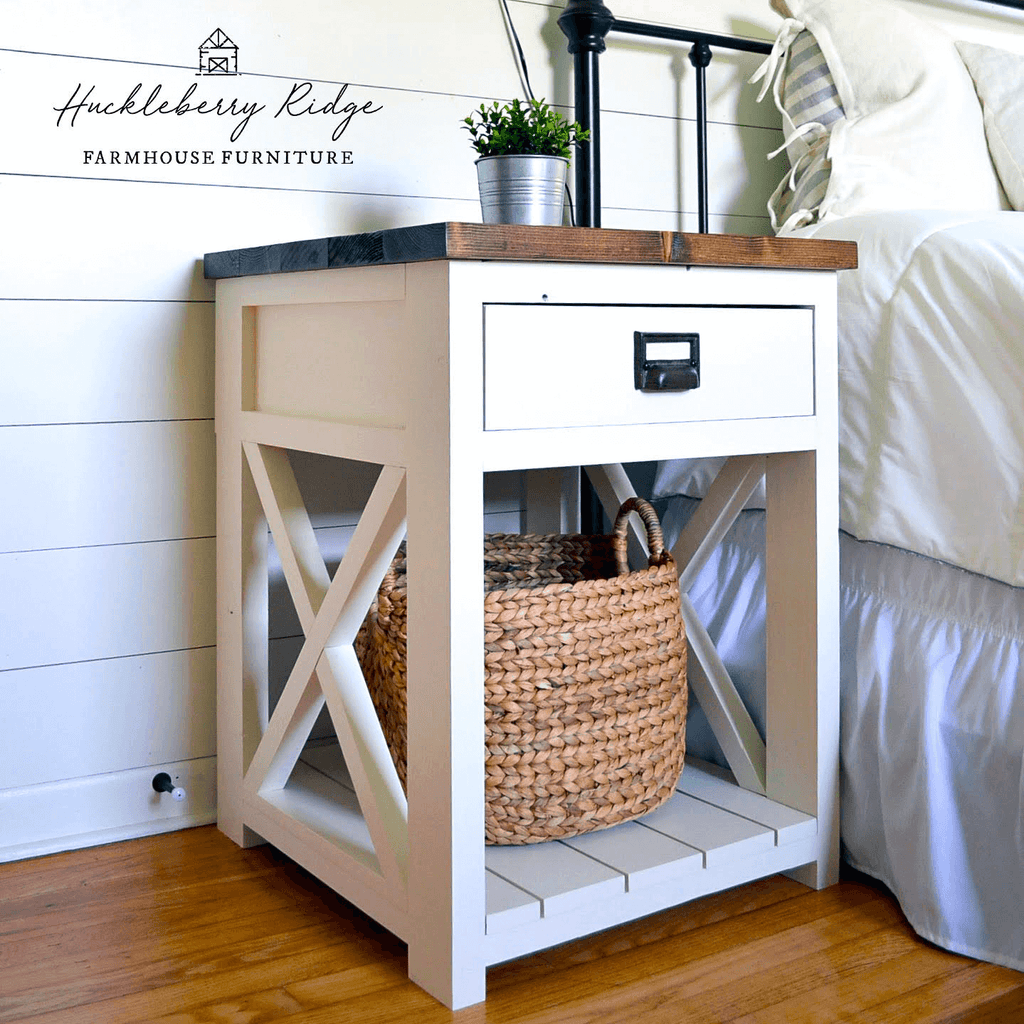
Sleep easy next to this amazing Farmhouse Nightstand. This build is the perfect addition to your farmhouse bedroom. With easy build plans here, you can have a dreamy farmhouse look.
Farmhouse Side Table

This Farmhouse Side table is the perfect project for beginner builders. If you need a simple project to tackle, this side table is the project for you. Farmhouse doesn't have to be hard. Check out the plans here.
I hoped you enjoyed all of these farmhouse plans! For more great plans and tutorials like these, check out my project library here.
Thanks for reading guys! XOXO, Ashley

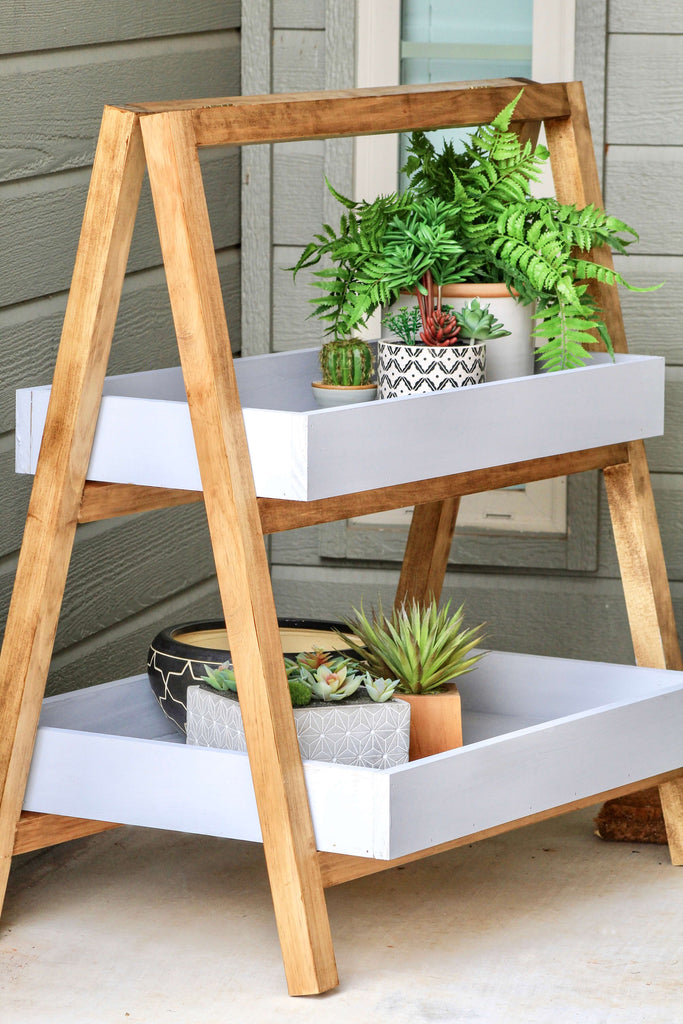
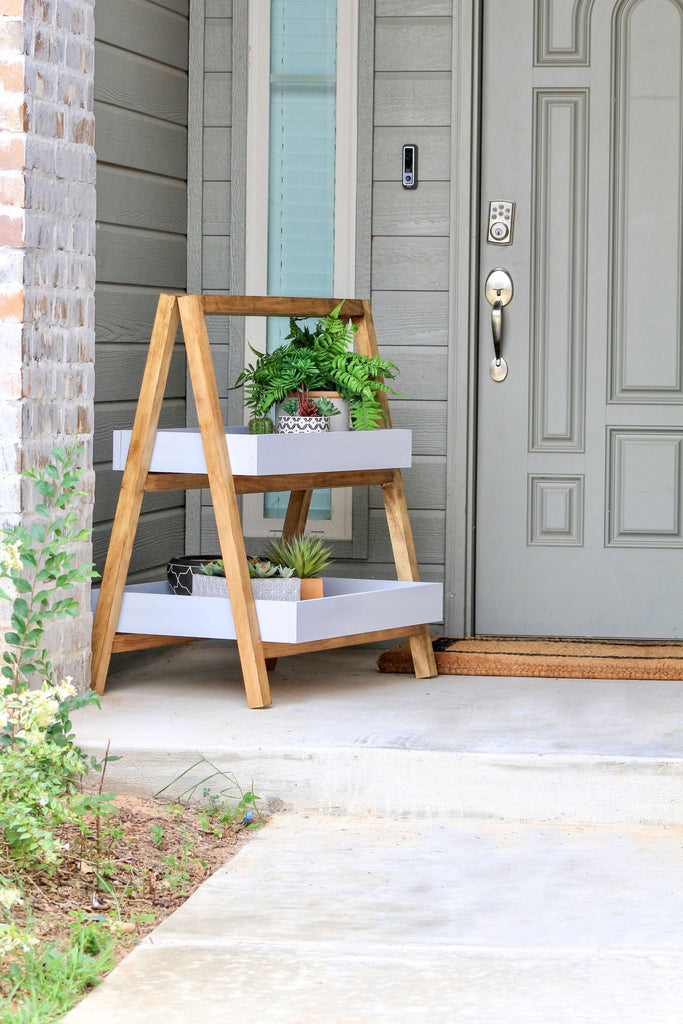
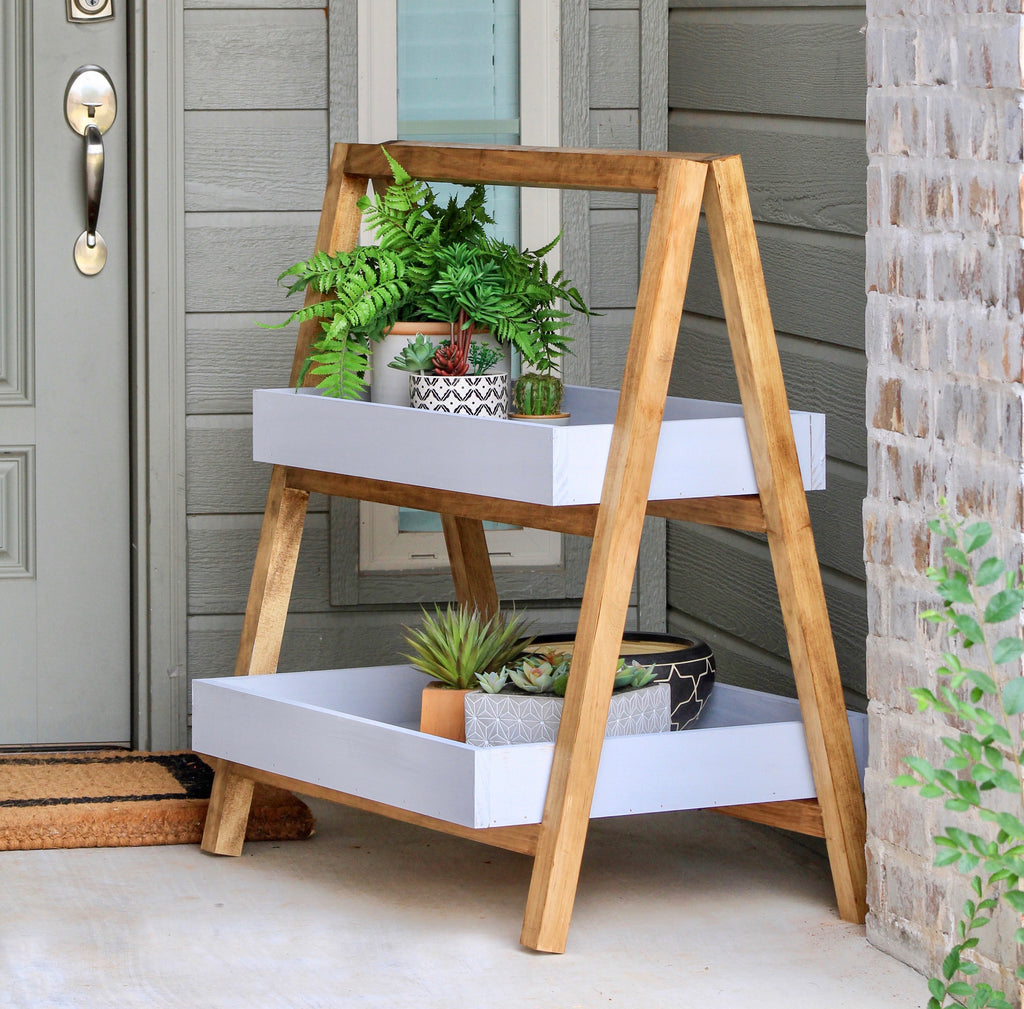
Modern A-Frame Plant Stand
"Modernize your outdoor entryway with this fun A-Frame plant stand"
With the summer still going, I figured I would make a quick fun project for the outdoors. I am in love with all things modern these days, so I thought why not create a fun A-Frame plant stand.
"This post is sponsored by The Home Depot."
There are some affiliate links in this post, meaning I get a small commission if you purchase through these links, at no cost to you. Click Here to read my full disclosure.
Now let's get into the nitty gritty!
To complete this project you will need the following materials , mostly available at The Home Depot:
- 5 - 2 x 2 x 8ft
- 3 - 1 x 4 x 8ft
- 1 - 4ft x 8ft - 3/4" piece of plywood
- 1 - 1 x 2 scrap wood
- Golden Hinges
- Brad Nails
- Wood Glue
- 2 1/2" Pocket Hole Screws
- Varathane Golden Oak
- Folk Art Chalk Paint - Parisan Grey (alternative option)
Tools Used
Cut List
- 4 - 2x2s @ 36"
- 6 - 2x2s @ 30"
- 2 - 1x4s @ 12 3/4"
- 2 - 1x4s @ 29 1/2"
- 2 - 1x4s @ 20"
- 2- 1x4s @ 29 1/2"
- 1 - 3/4" piece of plywood @ 11.75" x 28.5"
- 1 - 3/4" piece of plywood @ 19" x 28.5"
Seeing instructions in writing isn't always helpful, so check out this video tutorial on how I built this Modern A-Frame Plant Stand before looking over the steps.
Step 1: Build the A-Frame for the Plant Stand
First I gathered all the wood I would need to build the frame of the plant stand and cut all of my wood down to size. I decided to use SELECT PINE wood for this build because it always gives a clean look.
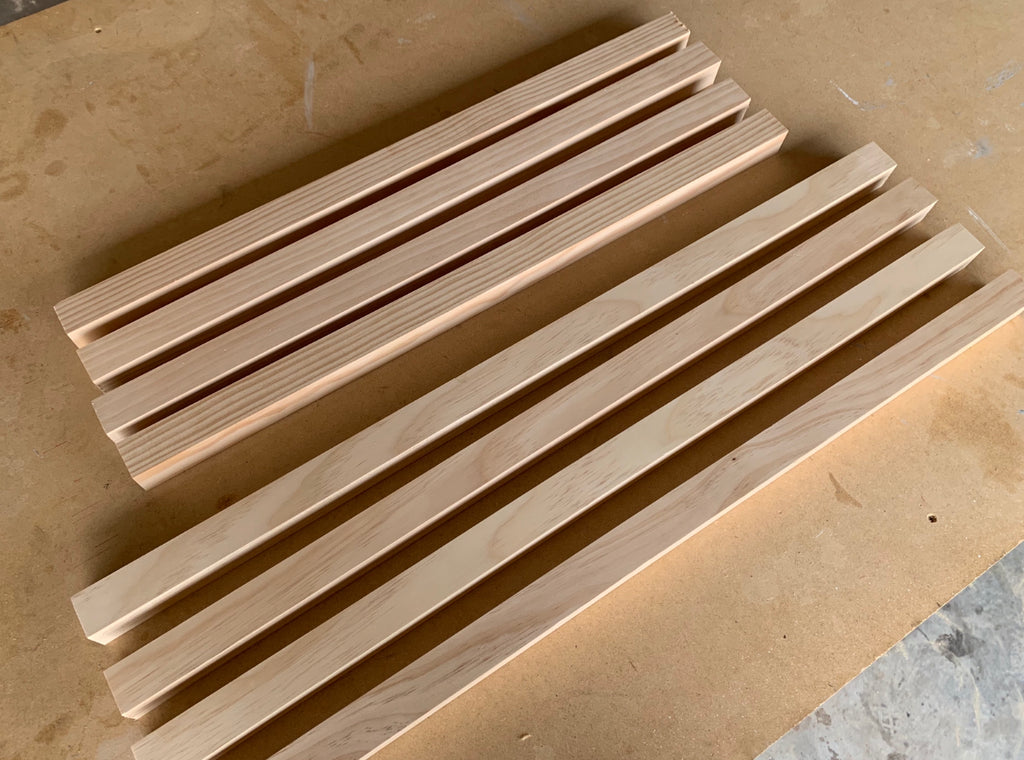
To attach the assembled sides together, I used a Kreg Jig on a 1 1/2" setting, with 2 1/2" pocket hole screws. I also used my Kreg Right Angle Clamp to assist with assembling the frame.
Once you have your two frame sides assembled, they should look similar to the picture below.

It is important to make sure these two pieces are as equal as possible, since this will be the main base for your plant stand.
Step 2: Add the Golden Hinges to the A-Frame Plant Stand
Now that the A-Frame is all assembled, it is time to add the Golden Hinges. I added one side of the hinges to one side of the plant stand frame first.
I placed the hinge down where I wanted it to be and made marks with a pen where the screws would drill into. I then drilled in some pilot holes using a 3/32" drill bit. This prevents wood from cracking and makes it easier to get the screws into place.
Then I used a screwdriver to screw in the screws. With small hardware like this, you want to stay away from power tools to prevent stripping a screw or messing up the project piece. Any screwdriver should suffice.
Once the hinges are in place, you should be able to spread the assembled pieces out to create an A-Frame.
Step 3: Build the Planter Boxes
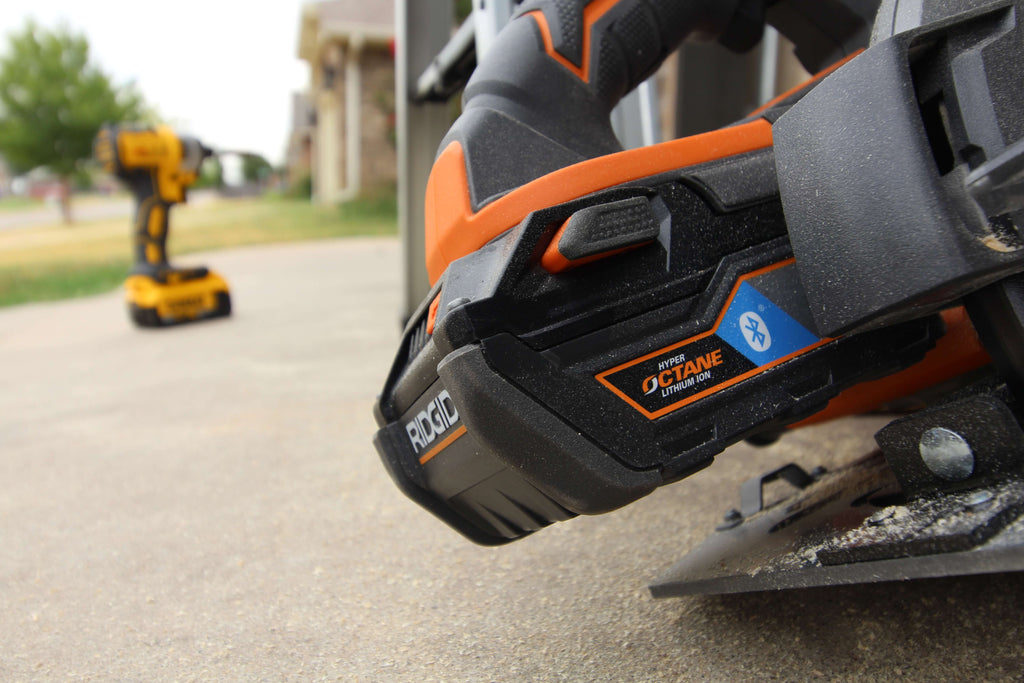
Now with the A-Frame ready to go, the last step is building the planer boxes. First, I started cutting down my plywood with my Ridgid OCTANE Circular Saw.
This circular saw is said to be 30% more powerful than any it's previous versions and is industry leading 2-11/16 in. depth of cut and RIDGID is running a deal now that gives you an option of a free toll when you purchase a qualifying kit. Check it out here.
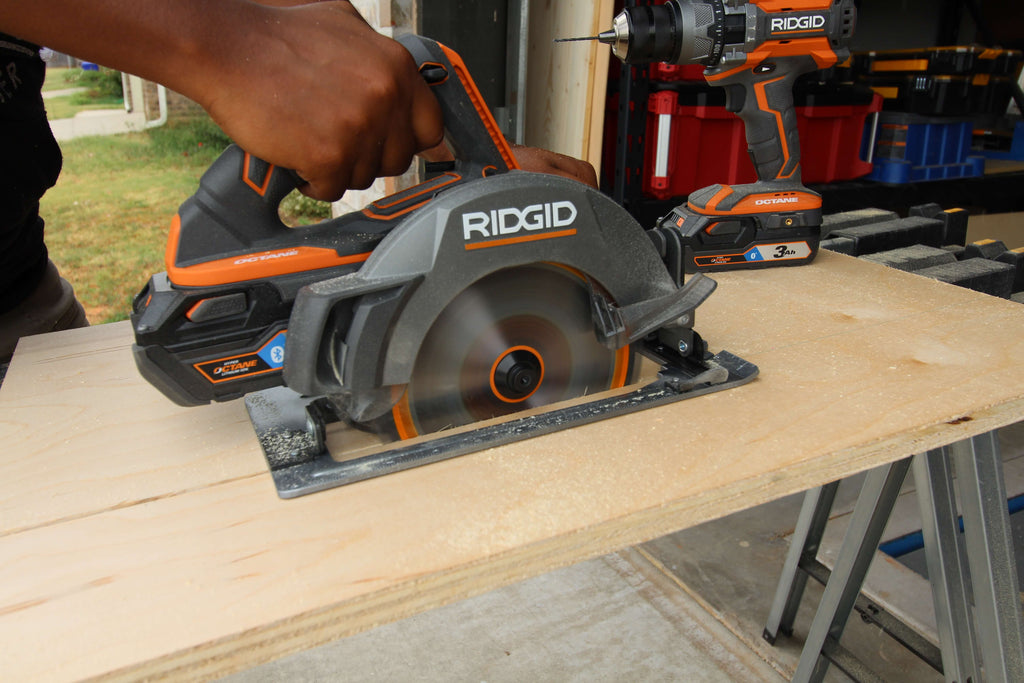
This saw also features an integrated chute with an included vacuum adaptor, which I thought was pretty cool. I really liked how smooth this circular saw cut through the plywood. Doubled with the RIDIGD Octane battery, this saw cut like a breeze.
Once the plywood was cut all down, I started building the boxes by attaching the 1x4s to the plywood with wood glue and brad nails. I used my brad nailer to secure the 1x4s into place.
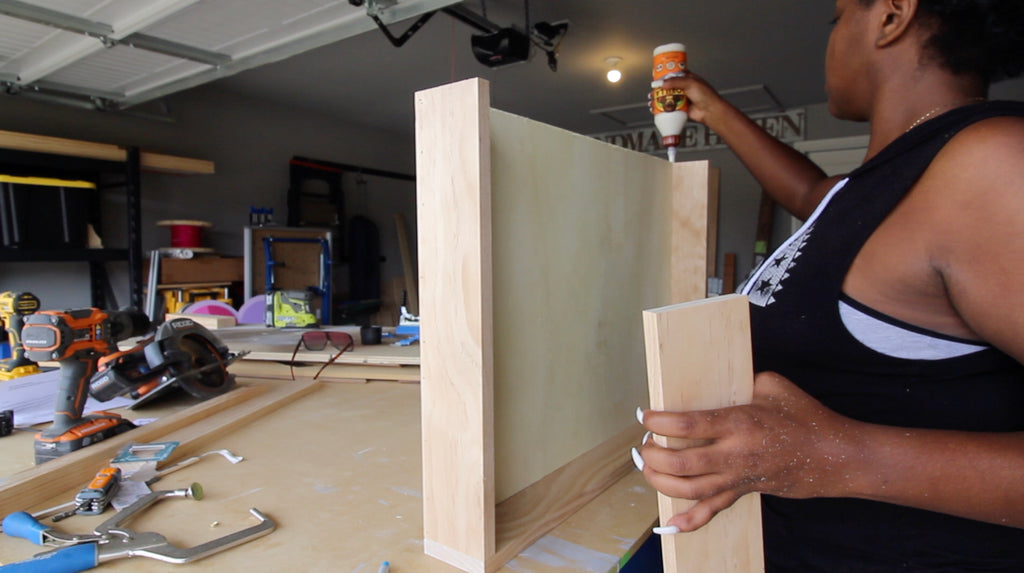
If you want your plant stand to be a little more sturdy , I would recommend using pocket holes or screws to assemble the boxes, but I opted for the quickest way.
Step 4: Paint/Stain the A-Frame Plant Stand
I decided to go with paint and stain for the A-Frame Plant Stand. For the stain I used, Golden Oak and I wanted the planter boxes to kind of look like concrete so I decided to finish the planter boxes in Folk Art Chalk Paint in Parisan Grey.
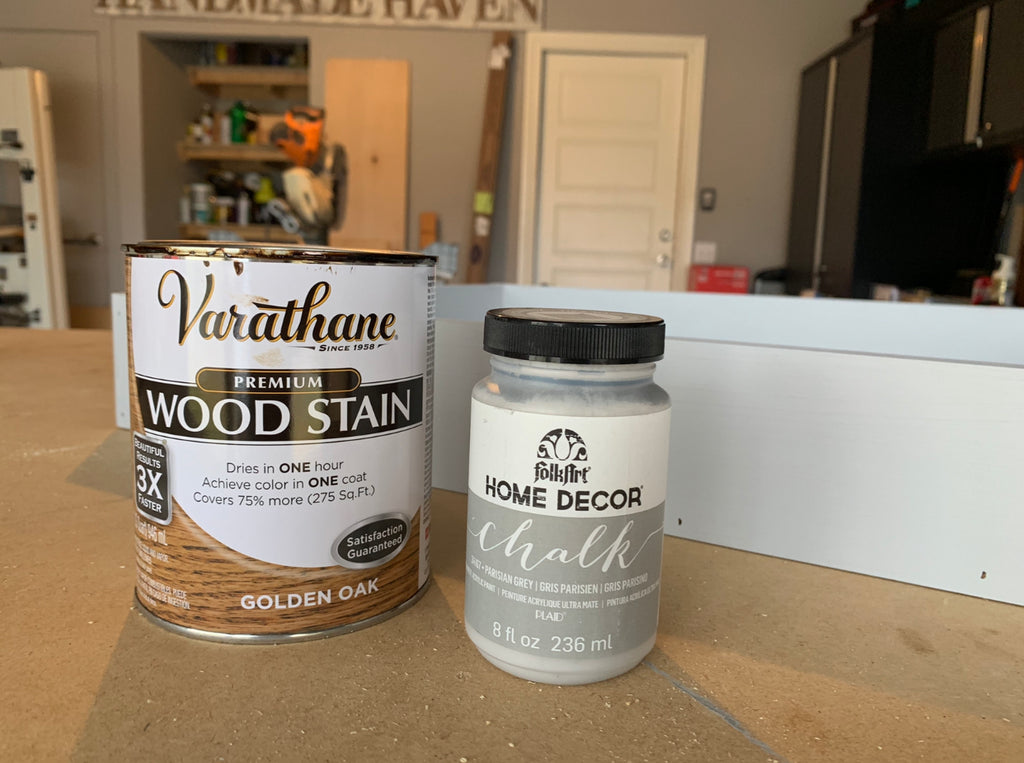
Now because this is an outdoor build, I'm not sure how well the chalk paint would hold up, but luckily my front entrance is covered, so it gets covered from a lot of weather. If you are building this for somewhere outside your house that isn't covered, I would recommend a more durable option for paint.
Let's take another look at this beauty. Isn't she lovely?

Thanks for reading guys, XOXO Ashley

DIY Hanging Wall Planter
“Who says plants can’t hang out in style?”
Hey guys! Angela here with Rustedpetal_ltd, here guest posting on the Handmade Haven blog. I am here and ready to walk you through how I made this Hanging Wall Planter. I had a blank space on the wall just outside of our deck doors that was screaming for something big and bold.
 After hours on Pinterest I saw several similar succulent wall hangers and knew this was the perfect project for my deck.
Being up in Canada does pose a few challenges in trying to build similar items, as we don’t always have the same products available for purchase or the same growing window. (Though I wish we did)

But with a few tweaks, I was able to come up with this beauty which is absolutely perfect in our space. Let’s check it out!
There are some affiliate links in this post, meaning I get a small commission if you purchase through these links, at no cost to you. Click Hereto read my full disclosure.
Materials:
- 8 - Pine Tongue and Groove - 5”x8’ (you will need 8 boards)
- 4 – 1 x 2 x 8’
- 3 – 1 x 3 x 8’
- 9 - 6” Clay Pots
- Adjustable Pot Rings
- Wood glue
- Brad Nailer
- White Spray Paint
- White Exterior Paint
- Brad Nails
* Most cuts are best made on the go to allow for minor variations in the wood *
Cut list:
- 8 - Tongue and groove @ 36”
- 1 - 1x 2 @ 33 ¼”
- 2 - 1x 2 @ 39 3/4”
- 4 - 1x 2 @ 35 3/4”
- 1 – 1x3 @ 33 1/4”
- 2 – 1x3 @ 41”
- 2 – 1x3 @ 36”
Step 1: Cut Boards to Size
Cut your tongue and groove boards down to the necessary size. You will need 8 pieces cut at 36”
 Step 2: Assemble Wall Planter Backing
 Step 2: Assemble Wall Planter Backing
Fit the tongue and groove together sliding the tongue into the groove, as shown below.
 Before attaching the bottom piece of tongue and groove, I ripped off the tongue on the table saw. (This can also be done with a circular saw, if you don’t have access to a table saw.)
 Now flip the boards over so the back is facing up and take the 3 - 1x2 pieces and attach them to the back of the tongue and groove with a bead of wood glue and 1”brad nails and your brad nailer.
 This creates a frame around the hanging planter on the back and along the sides and the bottom. You will finish the framing on the back with the 1”x3” piece on the top.
 Now the back has a frame to hold everything together.
Step 5: Add Frame to Hanging Wall Planter
Cut the 1x3 for the exterior frame and flip the tongue and groove right side up. Attach the frame pieces to the sides of the hanger using a bead of wood glue and 1 1/4” brad nails. When you have the border on, you will want to flip the hanger over and attach the 4 pieces of 1x2 boards (35 3/4”). They will go at 7 1/2”, 11 1/4”, 20 1/2” and 25” from the left. This is mainly an aesthetic step as the screws for the hanger will go through the tongue and groove and poke out the back.
Step 7: Paint the Hanging Wall Planter
Now you are ready for paint or stain if you so choose.
 I used a pure white exterior paint to make sure the paint on the hanging planter would last throughout the seasons.
Step 8: Paint Clay Pots
While the hanger is drying, you can grab your 6” pots and spray paint them white. For this particular project, you will need nine of them. I used Rust-Oleum painters Touch 2X ultra cover paint and primer. With paint and primer in one, it really gives the clay pots plenty of coverage.
Step 9: Attach Plant Rings
Now you can attach the plant rings. They are spaced out 5 1/2” down from the top, 12’ in between the two sets and the bottom is 7 1/2’ up from the bottom.
Once the pots are all dry, add your pots and you are ready to plant! Now pick a spot on your wall, attach your hanging wall planter and and WAAA-LAAAH you are finished!

Now let’s take another look at this beauty! I used a heavy duty d-ring to hang it to my wall and it works like a charm.
Pick your plants and herbs and have fun! Thanks for reading guys!

Kid's Modern Play Kitchen Hack
"A play kitchen hack that will have you reconsidering your kitchen design"
It's not often that I get to work on projects for kids, so I knew this would be a fun project to tackle and I am over the moon with how this play kitchen hack turned out. This project had me reconsidering my own kitchen design, I mean just look at it.
"This post is sponsored by the Home Depot"
 Now just wait until you see what it looked like before the transformation. I promise you will love it that much more once you see the before photo, here it is.
There are some affiliate links in this post, meaning I get a small commission if you purchase through these links, at no cost to you. Click Here to read my full disclosure.
 Now this little play kitchen was cute, but I knew I could bring a little more pizzaz to it and the best part is that I did this transformation using mostly only spray paint. That's right! I was able to transform this Kid's Modern Play Kitchen in one day using Rustoleum Spray Paint. As you can see it did not disappoint.

The main colors I used for this DIY Kid's Play Kitchen were Rustoleum Deep Forest, which is hands down my new favorite color, Rustoleum Smokey Beige, which is more of a neutral color, Rustoleum Satin Bronze and Rustoleum black for the bottom of the Kid's play kitchen.

This combination of colors really made this play kitchen hack come to life. Now let's dive into how I tackled this DIY Kid's Play Kitchen Hack.
To complete this project you will need the following materials , all available at The Home Depot:
- Kids Play Kitchen
- Rustoleum Comfort Grip
- Painters Tape
- Foam Brush
- Dremel Go Screwdriver
- Decorative Wallpaper
- 1/4" sheet of plywood - 11.5" x 23.5"
- 3M Adhesive
- Brad Nail Gun
- 5/8" Brad Nails
- Craft Scissors
- Miter Saw
The colors I used:
- Rustoleum Spray Paint - Deep Forest
- Rustoleum Spray Paint - Satin Bronze
- Rustoleum Spray Paint - Smokey Beige
- Rustoleum Spray Paint - Satin Black
- Rustoleum Chalk Paint -Charcoal
Step 1: Remove Handles and Hardware
The fist thing I did to complete my Kid Play Kitchen was removing all of then handles and hardware. I used the Rustoleum Spray Paint - Satin Bronze to coat all of the handles and metal kitchen pieces.
 I really love how the bronze looks on the play kitchen handles; it really makes it pop. The satin finish also gives it a little sheen which is perfect for this DIY Play Kitchen. I also am a big fan of this spray bottle design because it makes it a lot easier on your hands when spraying.
Step 2: Tape off Kid's Play Kitchen
It would have been way easier to paint the pieces of the Kids Play Kitchen before putting it together but unfortunately this kitchen was already assembled, so I used painters tape to tape off the play kitchen, so I could begin spray painting the rest of the play set.

I also used some trash bags to help cover the Play Kitchen to eliminate using so much tape, this makes the process much easier.
Step 3: Spray Paint Play Kitchen
Once I had the play kitchen taped off, I begin spray painting. I used the Rustoleum Spray Paint - Deep Forest for the outer part of the Kid's Play Kitchen and this is when I feel in love with the color. The satin gloss made it really shine.
 Then I used the bronze and Smokey Beige to spray the rest of the features on the Kid's Play Kitchen. I didn't worry about the inner parts of the top of the play kitchen because I knew I would be putting in wallpaper.

Now I have to share one of my favorite tools to use while using spray paint. The Rustoleum Comfort Grip makes spray paint projects a whole lot easier and less painless. The normal spray paint tops can make spray painting unbearable sometimes because continuously pressing the spray paint top can sometimes cause hand cramps, but the attachment makes spray painting easy.
 The best part is that it easily attaches to the top of any can with a press of two side buttons. In less than five seconds you can create a better way of spraying.
The bottom of the play kitchen was coated in Rustoleum Spray Paint - Satin Black and it really made the modern legs on the Kids Play Kitchen look great.
Step 4: Reattach Hardware and Handles
After waiting about an hour or so, the spray paint was dry enough to touch so I began adding the handles and hardware back not he Kid's Play kitchen. I didn't use any big power tools on this play kitchen because its so fragile, instead I used my Dremel Go Screwdriver to add the hardware back on.

Step 5: Add Backsplash
The play kitchen already started to look great but /I knew some added backsplash would be the one additive to take this Kid's Play Kitchen to the next level. After looking through a few wallpaper designs, I decided on this black and white Decorative Wallpaper. I knew it would contract really well with the Deep Forest and I was right.

To add the backsplash I took a 1/4" sheet of plywood and cut it down to a 11.5" x 23.5" piece using my miter saw. I then cut down the wallpaper using my craft scissors enough so that the wallpaper was slightly longer than the 1/4" plywood piece. To secure the wallpaper to the plywood I used 3M Adhesive.
I secured the plywood backsplash piece to the play kitchen using my brad nail gun and 5/8" brad nails. Then I cut out two little small squares to go into the top of the Kid's Play kitchen and used the 3M adhesive to secure that as well.
Step 6: Paint Over the Play Kitchen Stove
After adding the backsplash, I could see the end in sight. The last thing to do was to paint over the play kitchens stove. It had some pink in it so I wanted to cover it up to match the rest of the play kitchen.
 I used my Painters Tape to tape off a square around the stove top piece and then used a foam brush to paint on the Rustoleum Chalk Paint -Charcoal. /I had to do about three coats to get full coverage but chalk paint drys a little faster then regular paint, so it didn't take long to dry.

While waiting for the chalk paint to dry, I began admiring all of the colors. It turned out way better than I imagined.
Now let's take another look at the final transformation.
 I couldn't be happier with how this transformation came out. It's amazing what you can do with a little bit of spray paint. It looks like a big transformation but it was fairly easy, something /I'm sure anyone can tackle.
 The Decorative Wallpaper definitely made this Kid's Play Kitchen seem realistic. This color scheme would be a great color scheme for a real kitchen. This kitchen playset is making me want to be a kid again.
 I think it's safe to say that everyone loves a good before and after and this is definitely a before and after to remember.

Be sure to check out the Rustoleum Color Palette to see the tons of spray paint options that Rustoleum has to offer and I have great news, Home Depot is partnering with me to give away two $50 gift cards to two lucky readers. Enter below for a chance to win.
a Rafflecopter giveawayThanks for reading guys! XOXO, Ashley

Office Shelf Organizer and Message Board
"This office shelf organizer and DIY message board is sure to get your desk back in order"
I am excited to be joining forces with a cool group of bloggers to bring you a fun project for a fun DIY monthly challenge. This month, we were challenged to make something awesome out of a single 8-foot board and today I am excited to show you what I've come up with; a DIY office shelf organizer and message board.
"This post is sponsored by the Home Depot"
 I had two projects in mind and couldn't decide between the two, so I decided to do both! HOORAY! Not only did I create this cool office shelf organizer, but I also created this fun DIY Message Board to go along with it. You never can have enough organization in the office right?
There are some affiliate links in this post, meaning I get a small commission if you purchase through these links, at no cost to you. Click Here to read my full disclosure.
Now let's get to it!
Office Shelf Organizer
Let's get started with the Office Shelf Organizer first. This project was quick and easy and only required, guess what...ONE BOARD! Shocker right? For this project, I used a 1x10x8 Select Pine Board.
Step 1: Cut Wood to Size
The first thing I did for the Office Shelf organizer was cutting the wood down to the specified measurements. I used my miter saw to cut down the 1x10 down.
You will need the whole entire board for this project, so make your cuts accurately. Here are the measurements I used for the shelf organizer.

Step 2: Drill Pocket Holes
Once the wood was cut down to size, I began drilling pocket holes in the wood using my Kreg Jig. I drilled the pocket holes into the three 15" pieces on a 3/4" setting.

Step 3: Assemble Right Side of Shelf Organizer
For the right side of the organizer, I first attached a 15" piece to the 9" piece with my drill using 1 1/4" pocket hole screws and wood glue. Then you will attach the other side of the 15" piece to the 18" piece. This piece should be drilled 8.75" up the 18" board.
 When its complete, it should look like a little chair; no sitting!
Step 4: Assemble Left Side of Shelf Organizer
To assemble the right side of the office shelf organizer, first attach the two remaining 15" pieces to the 6" piece using 1 1/4" pocket hole screws and wood glue
Once the two 15" boards are attached, attach the assembled side to the remaining 18" piece using 1 1/4" pocket hole screws and wood glue. It should be drilled 9" up the 18" board. Now you have two assembled pieces that will make up your office shelf organizer. Now it's totally up to you to attach these two pieces together permanently, but I like the ability to change the size of the shelf if I want and that is it for the Office Shelf Organizer.
DIY Message Board
Next up, the DIY Message Board. I was able to have a little more fun with this one, but still was constrained to using one board. For this project, I used one 1x4x8 board.

Step 1: Cut Wood To Size
First, I cut the wood down to size. Here are the measurements you'll need.

Step 2: Assemble Message Board Frame
Once the wood is cut down, pre- drill pocket holes into the two 17" wood pieces, using a Kreg Jig on a 3/4" setting. Then assemble the frame using 1 1/4" pocket hole screws and wood glue
 I used my Kreg Right Angle Clamp, to help me screw the sides together. This helps keep everything nice and tight while you're screwing the sides together.
Step 3: Stain/Paint Message Board Frame
Once the frame is assembled, stain the message board with the stain of your choice. I opted to go with Varathane Briarsmoke. I'm staining the wood underneath so that when I sand the edges after painting, the wood stain will show through. After letting the stain dry, I painted the frame with Rustoleum Chalk Paint and then after drying, used my sander to sand off the corners of the DIY Message Board.
Step 4: Attach Cane Webbing and Accesories
I've been seeing cane webbing popping up all over the place, so I thought it would be a good addition to my message board. I first had to cut down the webbing to make it fit behind the frame.
It was easy to cut with just a pair of craft scissors. Make sure to cut just enough to have enough webbing left on each corner to be able to staple it down to the message board. I then started attaching the cane webbing to the message board frame using my staple gun and air compressor. I began stapling down one side and then carefully stapled down each side, one by one.
  The cool thing about this Ryobi compressor. is the fact that its cordless. This is my first experience with a cordless air compressor and I must say I was excited to give it a try. Having this is definitely a game changer in my shop because its way more flexible when it comes to portability and it's push-to-connect quick coupler allows quick and easy one hand operation.
 This baby may look small, but with its 120 PSI maximum, it's able to provide enough power for pneumatic nailers and even inflate tires. It's said to be able to inflate a car tire from flat to full in one minute and 20 seconds. Now that is cool, for this size of an air compressor.
After the cane webbing was attached, I used my Ryobi glue gun to add on these fun golden clips. I applied a small amount of hot glue and placed them on the bottom of the message board. Now can I just say how happy I was when I found out that Ryobi had a cordless hot glue gun. I hate having to plug hot glue guns in, so this tool was highly welcomed to my tool collection.
I really love that it's self standing because in the past, Ive used hot glue glue where I had to lay it on its side and sometimes it got messy. It also features an On/Off LED Indicator, so you can turn it on and off when needed. This cordless glue gun screams professional. I also decided to add in these fun gold and teal clothes pins inside the cane webbing to hold messages, cards, etc. It gives it a nice little touch.
Now, let's take another look at these cool Office Organizers. Between this office shelf organizer and DIY message board, I should have no problem keeping things in order; at least for now.
 I'm in love with how it came out and I am so glad I decided to go with both projects. If you are looking for a quick DIY to do with just one board, now you have two ideas to choose from.