Projects

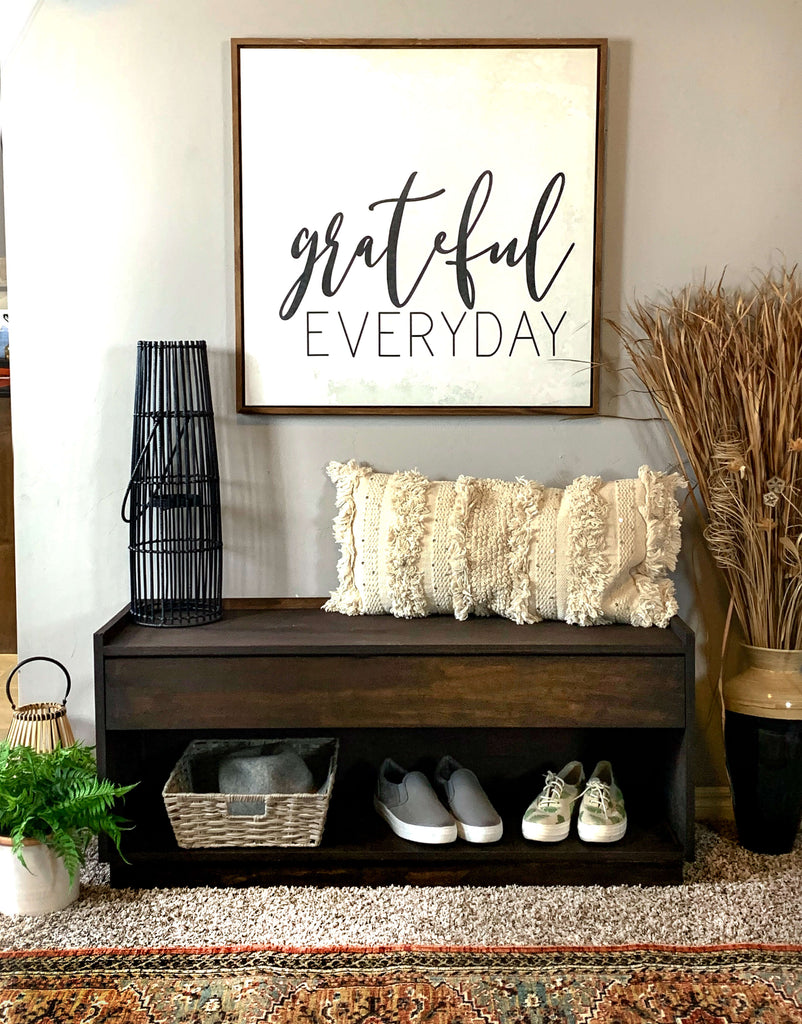
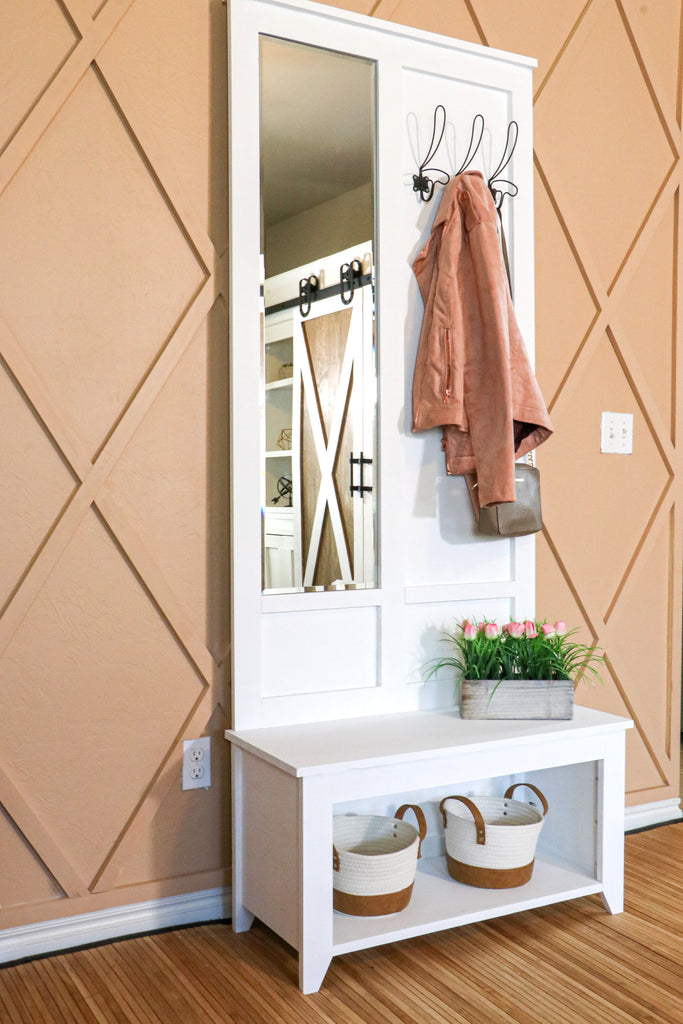
Hall Tree with Storage Bench
"This DIY Hall Tree Storage Bench is every modern girl's dream."
There are some affiliate links in this post, meaning I get a small commission if you purchase through these links, at no cost to you. Click Here to read my full disclosure."
Materials
- 1 - ¾” piece of plywood (4’x8’)
- 1 – ¼” piece of plywood (2’x4”)
- 2 – 1x6x6
- 2 – 1x4x8
- 2 - 1x3x8
- 29 – 1x2x8
- 12” Drawer Slides
- 1 ¼” Pocket Hole Screws
- 1” Staples
- Brad Nails
- Wood Glue
- 1/4" Dowel
- Coat Hooks
- 1 1/2" Wood Screws
- Rustoleum Kona Gel Stain
Cut List
See Printable Plans for Detailed Cut List
Tools
- Kreg Jig
- 5/32” drill bit
- Impact Drill
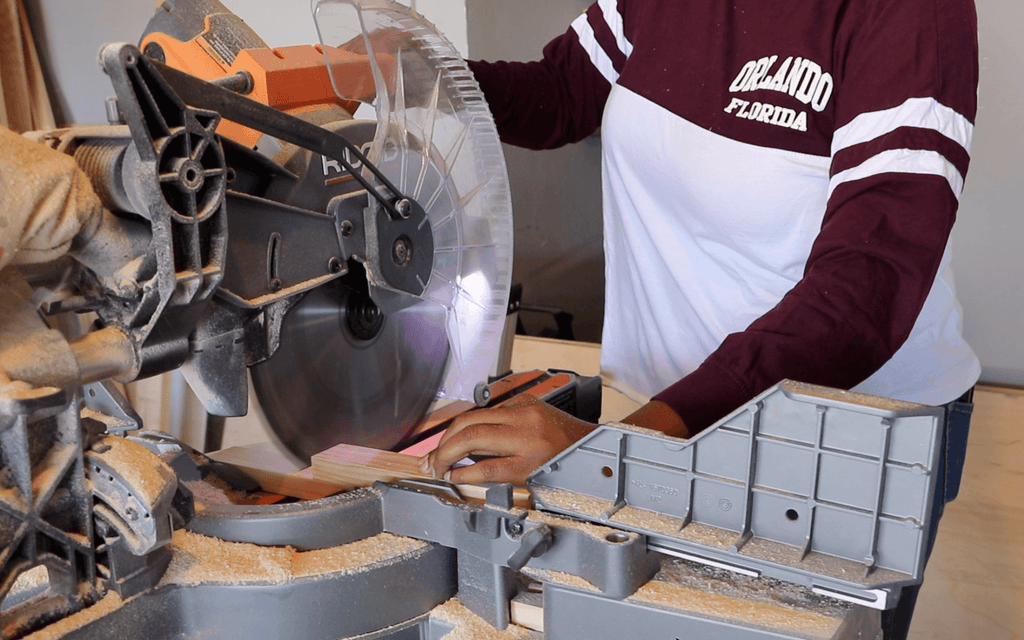
- Miter Saw
- Kreg Adaptive Cutting System
- Kreg Right Angle Clamp
- Kreg 90 Degree Corner Clamps
- Kreg Drawer Slides

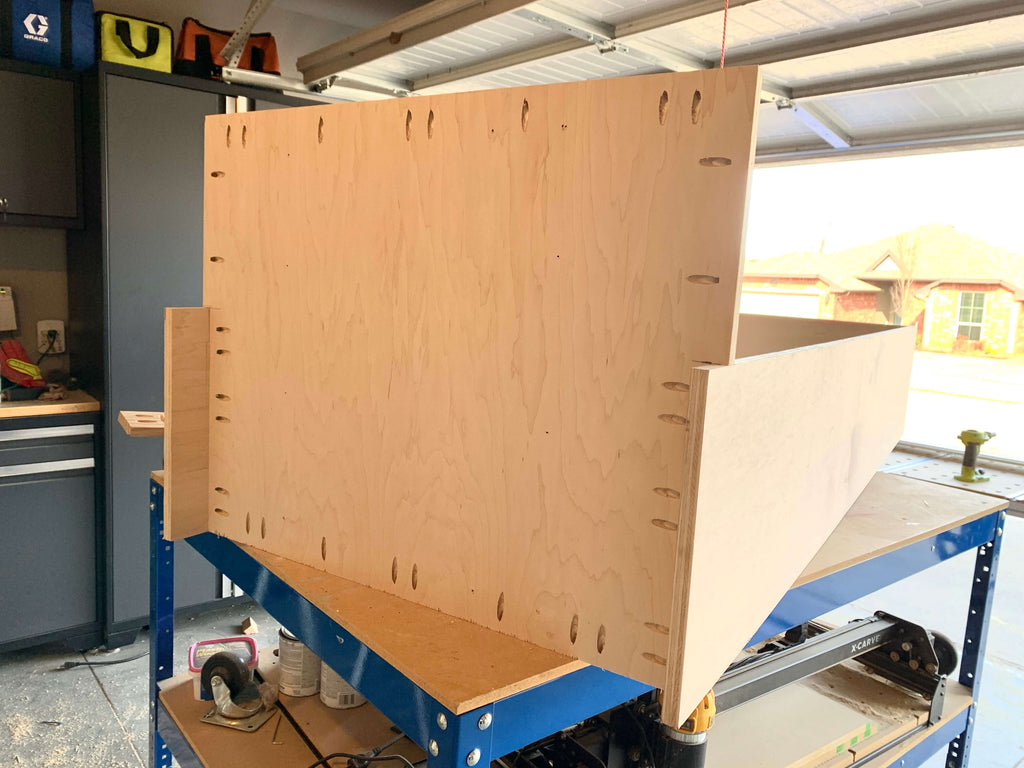
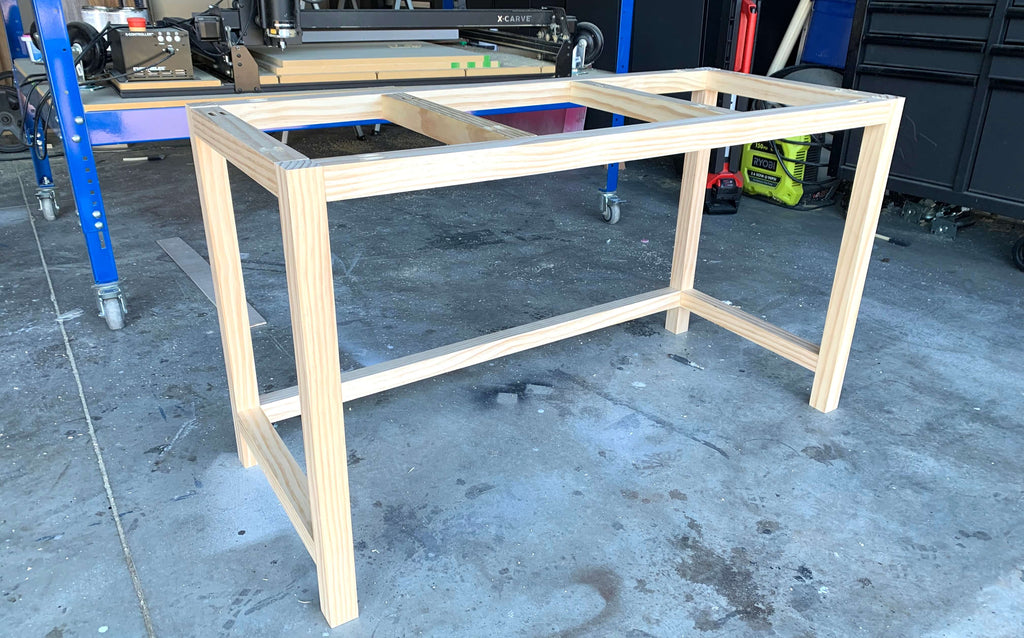
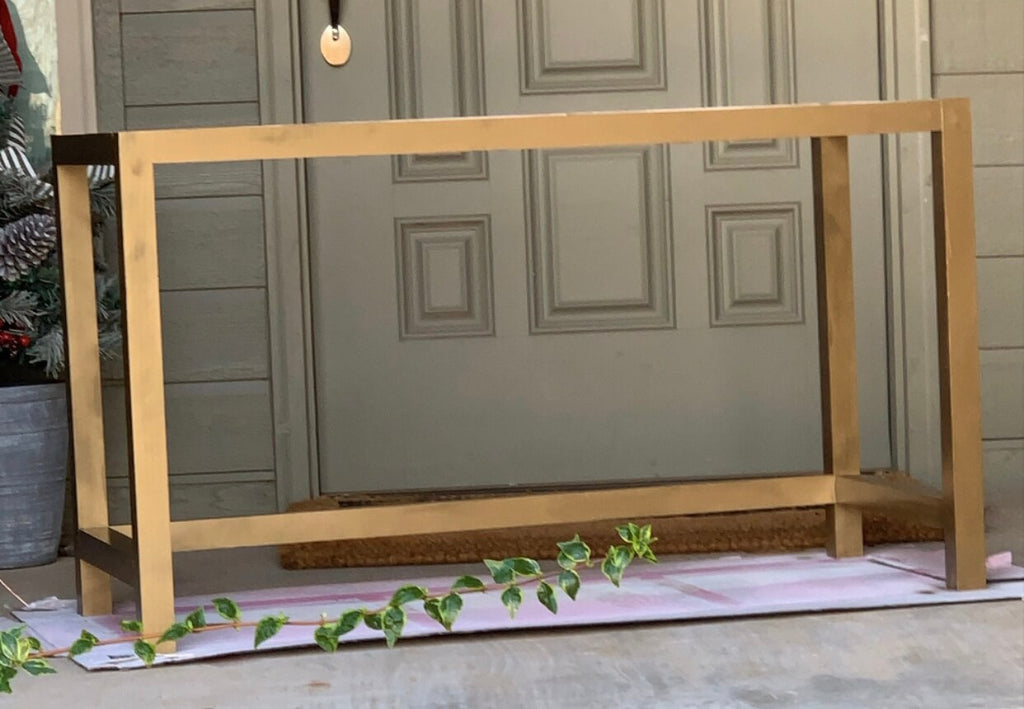
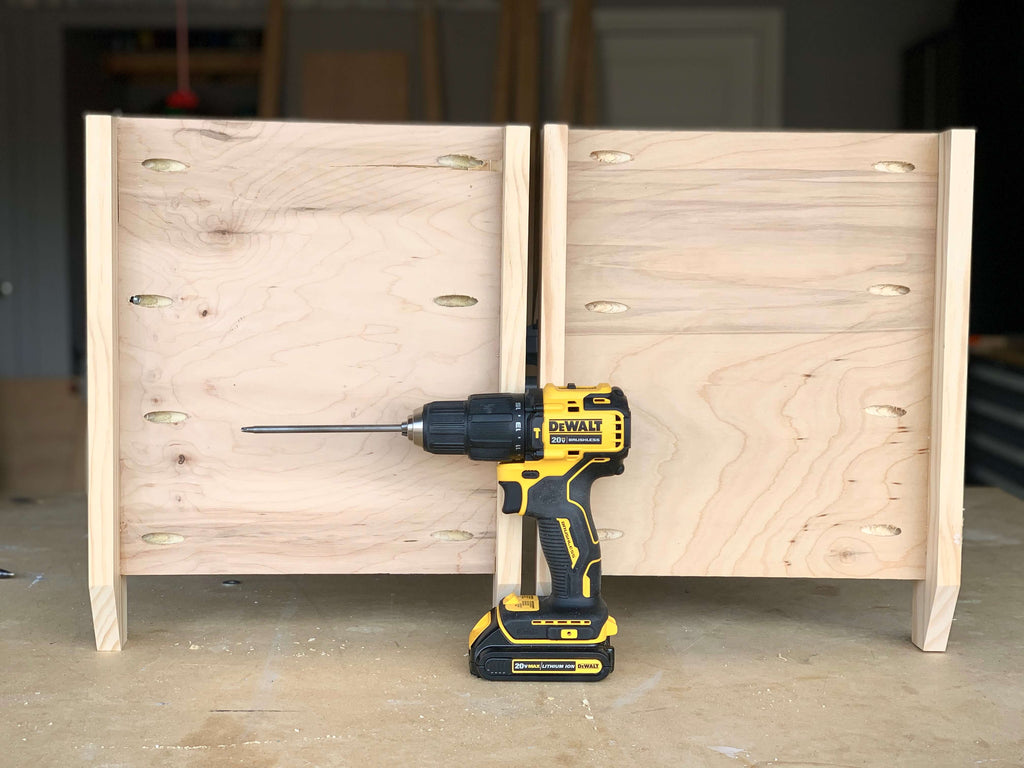
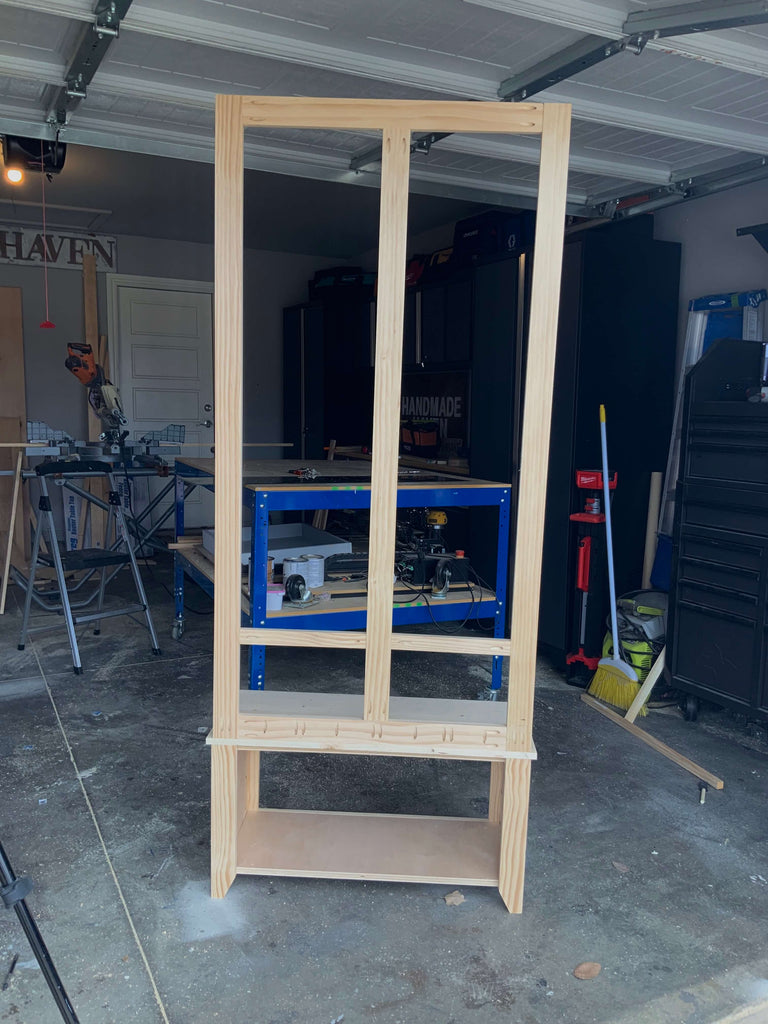
Step 1: Assemble the Entryay Storage Bench
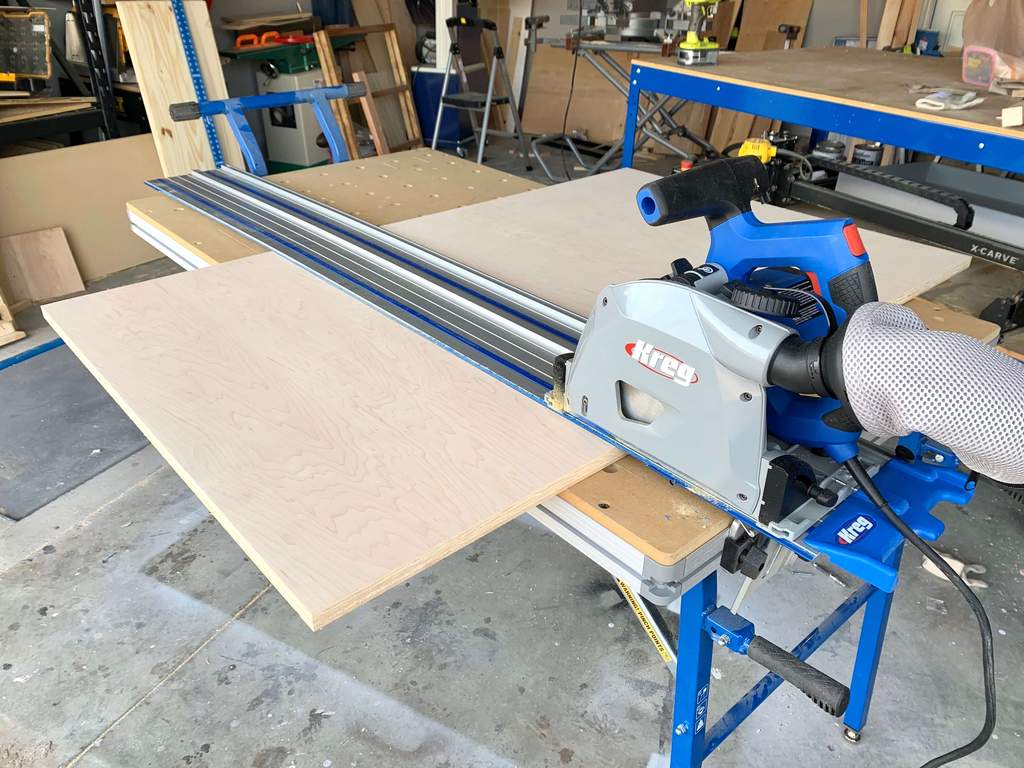
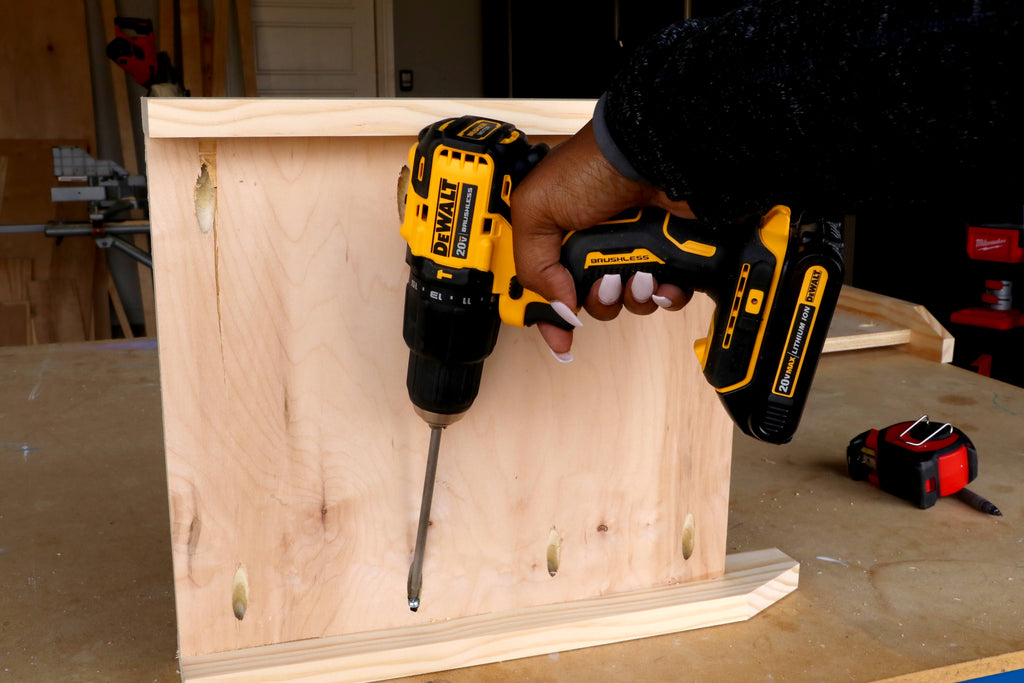
I first started off by assembling the bottom storage bench. I used 3/4" plywood to assemble a bulk of the storage bench and used my handy dandy Kreg Jig for most of the assembly.
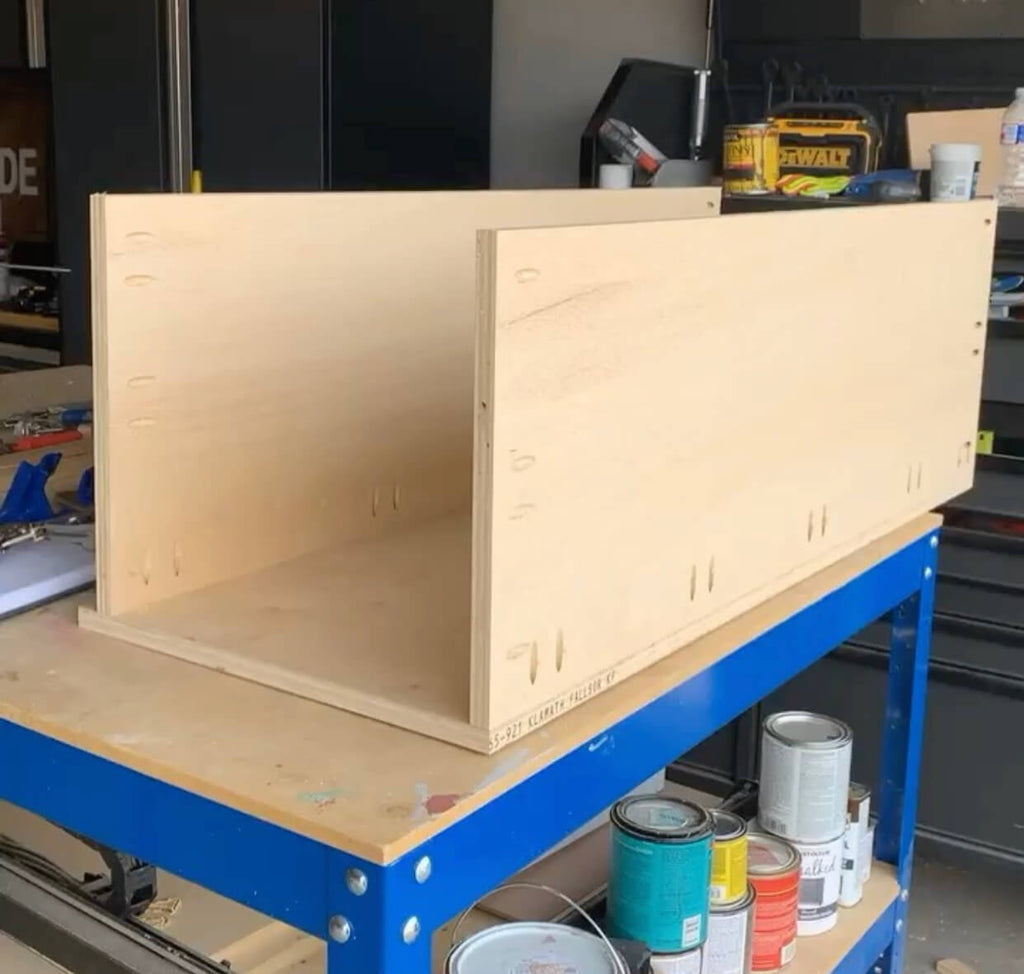
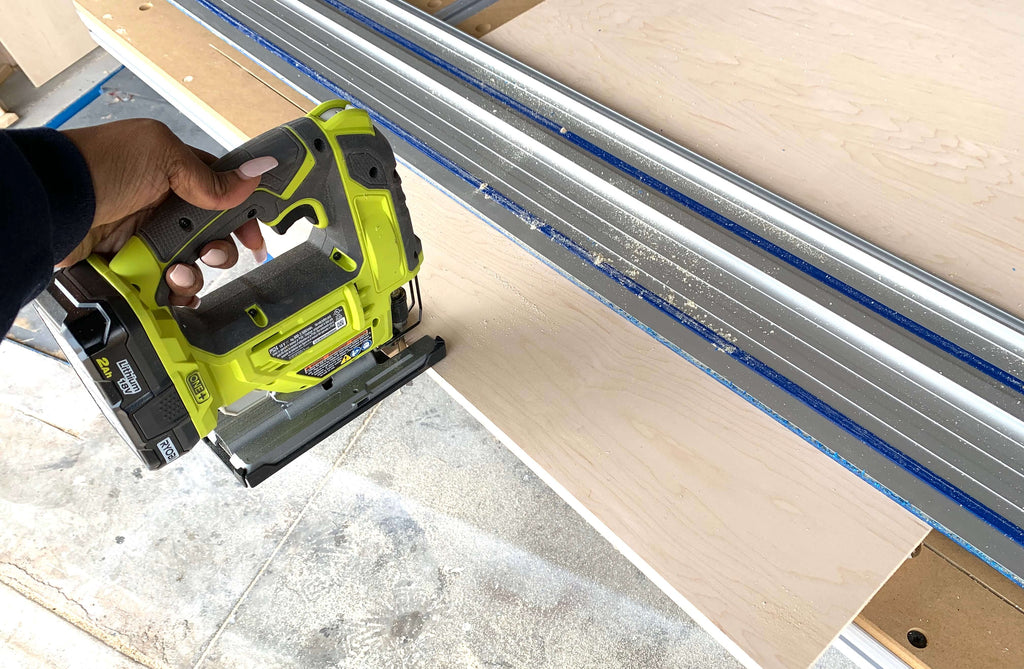
I was able to cut all of my plywood down to size using my Kreg Adaptive Cutting System. If you don't have a table saw this is a great alternative. It also feels a lot safer than that of a table saw.
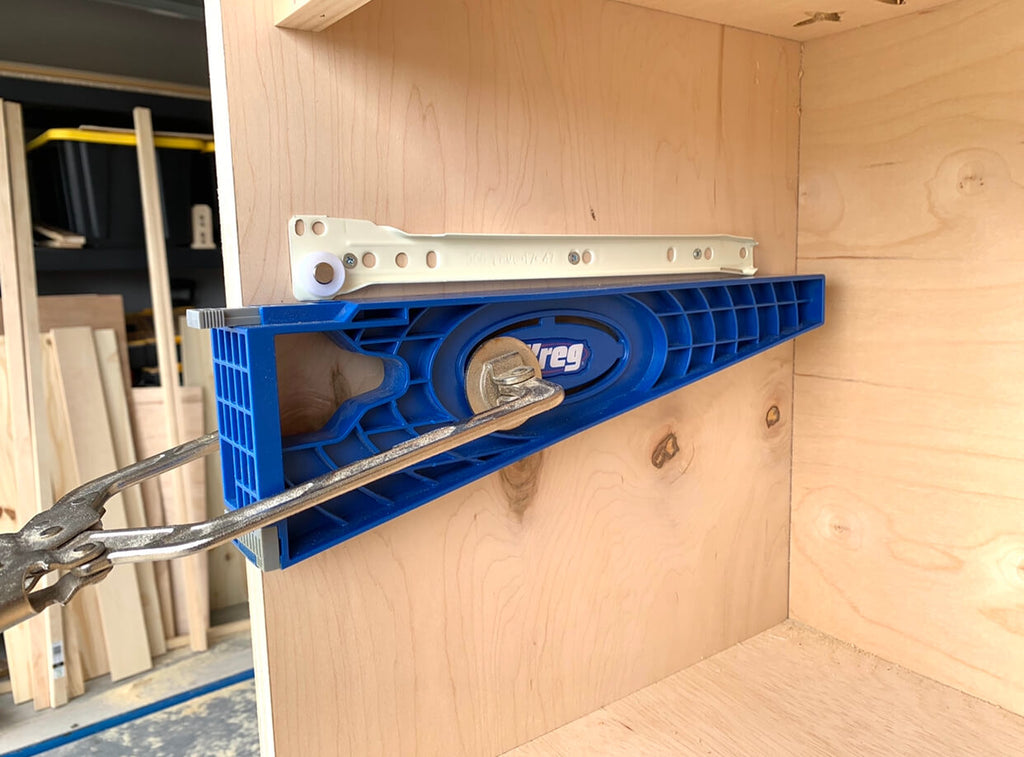
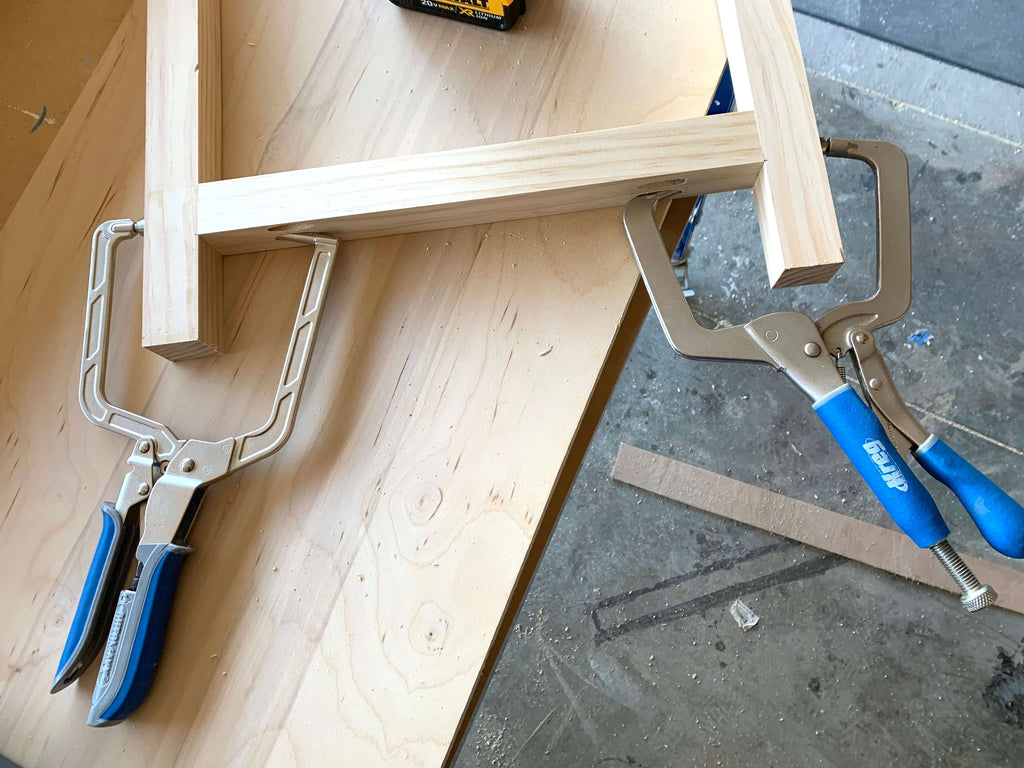
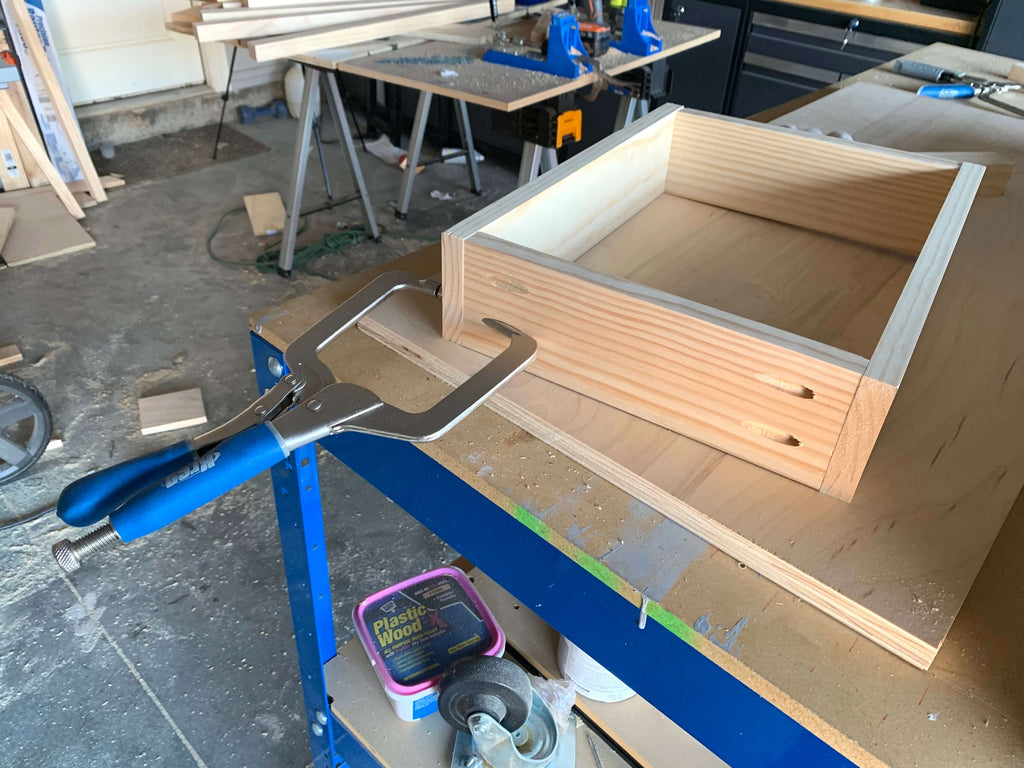
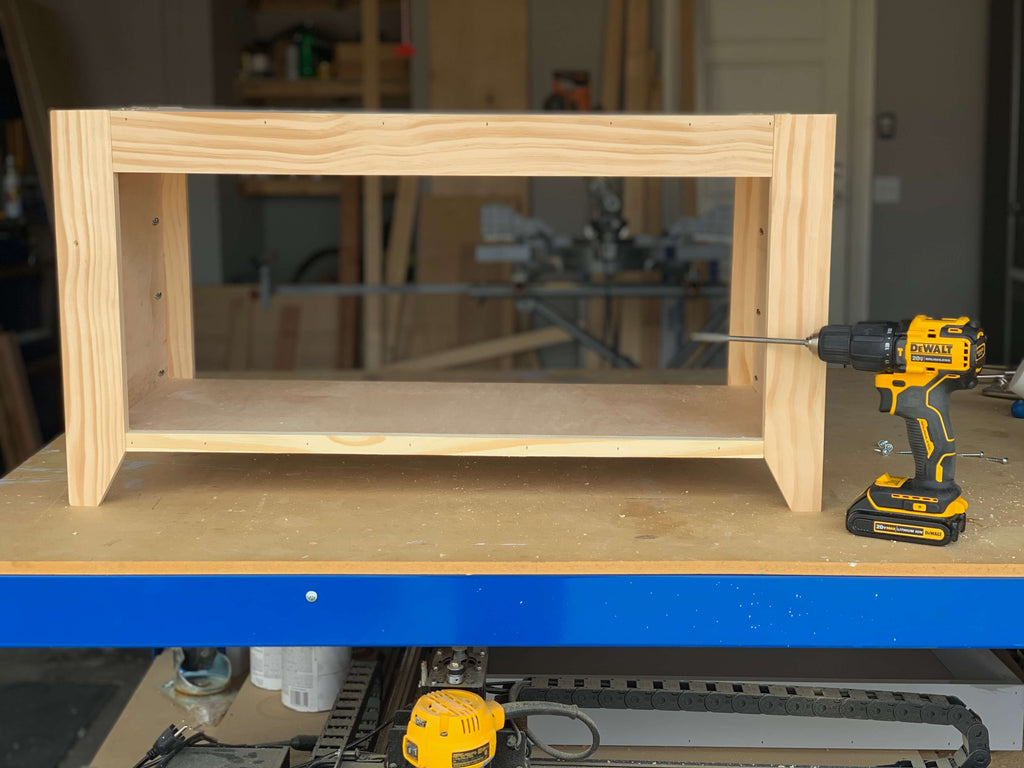
 I was able to assemble the drawer for the storage bench using my favorite right angle clamps and with the help of my Kreg drawer slides, I was easily able to create the drawer design.
I used 12” Drawer Slides for this particular build. I absolutely love the extra storage that this build provides.
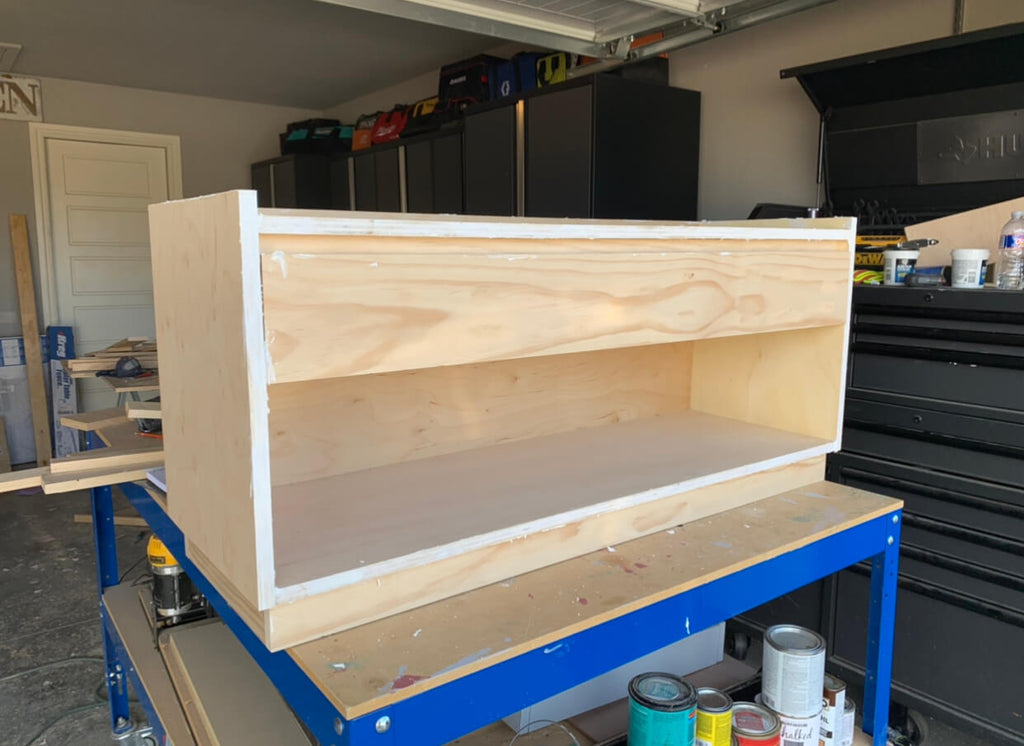
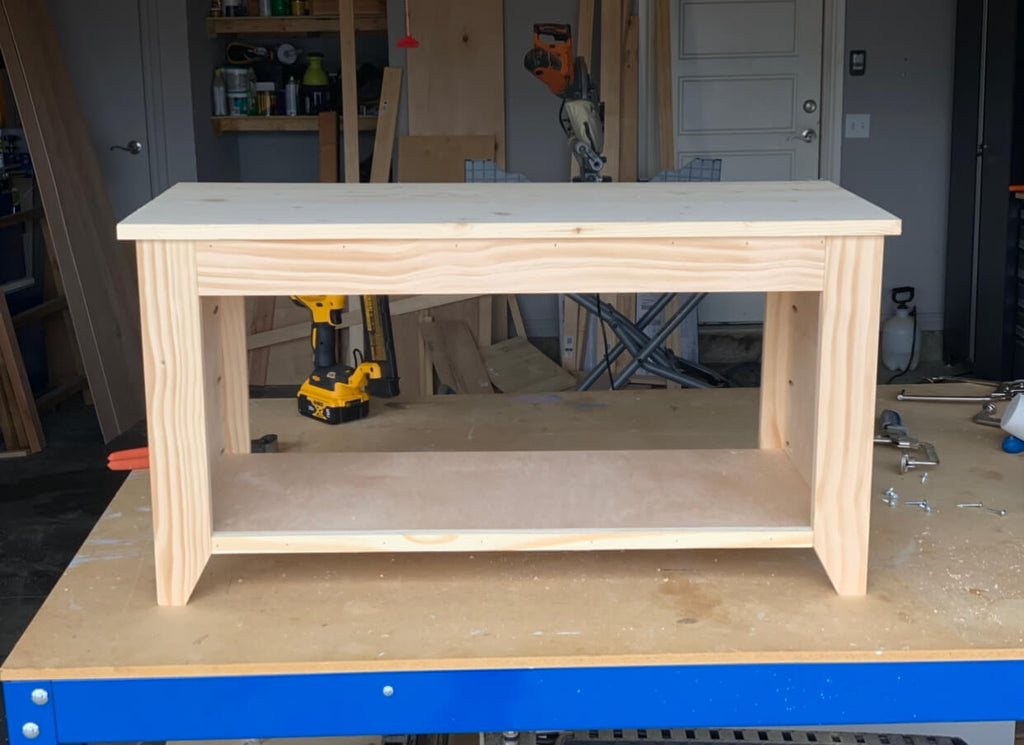
 Once the drawer was put it, my storage bench was complete, now on to the wall paneling set.
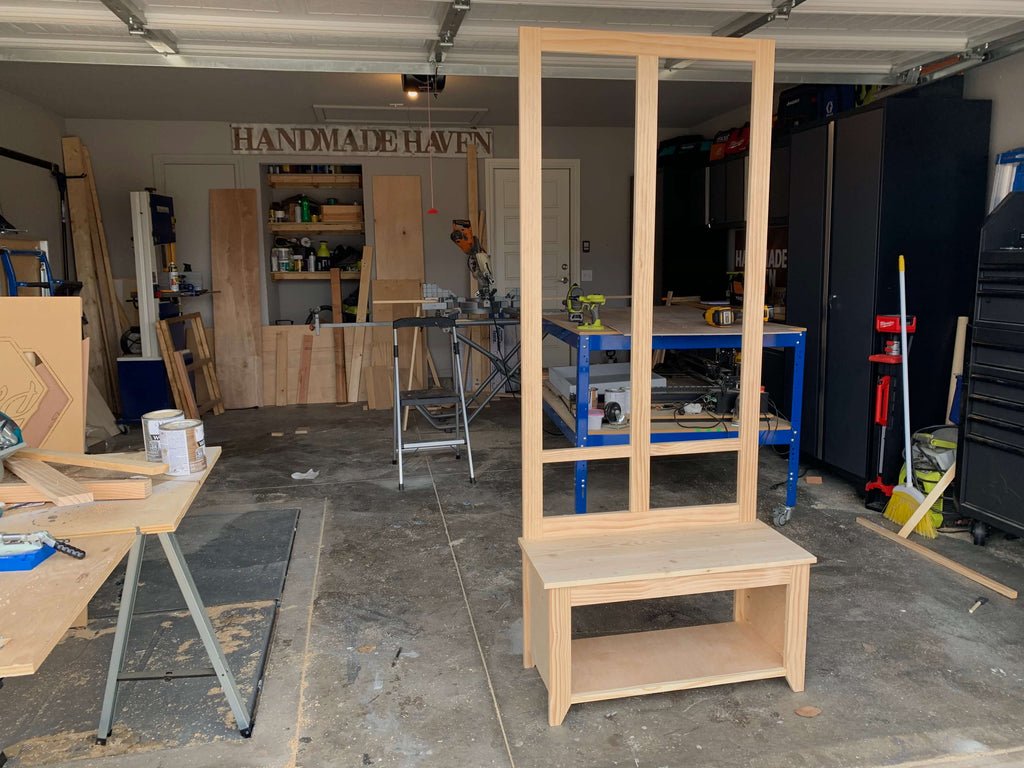
Step 2: Assemble the Wall Paneling Set
To begin the wall paneled set, I first had to cut all of my 1x2s down to the correct sizing. Once I had my 1x2s cut I started attaching them together.
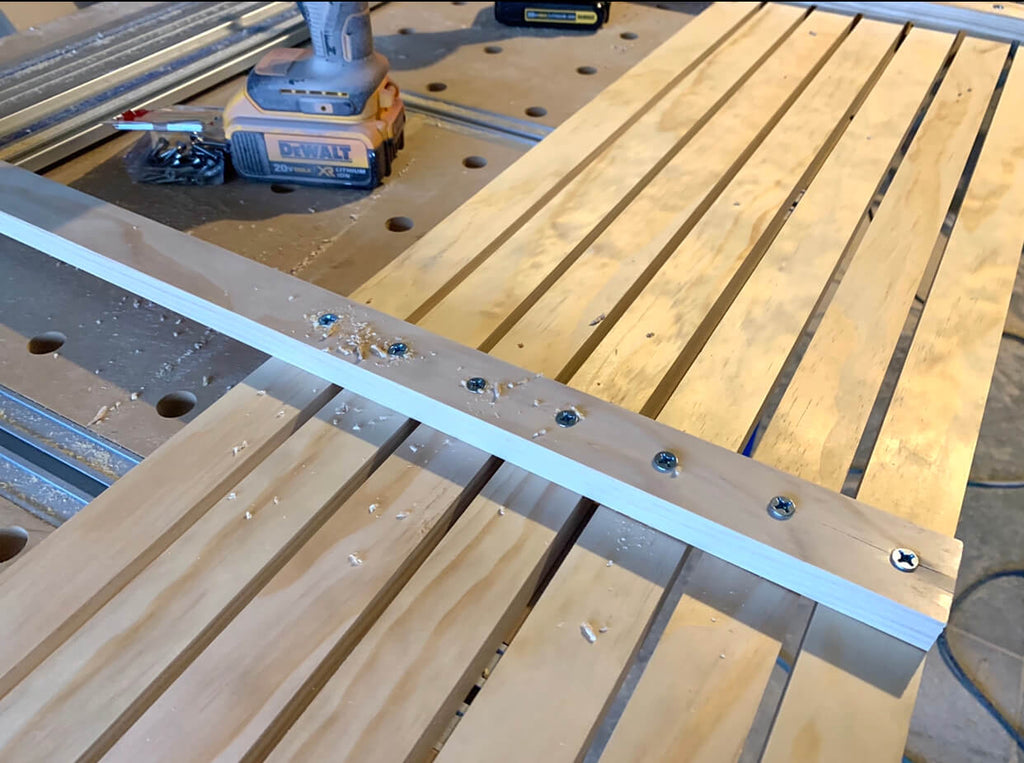
First, I placed the 23” 1x2 on top of the first 1x2, and then drilled a pilot hole first using a 5/32” drill bit, and then screwed in a 1 1/2" Wood Screws into both 1x2 boards to attach them together. Then repeated this step all of the way down.
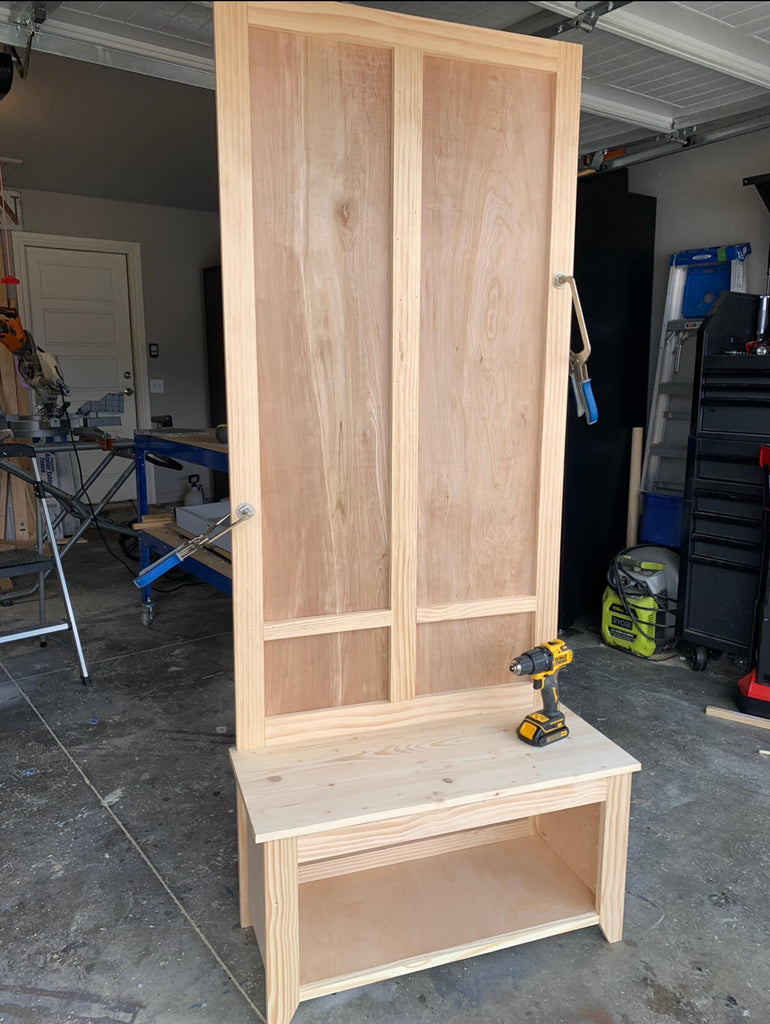
Originally, I was going to have one big panel, but it became to heavy so I decided to have two even panels. No worries though; because once you hang them up, its gives the illusion of one.
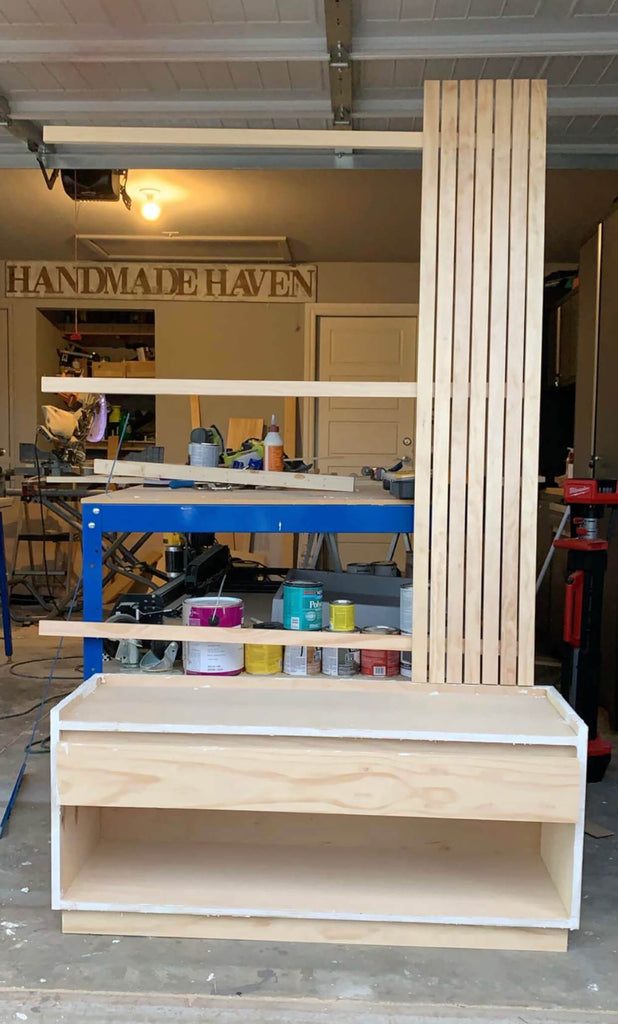
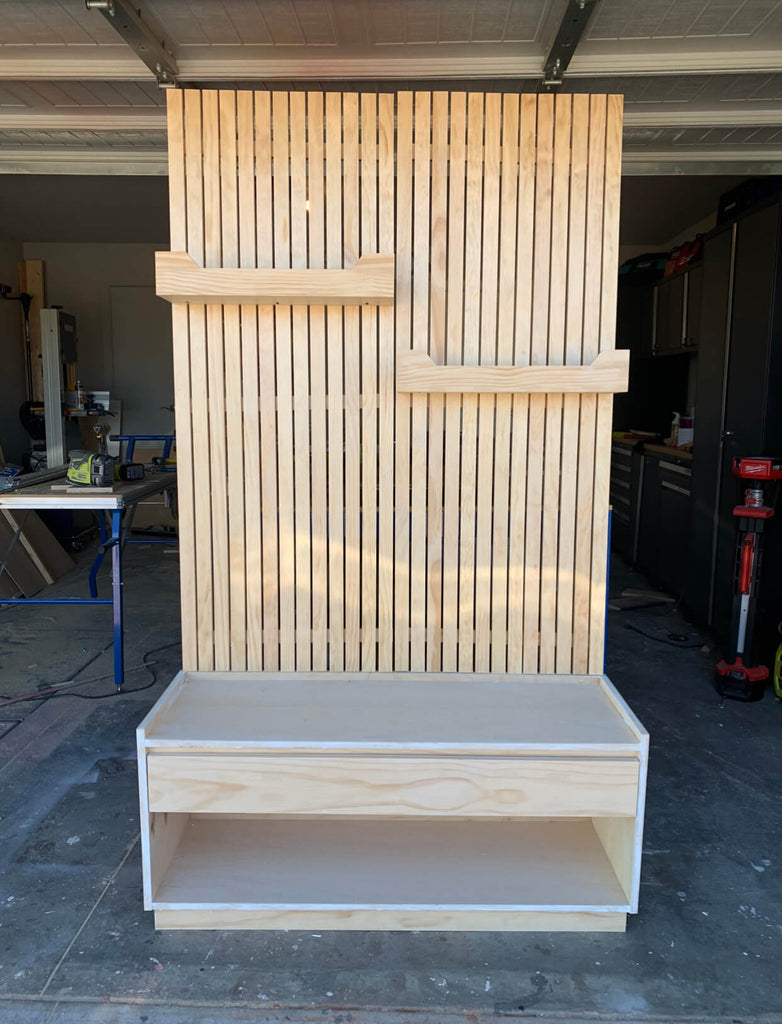
I love the look of the 1x2s together because it really brings that modern vibe. I had planned on adding shelves, but I still love how it looks without. I was drooling at this point.
If you want to see the technique of how I created this wall paneled set, check out this video on how I made this paneled coat rack. I used the same technique that I used to create this hall tree.
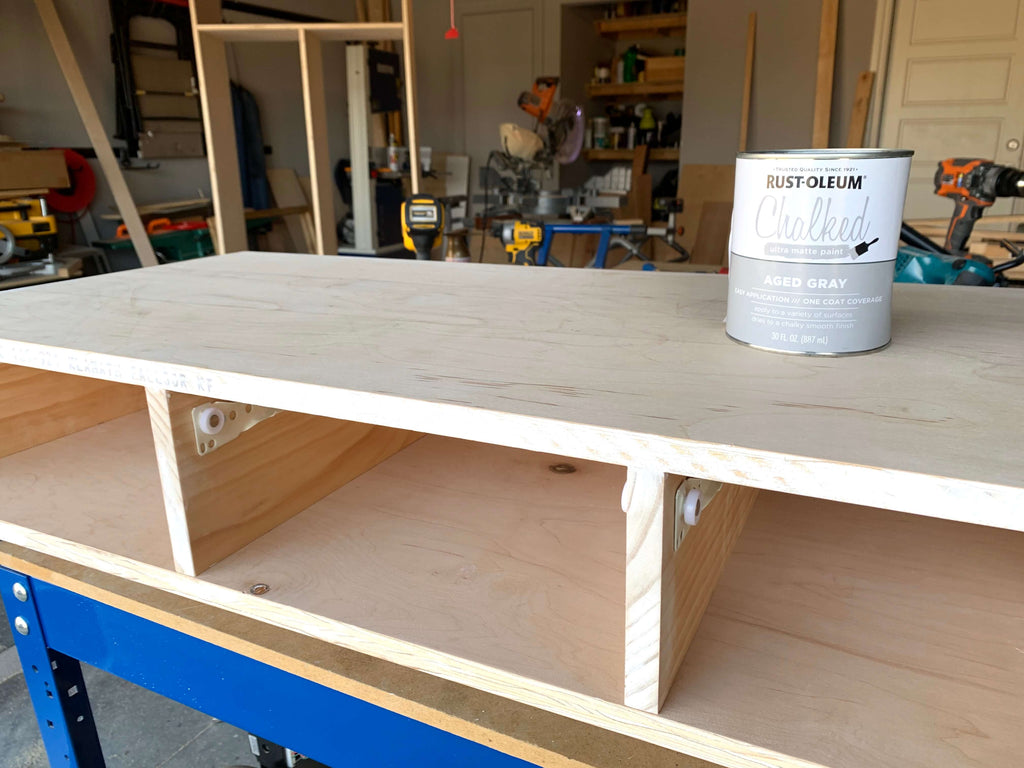
Step 3: Prep the Hall Tree Storage Bench for Stain
Once the hall tree bench was all built, it was time to prep for stain. This is always my most least favorite part, but its an important step.
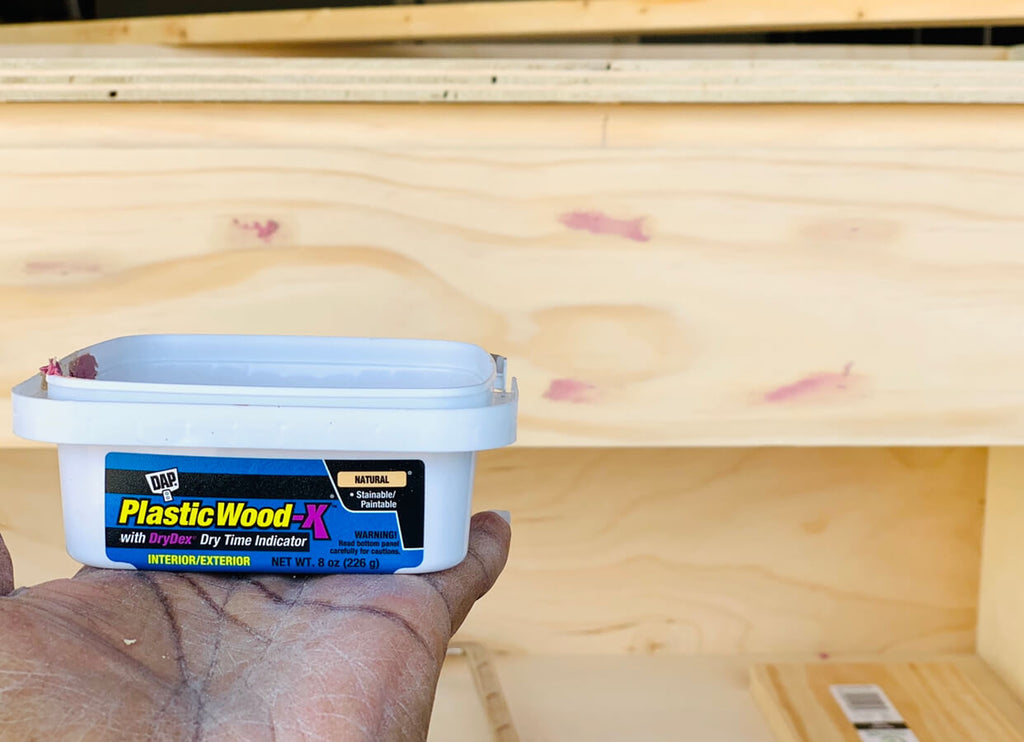
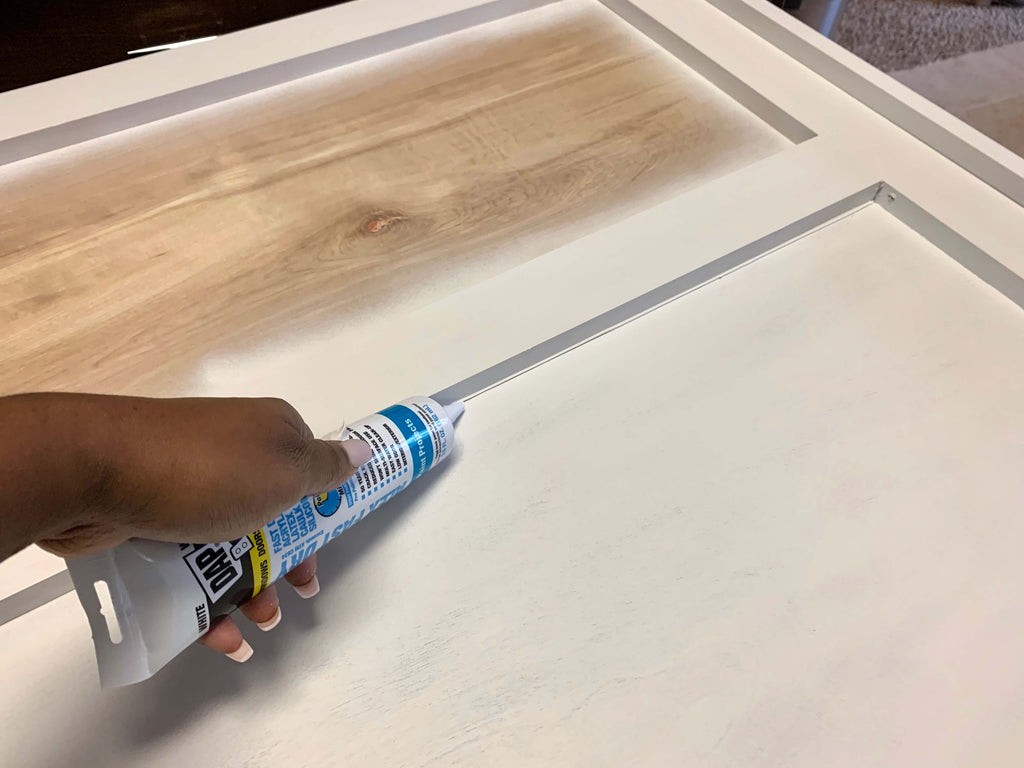
I first used my DAP Wood Filler to fill in all of the nail holes that I created on the panels and the storage bench. You definitely want to fill the nail holes on the wall panels to give them a seamless look.
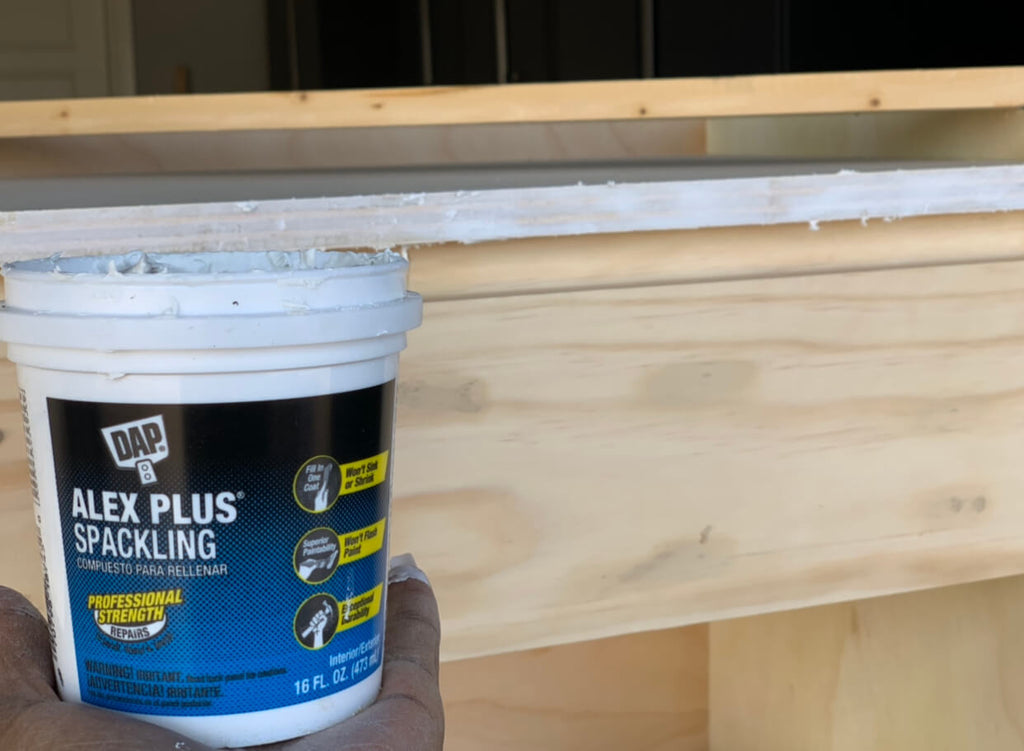
Next, I used to DAP Spackle to fill the plywood edges. This is a little trick I use to make plywood edges straight. Once I filled in all of the edges, I sanded her down with some sandpaper to make it nice and smooth for stain.
Step 4: Stain the Hall Tree
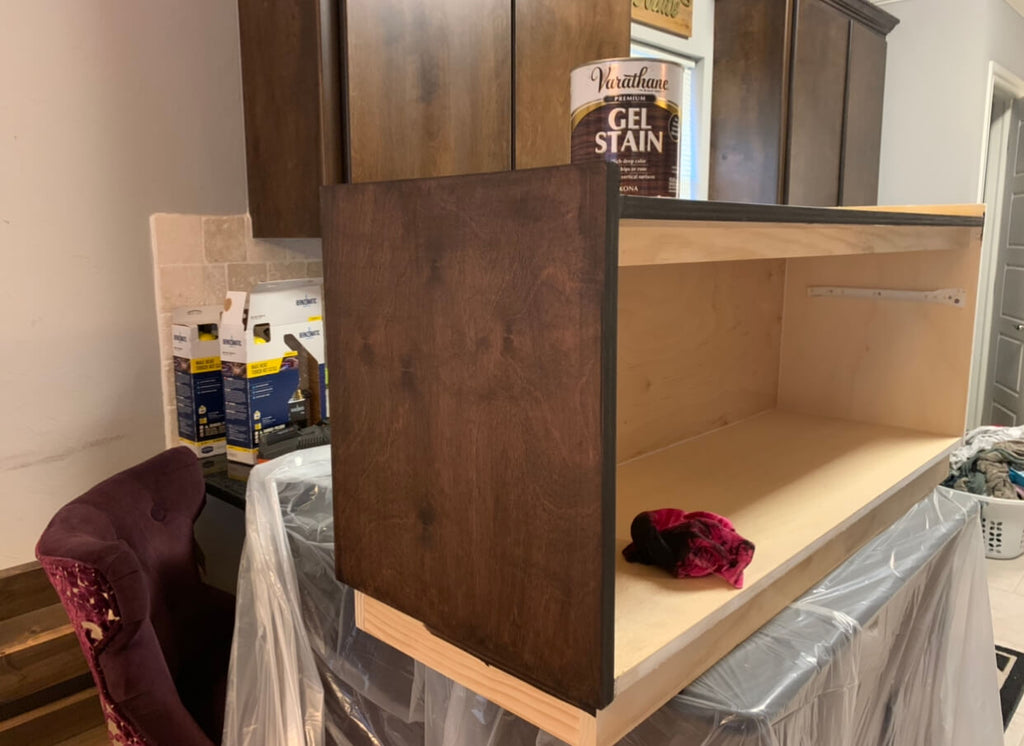
Once my build was all prepped, I begin staining. I decided to go with Rustoleum Kona Gel Stain and man did she look good. To apply the stain to the storage bench, I just used an old rag to wipe it down. I was able to easily apply it to the plywood and it made it look really good!
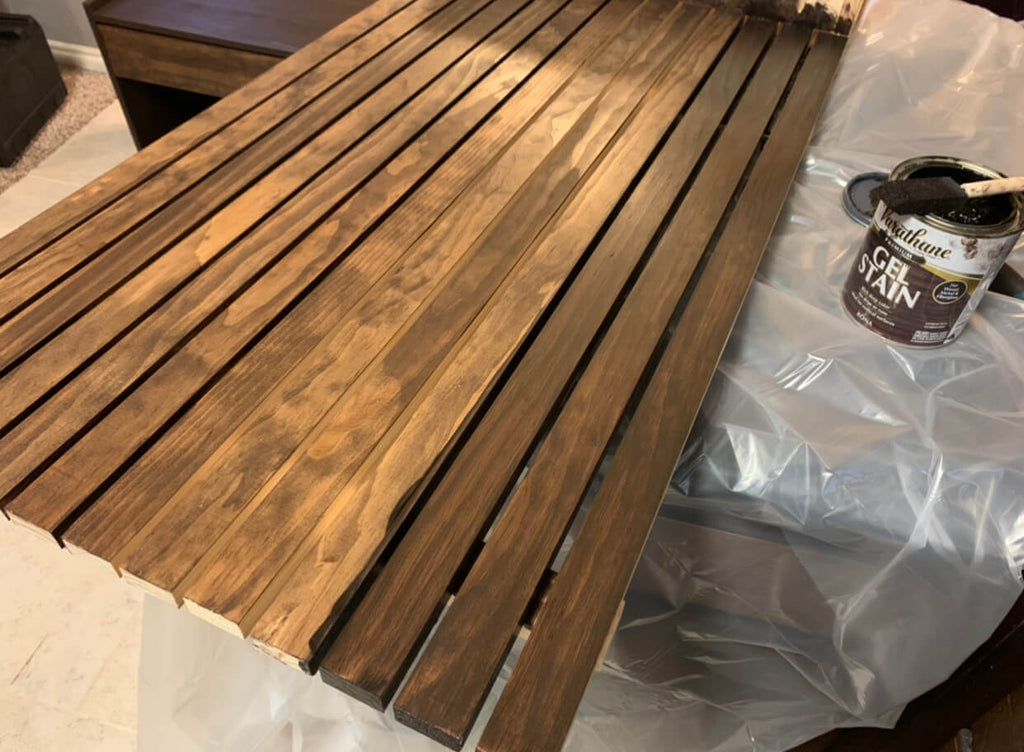
For the wall paneling, I first wiped it down with a rag at first, but I noticed the color wasn't coming out as rich as the storage bench, so I decided to use a small foam brush to wipe the gel stain on and that definitely did the trick. The little foam brush also helped to get in between the cracks of the the panels.
As you can see, the second time through made the panels look rich. I applied a heavy amount the second time around to get that deep rich color.
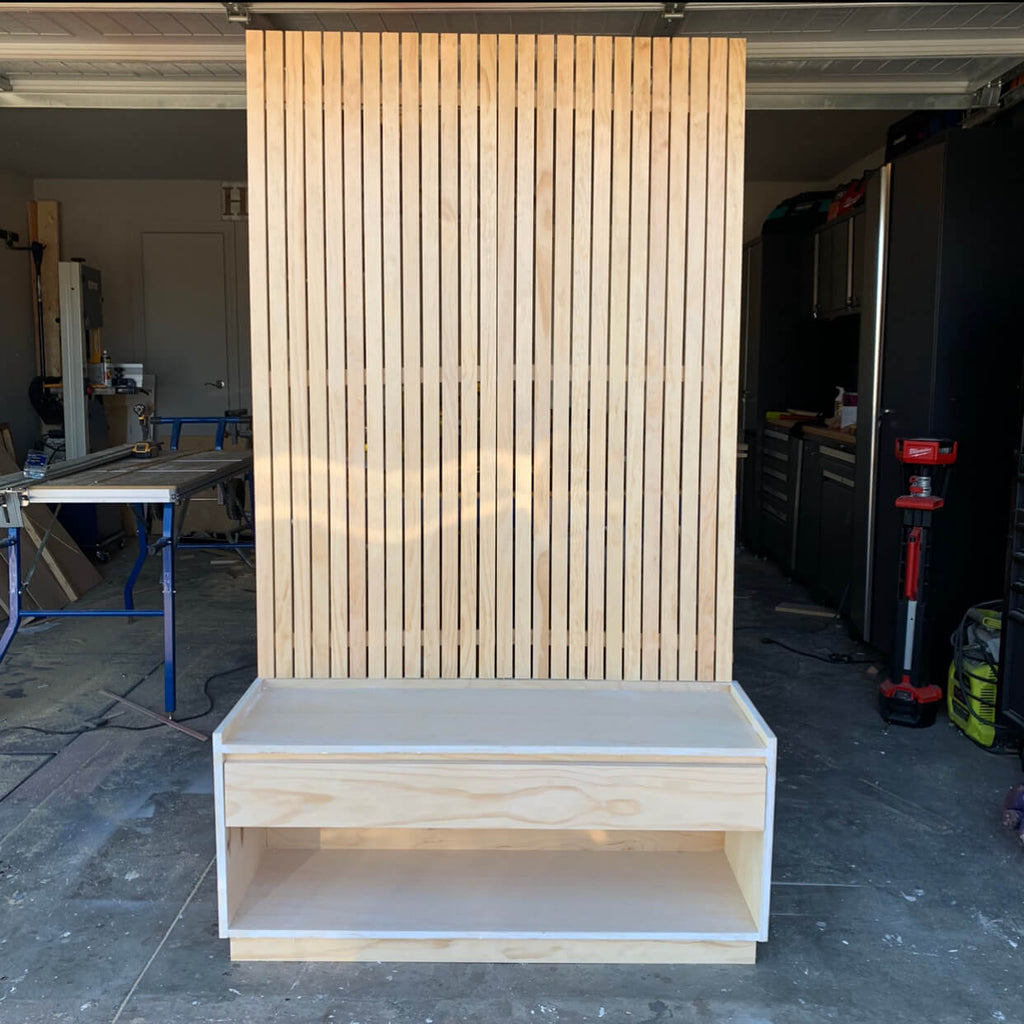
Step 5: Hang the Wall Paneled Set
Now you may be thinking; how the heck did she get that hung up. Well its a little easier than you may think. I first put my storage bench where I wanted it and then set one of my panels on top.
Once I had one of the panels where I wanted it, I marked where the top 1x2 was on the wall so I would know where it needed to go and then I used this metal cleat hanging system to hang them on the wall.
You screw one side of the metal cleat system to the wall and then the other side to the paneled set, and it allows you to hang the panel right on the other side of the cleat. I did one side and then the other
I made sure to hang the panel set so that it sits right on the storage bench for extra support and that's ends the hall tree journey.
Whether you want to create a fun storage bench or the full hall tree, this project is the perfect addition for your home entryway.
As always, thanks for reading guys! XOXO, Ashley

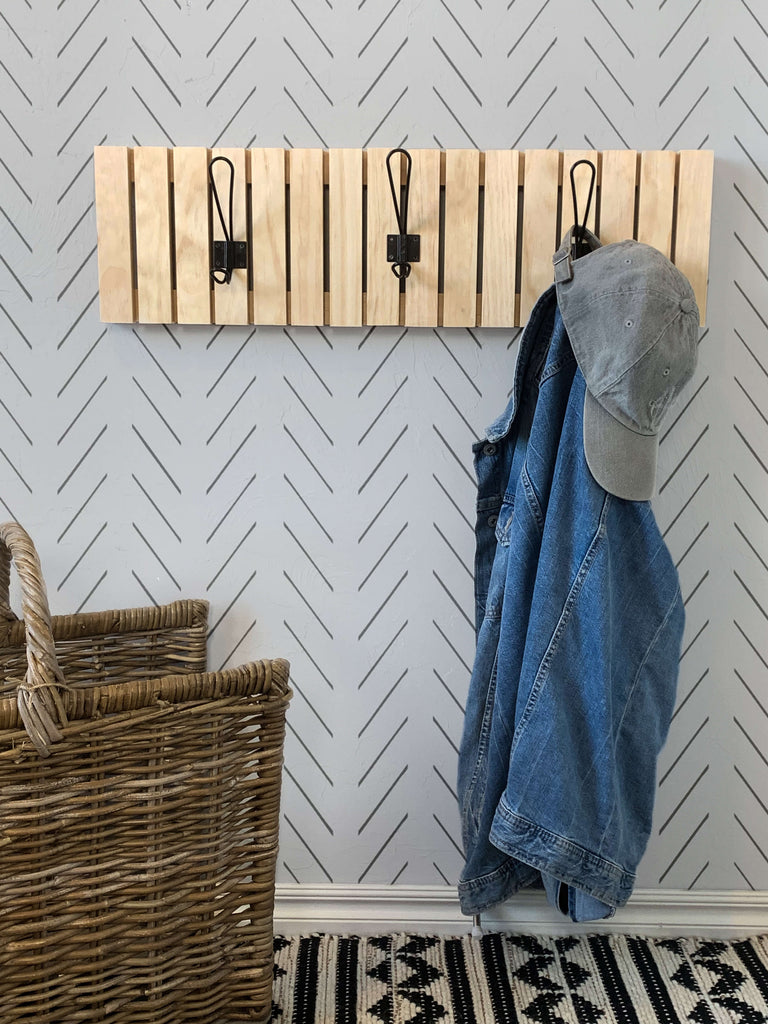
DIY Modern Wall Coat Rack
"A modern Coat Rack perfect for the weekend."
I am super excited to share today's project with you because it wasn't necessarily planned, but doesn't that make for the best projects? I had a bunch of scrap wood lying around and needed to get rid of it, so I figured, why not use some of that wood to create a fun project.
Let's just say that I made a good call. This DIY Modern Coat Rack was super fun and easy to make and a great addition to my small entryway. If you're like everyone else right now, you're spending a lot of time at home, so we might as well put our time to good use.
"There are some affiliate links in this post, meaning I get a small commission if you purchase through these links, at no cost to you. Click Here to read my full disclosure."
Materials/Tools
- 3 - 1x2s @ 6"
- 1/4" Dowel
- Coat Hooks
- 1 1/2" Wood Screws
- Drill Bit
- Impact Drill
- Miter Saw
Step 1: Cut Down Wood to Size
First, I used my miter saw to cut all of my wood down to size. I cut my smaller 1x2s down to approximately 8" and I cut my longer 1x2s down to approx. 23".
Feel free to make this coat rack as long as you'd like to fit your needs. I personally think the wall rack would have looked a little better longer, but I had to make it small enough to fit my particular space.
Step 2: Attach 1x2s to Stretchers
Once the wood is all cut down to size, I begin attaching the 1x2s. First, I used a 5/32" bit to drill pilot holes into the two 1x2s.
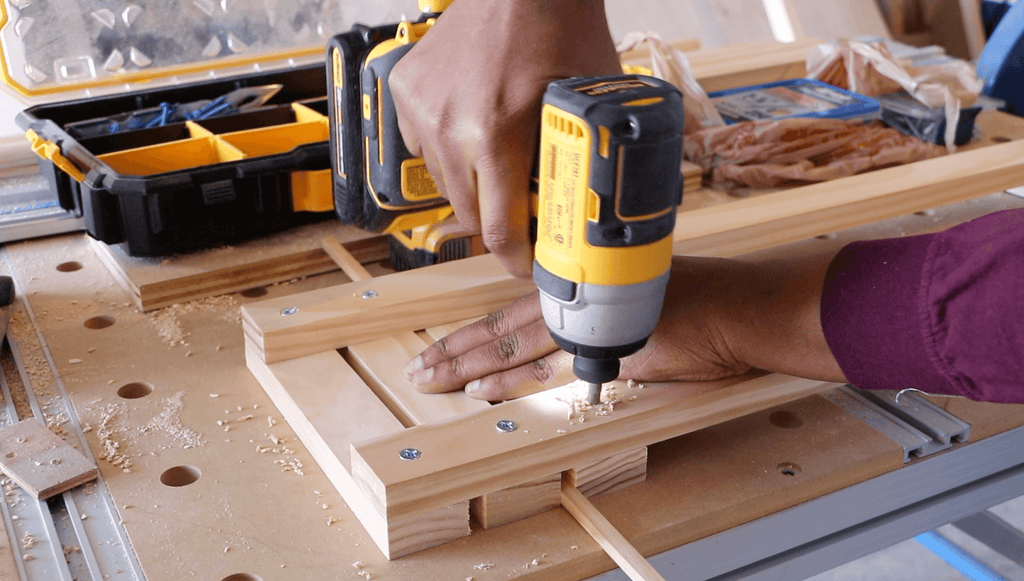 Once the pilot holes were made, I screwed in the wood screws into the two 1x2s using my impact drill.
 To get the accurate spacing between the two, I used a 1/4" dowel and placed them between the boards while screwing in the wood screws.
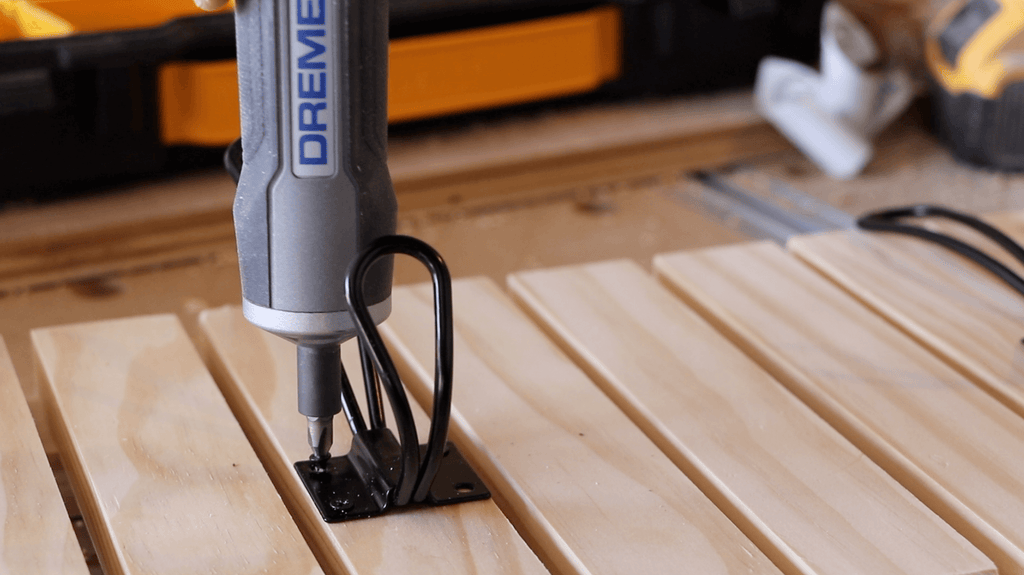
Step 3: Attach Coat Hooks
Once the coat rack was complete, I added three coat hooks to finish the look. I used my Dremel Go screwdriver to drive in the screws since they were so small. This tool allows you to drive in screws by just pressing the tool into the screw.
 Now let's take another look at the coat rack! I would say this was a successful Scrap DIY?
 Let me know what you think in the comments below and as always thanks for reading guys, XOXO Ashley.

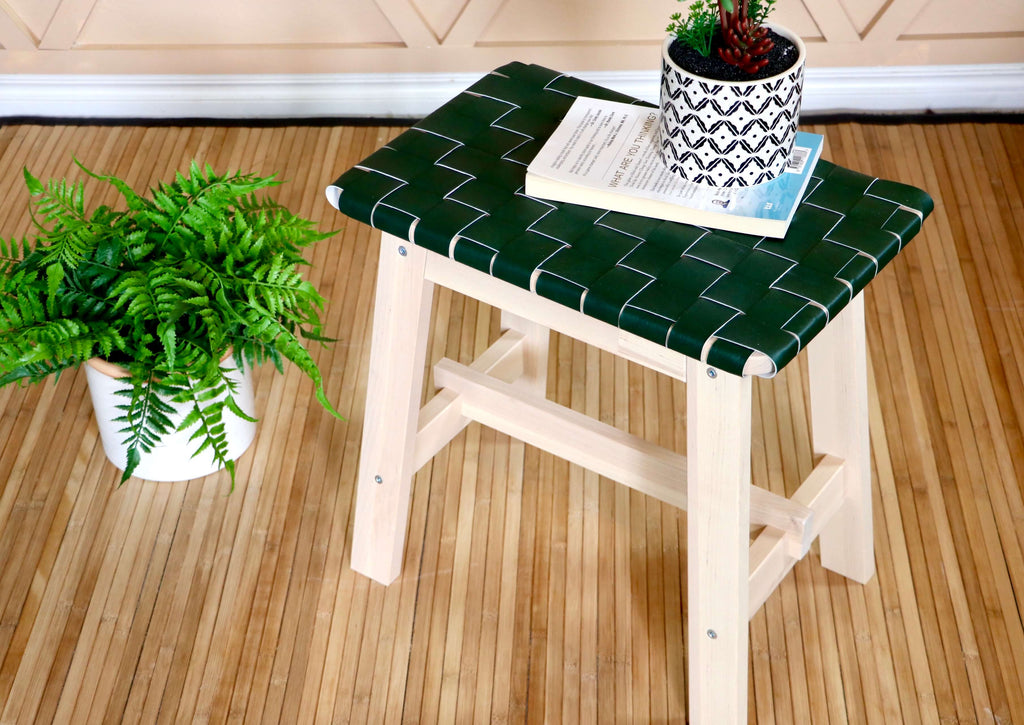
Ikea Stool Hack
"This Ikea Stool Hack is one for the books"
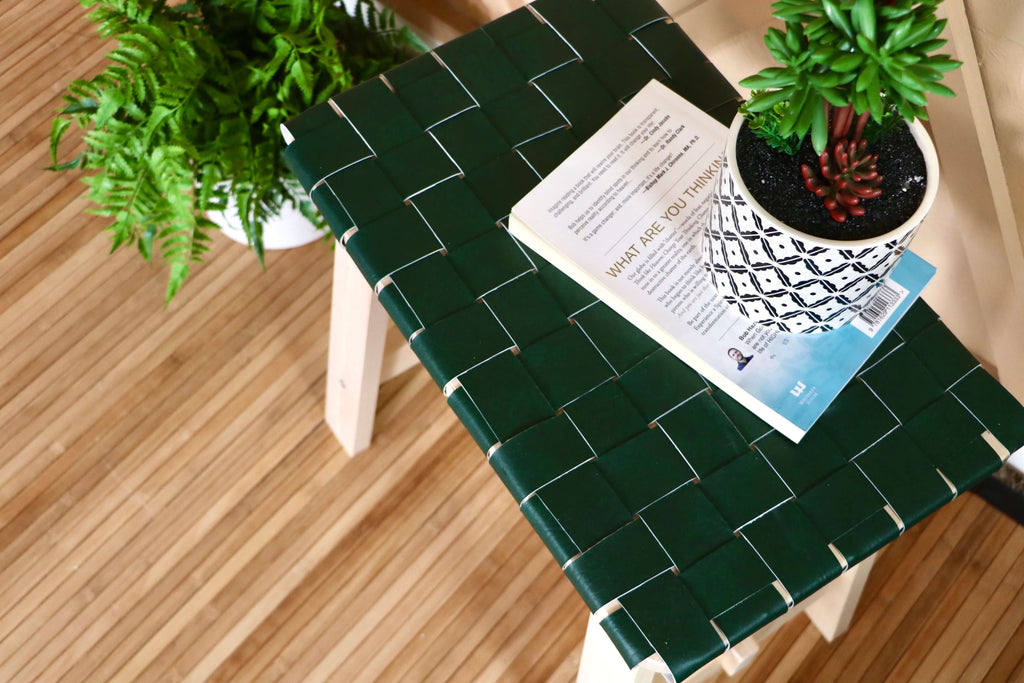
Now enough of the chatter, let's take a look at the process of creating this fun leather woven stool.
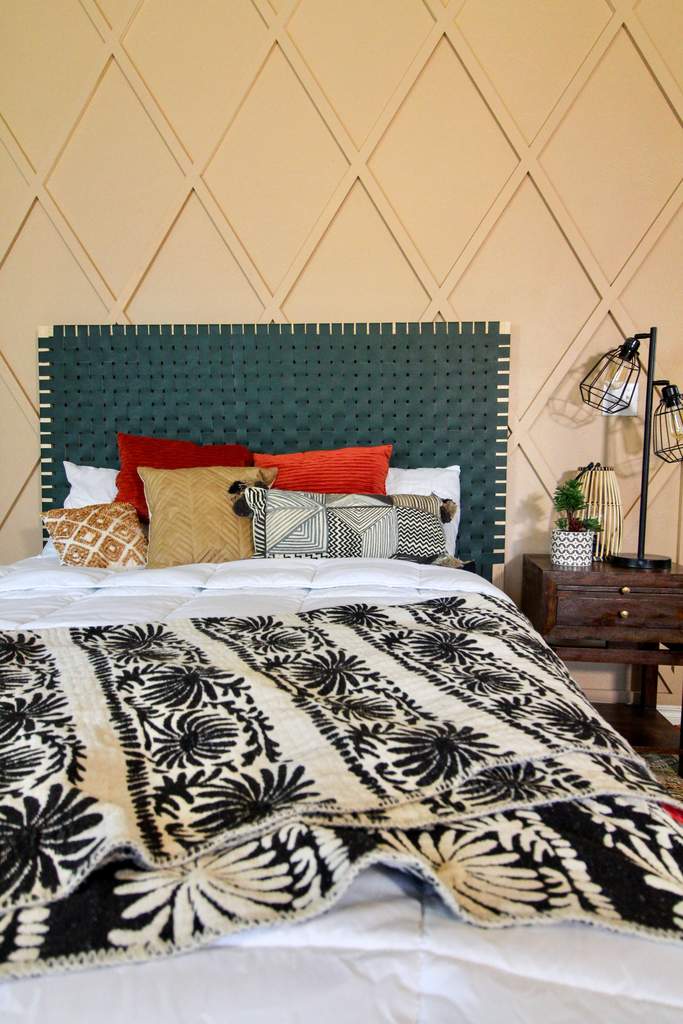
If you enjoyed this technique, I am happy to share that I have two other inspirational projects where I used this technique. The first project was a Faux Leather Woven Headboard, where I used the same color fabric. You can check that out here.
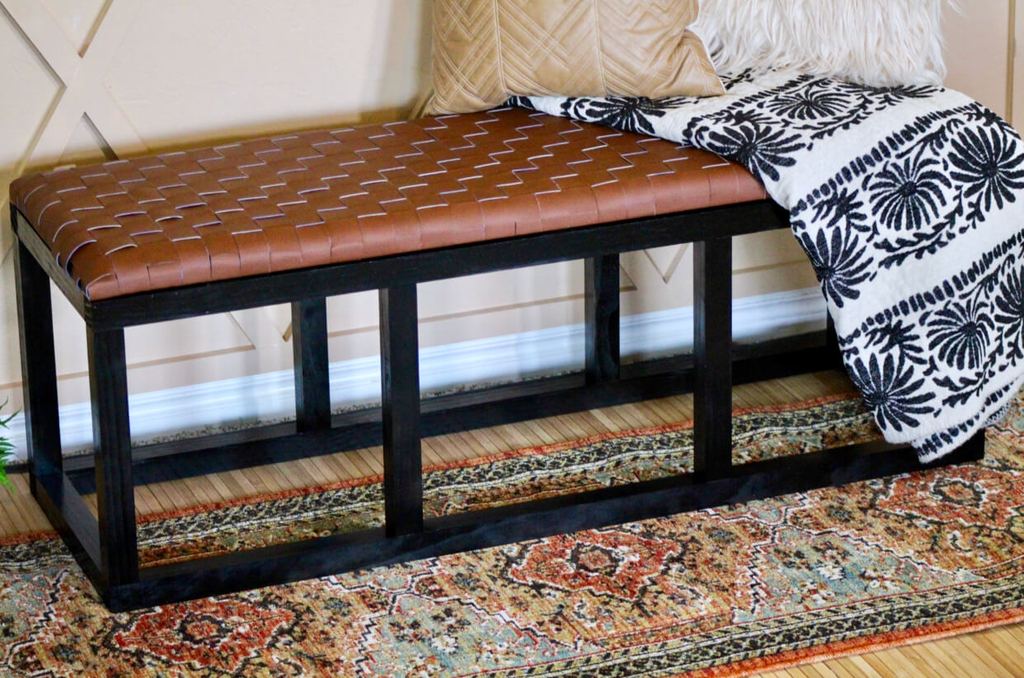 The second project was the Faux Leather Woven Bench, where I used a brown color using the same kind of fabric but on a bench I built. You can see that here.
 I just love the endless possibilities you can achieve with this technique.
Welp, that pretty much wraps it up. I hope you enjoyed my take on the style challenge and I hope to see this leather woven technique in your projects.
Head on over to Apartment Therapy for more challenge details and to check out some of the other projects from a few other bloggers.
Thanks so much for reading guys, XOXO Ashley

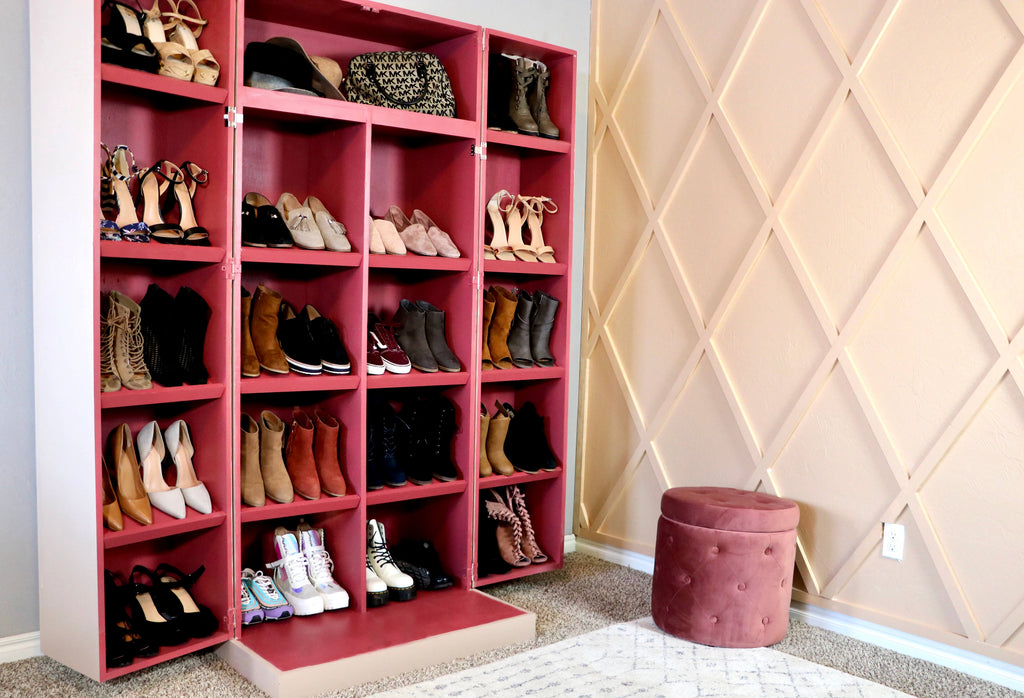
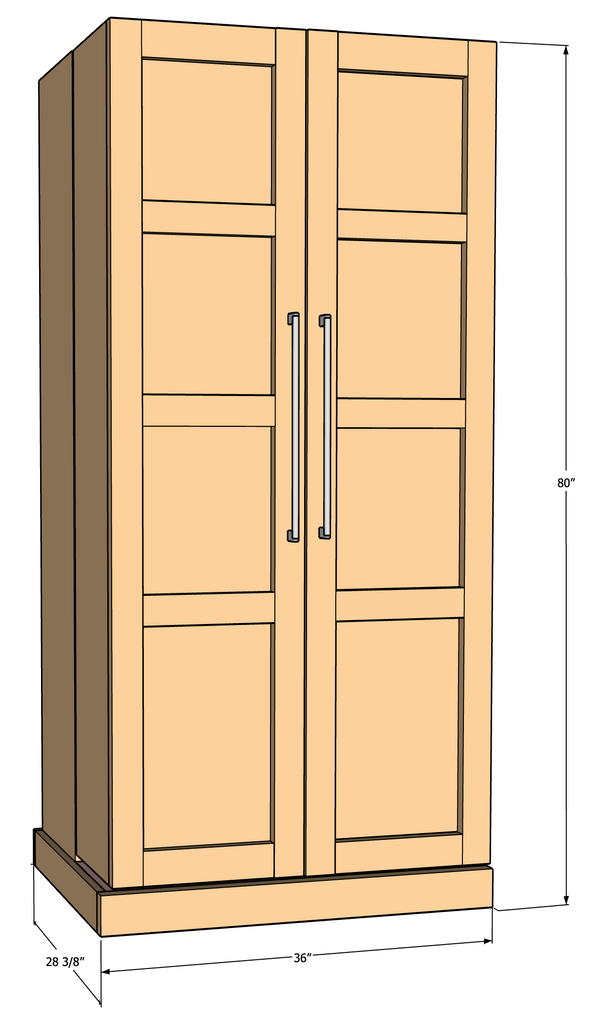
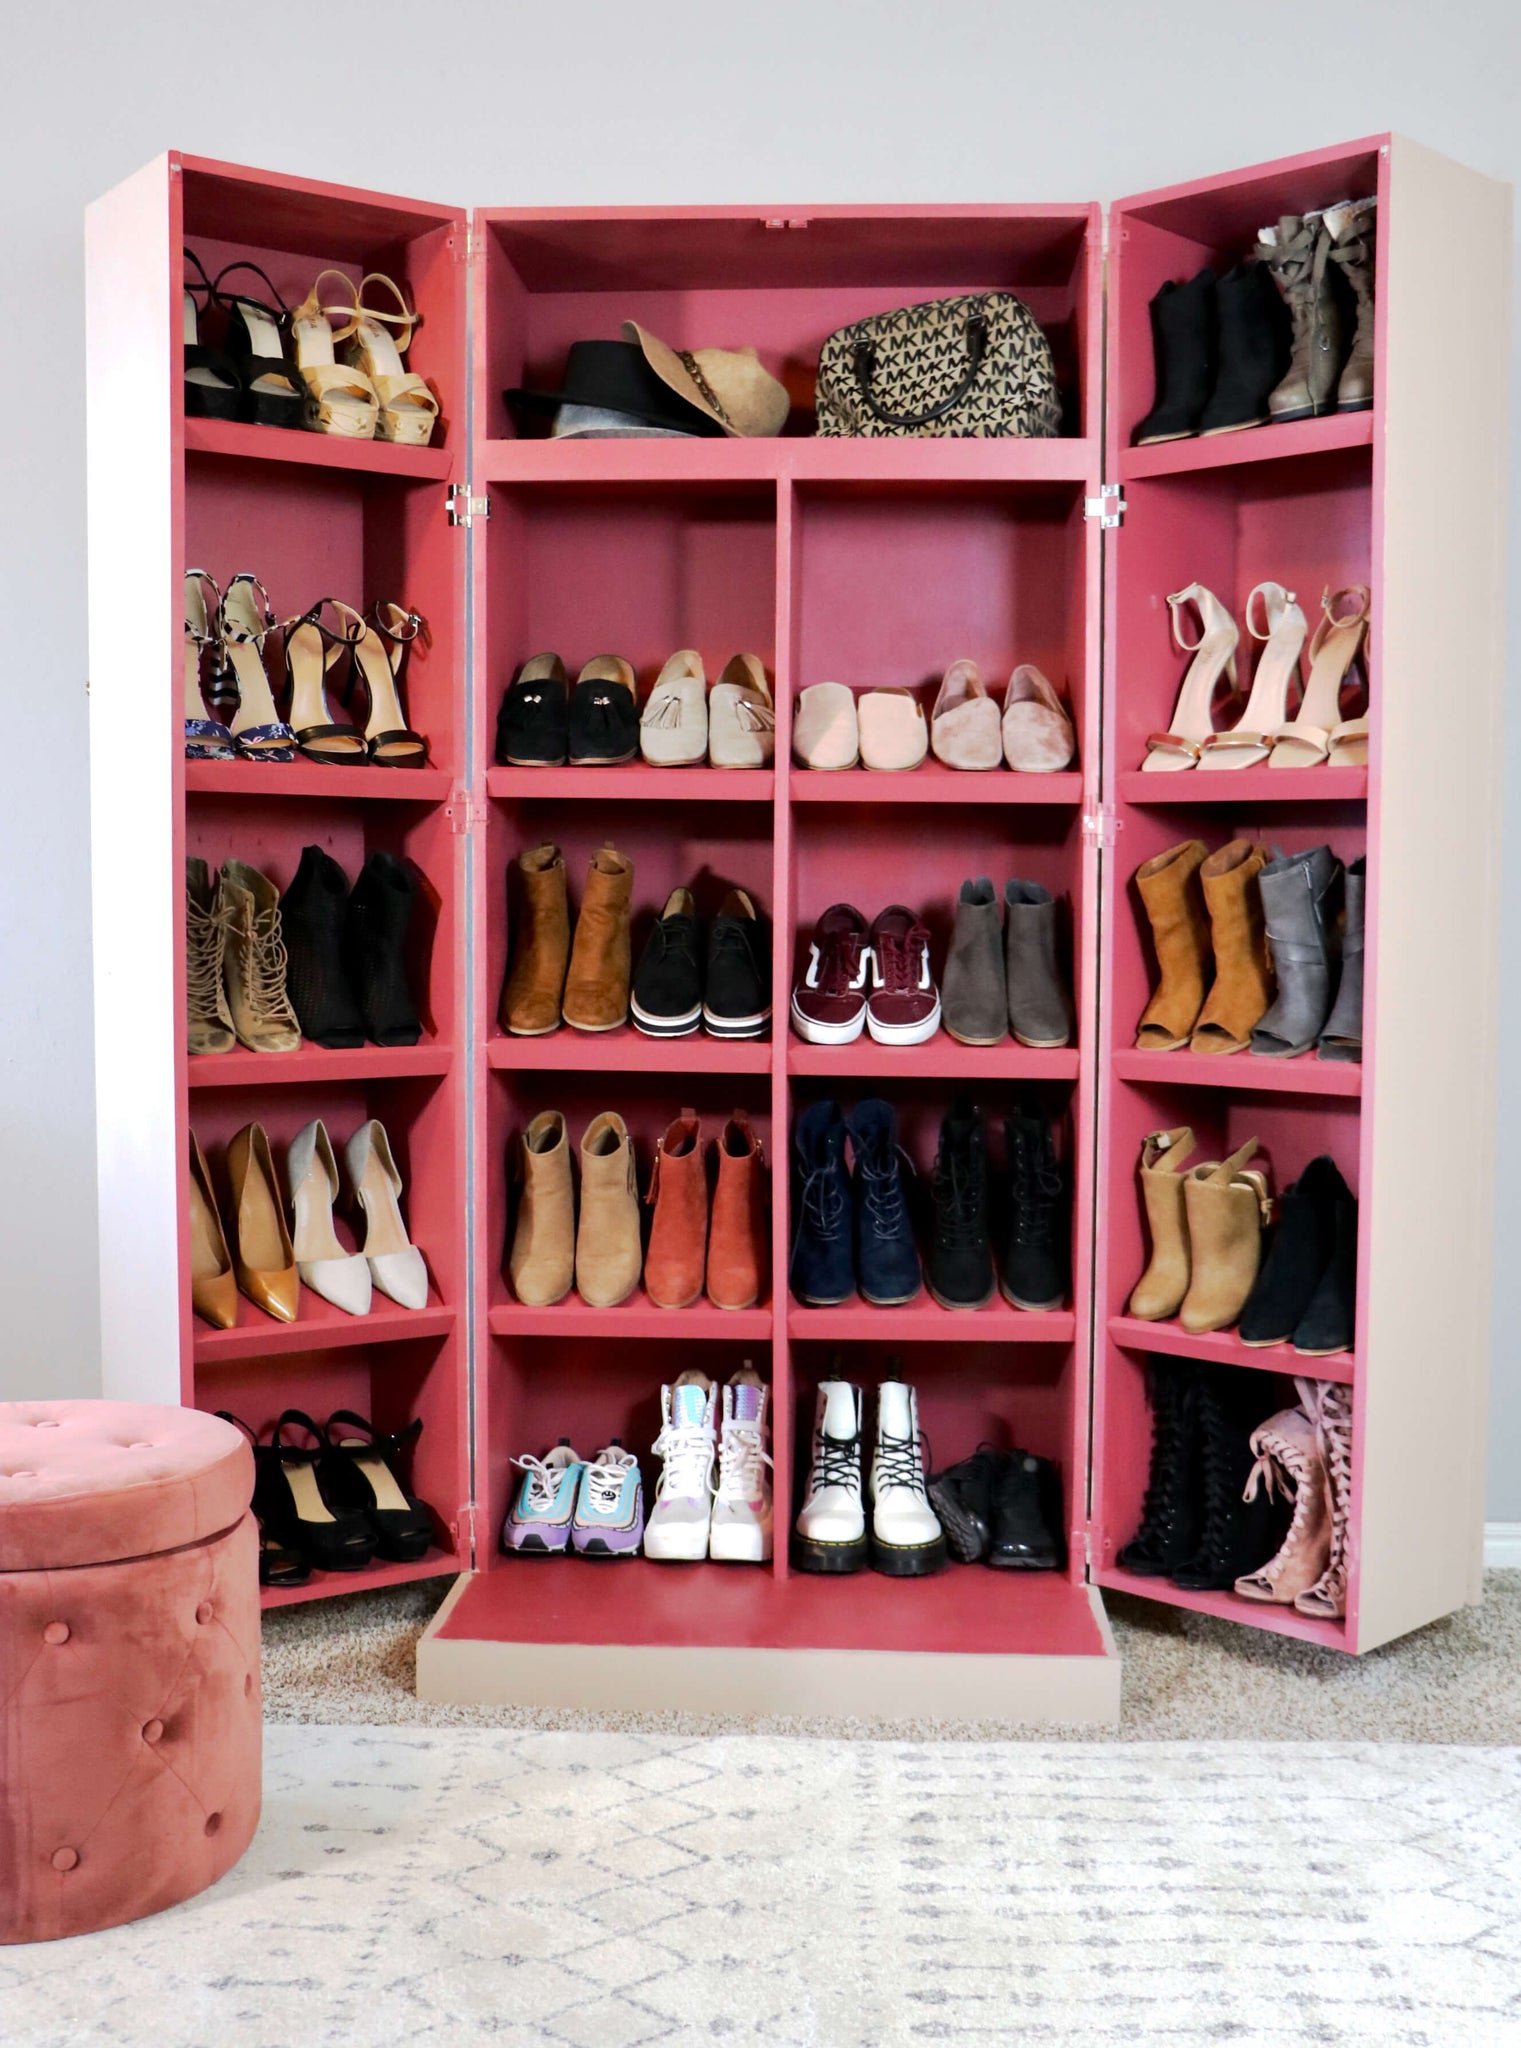
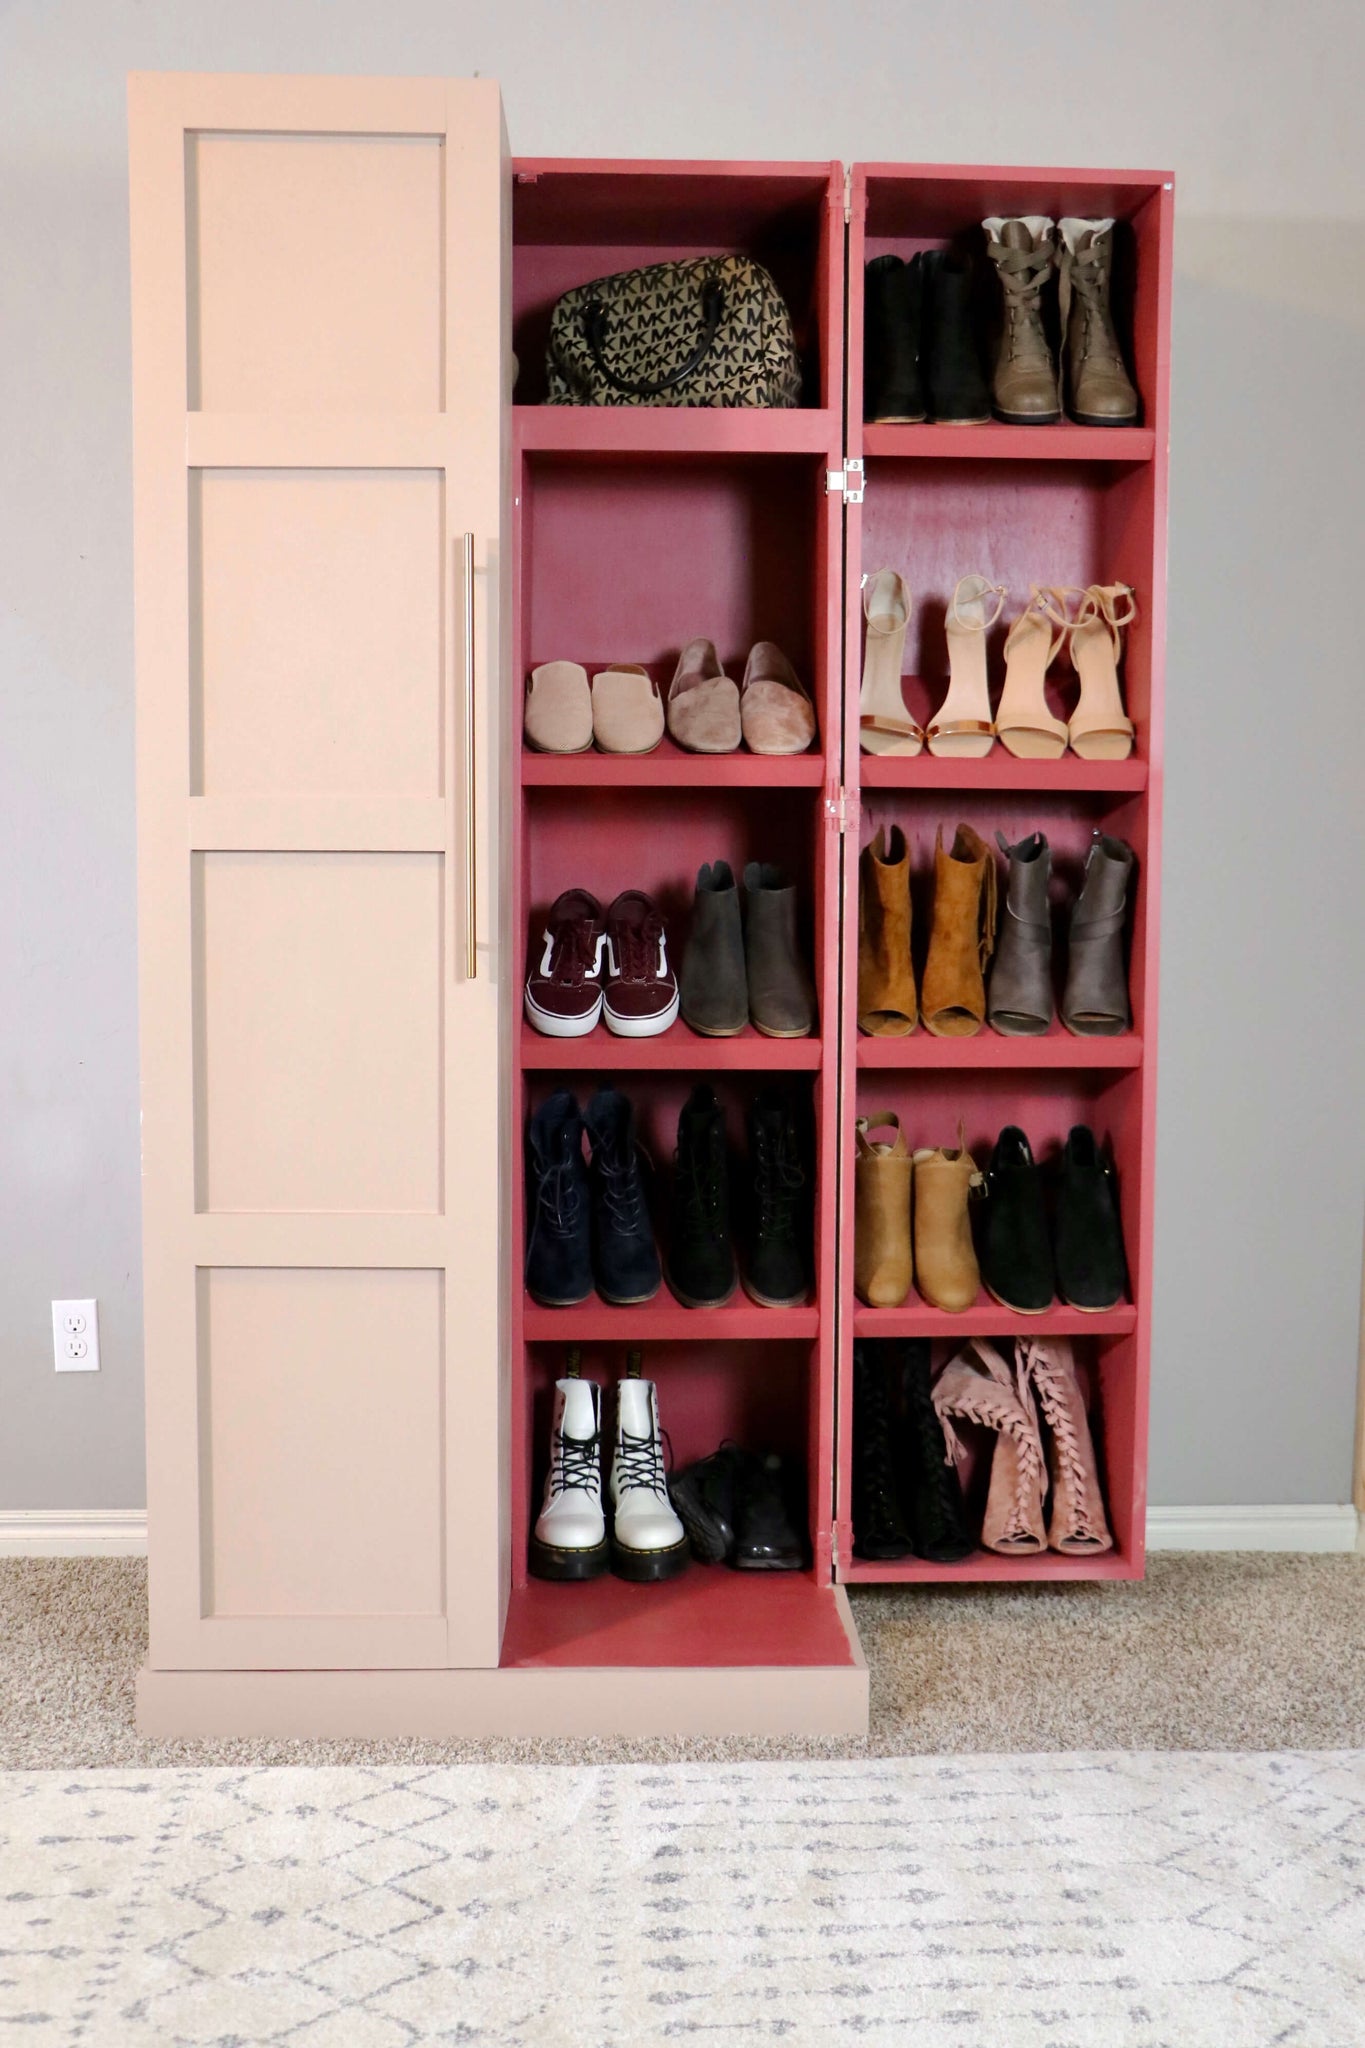
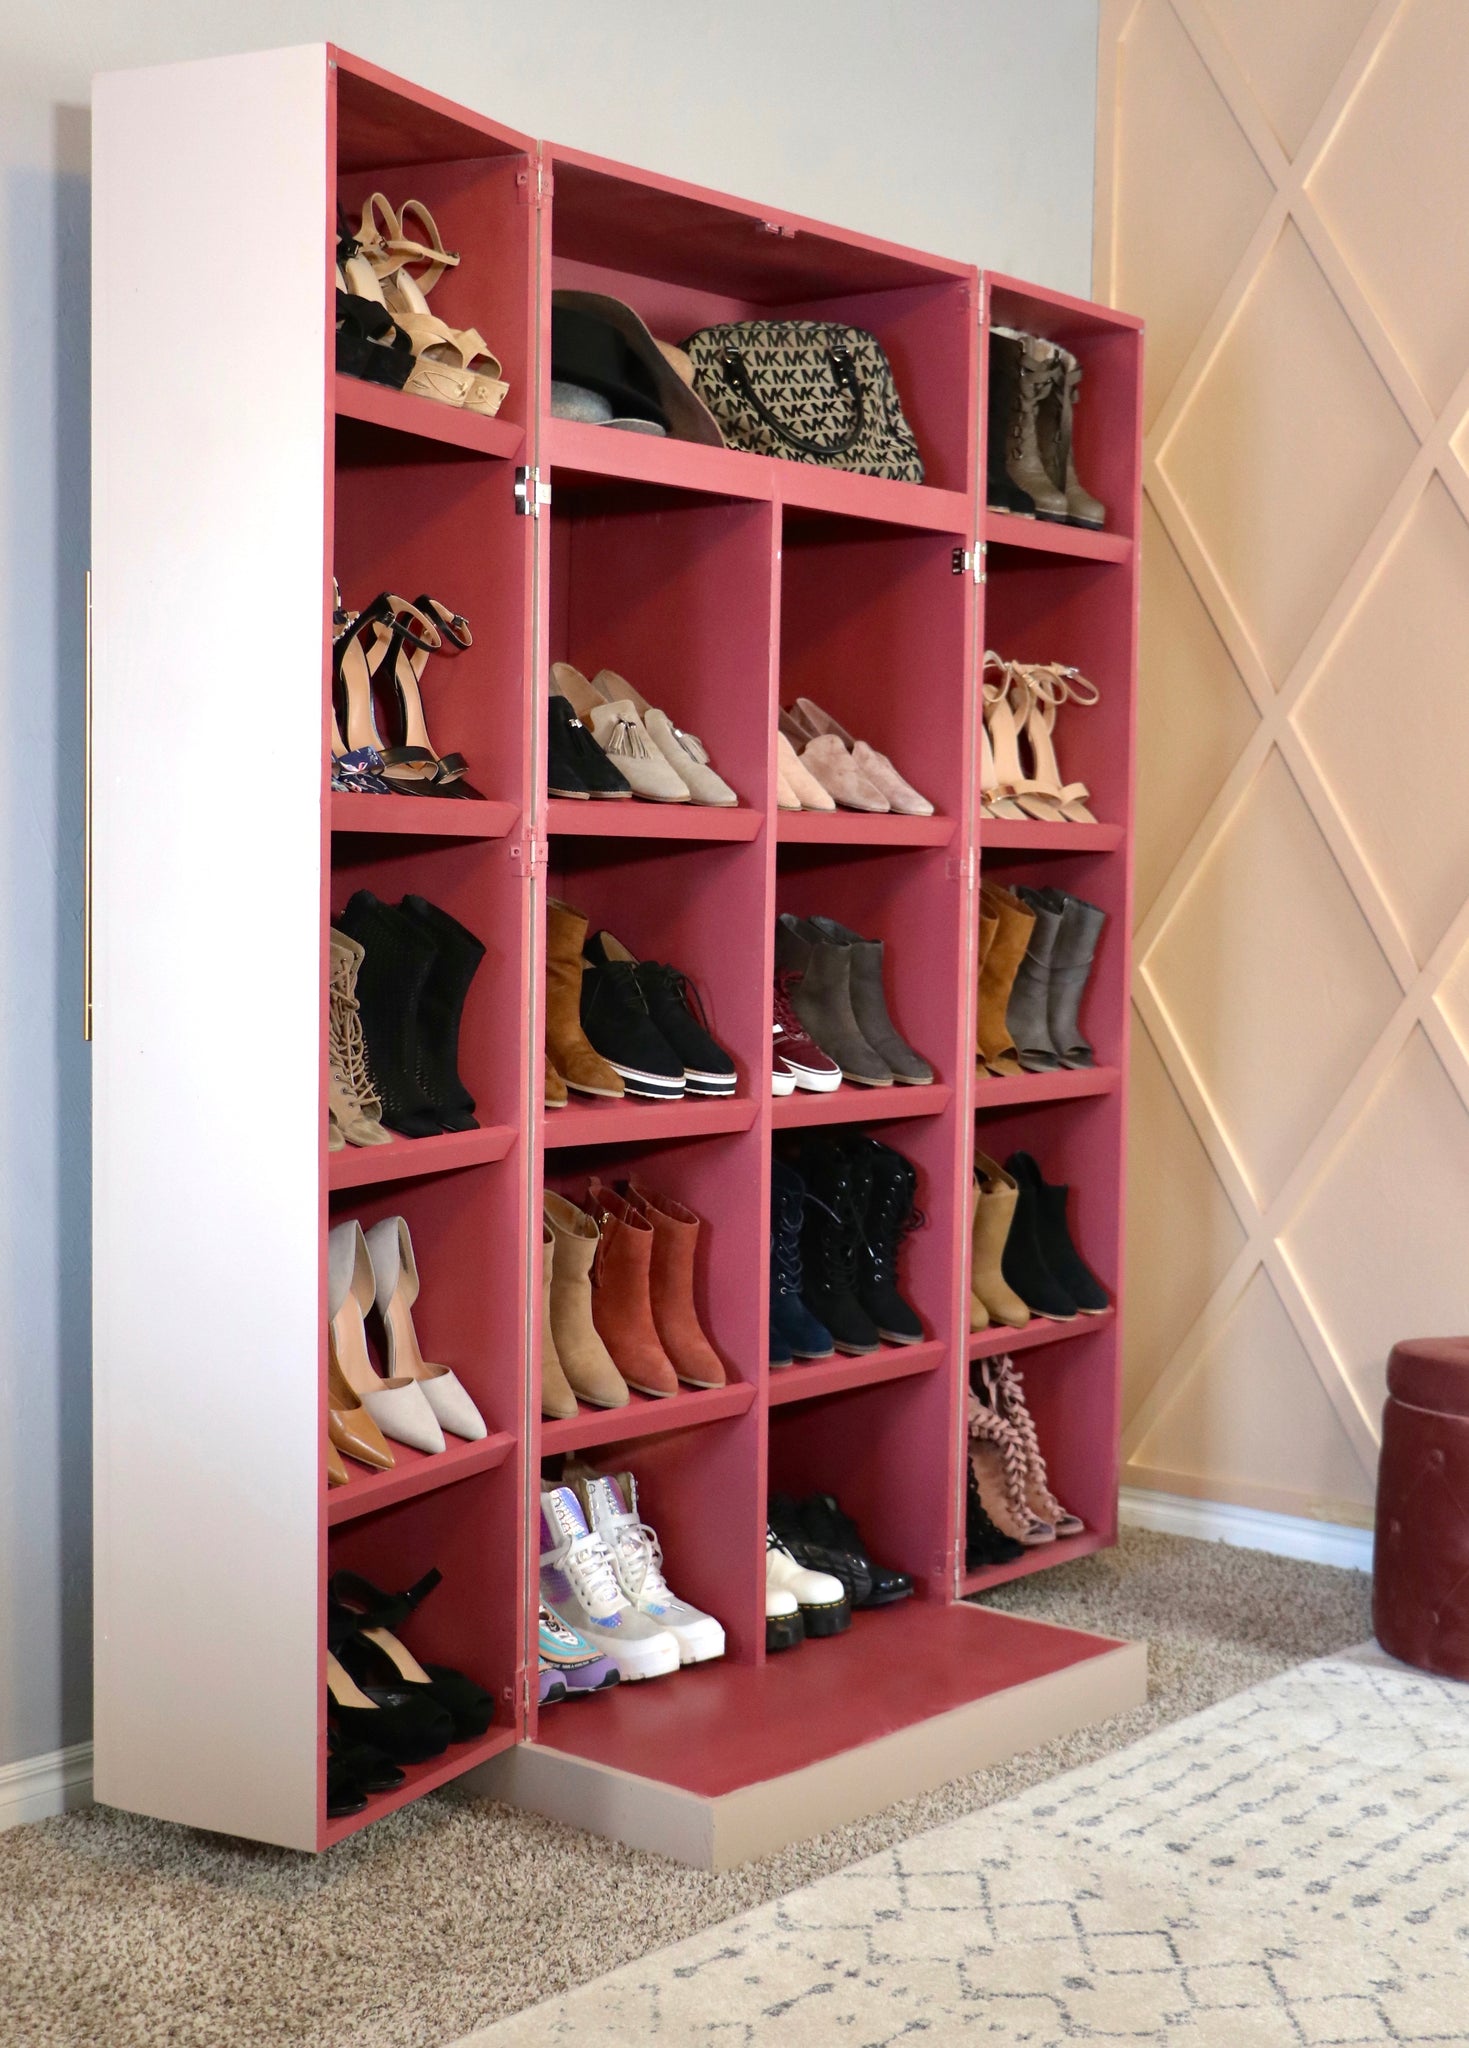
DIY Shoe Cabinet
"This DIY Shoe Cabinet will solve all of your organization problems."
I don't think I've ever been more excited about a project than I am today. I am very happy to be sharing theses DIY shoe cabinet plans with you. I was originally sent a picture of a shoe cabinet and I instantly fell in love.
 I knew it would be a little bit of a challenge without having dimensions to reference, but I was up for the challenge.
Luckily, I went through all of the bumps and bruises to figure it all out so you wouldn't have to. Man was it worth it, this shoe cabinet is every girls dream.
I hope you enjoy this shoe storage just as much as I do. I built a smaller hidden storage shoe cabinet but I outgrew it fast. It held 16 pairs of shoes, but this baby can hold 36 pair of shoes. Now that is what I call an upgrade. Now let's get into the details.

"There are some affiliate links in this post, meaning I get a small commission if you purchase through these links, at no cost to you. Click Here to read my full disclosure."
Dimensions
Wood Materials
- 2 - 3/4" piece of plywood (4'x'8)
- 2 - 1/4" piece of plywood (4'x8')
- 4 - 1x12x8 (Select Pine)
- 2 - 1x12x6 (Select Pine)
- 4 - 1x2x6 (Select Pine)
- 4 - 1x3x8 (Select Pine)
- 1 - 1x3x6 (Select Pine)
- 1 - 1x4x8 (Select Pine)
Cut List
See Detailed Plans for Cut List
Materials
- 1 1/4" Pocket Hole Screws
- Hinges
- Gold Cabinet Pulls
- Spackling
- Wood Filler
- Wood Glue
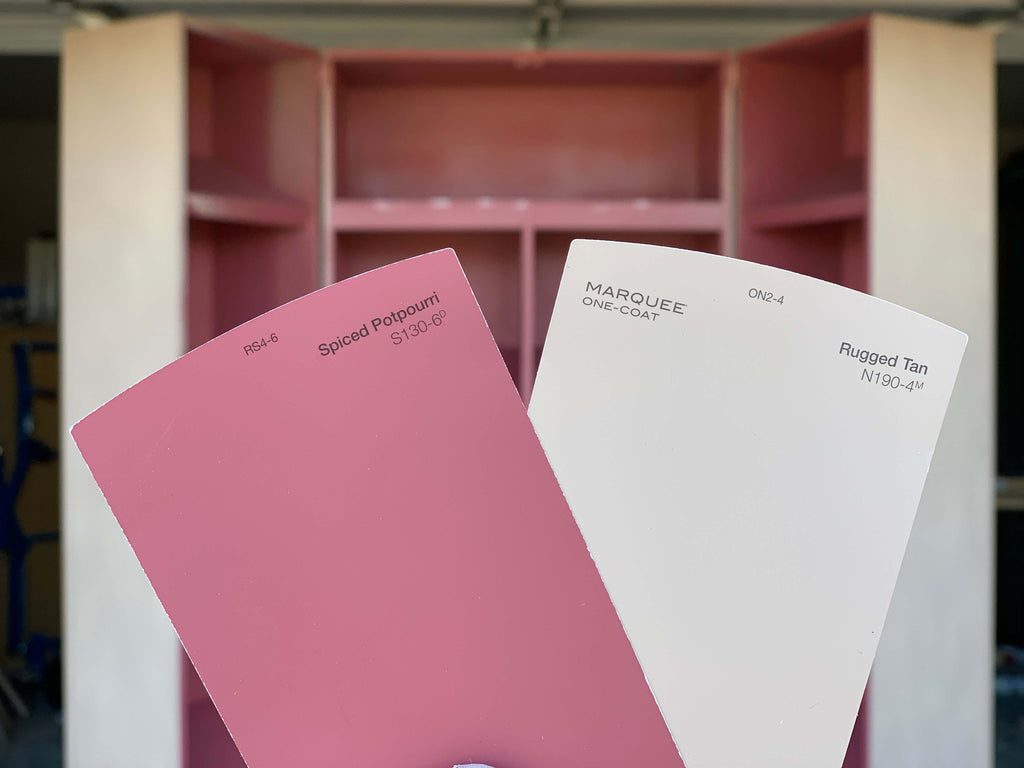
- Behr Paint - Spiced Potpourri
- Behr Paint - Rugged Tan
Tools Used
- Kreg Adaptive Cutting System
- Kreg Jig
- Jigsaw
- Kreg Right Angle Clamp
- Home Right Paint Sprayer
- Drill
- Kreg Foreman
- Staple Gun
- Brad Nailer
- Sander

Step 1: Cut Wood to Size
I first started off by cutting the wood I needed to build the main frame of the shoe cabinet down to size. When I purchased my plywood, I got my plywood cut down so that I can manage it better and don't worry I'm sharing all of the measurement details in the printable plans.
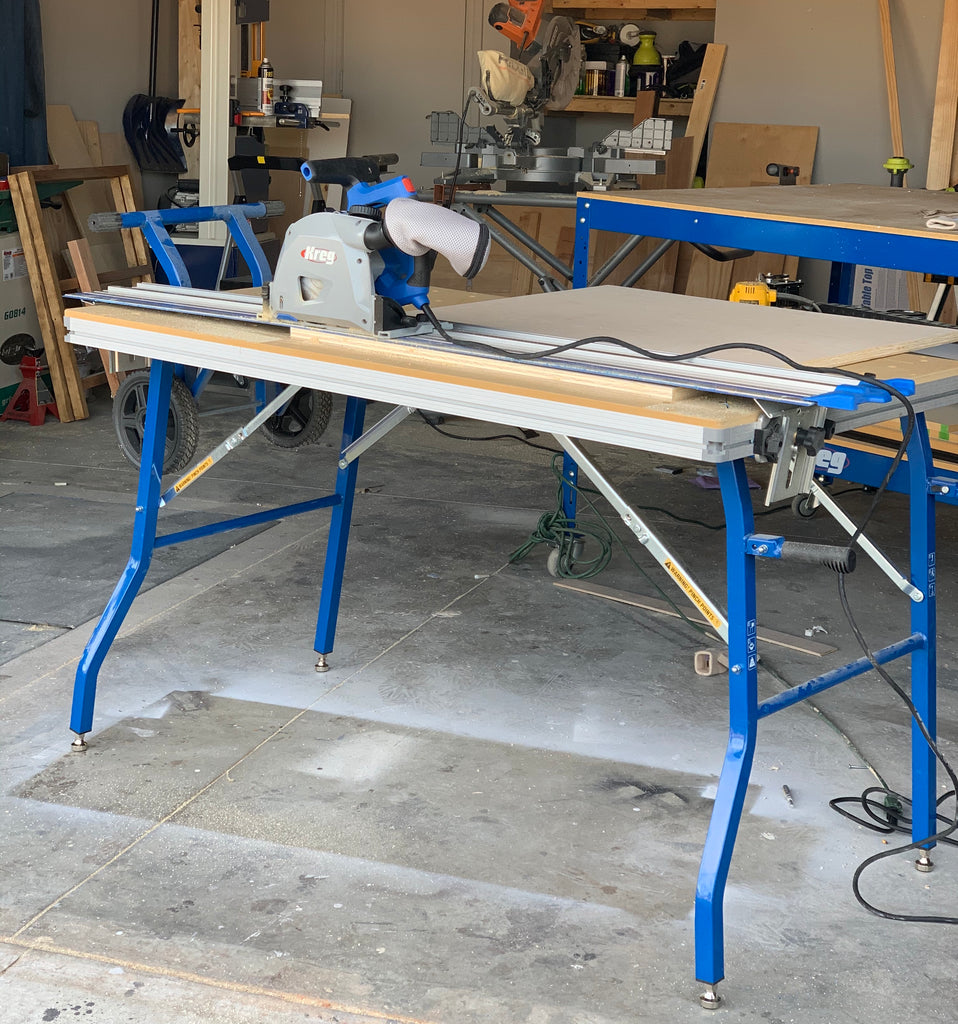 Once I got the plywood home, I started cutting the plywood down to the sizes I needed to create the center shoe cabinet frame. I used my Kreg Adaptive Cutting System to cut everything down. If you're not a big fan of the table saw, this is a great alternative tool. It's a track saw, but on a guided track; allowing for ease and precision.

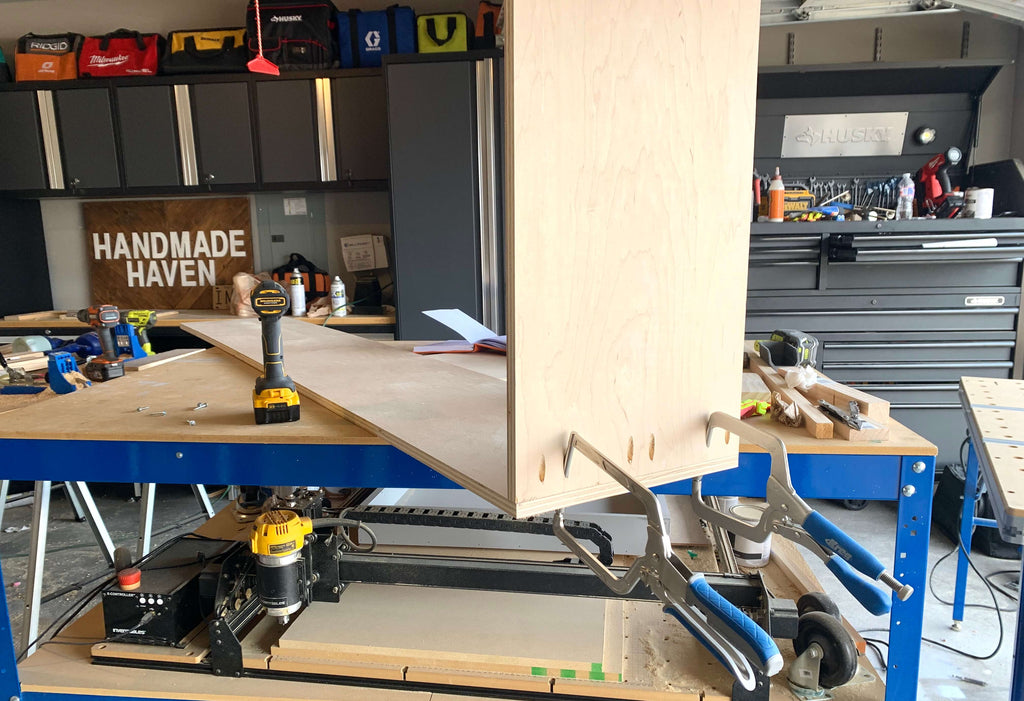
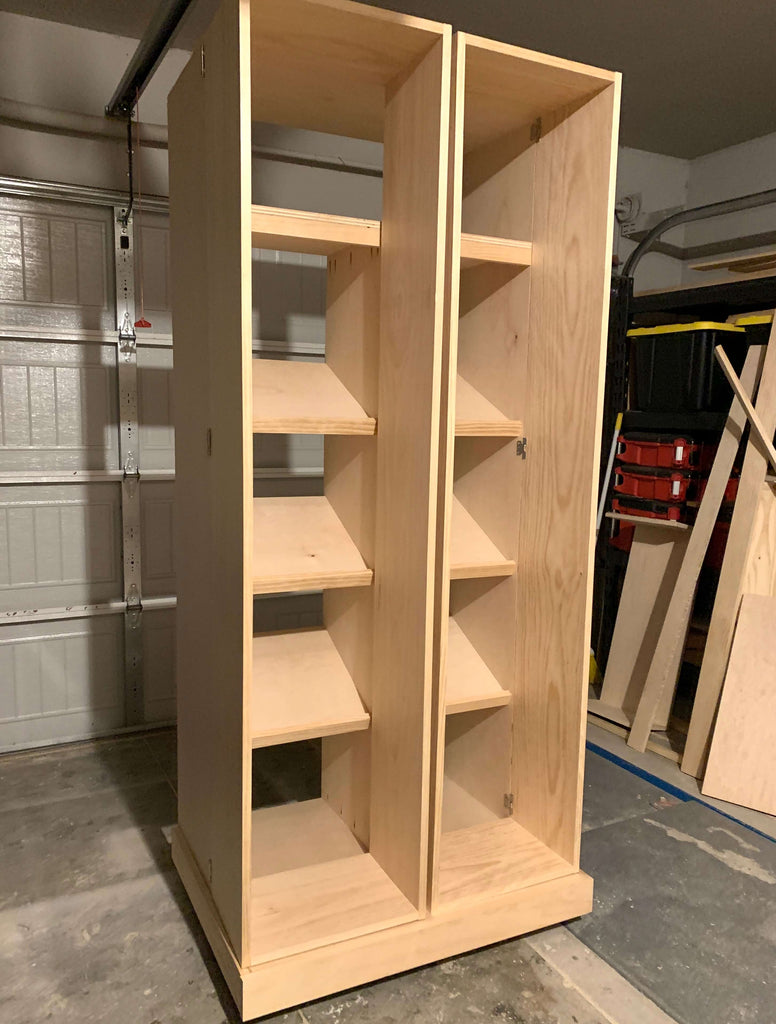
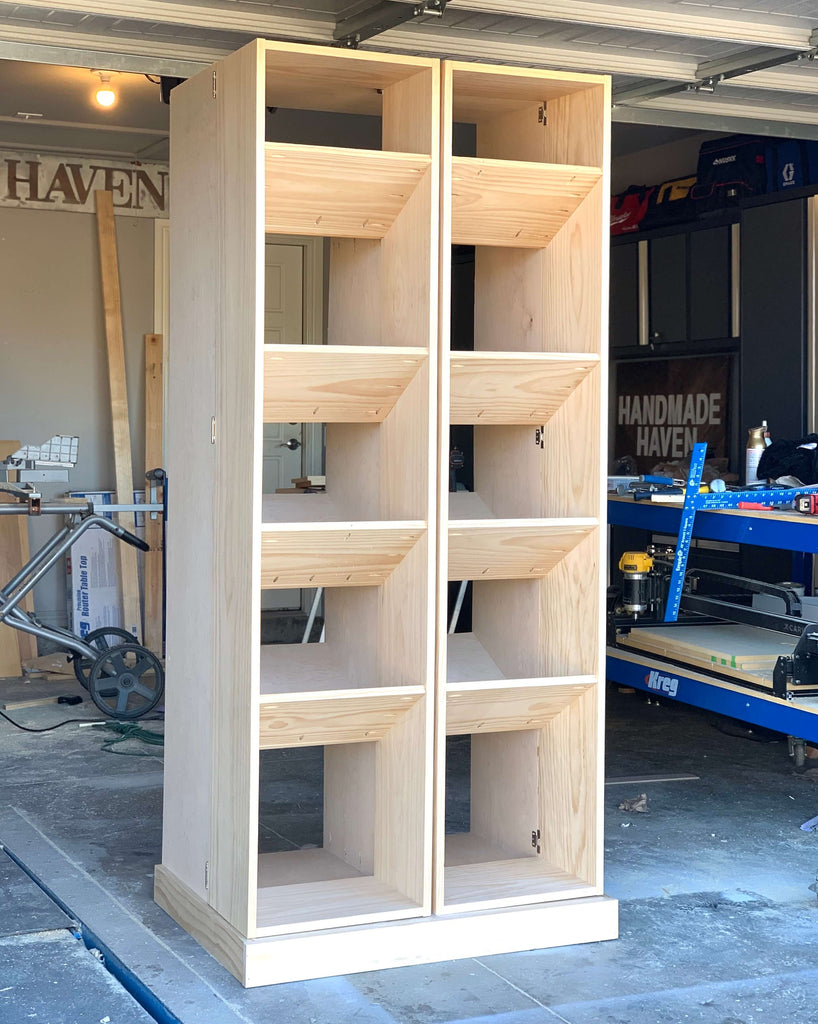
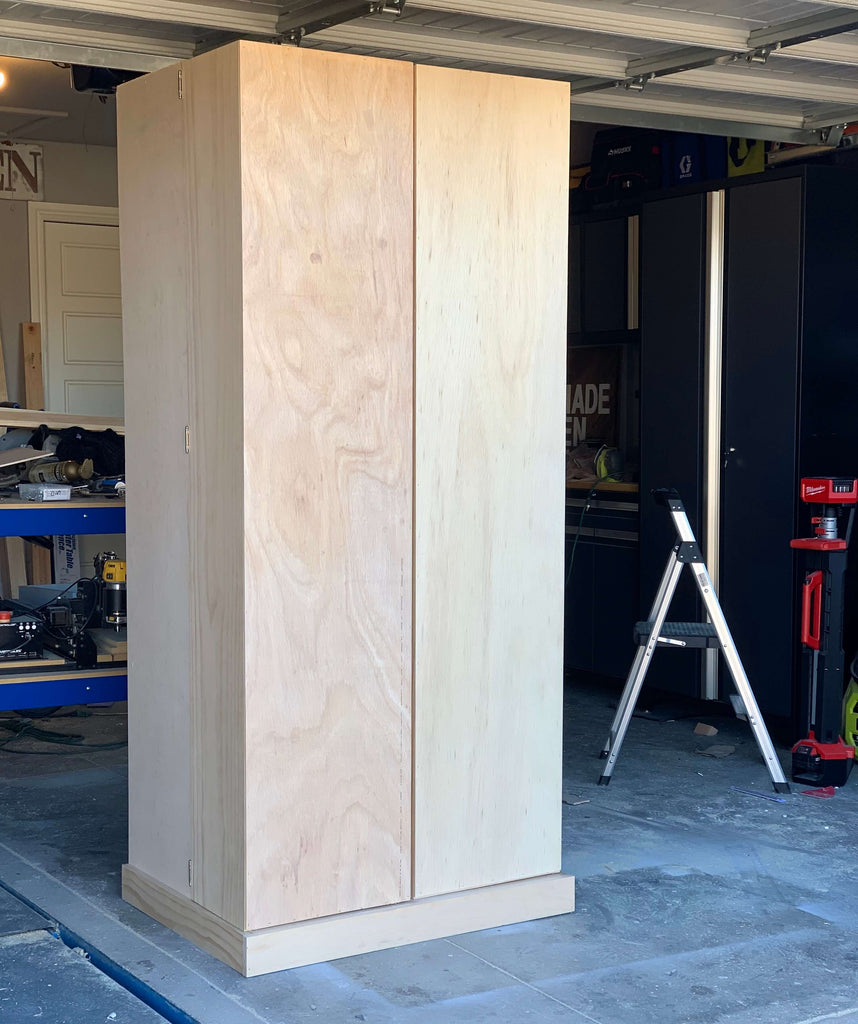
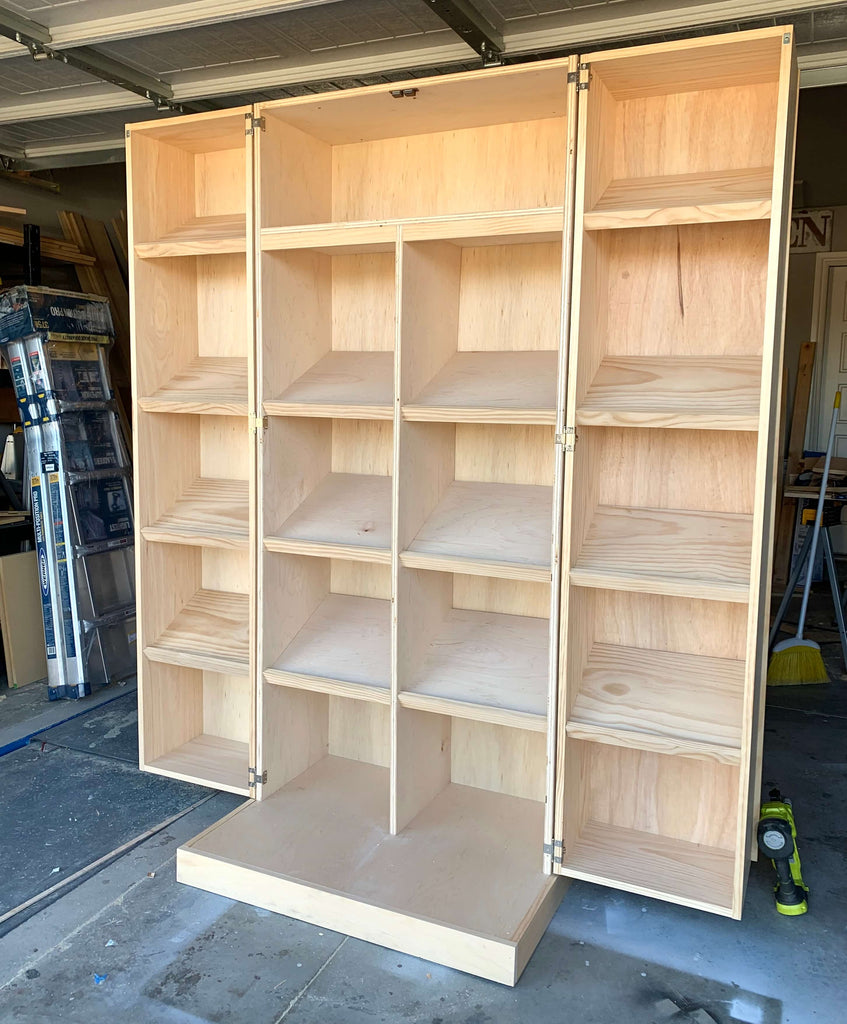
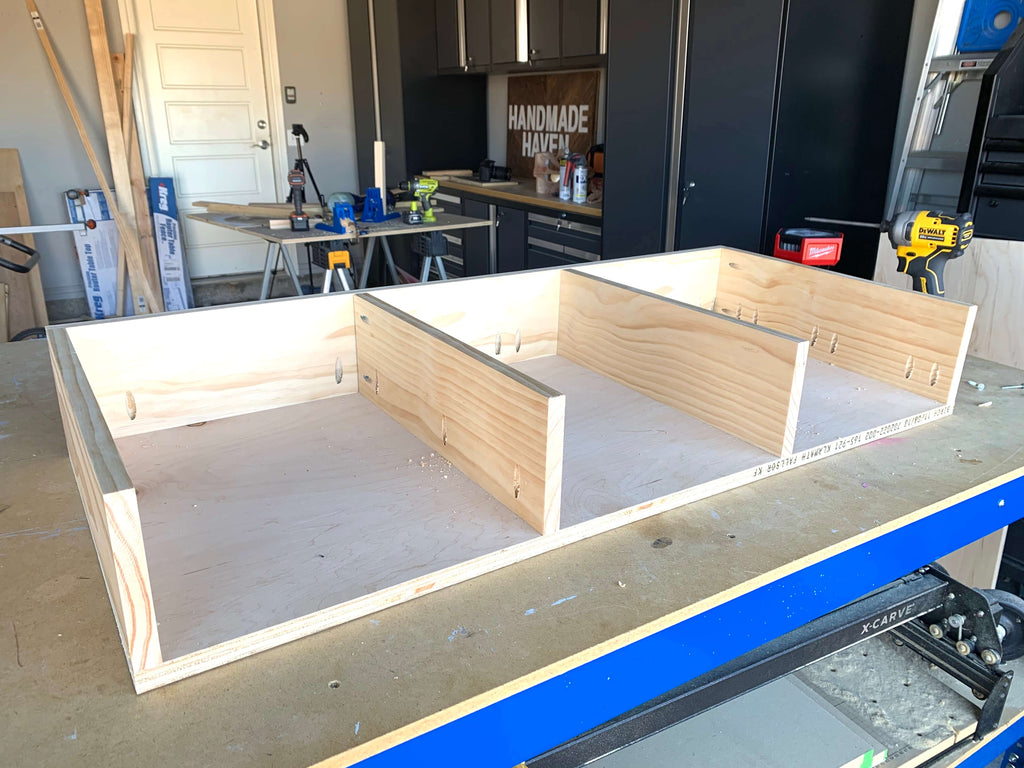
Step 2: Building the Shoe Cabinet Middle Frame
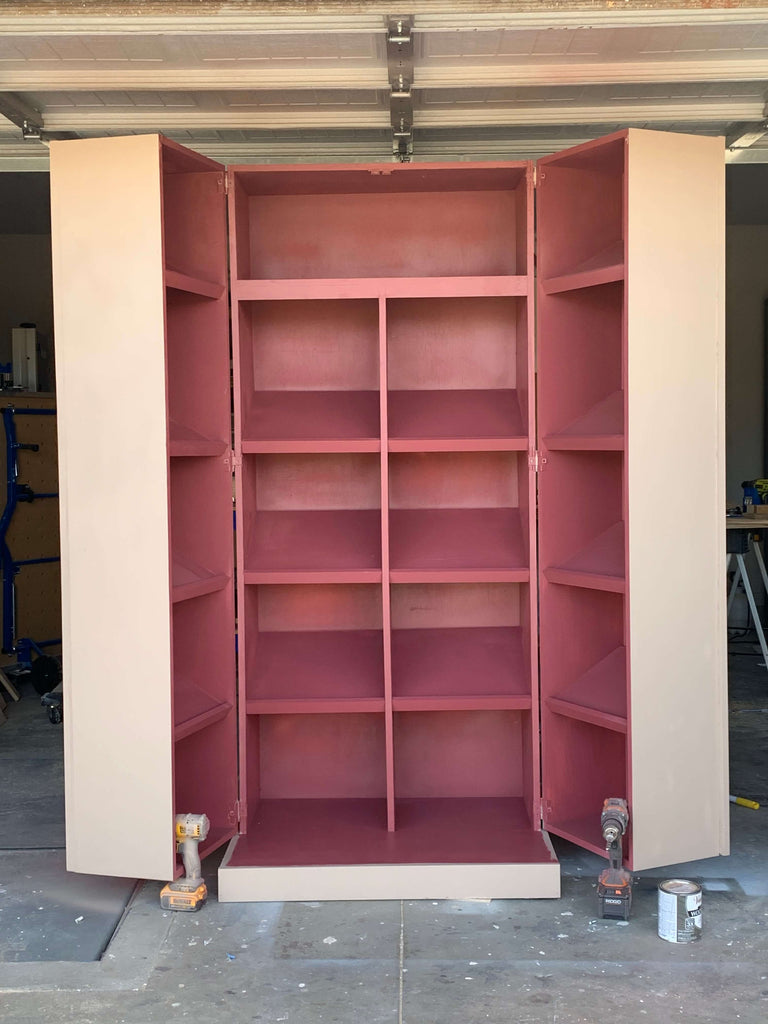
Once all of the plywood was cut down to size, I started building the frame. The first piece I needed to build with was the bottom plywood board. In order to make the board fit, I needed to cut out notches on the sides.
This will make more sense once you go through the shoe cabinet plans. I cut out the notches first by using my Kreg Adaptive Cutting System and then cutting off the end with my jigsaw.
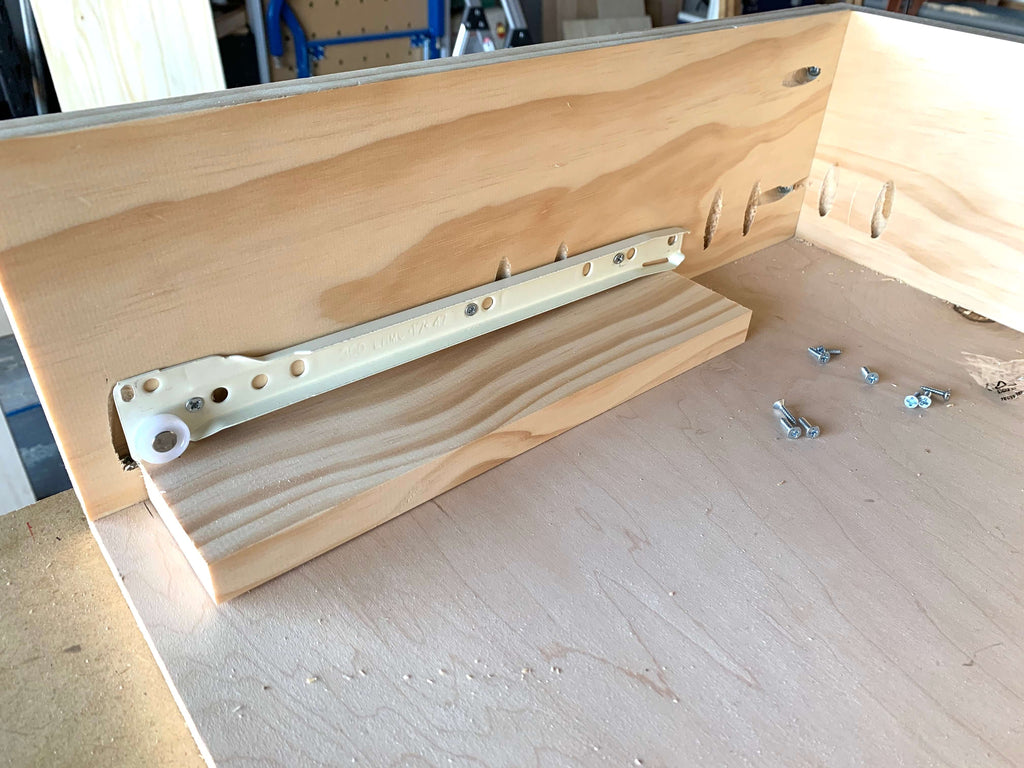
 After I cut the notches out of the bottom piece, I created pocket holes all around the board with my Kreg Jig to be able to attach it to the shoe cabinet sides. It should look like the photo below once you're done.
I didn't have any type of dimensions to reference while building this shoe cabinet but I was lucky to find this pantry build that had a similar bottom design tat I wanted, so I was able to use that to get me started.
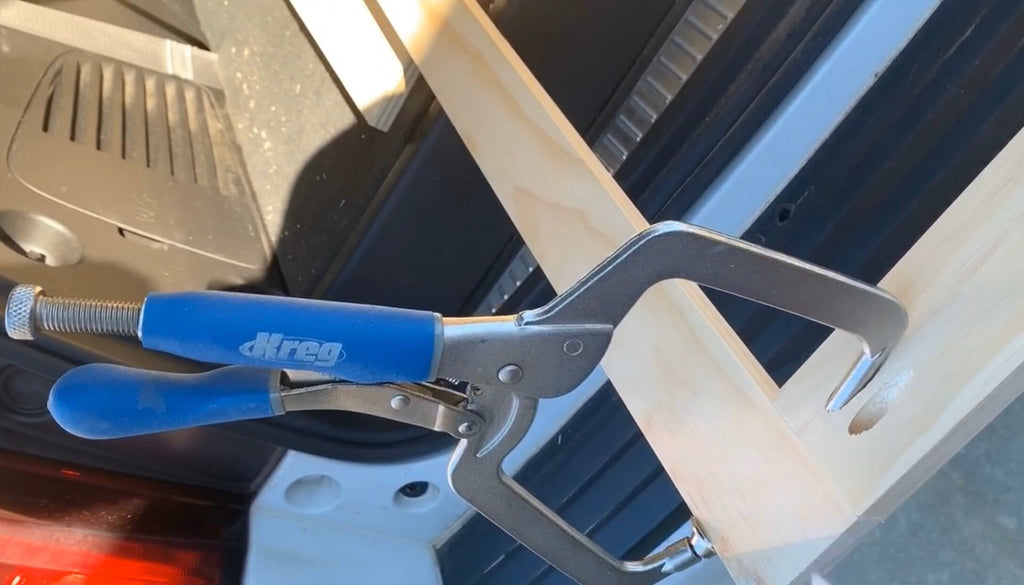
 Now it's time to get the top main frame assembled. I used my Kreg right angle clamps to help me build the main frame and used pocket hole screws to assemble the frame together.
 Once the top part of the center frame was assembled, I started attaching it to the bottom piece. I used my Kreg workbench to help me build this frame; it made it a lot easier to maneuver and this workbench can hold a lot of weight.
 After the outer frame was all put together, I added in the top shelf and the center divider using pocket holes and pocket hole screws.
If you're not used to using a Kreg Jig, this project will surely get you acquainted. Theres enough pocket holing to go around. I usually use my Kreg Foreman for projects that require a ton of pocket holes, but a regular Kreg Jig will work just as good, I use my Kreg Jig Master system a ton.

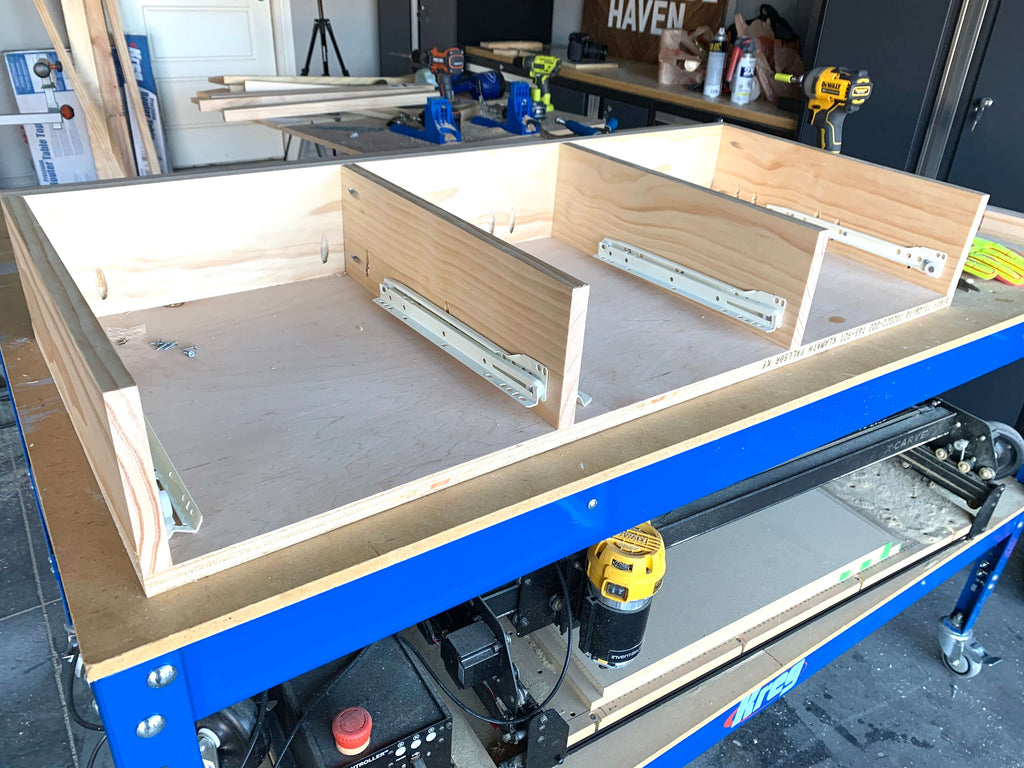
The center frame of your shoe cabinet should look something like the above when you are complete.
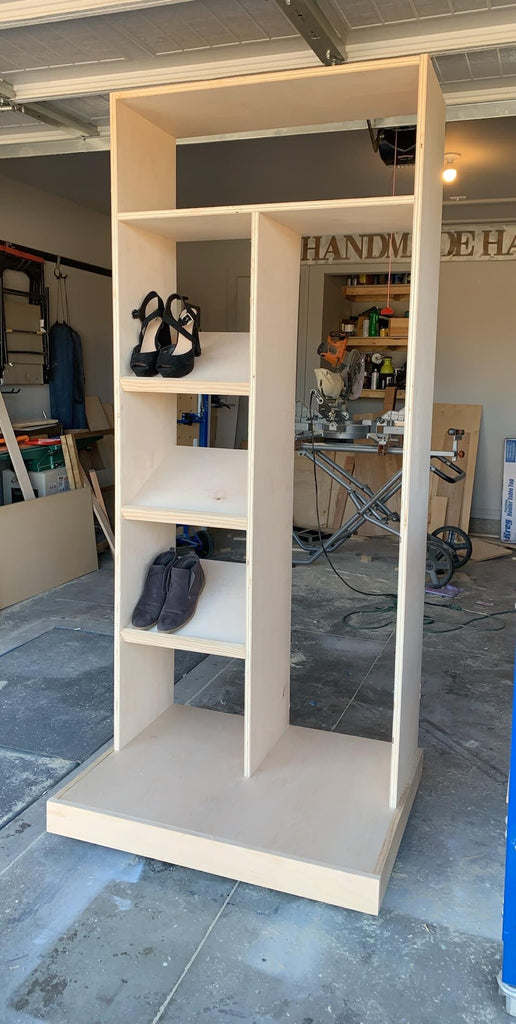
Step 3: Adding in the Shoe Shelving
With the center frame fully assembled, I began building the shoe shelving. The shoe shelves are made up of 3/4" plywood and 1x2 trim. I used pocket holes to secure the trim to the front of the 3/4" backing and used pocket holes on the bottom of the plywood sides to attach it to the shoe cabinet frame.

I decided to slant my shelves to give the shoe cabinet some character but feel free to make your shelves however you like.
I wear a size twelve, so I tested out how my shoe would look with this particular slant and it worked perfect for my size, but you may want a smaller slant or you may want your shelves to be straight. This part is totally up to you, just make sure you adjust your measurements as needed.
One thing to note about these shoe cabinet plans is that these slanted shelves weren't made to fully touch the shoe cabinet backing so there will be a small space behind the shelves once you're done.
If you don't want this space in the back, you will need to cut the back of the shelf at an angle so that it's completely flush with the backside. Again, this is the step where you can customize things how you want it.
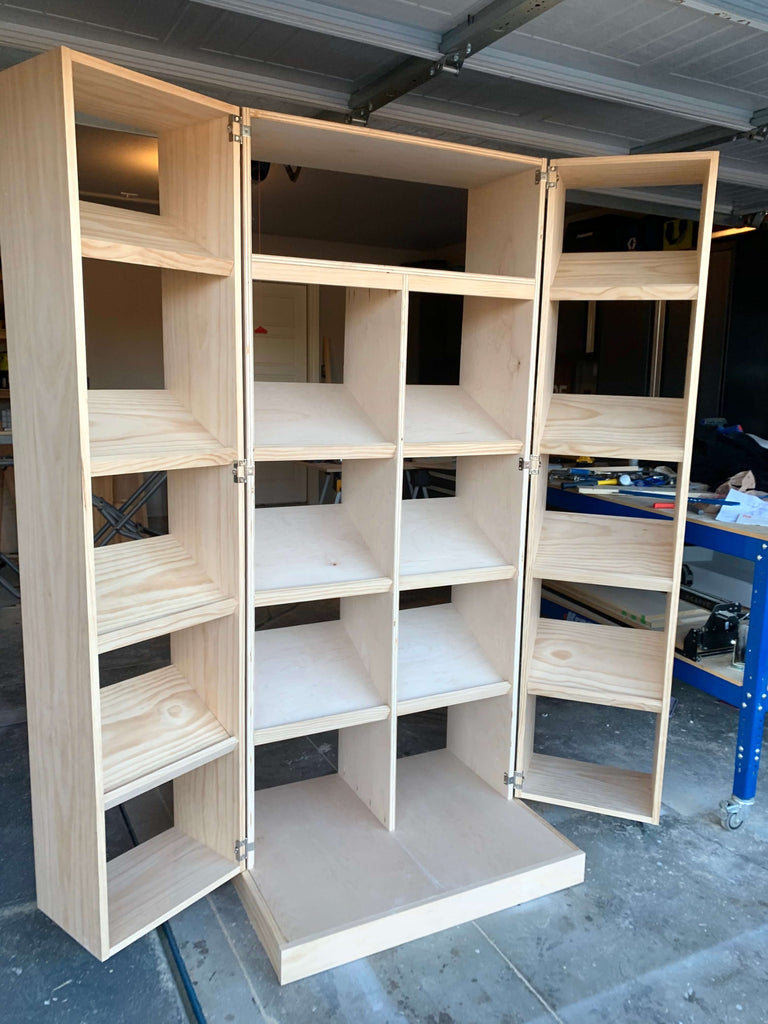
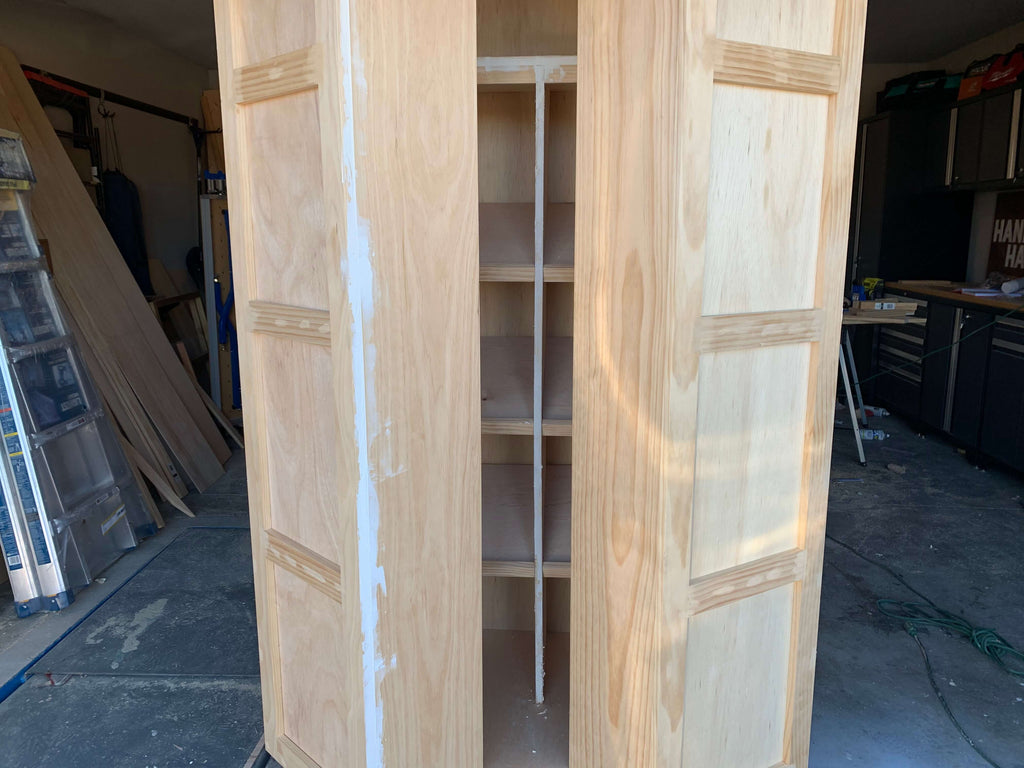
Step 4: Adding the Shoe Cabinet Doors
Now on to the fun part. Even though I built this shoe storage on my own, it will be incredibly helpful if you can find help with this part.
I first assembled the outer frame of the doors using pocket holes and pocket hole screws and then attached them using these hinges. You want to make sure you get hinges that allow the door to fully wrap around. I used 1x12 select pine boards to build the doors, but feel free to use plywood here to make your shoe cabinet cheaper.
I started off attaching the doors with three hinges, but I will be adding two more hinges later for extra support for 5 in total on each doors, just waiting on the delivery man for the last two.
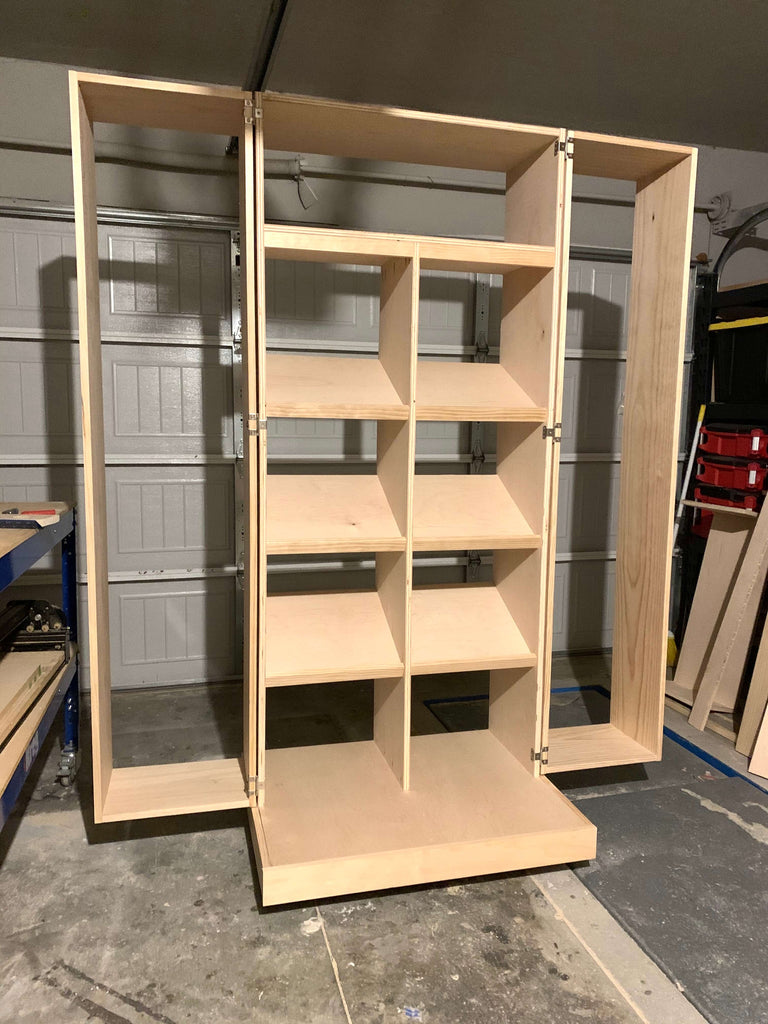
One thing to note here is that it's very important to leave enough space between the bottom of the doors and the shoe cabinet center frame so that there is enough room for the doors to freely swing open.
I ran into a little snag with this because I didn't have enough space underneath, but no worries, I will be making the correct changes in the plans so you don't run into the same issue.
These particular hinges should allow your doors to swing fully open and closed with no issues. So be sure to test your doors out after you attach them. The doors may not want to stay completely closed, but we will be attaching a magnetic catch later to help them stay closed.
Step 5: Adding Shoe Shelving to Doors
Once the doors are attached and you feel like they are functioning properly, you can start adding in the shelving. I added in these shelves the same way I adding the shelves to the center frame. I tried to match up the shelving as much as I could to the center frame shelving so that everything looked even.
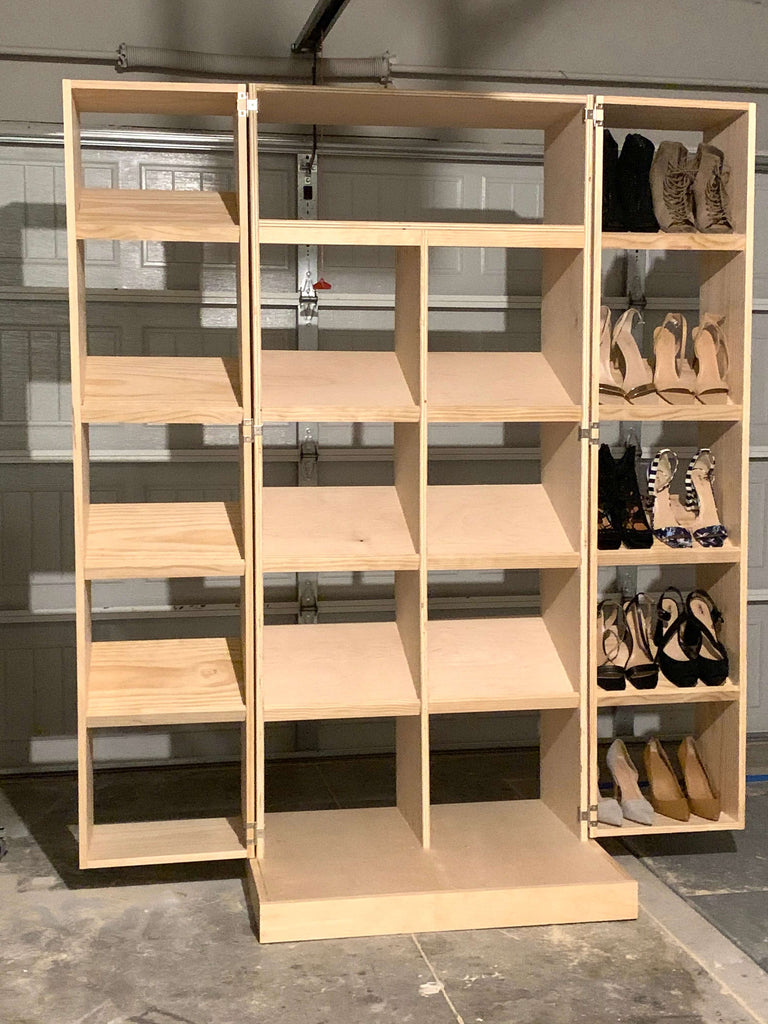
Once I started adding in the shelving, I noticed that the door dropped slightly, so it may not be a bad idea to add the shelving before you attach the door, but adding the shelves after helped me make sure all of the shelving lined up, so I will leave that up to you.
I added some of my shoes just to see if the weight would affect the door and it didn't seem to affect it much, but adding in the shelves definitely did. If you want to make any changes to the doors, this is where you want to make those changes.
Your shoe cabinet should look a little something like the above and below picture when you are done adding in all of the shelving. This was a really fun build to make and it was exciting to see it take form.
Step 6: Adding Shoe Cabinet Door Fronts
This is the part where we can have a little more fun because we can customize the door fronts to look however we want. I first started off by attaching 1/4" sheets of plywood to the front of the doors using my staple gun. I also had these sheets cut down to size at The Home Depot and then made further cuts later using my Kreg Adaptive Cutting System.
In order to help keep the doors closed while attaching the door fronts, I added in the magnetic latch at the top of the center frame.
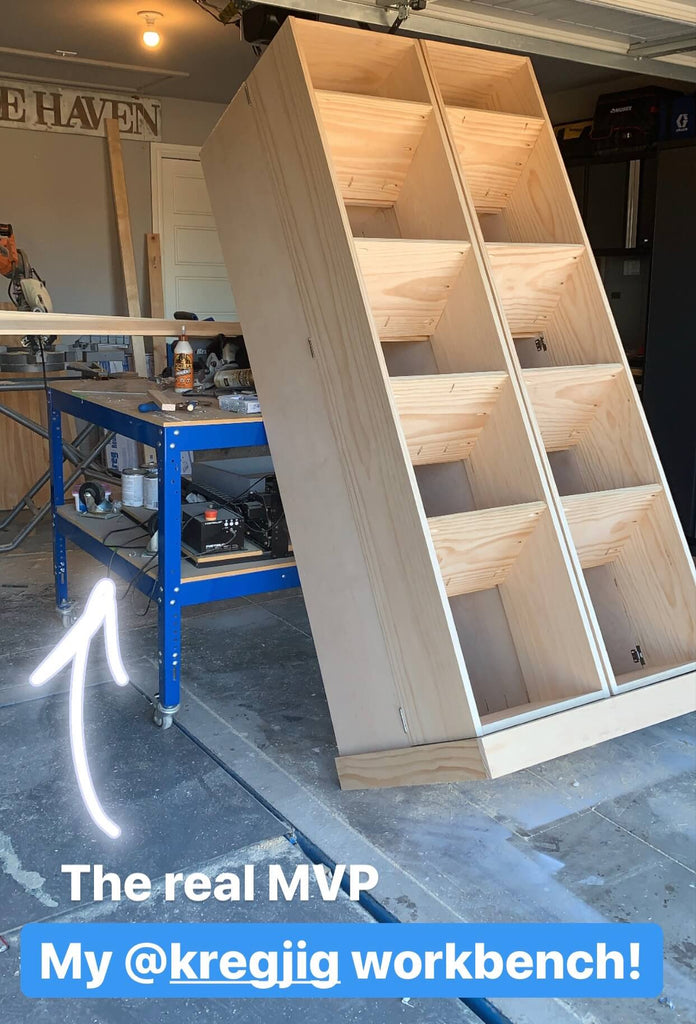
I leaned the shoe cabinet on my Kreg workbench to make it easier to apply the 1/4" backing. That workbench is a beast and I have loved using it ever since Kreg sent it to me.
You want to make sure that the 1/4" backing is the exact size of the door and that there is the same amount of space underneath the backing so that it doesn't snag underneath.
This shoe cabinet is giving me all the feels. After adding the 1/4" backing, I added on the outer trim. After going back and forth on designs, as you guys saw on my Instagram stories, I decided to go for a sleek door design.
I first assembled the outer square of the trim with help from my right angle clamp and then I attached it to the cabinet with wood glue and brad nails, making sure I nailed into the outer parts of the shoe cabinet into the 3/4" boards.
 Once the square trim was attached, I went back through and added the horizontal 1x3 trim pieces, also using wood glue and brad nails to attach.
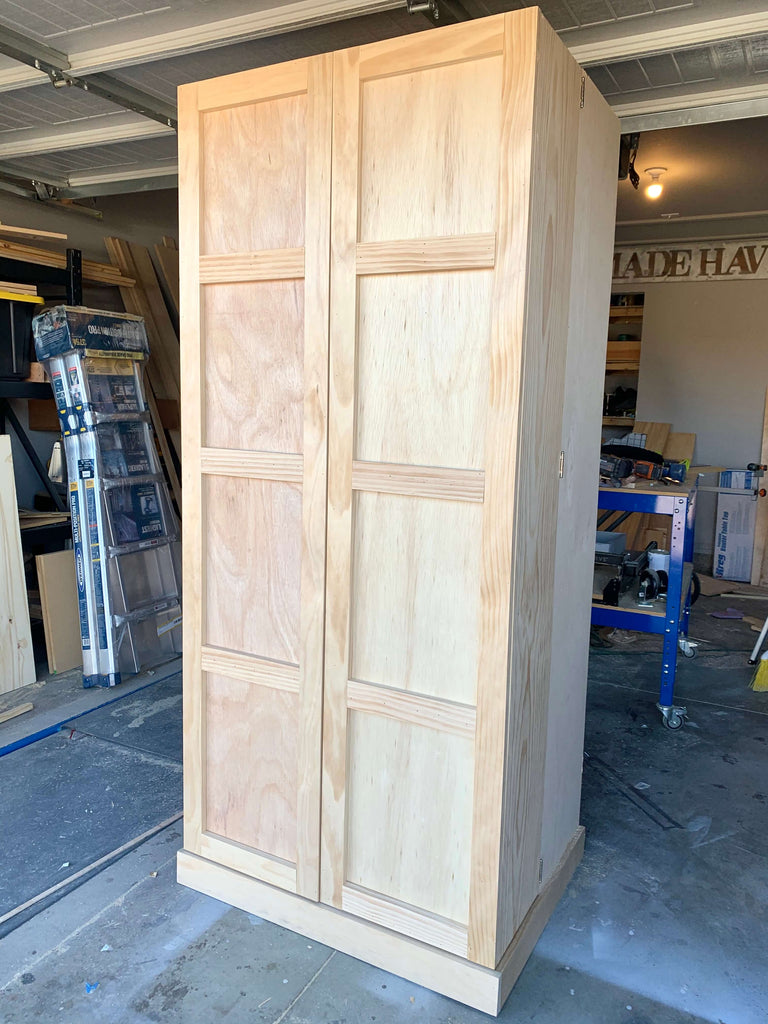
I used 1x3 trim to create this design and attached the trim to the shoe cabinet with my brad nailer
Step 7: Add the Center Frame Backing
Once the door fronts were attached, I added the 1/4" backing to the shoe cabinet center frame using my staple gun and I was finally finished with the building process of the cabinet.
I am so excited with how well this build came out; this was probably one of the more satisfying builds that I've made to date. Now it's time to prep for paint!
Step 8: Prep for Paint
I first started off with filling all of the nail holes with wood filler I also, went around and spackled all of the 3/4" plywood edges and holes I created in the process on the cabinet and caulked the inside edges of the cabinet.
This was one of the main reasons I decided to use common boards instead of plywood on the doors, I knew it would give me a cleaner finish and require less prep work for paint.
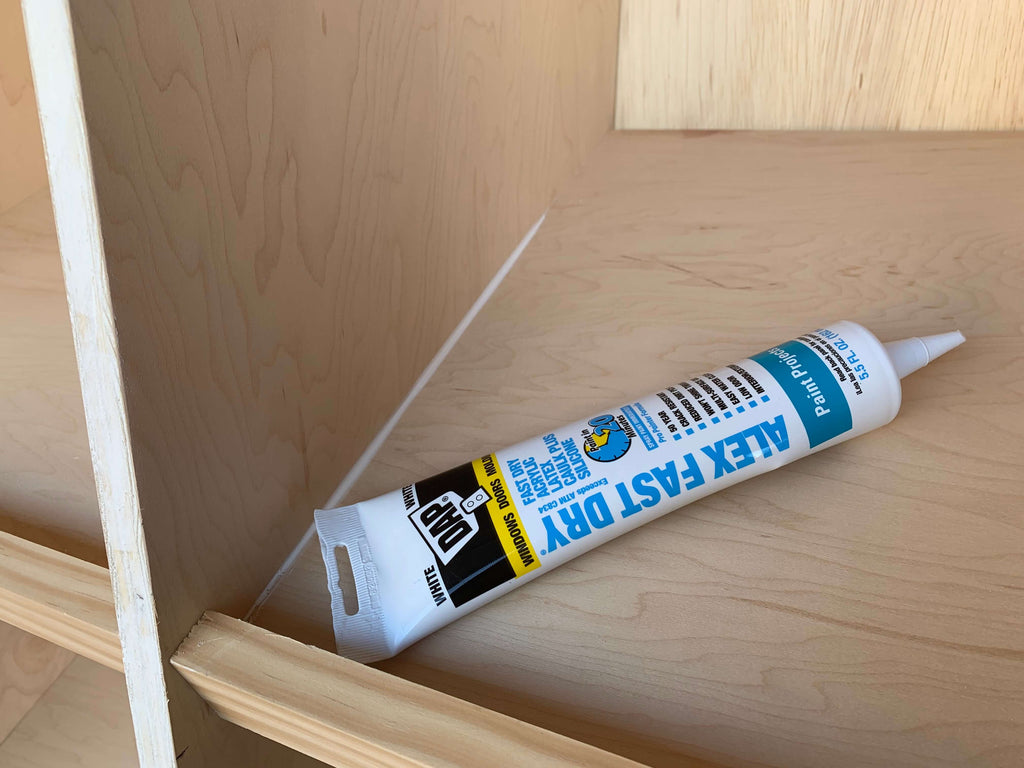
Once, the caulk and wood filler was all dry, I sanded the shoe cabinet down really well and then went back through and caulked all of the edges of the cabinet so that I would have really clean lines after painting. I made sure to do the caulking after the sanding because I didn't want dust particles to stick to the caulk.
Step 9: Paint the Shoe Cabinet
After sanding, I started to use my Home Right Paint Sprayer to paint the shoe cabinet. I have used several sprayers over time and I really love this one. Mainly because it's so easy to set up and clean up.
The cleanup process is my least favorite thing, but this sprayer makes it easy. It's also not as expensive as other competitive models.

I decided to share one of my other little tips today. As you can see, I use sandwich bags in the paint container to hold my paint. This allows the cleanup process to go a lot quicker when switching between colors.
They actually make paint liners like this but they are a lot more expensive then sandwich bags and you get about 10 for $5. Sandwich bags come at 150 for a $1, so I guess I'm being a cheap-o. Either way, it works just as great for me.

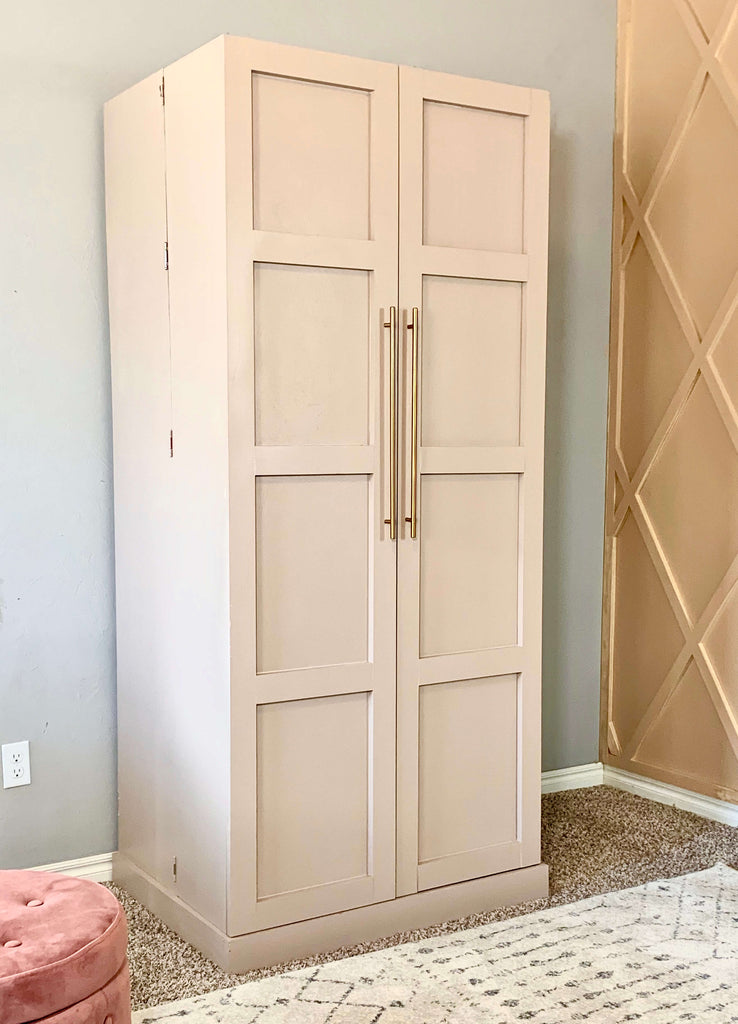
Originally, I thought maybe I could paint the whole cabinet pink bu tI quickly realized, that wouldn't be so great. So I decided to go for a two-tone look and I couldn't be more happier with how it turned out.
I usually like my furniture to be sleek and neat but I also have a very bold personality, so this cabinet was the perfect combination of sleek but fun.
I used about 3/4 of a gallon of paint for both colors. I did have to go back and use a roller for touch ups after spraying both colors. Unless you tape the cabinet, it's hard to not get paint on the other color when spraying so closely.
I did about three thin coats of each color and you're going to want to let the paint sit a little bit of time between coats to let it sink in, so you can see which spots need touch ups.
Step 10: Add Cabinet Pulls
The last step in the cabinet process was adding the cabinet pulls. I originally ordered some smaller pulls, but they were way too small for the cabinet, so I ordered some 17" gold cabinet pulls.
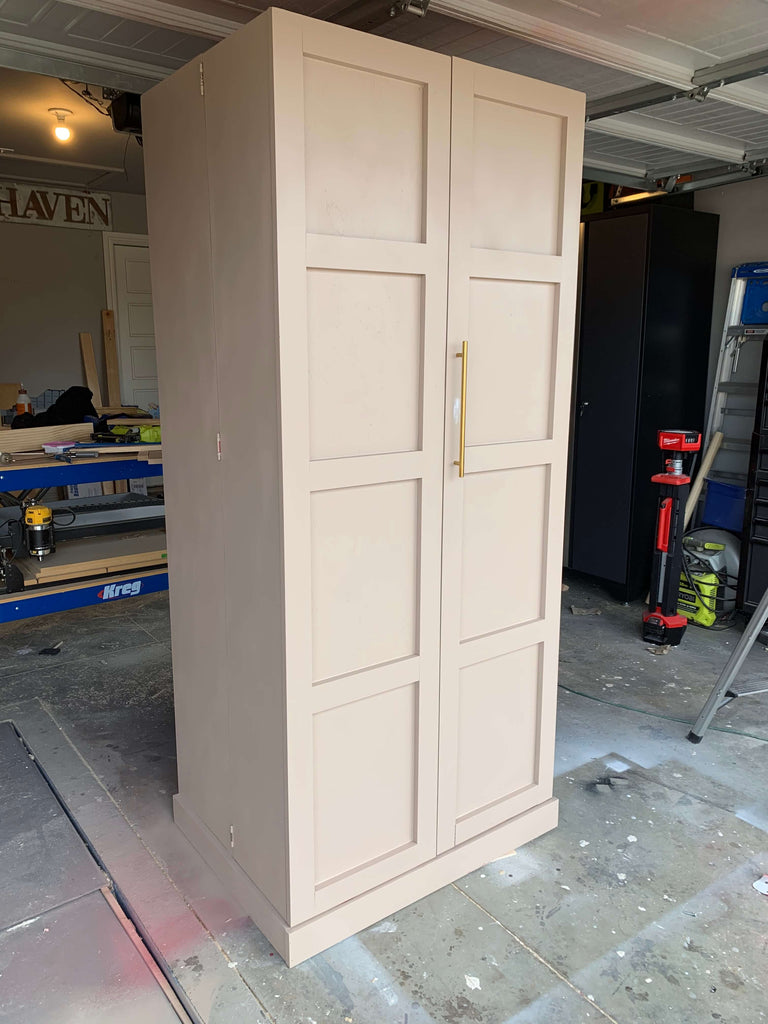
Originally, I was going to pace the pulls in the center of the cabinet, but it was really difficult to attach the pulls with the shoe shelves in place, so I had to make sure I placed the pulls in spots where it would be easy to screw in the screw from the back.
Shoe Cabinet Cost Breakdown
I'm sure everyone is wondering how much this baby cost. I spent roughly $550 on this project, which I know isn't super inexpensive but it was surely worth it.
I did utilize select pine for the shoe cabinet doors, which drove up the price quit a bit, so if you're looking for a way to cut costs, be sure to use plywood and regular pine for the cabinet doors and you can save a little over $150.
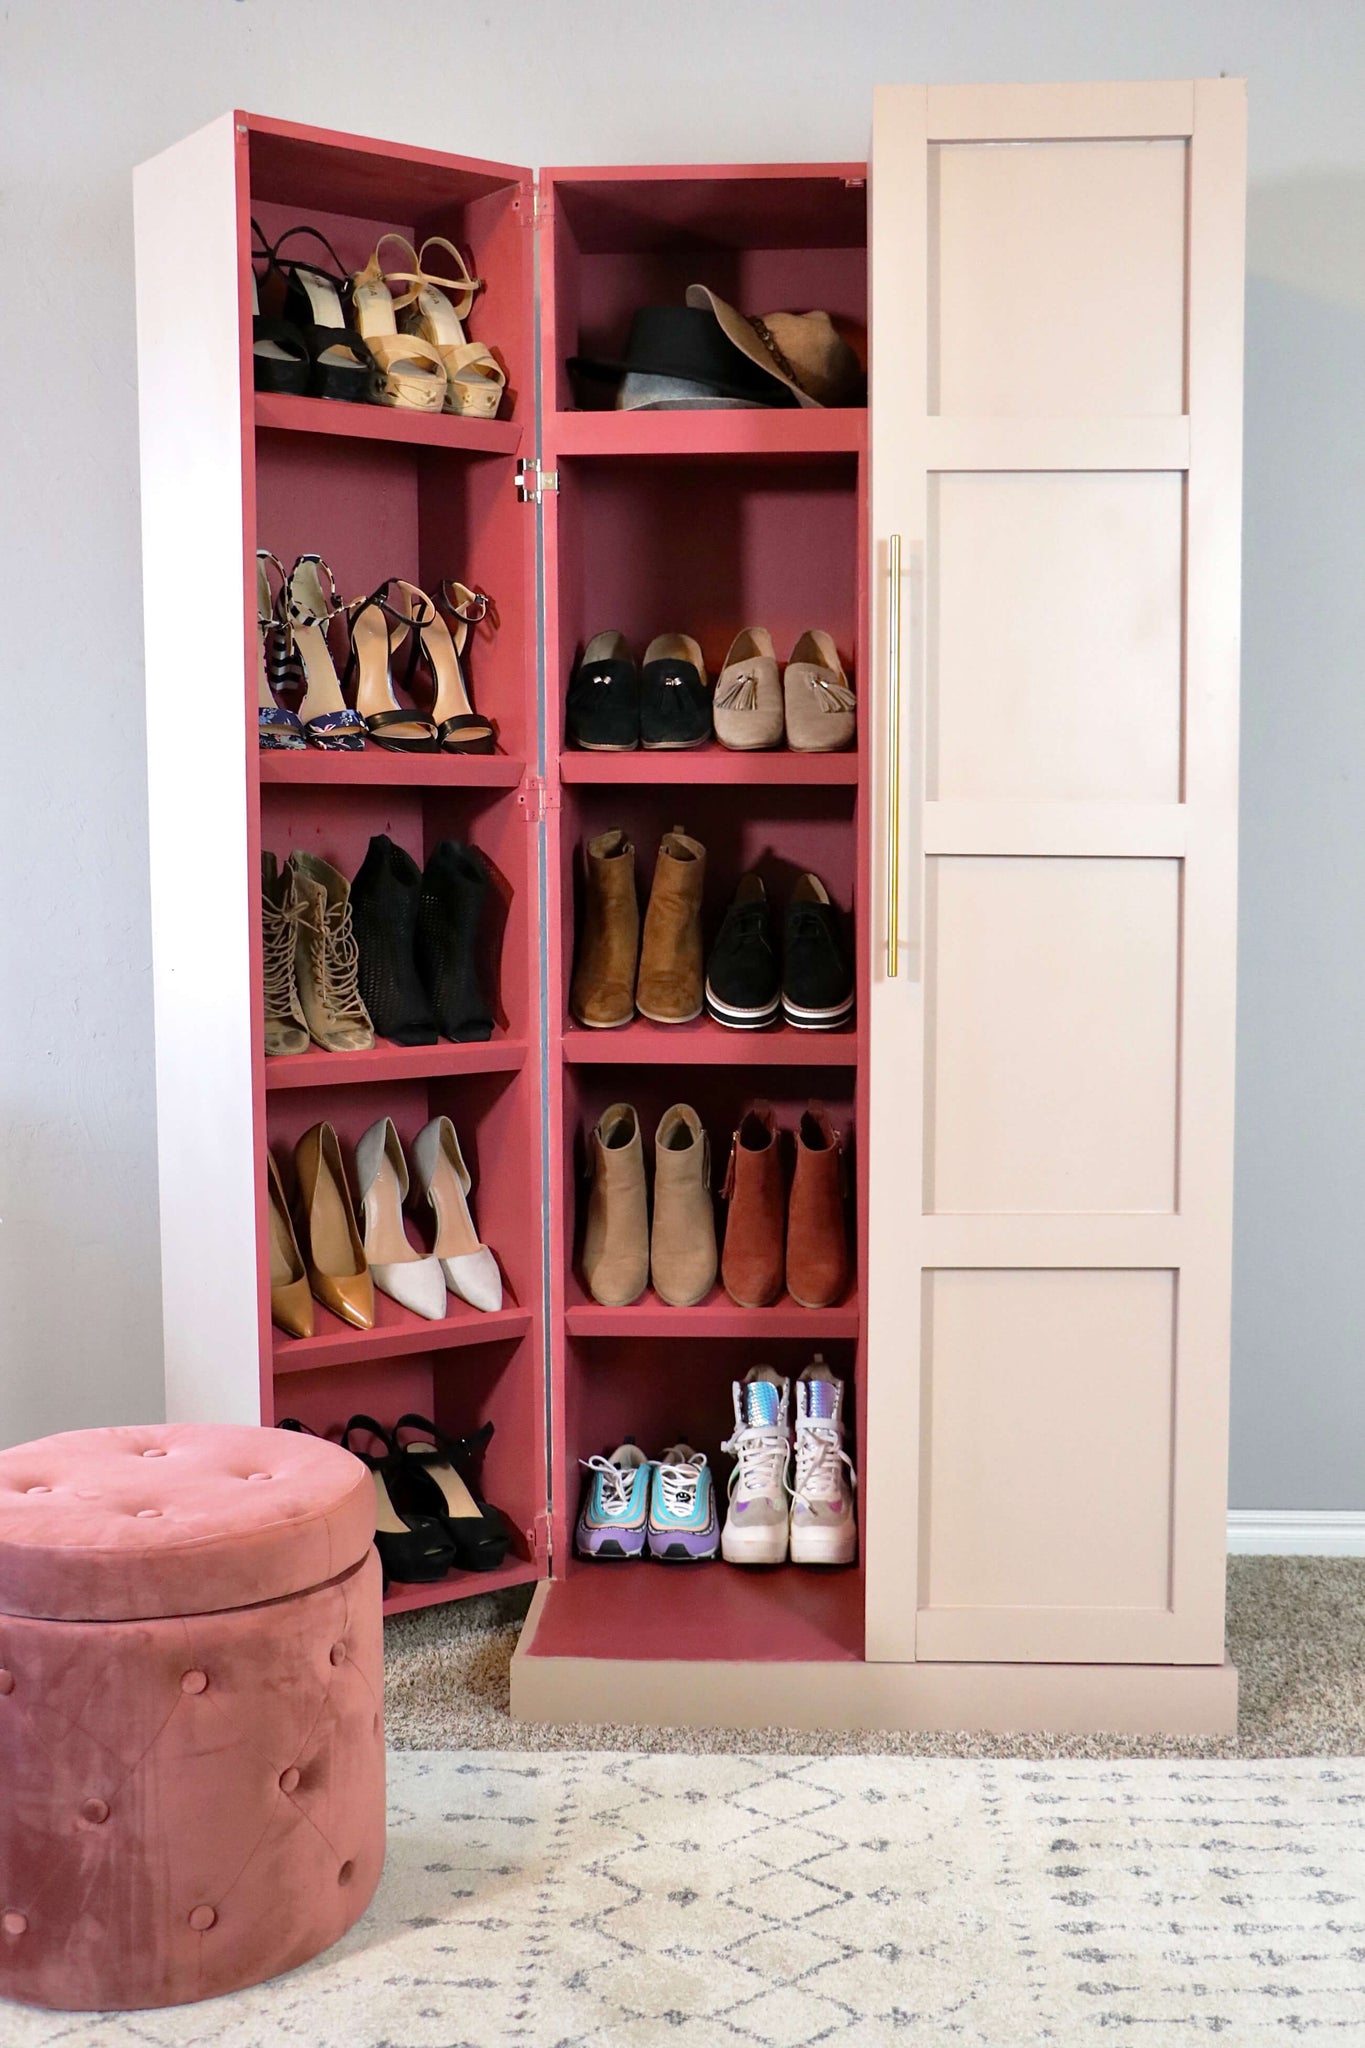
Welp, that about wraps it up for the shoe cabinet, I hope these shoe cabinet plans help you create your own cool shoe oasis, but before we go let's take another look at how great the cabinet came out!.
 Be sure to check out my Instagram stories under my highlight "shoe cabinet" to see my process of putting this shoe cabinet together and some helpful tips.
I couldn't be happier with the end result, I hope you guys enjoyed it too.
As always, thanks for reading guys.

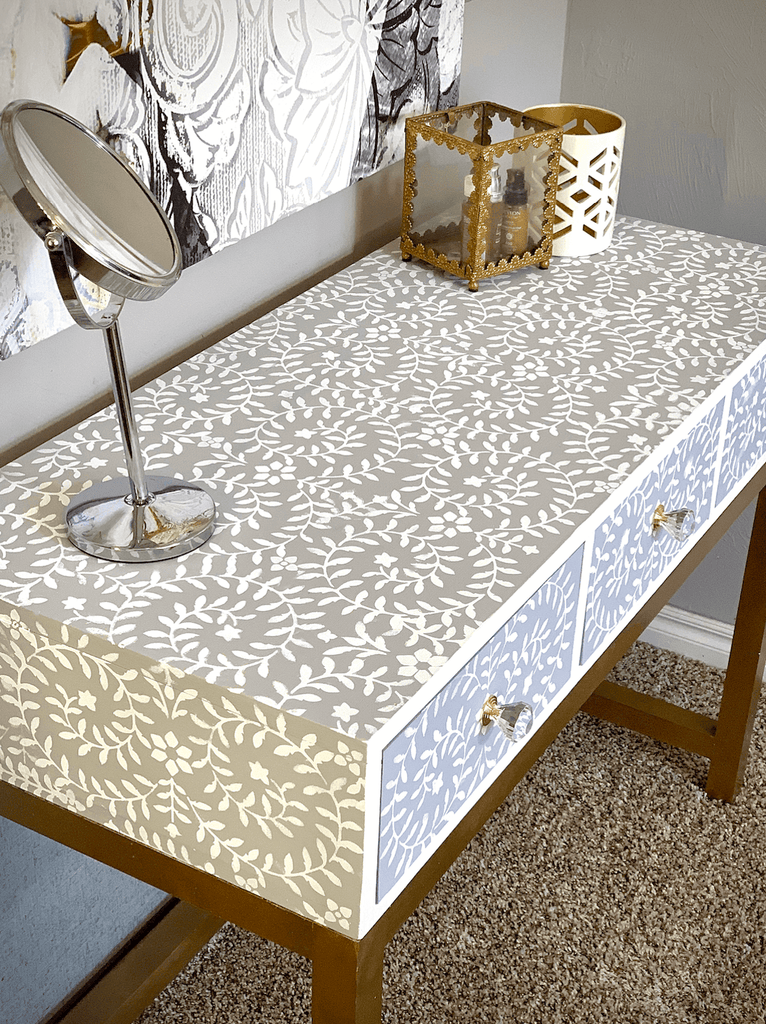
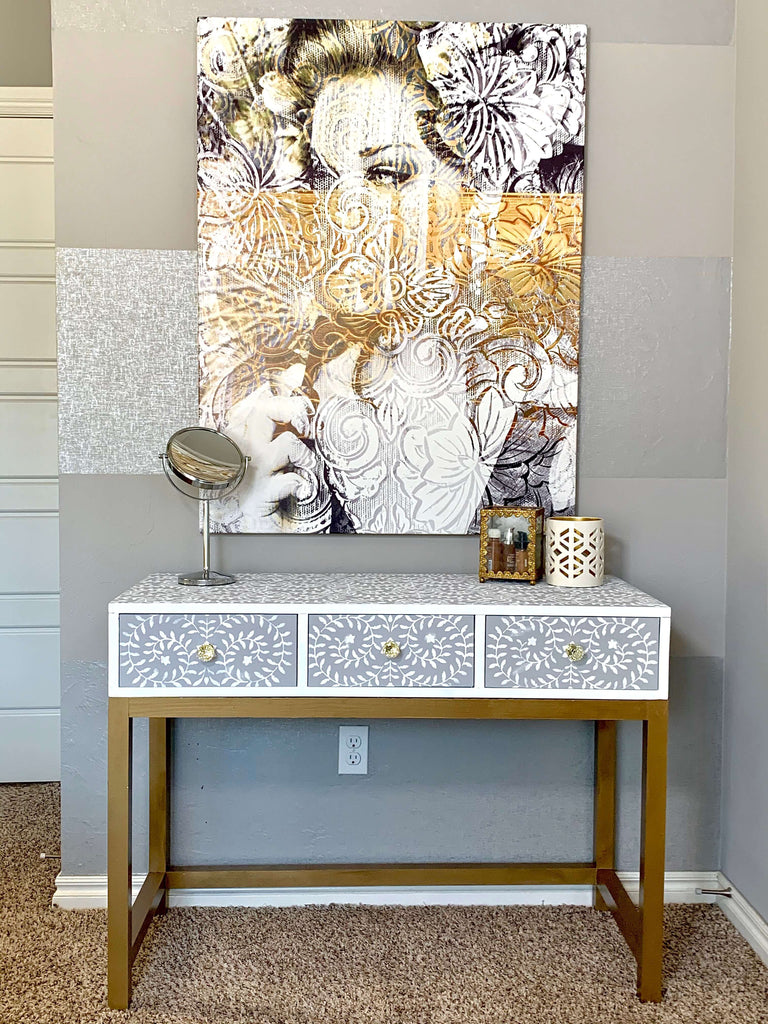
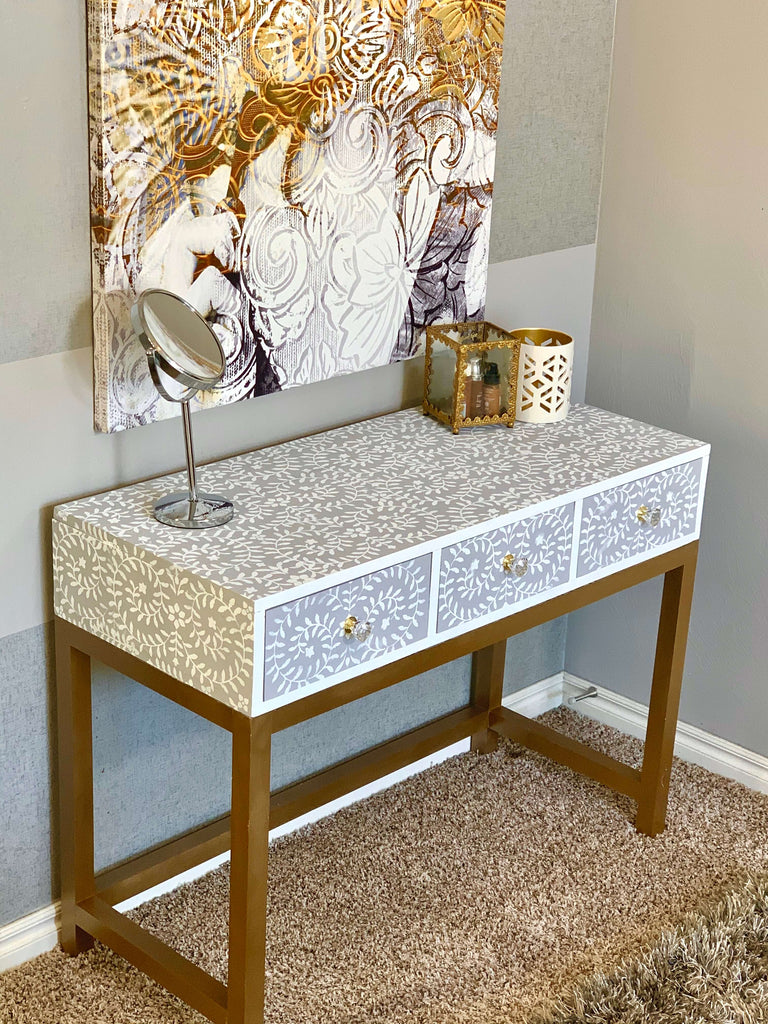
DIY Vanity Desk
"This DIY Vanity Desk will make you reconsider all of your other makeup vanity tables."
If you are looking for a solution for your messy makeup problems , man do I have a solution for you. I am a lover of all things makeup, so I wanted to create something that was both stylish and functional, luckily I succeeded at creating this fun DIY Makeup Vanity Desk.
“This post is sponsored by Build Something”
Even better news, I am partnering up with Build Something, Kreg's plan site, to bring you the free plans so you can recreate this unique vanity desk yourself. If you are a little intimidated about this build, don't be, I've got you covered with the step by step instructions.
There are some affiliate links in this post, meaning I get a small commission if you purchase through these links, at no cost to you. Click Here to read my full disclosure.

But first we must give recognition to this stenciled paint job. I am super proud about pulling this design off. I've seen a few makeup vanities in my day but not one that looks quite like this. I am sharing all of the details below on how I pulled this look off, so keep reading for all of the details.
Now let's get into it!
Dimensions
Materiels
- 5 - 2x2x6
- 1 - 3/4" piece of plywood
- 2 - 1x6x6
- Priya Bone Stencil
- Chalk Paint - White
- Chalk Paint - Grey
- Chalked Clear Coat
- Gold Spray Paint
- Door Knobs
- Drawer Slides
- 2 1/2" Pocket Hole Screws
- 1 1/4" Pocket Hole Screws
Tools Used
Step 1: Assemble the Vanity Desk Top
I first started off with creating the top for the makeup vanity desk. I used my Kreg Jig throughout this process to create pocket holes to be able to join my boards together. For the top, you will need to set your Kreg Jig on a 3/4" setting and use 1 1/4" pocket holes screws.
 After I created the pocket holes, I attached the 1x6 back board to the back of the bottom table top with the pocket holes facing forward. The back board should be flush with the end of the bottom desk board.
After, attaching the back 1x6, I attached the two side 1x6s, and the two middle 1x6s using pocket hole screws.
 I then cut the top board down to size, but I waited to attach this later to make it easier to attach the drawer slides to the inside of the desk.
Step 2: Assemble the DIY Vanity Base
Once I had the top assembled, I started working on the base. I used 2x2s to create the desk base. I used my Kreg Jig to create pocket holes to join the boards together, but for the base I had to set my jig on a 1 1/2" setting. I used 2 1/2" pocket hole screws to join the boards together.
 I used my two right angle clamps to hold the boards together, so I could drive in the pocket hole screws. These clamps really come in handy when you are working alone. Your two desk sides should look a little something like the picture below.
 Once I assembled the two desk sides, I was able to start forming the vanity desk base. I also used my Kreg right angle clamps here to hold the boards in place while I drove in pocket hole screws
 I made sure to face the pocket holes up for the 2x2s on the top, so they would be hidden by the desk top and I faced the pocket holes down on the 2x2s at the bottom part of the desk base.
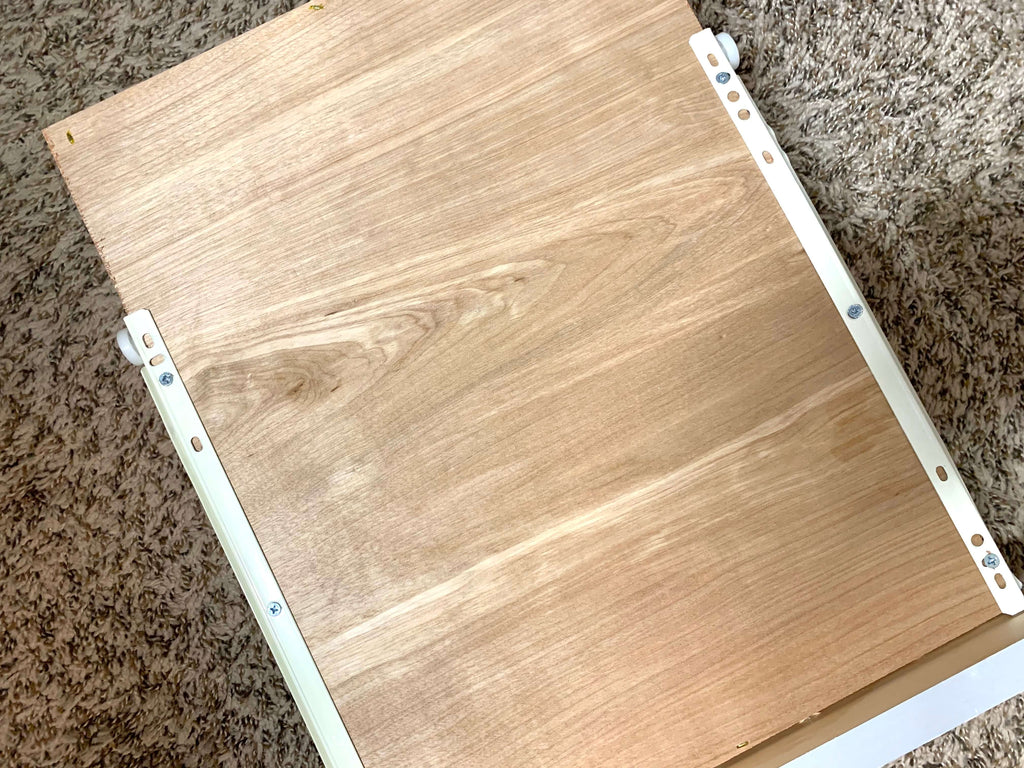
Step 3: Add Drawer Slides
If you are someone who is intimidated by drawer slides, don't be. This step is fairly easy and you should be able to get through this step in no time with the free plans on Build Something. I first started off by adding the drawer slides in between sections.
 The first thing I did was inset the drawer slide back 3/4" to account for the drawer face. I marked that line and placed a scrap 1x3 under the drawer slides. The drawer slide will be marked with a L or R, so you will know which slide goes on which side.
Then I sat the drawer slide on top of the 1x3 and then used three screws to screw it into the topside. Just that simple. I then repeated the same steps for the remaining desk sides.
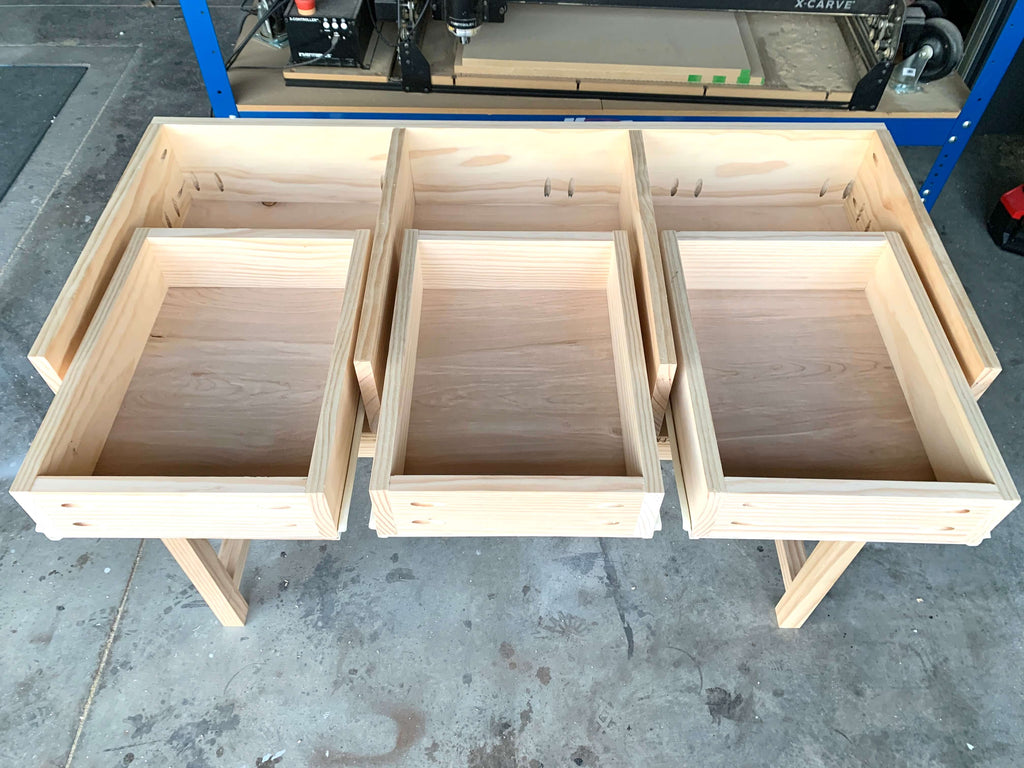
Step 4: Assemble Drawers
Once the drawer slides were in, I began building the drawers. I used 1x3 boards and a 1/4" piece of plywood to build them. I first built the main frame of the drawer using my Kreg Right angle clamp and pocket hole screws.
 Once the drawer was assembled, I used my staple gun to attach the 1/4" drawer bottom to the assembled frame. After building the drawers, I attached the second piece of the drawer slide to the bottom of my drawers.
 I then slid the drawers right into the drawer slides that were already placed and now we having working drawers; the sweet smell of victory.
 Once the drawers were in place, I attached the top piece of the desk top to the remaining top using a countersink bit and wood screws and then set the desk top on top of the base to see how it would look.
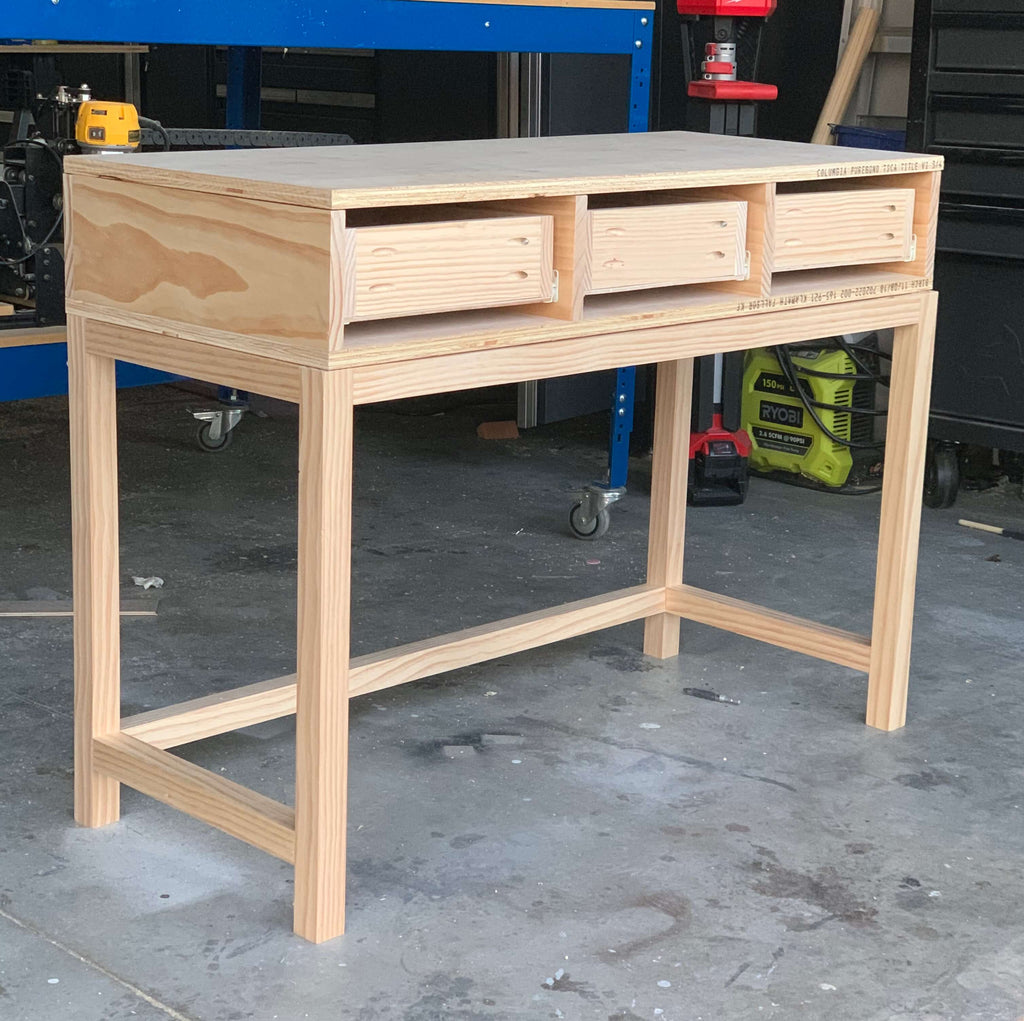 Don't you just love when a build starts to form? I know I do.
Step 5: Paint the Base
Since this is going to be a makeup vanity, I figured a gold finish would make it sleek and trendy. I first spray painted the base with two coats of white primer. Once that dried, I sprayed the base with two coats of gold metallic spray paint.
Step 6: Paint the DIY Vanity Desk Top
Next was the really fun part, painting the vanity desk top. Before I started painting, I prepped the desk for paint. I filled in the plywood edges with spackle to make sure I would have a smooth paint finish. After I applied the spackle, I sanded down the desk top and then painted the outside of the vanity desk top with Rustoleum grey chalk paint.
 I did two full coats to give it good coverage. Once that was dry, I started adding the Stencil. I was really excited to try this stencil out and I'm so glad my vision was able to come to life. I used the Priya Bone Inlay Stencil to create this design.
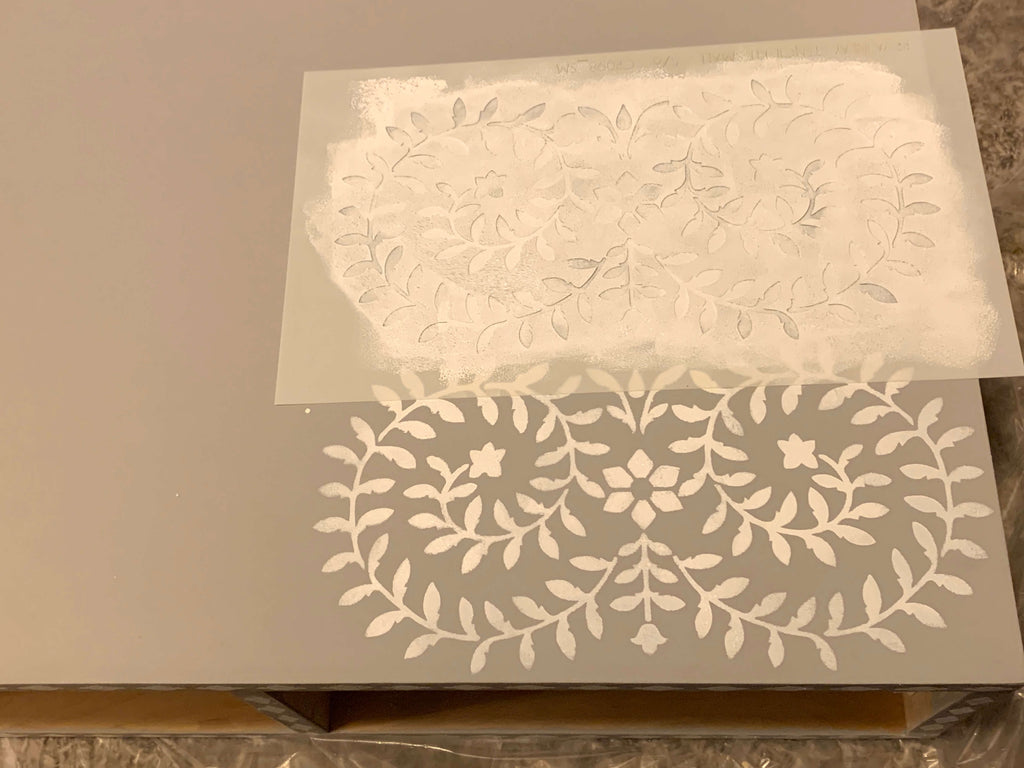 I used a roller brush to roll over the stencil to create this design. My tip would be to make sure you have only a little bit of paint on your roller when stenciling, it creates a cleaner look when you remove the stencil. I also used white chalked paint for the stencil design.
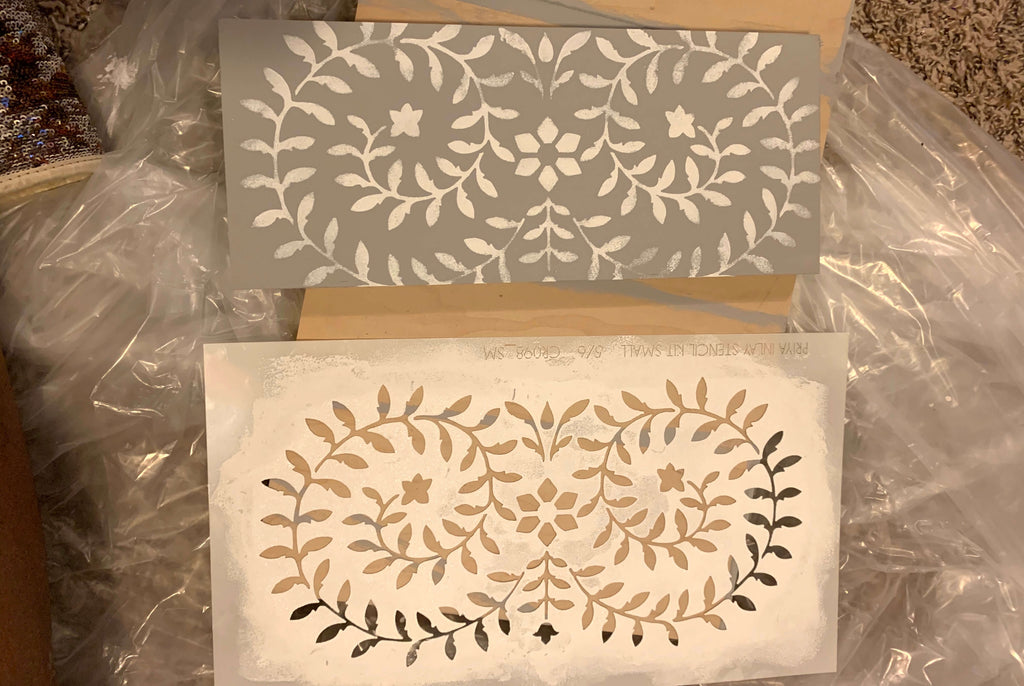 I went down the whole desk until I filled up the entire desk with the stencil. Once I finished the desk top, I applied the stencil to the three drawer fronts and that completed the desk top design.
Once the drawer fronts were dry, I sprayed the desk with a Chalked Clear Coat and then attached some fancy drawer knobs and the desk was complete. Let's take another look at my DIY Vanity Desk.

 I couldn't be happier with how this vanity desk turned out and I hope that your desk is just as amazing.
 This stencil couldn't have been a better option to pull off this desk design. Head on over to Build Something to get the free plans, so you can make a desk like this one. I can't wait to see wha you guys come up with.
As always, thanks for reading guy, XOXO Ashley.

So You Want to be Casted?
So you want to be casted?
I must say, being casted for a reality television show was definitely an exciting experience and I wanted to share some tips on how I got casted. If you ever get a chance to apply again for a show (fingers crossed for Making It Season 3) hopefully some of these do’s and dont’s can help make your dreams come true.
Now I’m no casting expert, so keep that in mind but I’m pretty sure these helpful tips will get you that much closer to TV Stardom.
Keep it on the Low!
Now ladies and gentlemen, I know how exciting it can be to want to tell everybody about applying to a show, but this is a big no no! Most shows are very big on their confidentiality, and sharing that you’ve applied for a show, or are being considered is definitely not a great idea.
You don't want to put your chances in jeopardy because you couldn't hold the tea. If you are interested in a show and are applying, keep it on the hush, hush, it will make announcing the good news that much better.
If at first you don’t succeed, try, try again!
Don’t let your first time applying be your last. I know how frustrating it can be to get rejected, but just because you get a no the first time doesn’t mean you’ll get a no the next time. I can tell you this wasn't my first no for a show, (second or third either) and I actually applied for Making It Season 1 and to be honest, having applied before and having gone through the process multiple times actually prepared me this time around. I had gotten over the initial nervousness of being interviewed and was able to just fully be myself! Don’t get discouraged. Keep at it.
If you've applied before, don't let that keep you from applying again; this just might be your year!
Patience is Key
When applying for a show, it’s obvious that you want to know the outcome of an interview or application. But when you apply, you’re basically playing the waiting game. Sometimes you may not even hear anything back, which is usually the case, but even when I did hear back it was still a wait.
After applying to Making It, I waited a little over two months before I heard anything back and even after that, it was still more waiting. Patience is key in these types of situations. You’re going to want communication and assurance but you likely won’t get it until you’re close to actually filming the show. I probably had about a week before I knew for sure, for sure that it was a done deal, crazy, I know. No need to email and bug the casters, if they want you, trust me, you will hear from them!
Brag on Yourself
I know we are taught to stay humble but this is your chance to brag on yourself a little. Be confident in yourself and what you do. There was a big difference in my first couple of interviews vs. the Making It 2 Interview.
In the first interviews I would say things like “ I think I could do this,” or “I’m kind of new at this, but I’ve built a few things.” But in the second interview I used phrases like “I am confident I can knock this out.” Basically being confident in your responses and presenting yourself in a positive light. The casters want to see that you are confident in your abilities. Your golden, you just have to show them that!

Be Yourself!
Now this may seem really obvious, but when your in an exciting, high rush, situation like being casted for a television show, it’s very easy to lose yourself in an interview. Just simply be yourself. I promise, you will feel way better in the end if you are your true genuine self.
Welp that's all the tips I have, hopefully this will help you get that much closer to getting casted on Making It!
Check out the application here!
Later y'all, thanks for reading.
Official Announcement | Making It Photoshoot | Premiere Party | Episode 1 Recap | Episode 2 Recap | Episode 3 Recap

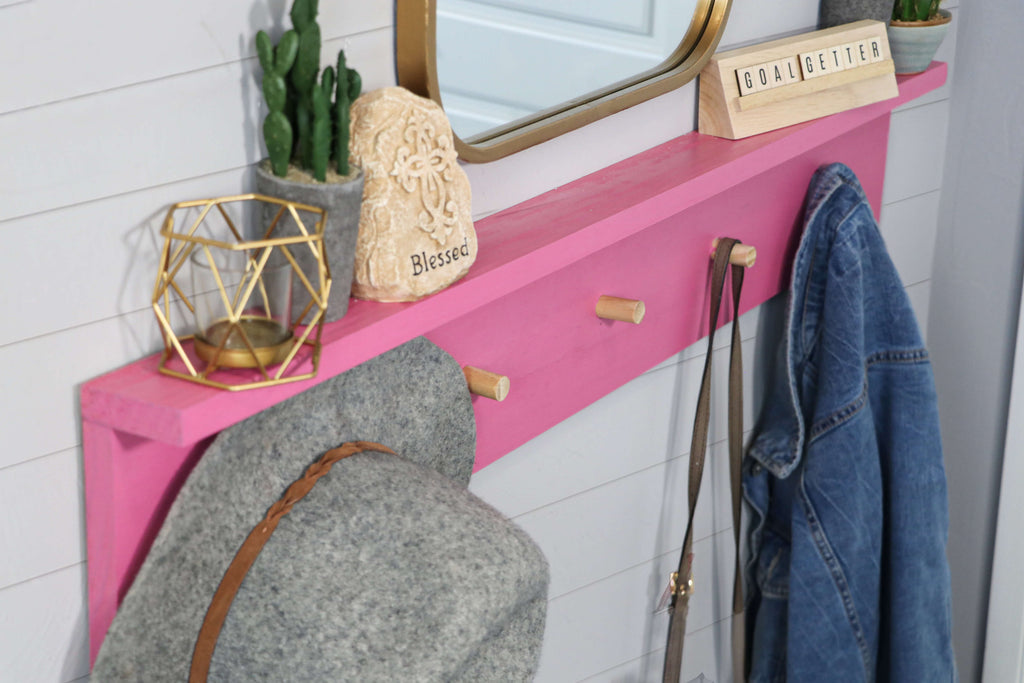
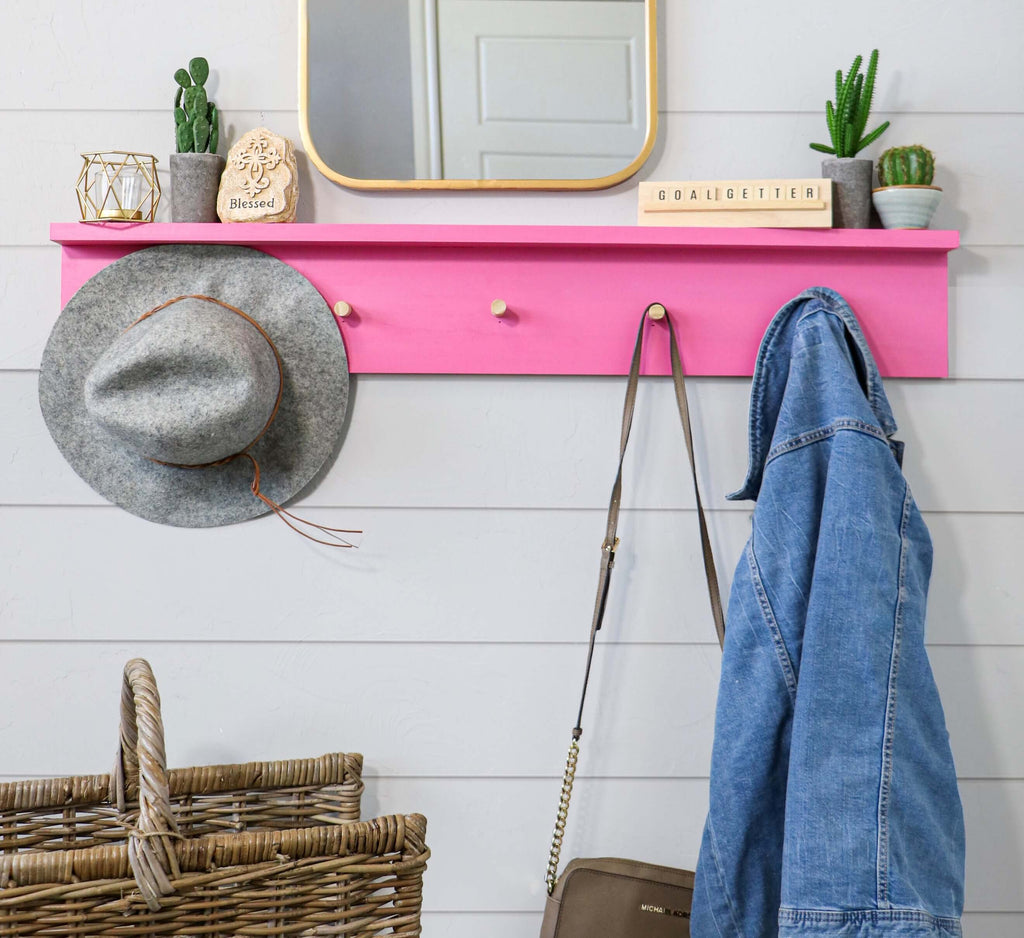
DIY Wall Coat Rack
"A DIY Wall Coat rack that will brighten up your entryway"
I always love simple DIYs and this coat rack is no different. I wanted to bring you guys a simple project, a little something different from my larger furniture projects that I usually do. So let's dive in.
Materiels
- 1 - 1x6x6 Select Pine Board
- 1 - 1x3x6 Select Pine Board
- 1 - 5/8" Wooden Dowel
- 1 1/4" Pocket Hole Screws
- ColorShot Spray Paint
- RapidFuse Glue
Tools List
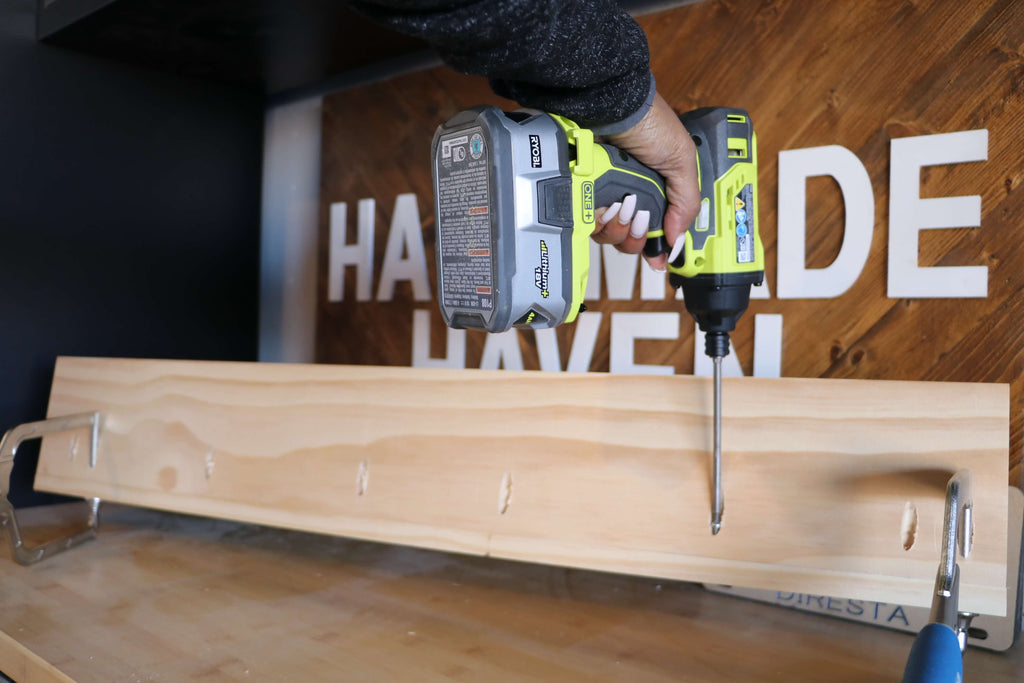
For this particular project, I get to test out my new Ryobi Drill and Impact Driver Combo Kit. It comes packed with the drill driver and impact driver, two batteries, a charger and a bag.
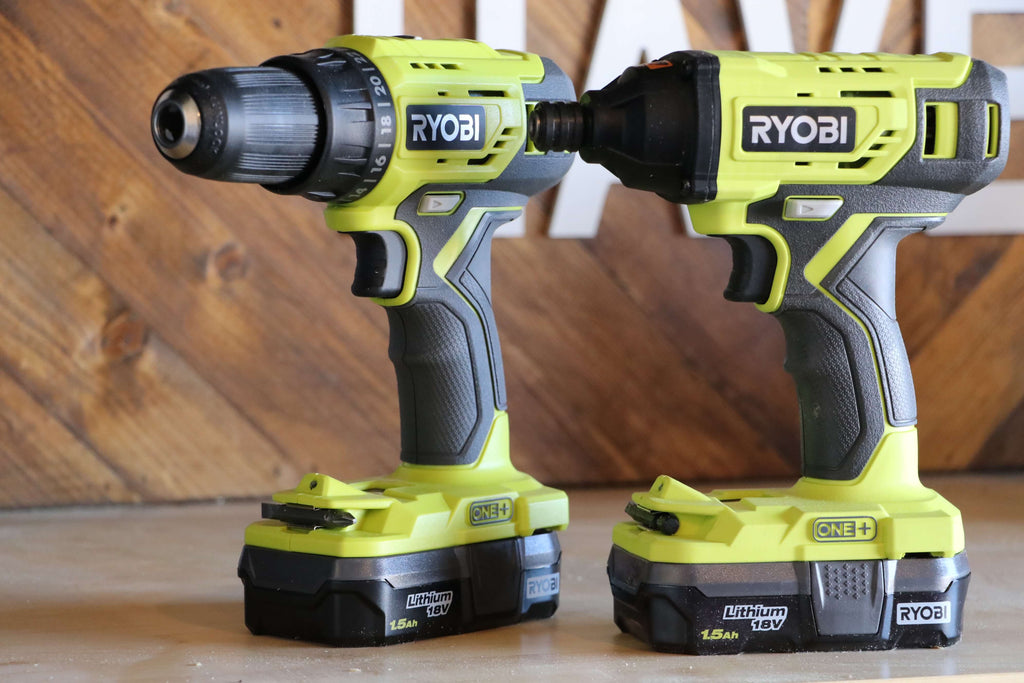 In this particular kit the batteries and charger have been upgraded for overall performance. So let's see how it stood up to the job.
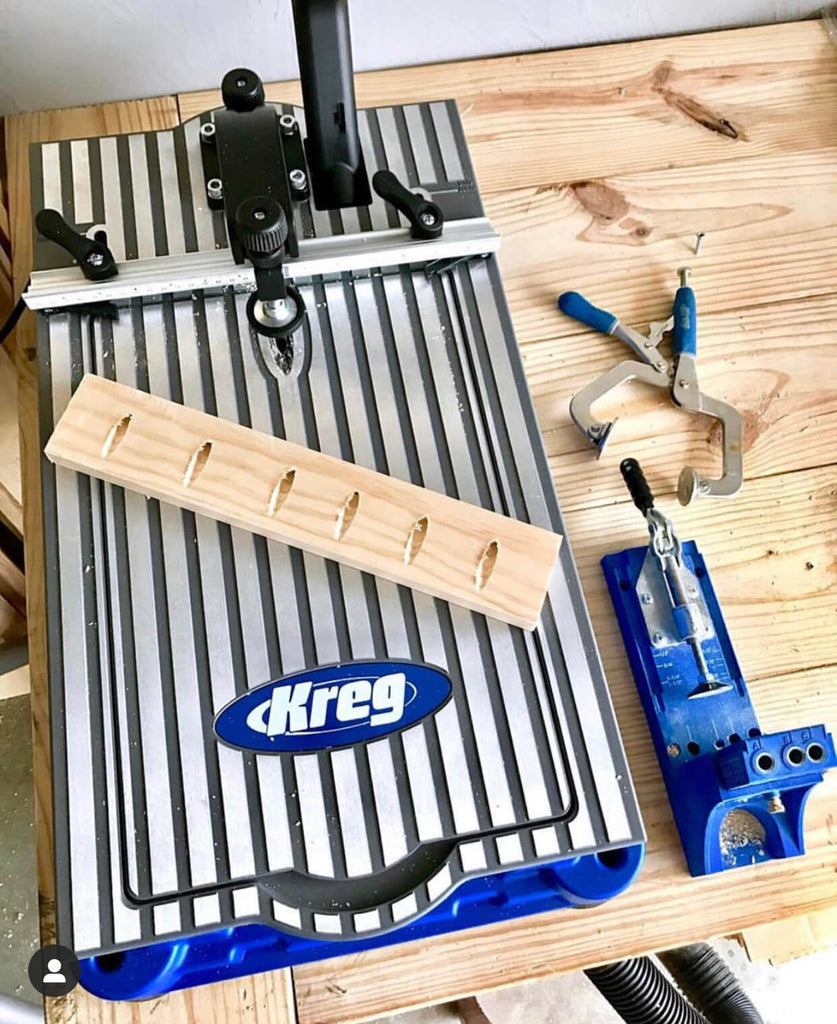
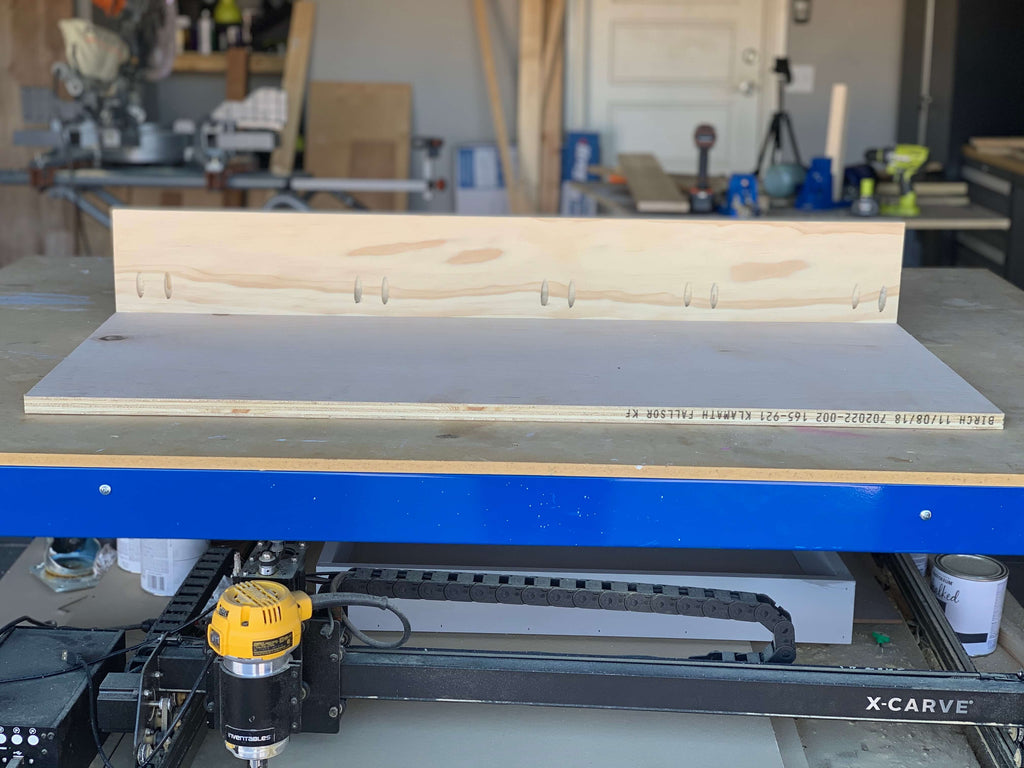
Step 1: Drill Pocket Holes
First, I cut my two select pine boards down to size using my miter saw. I opted to cut my boards down to 39" but feel free to make yours as long as you see fit. Once my boards were cut, I started drilling pocket holes into my 1x6 board using my RYOBI Drill/Driver.
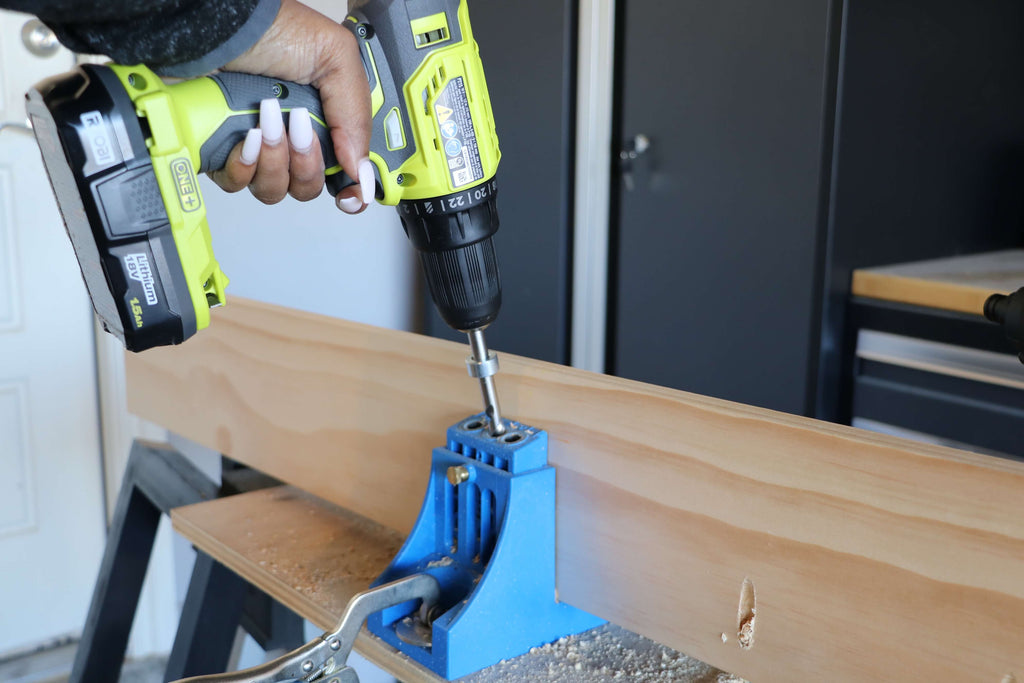
The new drill/driver has 500 in-lbs of torque that gives it power when doing activities such as these. I created pocket holes all along the back of the board and used my Kreg Jig to do so. For this board, I set my jig to a 3/4" setting.
Step 2: Assemble DIY Coat Rack
Next, I joined my boards together using pocket hole screws. I utilized my right angle clamps to hold the boards into place while I used my RYOBI Impact Driver to drill in the screws.
 The Ryobi Impact driver has 1800 in-lbs of torque to deliver increased speed when driving screws. I drilled in the outer pocket hole screws first to hold things into place and then proceeded with the rest of the pocket holes.
Step 3: Drill Dowel Holes
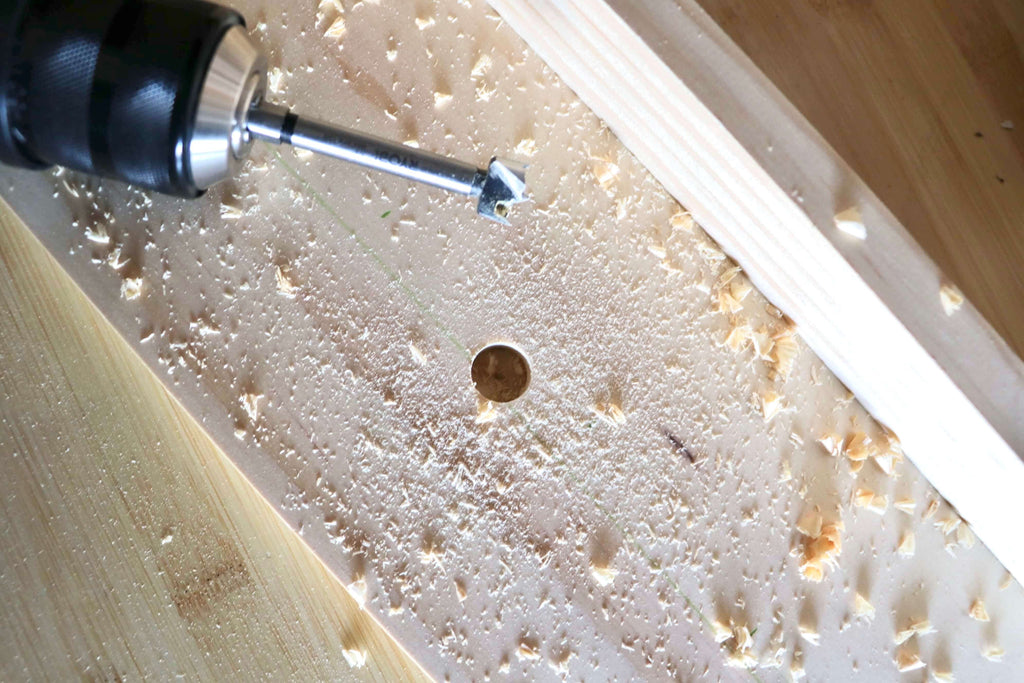
Next, I added the dowel holes. To create the holes, I used my 5/8" forstner bit. Now, you can use your Ryobi Drill/Driver to drill the dowel holes, but I decided to use my RIDGID Octane Hammer Drill instead because it was a lot faster. This baby has a ton of power, and was a better option for this particular task.
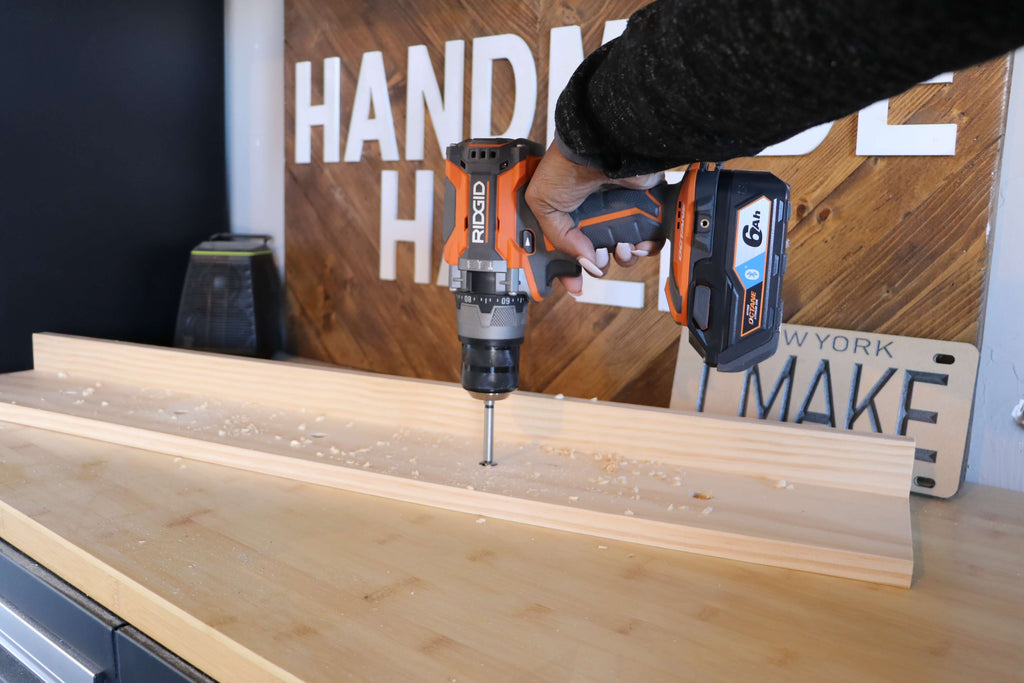 I first marked the board in half at 2 3/4" and then marked evenly across the board to make sure my dowels would be evenly placed. I drilled my holes just deep enough so that the top of the Forster bit would be even with the top of the hole.
Step 4: Add Dowels to Coat Rack
Now I did this step third, but later on in the process, I realized that it was probably better to do this step after painting the coat rack. Lesson learned, do this step once your paint is dry.
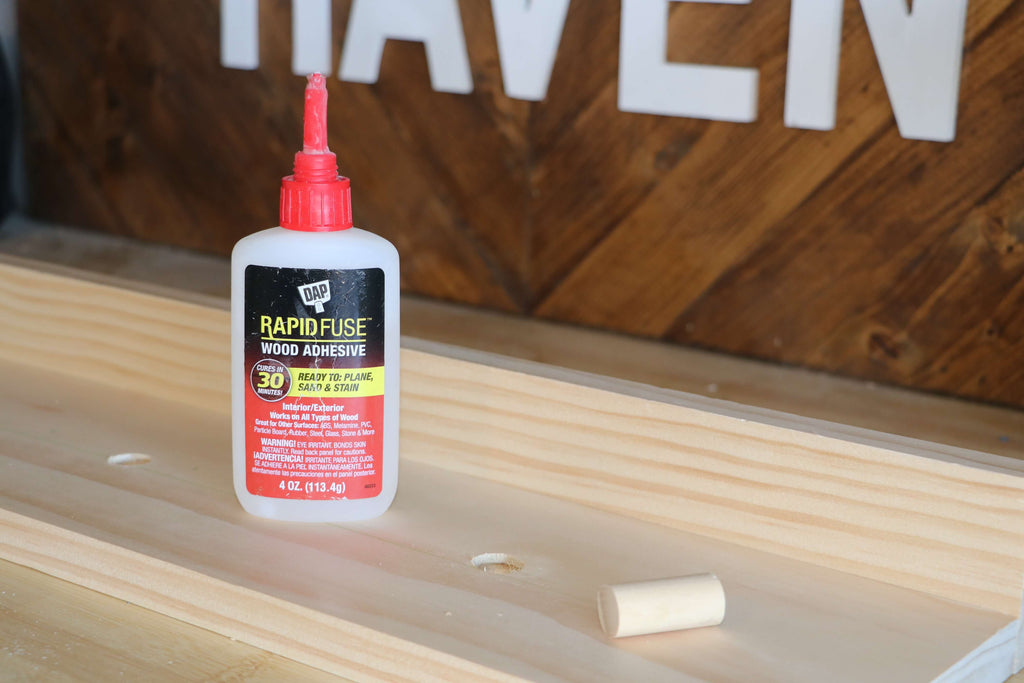 I used DAP RapidFuse Glue to attach the dowels to the coat rack. I use this glue all the time and I really enjoy using it. It always has a strong hold with whatever I'm applying it to and dries almost instantly.
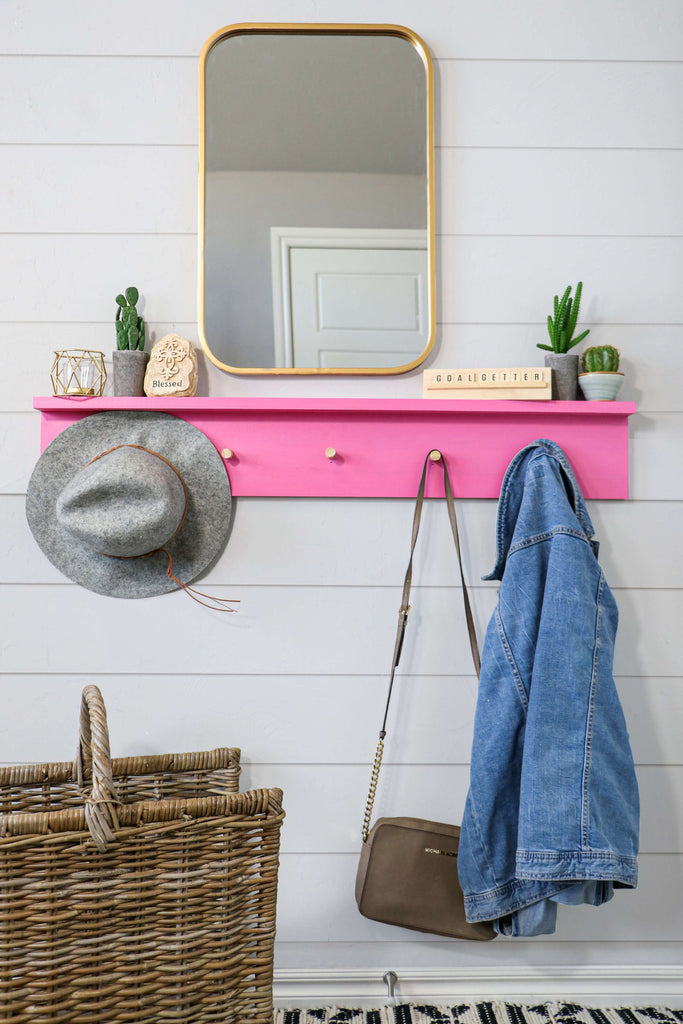
Step 5: Paint your DIY Coat Rack
Now here is the fun part! Getting to choose a color for your coat rack. I went with something bold and fun, pink! This was also my first time trying out this new spray paint ColorShot.
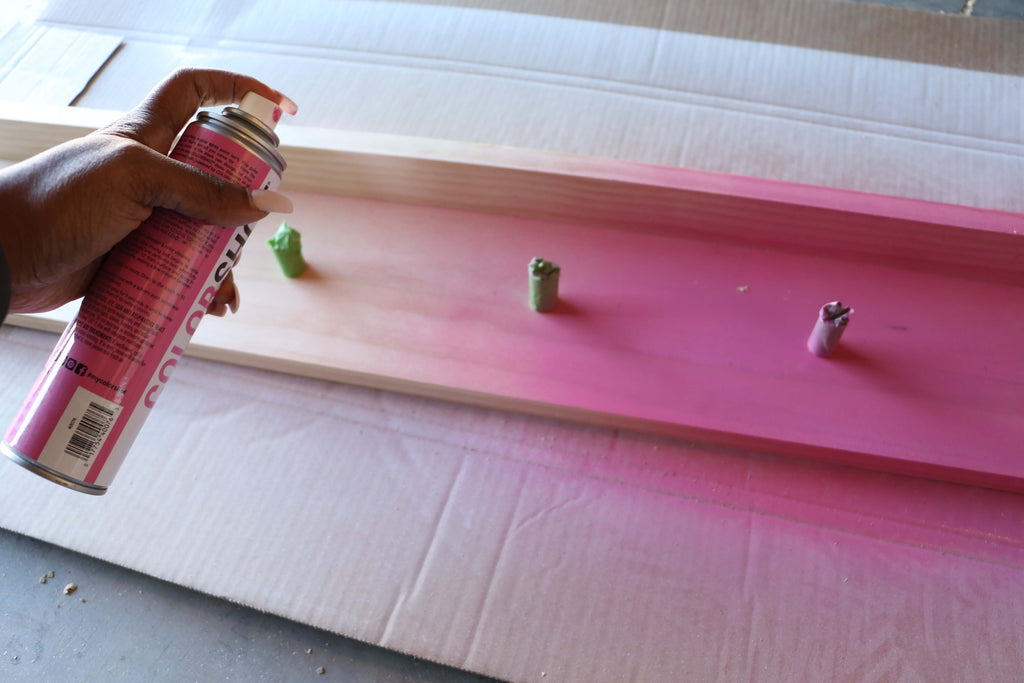 One thing that I noticed that I really liked was how quickly it dried. I sprayed a thin coat and it quickly dried to touch. This particular color is called Farmer's Daughter. I sprayed several coats and then let it sit to dry.

Step 6: Style and Enjoy
Once your DIY Coat Rack is all dry, you can style and enjoy. This project was a super simple project that I was able to knock out in a few hours but man does it make a corner space look good. I hope you guys enjoy and I can't wait to see your renditions of this coat rack. But before you go, let's get one last look at mine.
Thanks for reading guys, XOXO Ashley.

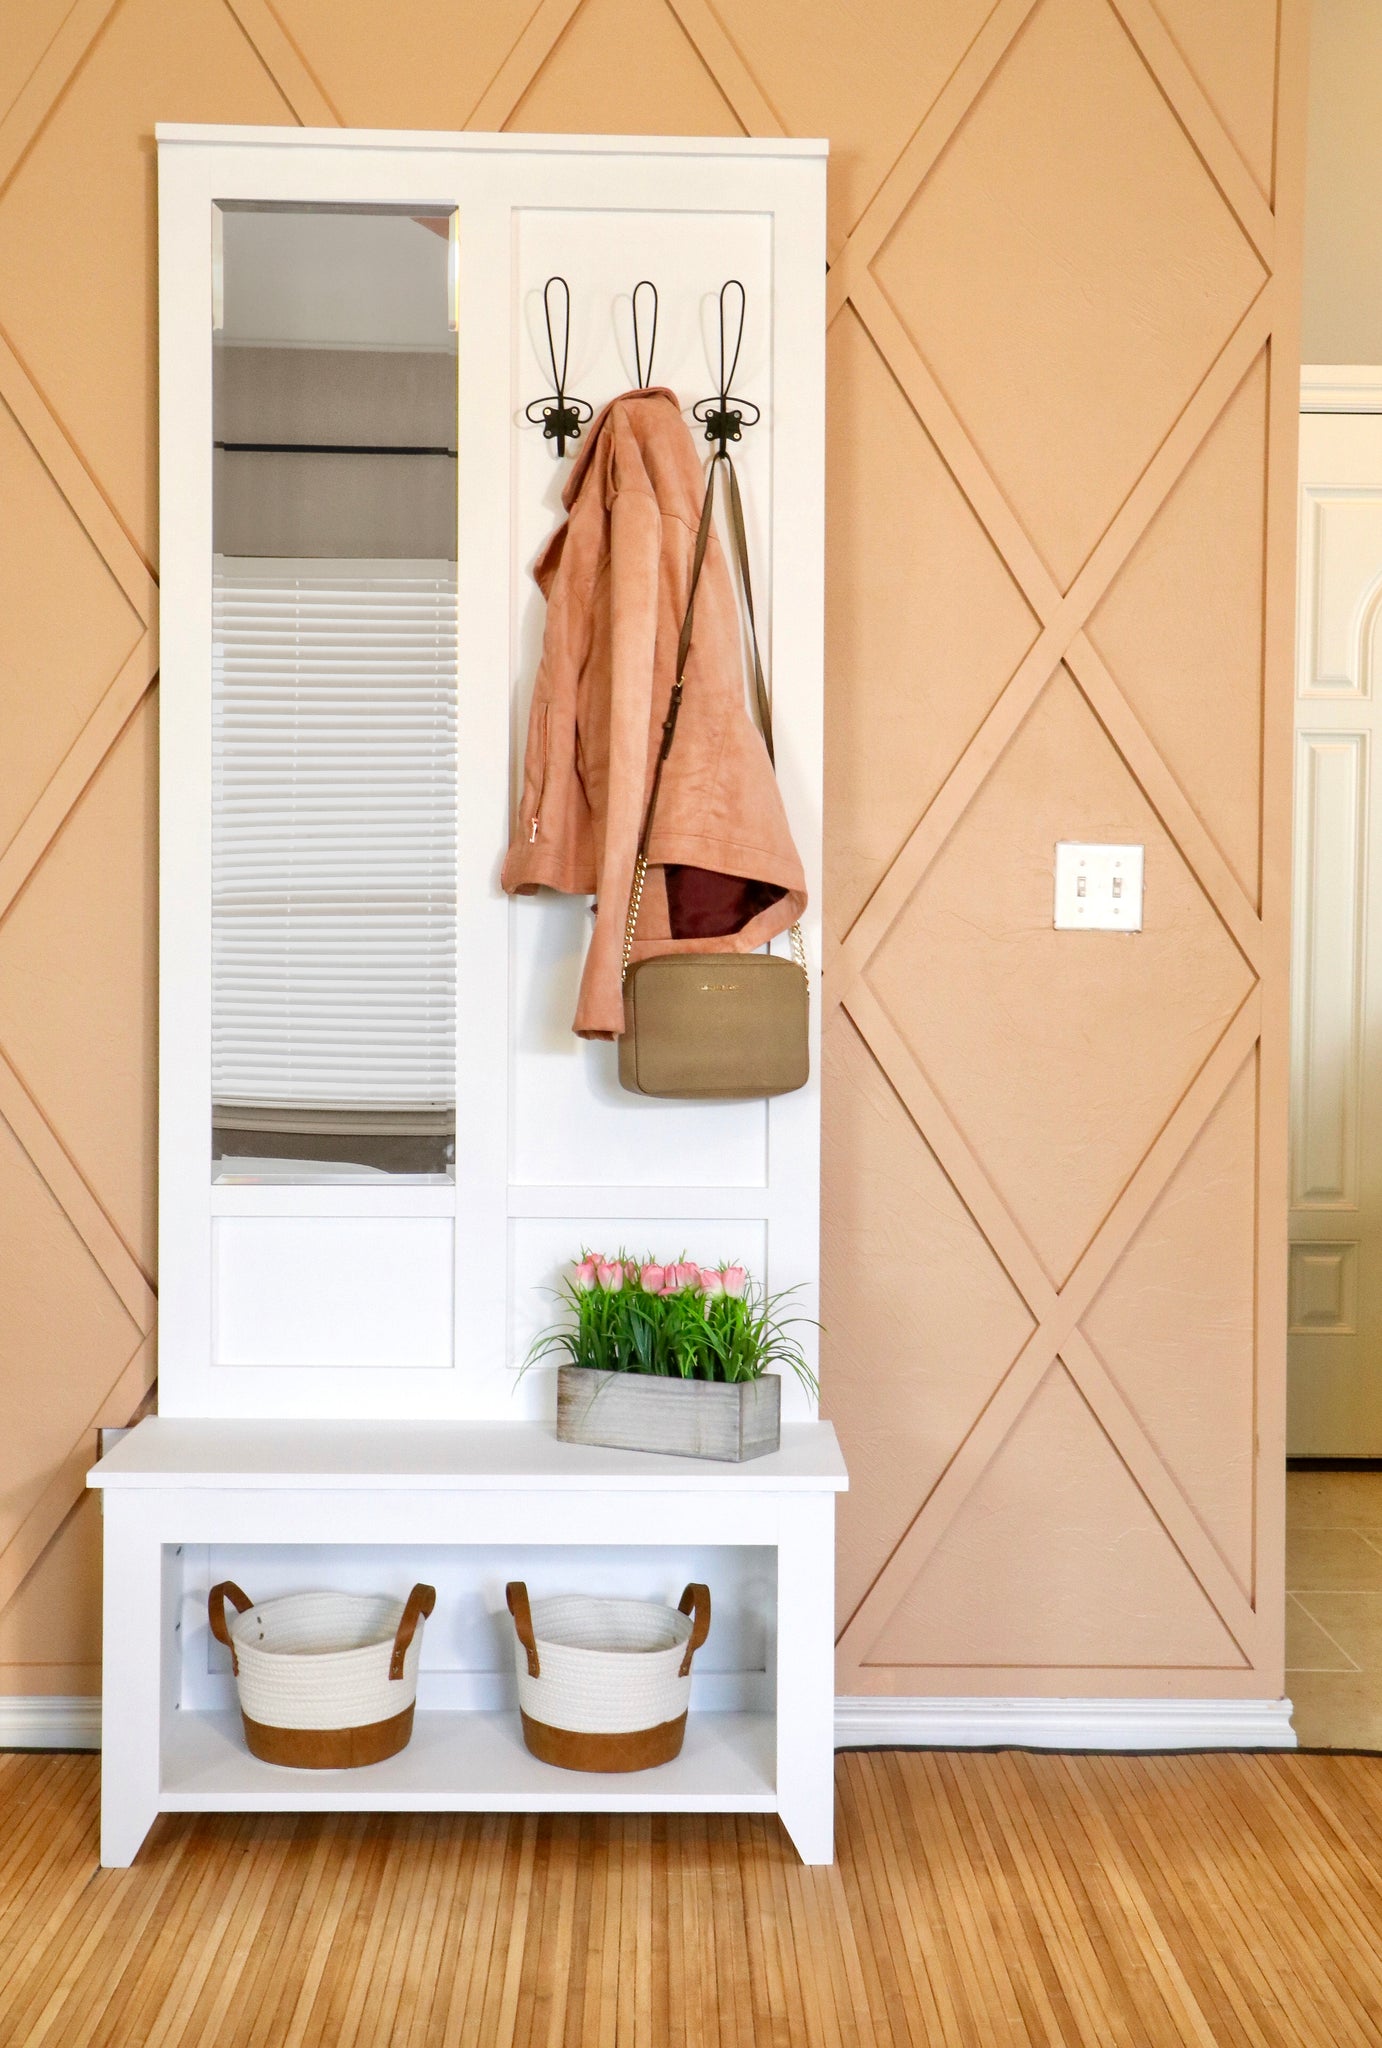
Hall Tree Bench DIY
"Give your entryway a fresh new look with this DIY Hall Tree Bench."
- 7 - 1x3x6 (Select Pine)
- 1 - 1x2x6 (Select Pine)
- 1 - 1/4" piece of plywood
- 1 - 3/4" piece of plywood
- 1 - Project Panel
- 2 - 3/4" Dowel
- 12x48 Frameless Mirror
- Coat Hooks
- Pocket Hole Screws
- Mirror Adhesive
- Brad Nails
- Staples
- Wood Glue

For those of you who are more visual, I created a quick video of my process building this hall tree. Check it out and then read the steps below.
Step 1: Build Hall Tree Bench Sides
To begin building the bench sides, I first had to cut the notches out of my 1x3s; I did this by using my miter saw. I marked off where I wanted to cut and made the same beveled cut for all four legs of the hall tree bench.
 Next, I attached the bench sides to the 1x3 legs using a Kreg Jig on a 3/4" setting. I assembled them together using pocket hole screws and added some wood glue for extra strength.
I used my new DEWALT Atomic Hammer Drill for this build and it did a great job creating pocket holes and drilling in screws. It features a 2-speed brushless motor and its compact size of 6.8" makes it really lightweight. At 2.5 lbs, it was the perfect drill for a project like this one. The kit comes with two batteries, a charger and a bag.
 I inset the hall tree bench sides so that the inside of the bench sides were aligned at the beginning of the notched corner. The pocket holes should be facing inward and the notched side of the bench leg should be facing inward.
Step 2: Assemble Bench Frame
Once the bench sides were assembled, I attached the longer 3/4" plywood boards to the assembled sides using a Kreg Jig on a 3/4" setting and pocket hole screws.
 The pocket holes on the top 3/4" board should be facing upward and the pocket holes on the bottom board should be facing down.
Step 3: Add Trim to Hall Tree Bench Frame
Next, I added the trim to the hall tree bench. I used my brad nailer and wood glue to attach the trim to the assembled bench.
 I attached a 1x3 board to the top of the bench and the top back side and used a 3/4" dowel for the bottom front and back trim, as shown above.
Step 4: Attach Bench Top
With the bench assembled, it was time to add the bench top. I used a project panel to create the hall tree bench top. I first had to cut it down to size using my circular saw.
 Then I attached it to the bench using my brad nailer , brad nails and wood glue. The back of the project panel top should be flush with the back of the bench, to ensure the hall tree backing can sit evenly on the back of the hall tree bench.
Step 5: Build Upper Hall Tree Frame
Next, I began building the upper frame of the hall tree by attaching 1x3s together using a Kreg Jig on a 3/4" setting and pocket hole screws. I first created the outer square and then attached the middle 1x3. I made sure to place the mirror down in the frame to make sure there was a snug fit.
 Once I assembled the upper frame, I attached it to the bottom bench using the pre-drilled pocket holes and pocket hole screws. Be careful when assembling these two together because the top is a little flimsy without the backing.
Step 6: Attach Hall Tree Bench Backing
Next, I began building the upper frame of the hall tree by attaching 1x3s together using a Kreg Jig on a 3/4" setting and pocket hole screws. I first created the outer square and then attached the middle 1x3. I made sure to place the mirror down in the frame to make sure there was a snug fit.
Once I assembled the upper frame, I attached it to the bottom bench using the pre-drilled pocket holes and pocket hole screws. Be careful when assembling this two together because the top is a little flimsy without the backing.
Step 6: Attach Hall Tree Bench Backing
Next, I attached the 1/4" piece of plywood backing to the assembled hall tree bench. I first applied some glue to the back of the hall tree frame and then clamped the plywood and secured it down with my staple gun.
 I decided to place the mirror on the hall tree to make sure it fits and man was I pleased. It came out way better than I expected.
Step 7: Prep and Paint
With the hall tree fully assembled, I began prepping the build for paint. I used wood filler first to fill all of the nail holes and gaps on the project. Once the wood filler was dry, I sanded down the spots were I applied the Dap to smooth out the rough surfaces, then I gave the whole hall tree bench a good sanding.
 I painted the hall tree with one good coat of Behr paint and then used some caulk to fill the inner corners of the trim. Once the caulk was dry, I went back and gave the hall tree another good coat.
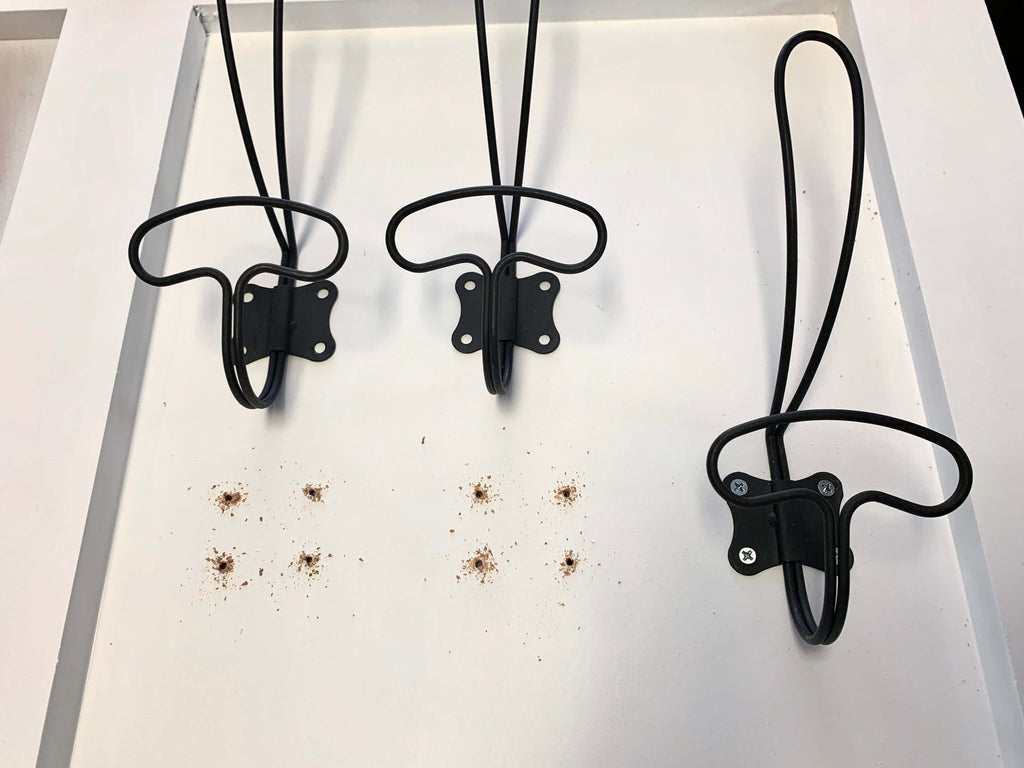
Step 8: Add Coat Hooks and Mirror
After the paint dried on the hall tree bench, I decided to add the coat hooks.
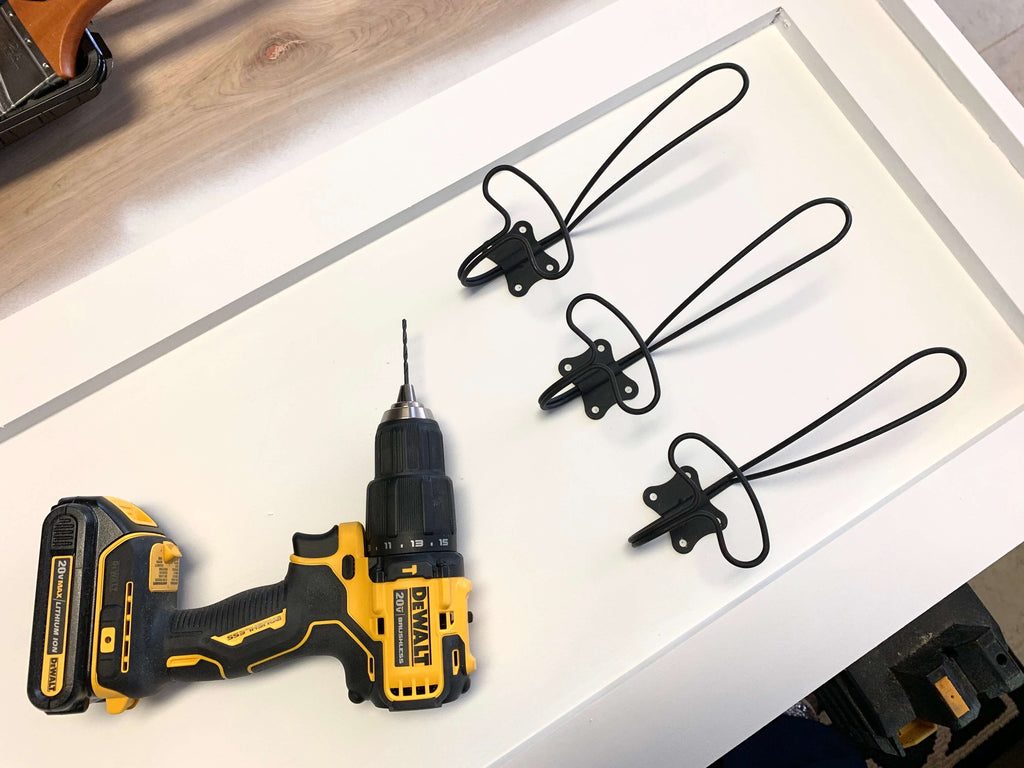 I first marked where I wanted the coat hooks to be and then drilled pilot holes into the backing. Once the holes were drilled, I used a screwdriver to screw in the coat hooks. I absolutely love these hooks, they are one of my favorite designs.
 Once the hooks were added, it was time to add the mirror. This was a pretty easy process. I applied some mirror adhesive to the back of the mirror and clamped the mirror down into place for several hours.
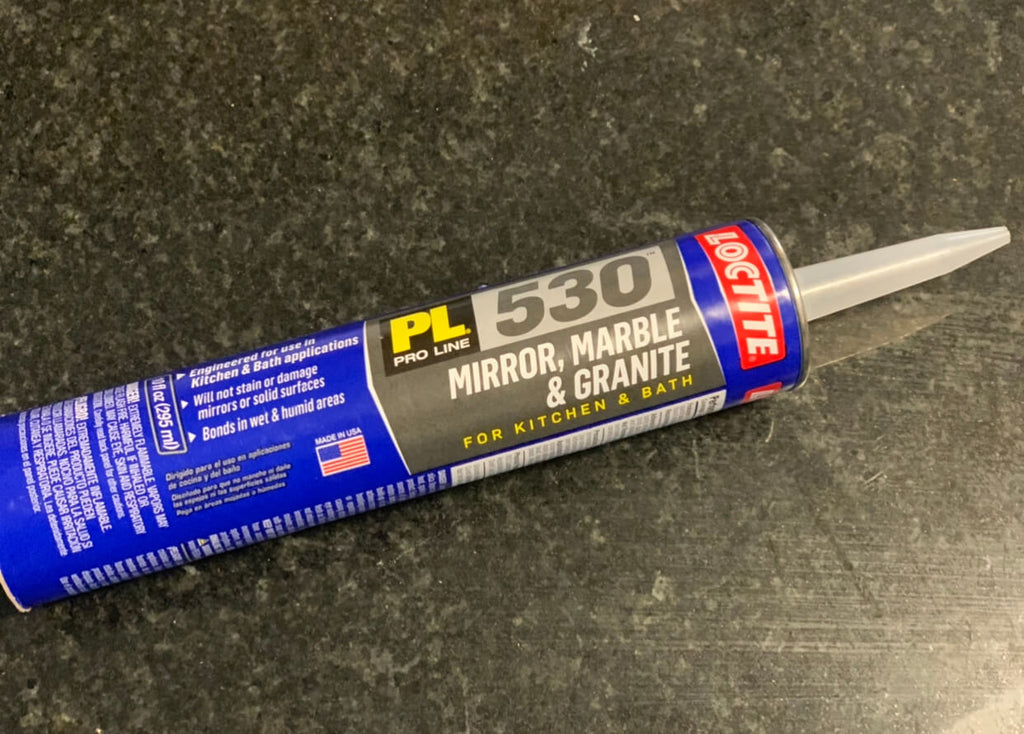 I made sure to put something soft under the clamp to make sure I didn't mess up the mirror. After letting that dry, the hall tree bench was finished!
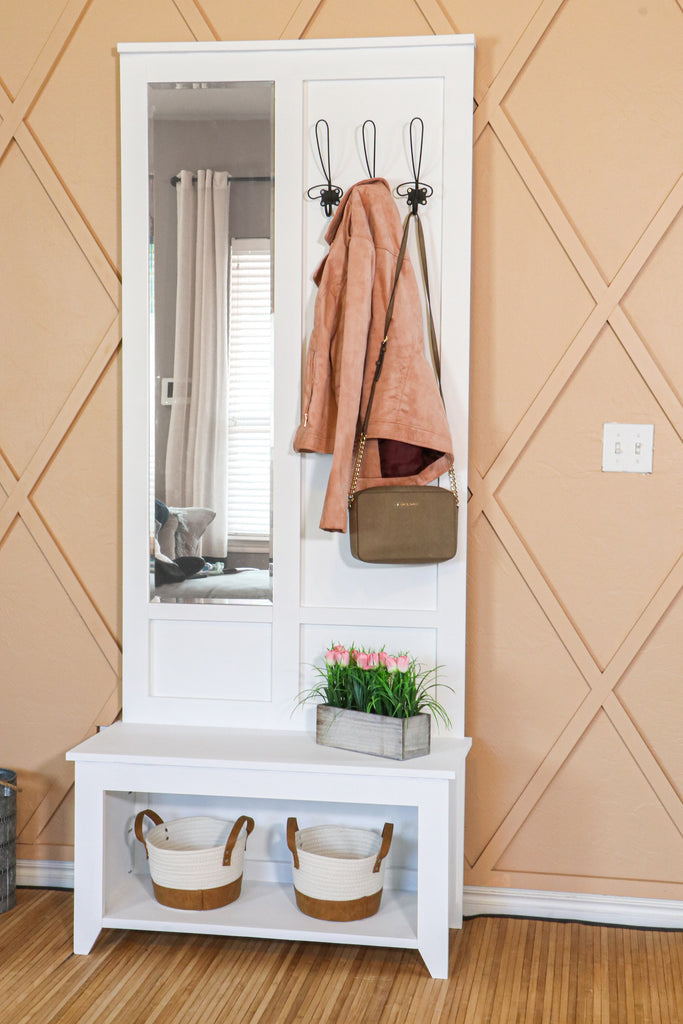
Now let's take another look at this fabulous hall tree bench, it really looks great in my little entryway. This build was the perfect combination of style, organization and functionality.
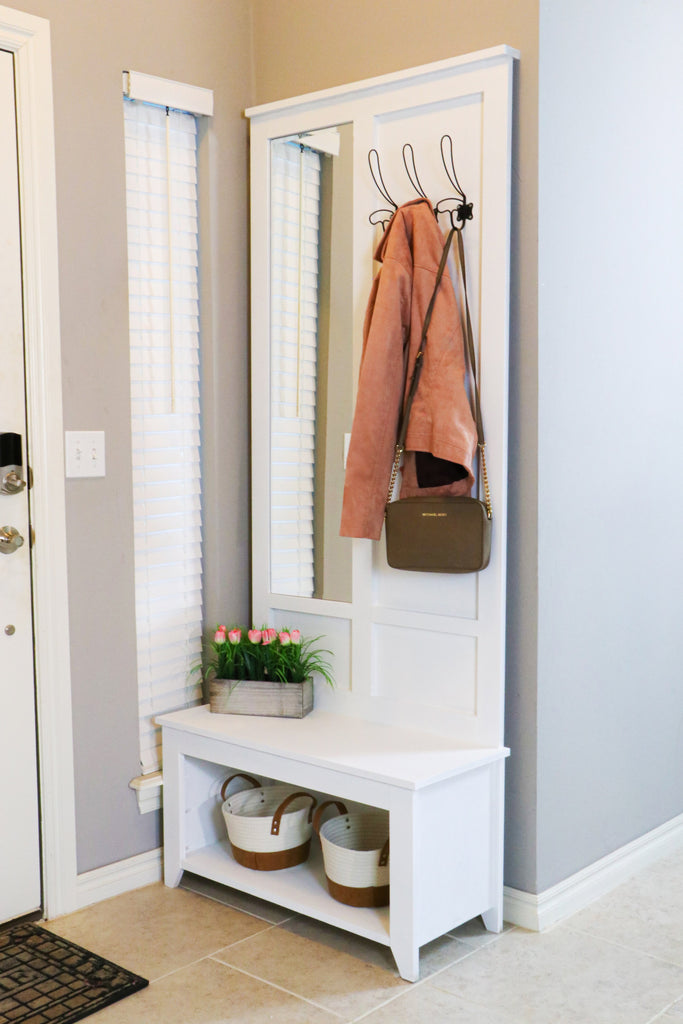 I especially love that I have a mirror right by the door for that last mirror check before leaving the house. I hope you guys enjoyed the project.
As always, thanks for reading, XOXO Ashley.

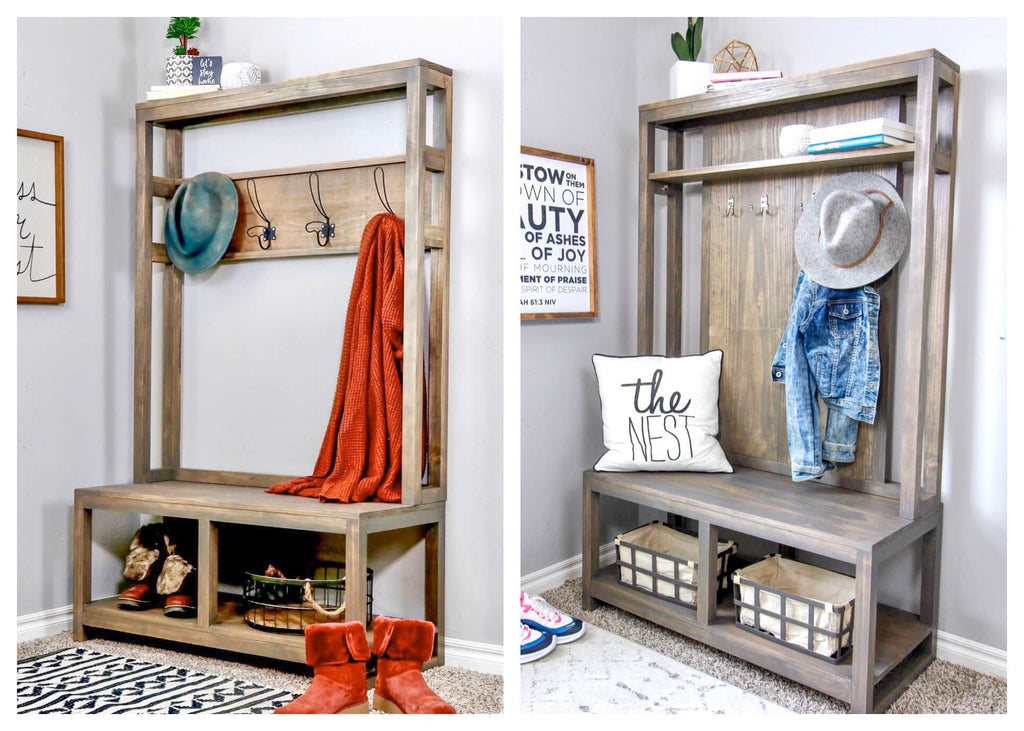
10 DIY Desk Plans for the Office
"Who knew a DIY Desk could look so good"
A-Frame Desk
 Who doesn't love a simplistic DIY Desk? This A-Frame Desk gives a unique style to the office with its featured A-Frame braces and for less than $100, I would say that this desk is an office win. Tutorial for the A-Frame Desk here.
L Shaped Double X Desk
 L shaped Desks seem to be making a splash in the desk world and this L Shaped Double X Desk is no different. If you're looking for a home office desk with a little more space, than you've come to the right place. This DIY Desk will surely change the feel of your office space. Plans for the L Shaped Desk here.
Farmhouse X Desk
 Who doesn't love the ole' farmhouse feel? This computer desk is a simplistic way to bring a little farmhouse to your home and with lumber under $80, you can't beat it. Plans for Farmhouse X Desk here.
Concrete Desk
 If normal is not your style, you may be intrigued by this concrete desk. This modern style desk is sure to turn heads with its unique concrete top and modern style legs. If you're looking for different, I think I've found something you may like. Your home office will love you for it. Tutorial for Concrete Desk Here.
Floating DIY Desk
 If you are more of a space saver, you have to check out this Floating Desk from Erin Spain Blog. She used frog tape to make a unique design on her floating desk. Something simple and functional to make your home office look super stylish. Check out the tutorial here at Erin Spain Blog.
DIY Kids House Frame Desk
 With all this talk of DIY Desks, we can't forget about the kids! If you want to get your kids in the working mood, be sure to give them something fun to work on. This DIY House Frame Kid's desk will give your kids the motivation they need to get the work done. Tutorial for House Frame Kid's Desk here.
Kid's Plywood Desk
 If you're looking for a more modern kid option, than fear not, I have come to your rescue. This Kid's Plywood Desk from Erin Spain blog is another great option for your kid's who are more simplistic. With a mix of metal and plywood, this Kids DIY Desk will surely make your kids smile. Tutorial for Kid's Plywood Desk here.
Rustic Modern Writing Desk
 This Rustic Modern Writing Desk will give your home office that rustic feel you've been looking for. A great project for beginner builders and a fun and cheap way to make your office look stylish and fun. Tutorial for Rustic Modern Writing Desk here.
DIY Workbench Inspired Desk
 If you're looking for a more rugged look; check out this Workbench inspired desk. If you have a craft room or need something more manly, this is the desk for you. Check out the tutorial here at Jaime Costiglio Blog.
DIY Floating Desk with Hidden Storage

If hidden storage is your thing, you're going to love this one. DIY Huntress decided to create a floating shelf with hidden storage and I am loving it. A simple way to update that awkward nook space in your home. Check out the tutorial here.
That wraps up the DIY Desks roundup. Hopefully, you've been inspired by these amazing builds to be able to create your own DIY Desk for your home office.
Thanks for reading guys, XOXO Ashley.

DIY Kate Spade Photo Backdrop
"A Photo Backdrop all your friends will love"
I am in full celebration mode after announcing my appearance on NBC's show Making It. I decided to have a viewing party with all of my fam and friends and I knew it wouldn't be a good party without a fun backdrop, so I decided to create this Kate Spade Photo Backdrop.
With me being a DIYer, of course I had to make it myself, so today. I'm sharing all the details on how to re-create this fun backdrop.
Materiels
Backdrop
- 2 - 1/4" sheet of MDF (4x8)
- 9 - 2x4x96"
- Behr Paint (Flat Black)
- Behr Paint (Ultra Pure White)
- Spax Construction Screws
- Frog Tape
- Paint Roller
Flowers
- Cardstock Paper
- Cake Rounds
Tools Used
- Drill
- Framing Nailer
- Miter Saw
- Staple Gun
- Hot Glue Gun
- Scissors
- Cricut
- Paint Sprayer
Now let's get into how I made the Kate Spade photo backdrop.
Step 1: Paint the MDF White
To get the backdrop started, I first painted the MDF boards white. I first painted the board Behr Ultra Pure White and I used my paint sprayer to make the process go a little faster.

When I'm using my paint sprayer, I always like to keep a foam brush handy for any spatter, but for the most part this was a petty simple step.
Once the boards were all painted, I let them sit for about 5 hours. Normally, paint drys a little faster than that, but because I knew I would be putting tape on the boards, I wanted to make sure it was really dry.
Step 2: Mark off Lines and Paint
After the boards were all dry, I started marking off the lines with frog tape. Whenever I am wanting straight lines when painting, I always use frog tape. I haven't been able to find a product that gives as straight as a line as it does, so I highly recommend it.

This step will be a lot easier with two people. I marked the size of the line I wanted and then put the tape down accordingly. My strips were about 5" wide.
Once the lines were all taped off, I went around with a paint roller to roll the black on. I used Behr Flat Black for this. The taping is probably the mot tedious of the project, once you get past that, your good to go.
Step 3: Assemble Stand
Once I finished painting those boards, I put them aside to let them dry and begin assembling the backdrop stands.
I used 2x4 boards to create the backdrop stands. I first made a square out of the 2x4s. I wanted to square to be big enough to give good support but didn't want it on the edge. The outer square was made up of two 90" vertical pieces and three 39" horizontal pieces and I attached them together using a framing nailer and nails.
 I then added the back brace piece. I cut an angle on the bottom of the two outer pieces at 30 degrees and then cut the part that attaches to the square based on how I wanted the stand to sit. I used screws to screw the back piece on to the square and then added an extra 2x4 to screw to both the back piece and the square to make sure there was no movement.

Step 4: Attach MDF to Stands
After assembling the stands, I started to attach the MDF boards. I used a staple gun to add the MDF board to the stands. You want to make sure you make both stands first and then add the boards, so you can put the board beside each other to make sure it looks seamless when it comes together.
 Also, make sure you paint he stripes in such a way that you have a white strip on the inside of the right board and a black stripe on the inside of the left board so it will look even.
 and WAA-LAAH now we have two backdrops! The best part is I paid a little under $120 to get these backdrops done which I'm counting as a win.
With the backdrop complete, now it's time to get into how I made the paper flowers.
Step 5: Creating the Flowers
This was my first time making paper flowers but the process was fairly simple. Although these flowers were easy to make, it was a little time consuming. If you can find help to get this done, I would highly recommend it.

I used this online tutorial to make these flowers and it worked out pretty well for me. To attach the cake boards to the backdrop, I used Command double sided tape. I also used hot glue for some of them, but if you do this you may end up messing up your back drop a bit. I didn't plan on using this again so it was fine for me, but if you do plan to use it again, I would go with the double sided tape.
Step 6: Enjoy
Once the flowers are made, the last step is to set it up at your event and enjoy!
 Read all about the party here. If you're wondering why I had two backdrops, here's why! I decided to have the same backdrop for the dessert table. Luckily, I grabbed a quick photo during set up.

Thanks for reading guys, XOXO Ashley

Making It Season 2 - Episode 3 Recap
"Best Friends"
Faster Craft
For the faster craft we were challenged to team up into twos and make a matching costume. This challenge was definitely a fun one.
 Since Floyd and I are two people who work heavily with tools, we thought it would be a fun idea to dress up as a jigsaw and a pack of jigsaw blades.
 I think it was a fun element that we actually used the tools that we were making. Let's take a look at the other cool costumes.

Floyd and I especially loved Lilly and Rebecca's Llama so we had to test it out.

This challenge was probably the most fun one. Check out the clip to see all of the cool costumes in action.
Master Craft
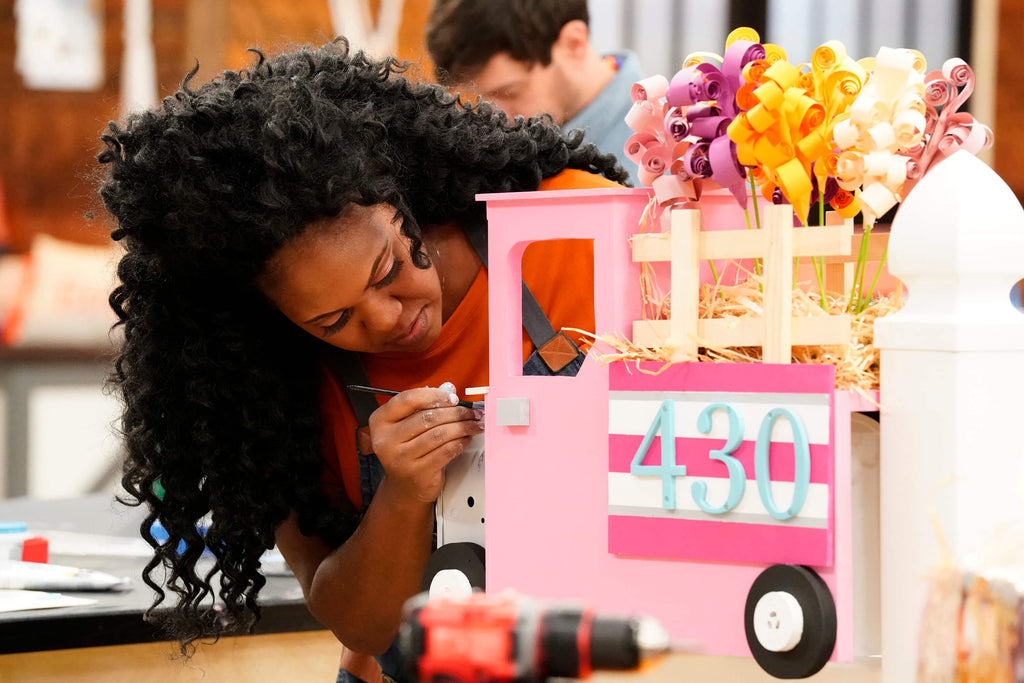
For the master craft we were challenged to make an animal house for an animal we have or would have. I personally don't have any pets but I decided to make a dog house.

I wanted to do a more modern style dog house for a german Shepard. So I decided to keep it pretty simple for the finishes.
 Although Dana and Simon didn't think it brought much wow factor, I thought me building a big dog house for a timed challenged was wow enough for me! You be the judge.
 Let's see the other amazing animal houses.

Judging

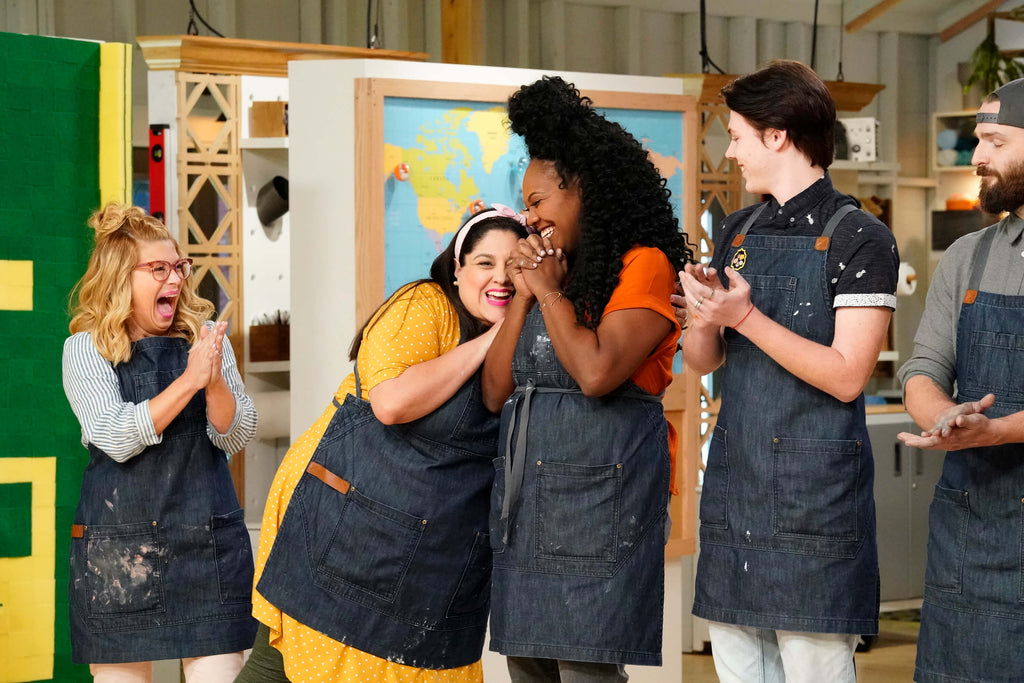
Back to judging we go for the 5th/6th time. Jessie and Justine were able to snag a win for the couple's costume. They're sushi costumes really resonated with the judges.
 Jessie ended up being the winner for the animal house master craft. Her use of optical illusion impressed the judges.
 Unfortunately, this was my time to go. That's right, I was eliminated on the third episode, but I was extremely proud of what I was able to build and accomplish on the show.
 So no sad faces here, I stayed true to myself throughout my time on the show and as long as I inspired one person throughout this journey, Im happy with the outcome. You haven't seen the last of me!
I am super grateful to have the opportunity to meet nine other amazing makers who I know get to call friends.
That wraps up all the details for episode 3. Thanks for reading guys!
Official Announcement | Making It Photoshoot | Premiere Party | Episode 1 Recap | Episode 2 Recap | Casting Tips

DIY Desk under $100
" A DIY Desk perfect for the home office"
"This post is sponsored by The Home Depot."
I have been putting off building me a desk for some time now, but I finally got around to it. I have been using my kitchen table as my desk in the meantime and I am so glad to be getting out of the kitchen.
 I had been looking around for designs for a while and saw this cool design online and just had to re-enact it. Lucky for you, I am sharing these farmhouse desk plans with step-by-step instructions on how to build it.

Now let's get into the nitty gritty!
"There are some affiliate links in this post, meaning I get a small commission if you purchase through these links, at no cost to you. Click Here to read my full disclosure."
Dimensions

Materials
- 2 - 2x2x6 (Select Pine)
- 2 - 1x4x8 (Select Pine)
- 1 - 1x3x6 (Select Pine)
- 1 - 1x3x8 (Select Pine)
- 1 - 1x2x8 (Select Pine)
- 24 x 48 Project Panel
- 1 1/4" Pocket Hole Screws
- Wood Glue
- Varathane Stain
"See Detailed Plans for Cut List"
Tools Used

Step 1: Assemble the Desk Sides
The best part about this build was getting to try out my new DEWALT Atomic 20-Volt Hammer Drill/Impact Combo Kit. I love that it comes with this heavy duty ToughSystem Case.
 The case comes packed with a compact impact drill and hammer drill, both 20V brushless tools.
I first used the DEWALT Hammer Drill to drill the pocket holes into the sides of the DIY Desk. I used my Kreg Jig on a 3/4" setting.

After drilling my pocket holes, I attached the middle stretcher pieces to the outer 2x2s using 1 1/4" pocket hole screws and wood glue. Your two desk sides should look something like the following when you're finished.
The top stretcher should be a 1x4 and the bottom stretcher should be a 1x3.

Step 2: Attach V Braces
Next was the fun part, adding the decorative V braces. I first made my bottom angled cut and then placed my 1x2 underneath my assembled side and marked my board where I should make the second cut.
Always measure before you cut for the best fit. I did this for both sides.

Then I used my Kreg Jig on a 3/4" setting to drill pocket holes into the V braces and attached them to the assembled sides using 1 1/4" pocket hole screws.

Your assembled sides should look like this once you attach your decorative V braces.

Step 3: Attach Stretchers
Next, I attached the two assembled sides together by attaching the two stretcher pieces. The top stretcher piece is a 1x4 and the bottom stretcher is 1x3.
 I used my Kreg Right Angle Clamps to secure the stretcher pieces so I could screw them into the sides. I used the 1 1/4" pocket hole screws along with wood glue to secure the stretchers into place.

Step 4: Add Back V Braces
Once the stretchers were in place, I used the same technique to measure the back V braces and attached them using a 1 1/4" pocket hole screws.
Drilling pocket holes on slanted boards can be a little tricky, so just be mindful of where you are drilling your holes.

Step 5: Add Desk Front
Now for all of you who thought I had a drawer on this desk, I hate to inform you that this is a faux drawer. Yes, I was being lazy; but luckily for you guys I have added extra steps in the printable plans for those of you who want to add in a drawer. Redemption!
 To create my faux drawer, I set the depth on my miter saw to a specific depth so that it would only cut a little above midway on the board. This step was super simple. Then I added a drawer handle to the front, to give the illusion of a drawer.
Once I added the handle, I attached the desk front to the assembled desk using 1 1/4" pocket hole screws along with wood glue.
 My Kreg Right Angle Clamps always come in handy. If you are a builder that works alone, I highly recommend these for building.
Step 6: Attach Middle Supports and Top
Lastly, I attached the middle supports to the assembled desk. I made sure to pre-drill holes on the top of the middle supports to be able to secure the top to the desk.
 Once I attached the middle supports, I used my circular saw to cut the 24x48 project panel down to size and attached it to the desk using the pre-drilled pocket holes and 1 1/4" pocket hole screws and this beauty is finished.

once I finished building the desk, I went back through and filled in all the pocket holes to give it a seamless look. Check out my tutorial on filling pocket holes to see how I got the job done. Be sure to check out the farmhouse desk plans for all the measurements.