
Projects

Dining Room Makeover ft. Home Depot Decor
"A Dining Room makeover with a whole lot of color."
I am so excited to share this project with you guys because I love tackling projects where I introduce bold colors and fun patterns. Who's ready for a dining room makeover!?
"This post is sponsored by the Home Depot."
The Before
Looking at this blank dining space really was making me sad because I am a girl who loves color and the thought of this space being so dull and boring made me that more excited to make it over.
 It's a really good space with lots of room, but it just wasn't giving; it was in desperate need of an upgrade.
 There are some affiliate links in this post, meaning I get a small commission if you purchase through these links, at no cost to you. Click Here to read my full disclosure.
The Design Plan
After searching for furniture and decor online on the Home Depot website; I had a really hard time narrowing down my selections because there were so many great finds! Most of you know I'm a rattan girl; and Home Depot had so many decor choices for rattan.
My personal favorite was the Arched Rattan Mirror and the 3 Piece Rattan Baskets. Items like these are so cool to me because you can find so many uses for them! But I think we can all agree that the highlight of this room are those amazing dining chairs. I always pick one item to base my design off of, and when I saw these chairs; I knew they would serve as my main design inspo.
Once I narrowed down some decor selections; I started creating a 3D mockup of how I wanted the space to look and this got me ready to get going.
 I have recently been on this rattan kick and home depot had so many decor items with rattan; I may have gone overboard but it turned out great, so I'm a happy girl.
Wood Slat Wall and Wallpaper Installation
I really wanted to create a fun and bold room; so I knew I had to find a really fun wallpaper to bring this room to life. I am a huge fan of mixing colors and textures together and I knew this would be the best fit for the dining space.

Check out the full wallpaper and wood slat wall installation tutorial for details:
Wallpaper Installation Tutorial
Wood Slat Wall Installation Tutorial
Styling the Room
Now let's talk about the fun part; styling the room. Check out all of the fun items that I was able to find to dress up my dining space. Not only were they quality items but they were very affordable as well.
- Cane Dining Chairs
- Clear Acrylic Chairs
- Cane Sideboard
- Rectangle Trestle Dining Table
- Aztec 8'x10' Rug
- Arched Rattan Mirror
- Globe Lighting
-
Abstract Art Print 24 x 36
- Gallery Wall Frames
- Natural Rattan Lantern
The Final Reveal
Now for the moment you've all been waiting for; the final reveal. Here it is:

I can't believe just how amazing this makeover turned out; I was blown away with how all of the colors and decor came together.
 Going bold can sometimes be a risk but man was it a worthwhile risk because I am in love with my new dining space.
 The quality of The Home Depot decor items really elevated the space in a major way and I am ready to get to shopping for the next makeover!
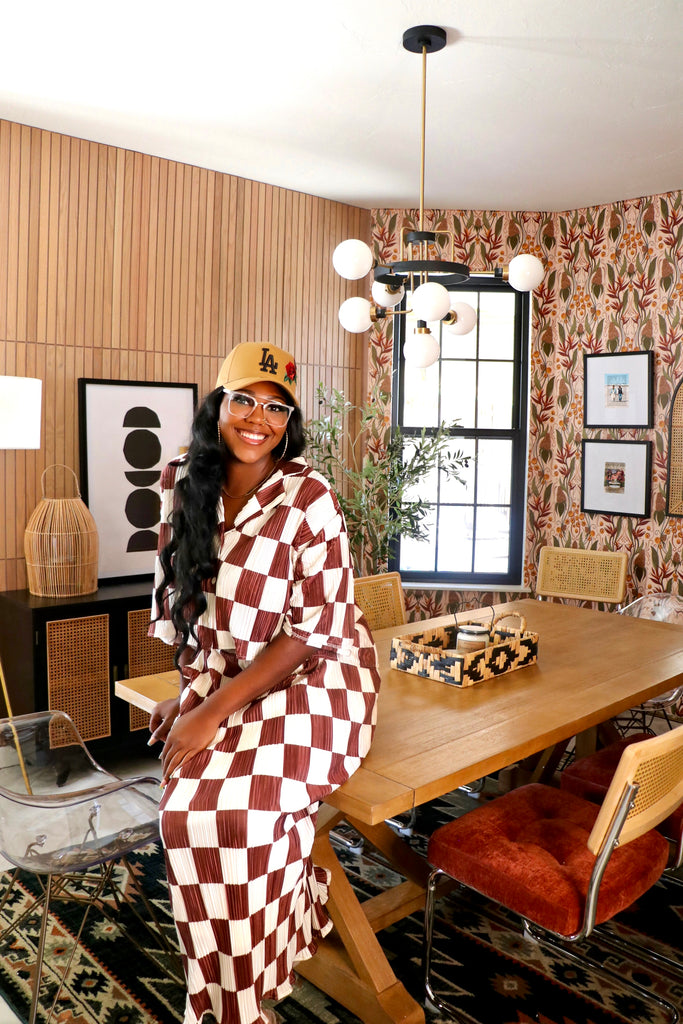
All in all, I'm so glad I decided to go bold and I cant wait to host my next party. Thanks for reading guys, XOXO Ashley.
As always, thanks for reading guys.

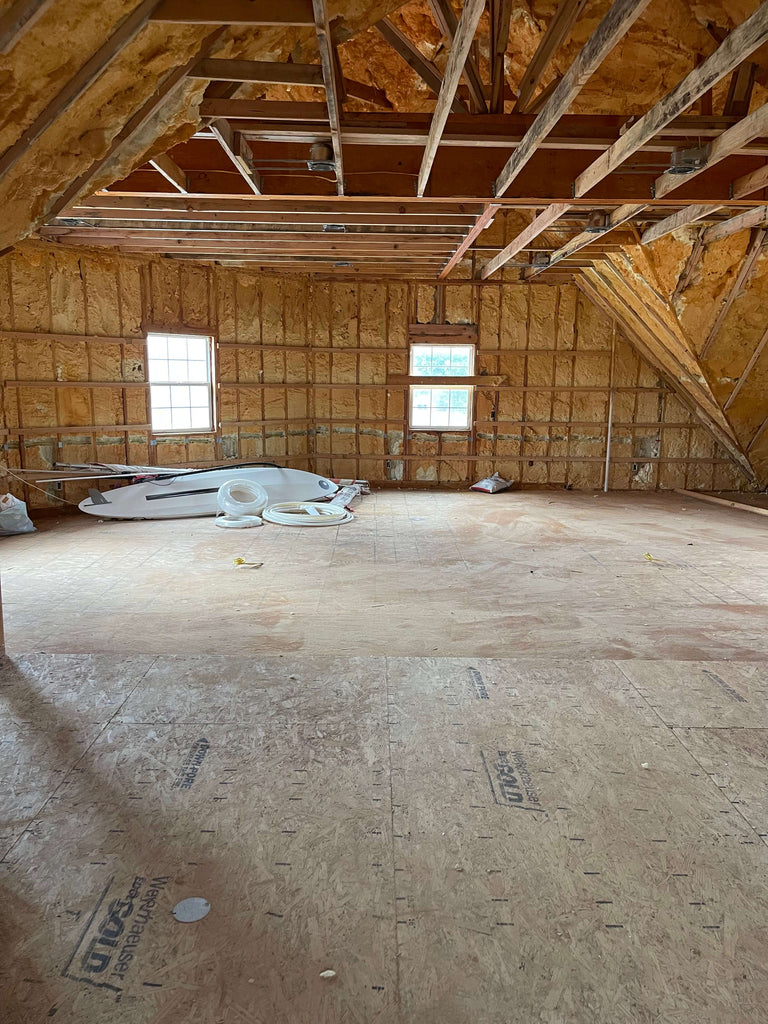
The Shop Office Renovation Timeline
"A true dream office is coming to life."
Before I ever saw the lake house, I always dreamed of having a dedicated space to do my business duties, so naturally when I saw the house, I fell in love when I saw the shop.
The only downfall is, it needs a lot of work to get it to where it needs to be, but the fun part is, I get to turn it into the exact space I want. Let's take a look at the shop as I found it!

Check out the timeline below to see how I am bringing this shop transformation to life!
Step 1: Epoxy Floors
The first thing I did before I could even move in good was epoxy the floors. I had it done in my last garage and absolutely loved it. The floors are super durable and in my opinion a great investment.
See the full tutorial here for all of the details!

Step 2: Installing HVAC
Now, with making a dream shop, HVAC is a must. I knew I wanted heating and air in the shop, so I decided to use Integrity Heat and Air to install mini splits. I decided to go with a ductless unit because it required a lot less work.

Here is what I had installed:
(2) MWMB030S4-1P (indoor unit), MPB030S4S-1P(outdoor unit), remote control, copper line set, communication wiring, condensate drain, outdoor unit pad all for a whopping $11,850.00.

Lennox MPB/MLA mini-split heat pumps offer an easy, secure installation—especially compared to window units that can leave your home vulnerable to insects, weather elements and theft. Therefore, whether you’re utilizing
ductwork or not, Lennox provides solutions for any room, any time of year.
Now I do want to mention that did not include my electrician providing (2) 208/230v 30 AMP disconnects at the outdoor unit locations, that was an additional $650.
Step 3: Framing the Shop

Step 4: Running the Electrical
Step 5: Drywall

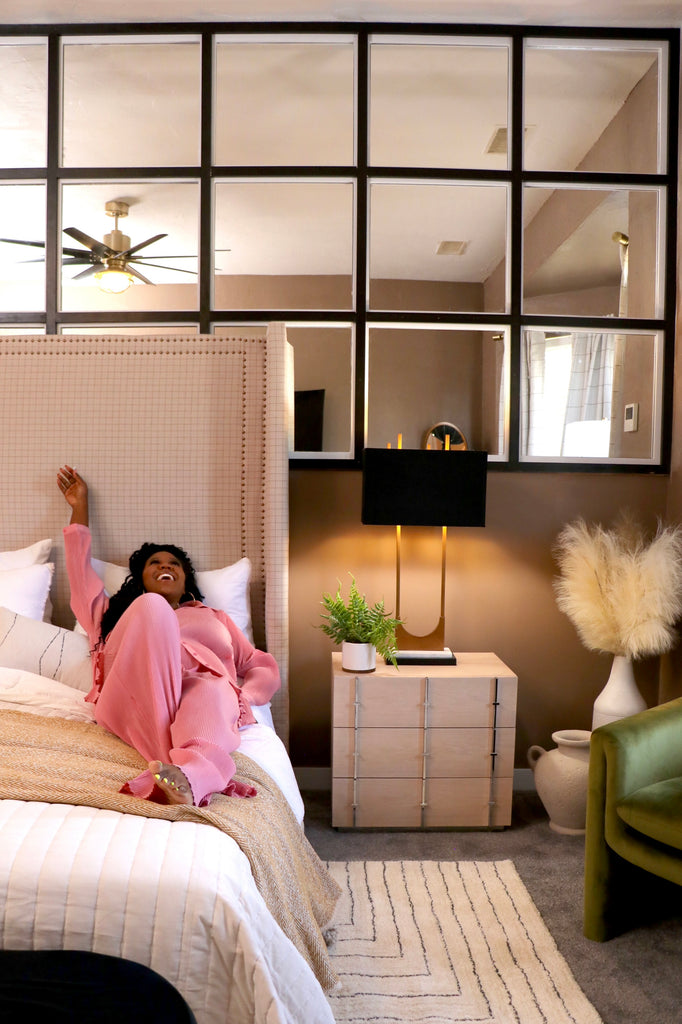
DIY Mirrored Wall for a Master Bedroom | Discover Personal Loans
"A wall of mirrors is a statement piece you'll never forget."
"This post is sponsored by Discover Personal Loans."
I am so excited to share this project with you guys because I have been over the moon about my bedroom being finished. This Lake House renovation has already been a wild ride and I'm happy to finally have a space complete.
Today, I'm sharing all of the details on how I was able to bring this mirror wall to life and how Discover Personal Loans helped me get the job done!
There are some affiliate links in this post, meaning I get a small commission if you purchase through these links, at no cost to you. Click Here to read my full disclosure.
Step 1: Funding the Project | Discover Personal Loan
With a renovation, costs can add up quick, but luckily, I was able to find an option that I think would be great for anyone wanting to update their homes. Discover Personal Loans customizes your loan to fit your project and budget, with loans available between $2,500 and $35,000 and flexible repayment terms.
 You can borrow money without using your home as collateral and Discover Personal Loans can send funds directly to you in as little as one business day after acceptance.
I personally love Discover Personal Loans because projects can widely range in cost, but Discover has specialists to help tailor your loan to your project and your budget, so you only have to commit to the loan amount you need. As someone who just recently paid off all of my debt, being able to customize my loan to only take out what I need really is helpful when trying to keep my new debt under control.
 Also, if you're concerned about origination fees, you're in luck because Discover personal loans don’t have any. Origination fees are pesky charges that some lenders require their borrowers to pay to get the loan. Since the one-time fee is commonly calculated as a percentage of the loan, no origination fees can equal huge savings! Now that we’ve covered funding, let’s move on to executing the DIY mirror wall of your dreams.
Step 2: Installing the Wall Trim
To kick the wall off, I started by installing 1x3 trim. I cut it down to size on my miter saw and then fastened it to the wall with a bead of liquid nails on the back and then secured it in place using my brad nailer and 2" brad nails.
 I decided to only do half of the wall because I wanted to bring a luxury feel to the room without overwhelming the space. A full wall in the bedroom would have been a little too much, but halfway down gives the space just the right amount of “wow” factor.
Step 3: Cutting and Installing Mirrors
Once the 1x3 trim was installed, I started fitting in the mirrors. This was probably the most tedious part of the project, but also the most fun because I love learning new techniques.
Using glass cutters, I first would score the mirrors where they needed to be cut and then popped them on the line that I scored.
Each of my mirrors were approximately 19" x 21", so they were a pretty good size.

Once I cut the mirrored glass down to size, I installed them by added 9 beads of mirror adhesive to the back of the mirror and placed the mirrors in the appropriate slots.
I fit the mirrors in the dedicated holes first to make sure they fit and then installed them on the wall.
 I was able to get all of my mirrored glass from a local hardware store; I had to go to a few places to get 24 of them but eventually was able to get them all. They typically don't carry that many in stock at one store, so it took a few road trips to get enough (especially after breaking a few) but it was well worth it.
The good news is if you don't feel comfortable cutting the glass yourself; they will cut it for you for free; if you purchase their mirrors. However, if you go this route, be prepared for it to take a while.
I had them cut the first couple of mirrors but quickly learned that it would be way faster to just cut them on my own, so I decided to learn how to cut the mirrors myself. Either way, you have options.

They have two sizes available; both 24" x 30" and 30" x 36". I had to get both in order to have enough for this particular project but I will say that it was easier to cut from the bigger sheet.
Both mirrored glass sizes are priced well compared to what I've seen out there, I was quoted over $2k by two different sources to have them custom cut but I only spent around $700 to use these mirrors.
Step 4: Installing Top Trim
Once I started fitting in mirrors, it was time to add the top trim. I decided to do double trim to add dimension to the wall and I knew the color combo of black and white would look so good against the brown.
 I painted the trim black first and then installed it directly over the white trim. I installed it using 2" brad nails and my brad nailer.
Step 5: Adding Bottom Wall
Once the mirror wall trim was up, I started working on the bottom half of the wall. Because the mirror portion of the wall protruded out a bit, I wanted to also bring out the bottom portion of the wall to make things proportionate.
 Originally, I wanted the wall to come out a little more but my original plan didn't work out, so I opted to add a 3/4" board to the wall, to make sure the wall was proportionate.
I attached the board to the wall with 3" construction screws and liquid nails to make sure the wall was securely in place and then painted it with Behr paint in the color Caffeine to match the rest of the room.
Materials
- 1x3x8 Select Pine Boards
- 1x2x8 Select Pine Boards
- 2 - 3/4" MDF Boards
- Mirrored Glass
- 3" Construction Screws
- 2" Brad Nails
- Caulk & Puff & Paint
- Wood Filler
- Mirror Adhesive and Liquid Nails
Paint Colors Used
- Behr Paint Plus: "Caffeine" in Eggshell
- Behr Dynasty Paint: "Smokey Cream" in Eggshell
- Behr Paint Plus: "Etched Glass" in Hi-Gloss
- Behr Paint Plus: "Blackout" in Hi-Gloss
Tools Used
- Miter Saw
- Brad Nailers
- Glass Cutters
- Measuring Tape
- Variable Speed Grinder
- Paint Sprayer
Step 6: Style the Room
Now for the fun part, styling the room. Here are all the sources for the furniture I used to really make this room come alive!
The Final Reveal
Now that we've gone over all of the details, it's now time for the final reveal, so here it is.

Excited is an understatement; I am over the moon with how this mirror wall turned out. It came out exactly as I envisioned it.
Most of you who followed along, saw the 3D rendering I did before I started the room and I must say, I hit it out of the park, because it looks almost identical to how I planned it (with a few minor changes).
If you're curious how I bring my 3D renderings to life, I share all of the details in my "Software to Success" Ebook here.

But to also remember where this room came from is amazing to me. Total night and day difference from where we started.

I'm probably most excited about that wallpaper trim being gone, because it was so outdated and this room was giving 80s vibes.
I must say, as much as I had confidence in myself, I was excited to see how the mirror wall was going to come to life and it far exceeded my expectations.
 The inspiration for this mirror wall was the wall in my previous house; I loved it so much that I knew I had to bring it to the Lake House.
 I didn't want to do the exact same thing, so I decided to put it in the bedroom and really add some depth with the double paneling and I'm not disappointed. The mirror wall really is a statement piece.

All in all, I am so excited about this mirror wall and even more excited that my room is that much closer to being complete and a big huge shout out to Discover Personal Loans for helping me bring this project to life.

As always, Thanks for reading guys, XOXO Ashley.
![]()

Studio Bonus Room Makeover | Transformation with Behr Paint
"A bonus room transformation you won't forget featuring Behr Paint."
I always love getting to use paint to transform a room because it's one of the most inexpensive ways to make a lasting impact on a room. I wanted to really bring this studio bonus room space to life and I knew a little bit of love and Behr paint would do the job.
"This post is Sponsored by Behr Paint."
"There are some affiliate links in this post, meaning I get a small commission if you purchase through these links, at no cost to you. Click Here to read my full disclosure."
Colors Used
Materiels/Tools Used
- Wallpaper
- Painters Tape
- Paint Drop Cloth
- Step-Ladder with Project Bucket
- Liquid Nails
- Laser Level
- Brad Nails
- 1x3 Select Pine Boards
- 1x2 Select Pine Boards
- Caulk
- Wood Filler
- Miter Saw
- Sander
The Before
I always love transforming rooms with paint, because there are so many creative ways to make a room come to life with different colors. The even better part is that it's one of the most inexpensive ways to bring forth a transformation. Let's take a look at how the room looked before the transformation.

I really wanted this bonus room have a fun but sophisticated feel. I had planned on using this room as a space where I could conduct business meetings and just a place to kind of unwind, so I wanted it to feel like a creative space where I could come up with ideas but also have a chill vibe.

As you can see, this room was as simple as they come. It definitely needed some pizazz, so with a little help from Behr paint, I took on the challenge to bring this space to life.
Step 1: Adding Wall Paneling and Painting using Behr Deep Veridian
I first started off by adding paneling to the walls; I really wanted to add some depth to the room and I knew painting half the room a bold color would do the trick.

I cut the wood down to size using my miter saw and then attached the trim to the walls using Liquid Nails and 2" brad nails. Here I am using 1x3 select pine boards.

Once I added the wood trim, I went ahead and painted the walls with Behr Deep Veridian S400-7. I knew I would need two coats, so I found it easier to go ahead and paint the wall before applying the trim in the middle.
This Deep Veridian S400-7 was the perfect pop of green for this room and I knew it would be the perfect match for my green sectional. Usually with walls, I like to go with matte for the sheen, but being that I am painting trim, I used Semi-gloss to provide a little more protection to the wood.
Step 2: Painting the Striped Wall using Behr Studio Clay
Now on to the striped wall! If you've been following me for a while you know that I love doing funky designs with paint. Even though this was a more simpler way to do a funky design, I knew the striped wall would bring an element to the room that would change the whole feel of it.
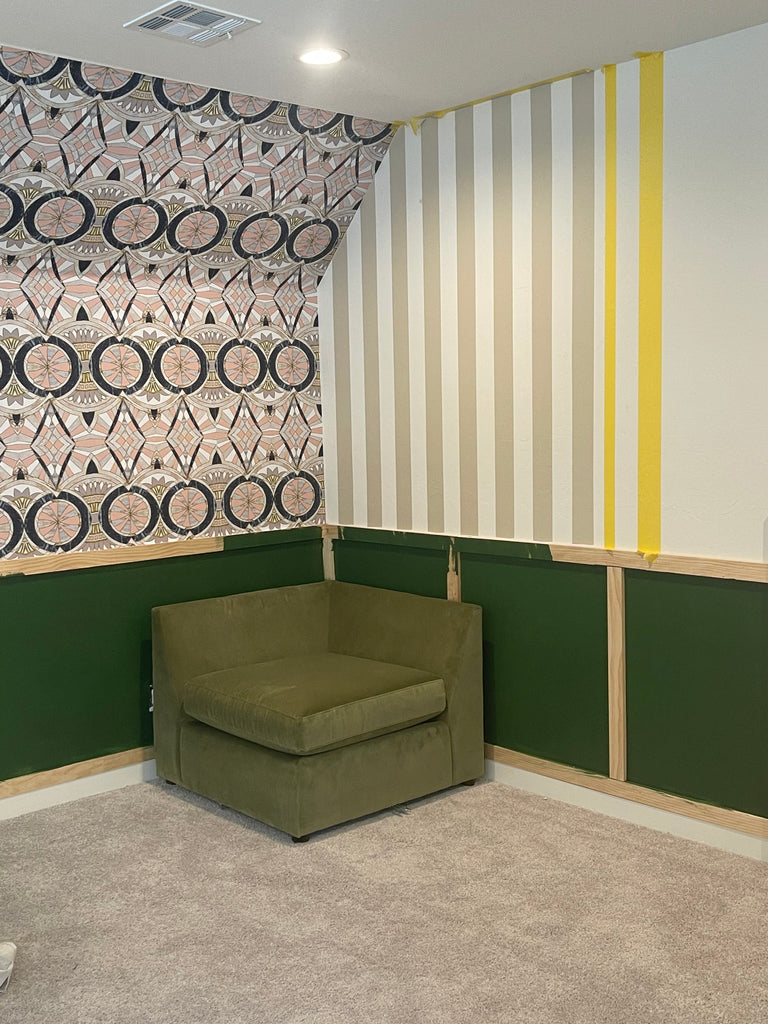
I used my laser level to accurately apply my painters tape so that I would be able to create these striped lines. I used two lines of tape for each line to create a thick line all of the way down the wall.
 Being that I decided to go bold below with the Deep Veridian S400-7, I opted to go more neutral on the top with Studio Clay MQ2-27 in Matte.
Step 4: Stying the Bonus Room
Styling a room is always huge part of making the room come together and always one of my favorite things to do once I finish painting a room. I am so in love with my green sectional that I recently purchased, it is definitely the highlight of the room, along with some other amazing items. Check out everything in the room below.
- Green Sectional Couch - Velvet (Leaf)
- Three Legged Coffee Table
- Women and Flowers Canvas Art
- Floral Women Art
- Medallion Rug
- Velvet Chair
The Final Reveal
I couldn't be happier with how this makeover turned out. The painted stripes really elevated the room and made this a space I can really have fun in.


If you've been following along with me on Instagram, you know that I am in the process of selling my home, so I decided to remove the wallpaper soon after putting it up, but I couldn't just leave the wall blank, so I decided to paint the wall with Studio Clay MQ2-27. If you aren't a super bold person, and don't want to go with wallpaper, paint is always a great way to bring a little character to the home.

The sad part about this room is that I will soon be leaving it, so I won't get to enjoy it, but I have many plans for many more paint projects at my new place!

If you're wondering how you can transform your room on a budget, be sure to check out Behr paint at Behr.com or at your local Home Depot and all of their many color options.

and as always, Thanks for reading guys! XOXO Ashley!

Bathroom Renovation and Remodel | Design Ideas to Inspire
"A Bathroom remodel with a design you'll never forget."
After five years of building, I finally got to tackle the project I've been wanting to do the most; a bathroom renovation. My parents have been talking for years about how they wanted to update their older upstairs bathroom, so I'm making it happen!
"This post is sponsored by The Home Depot."
Luckily, with the help from Home Depot and Kohler, I had the opportunity to completely transform my parents bathroom and give them a renovation of their dreams.
There are some affiliate links in this post, meaning I get a small commission if you purchase through these links, at no cost to you. Click Here to read my full disclosure.
Featured Products Used
-
Kohler Harken Double Vanity in Linen White
- Kohler Single Flush Elongated Toilet-Sandbar
- Kohler Elmbrook 60 in. Rectangular Bathtub
- Kohler 3-Spray Tub and Shower Faucet
- Kohler Cursiva Toilet Paper Holder
- Kohler 28" Round Decorative Mirror
- Kohler Simpalo LED Semi-Flush Mount
- Kohler Hauksbee 4-Light
- Kohler Levity Semi-Frameless Sliding Tub Door
- Kohler Cursiva 24 in. Towel Bar
- Kohler Devonshire Bathroom Faucet
Time to Complete Project: 5 weeks
For a detailed list and cost breakdown, see below!
The Before
As always, I like to give you guys a look at the before photos, so here it goes. This is one of three bathrooms that my parents have in their house and it was the oldest one. So naturally, it was the first bathroom they volunteered when I asked them if they would like a bathroom remodel.

As you can see, the bathroom was pretty outdated and my mom really wanted different floors in here. Im happy to report that my mom is very satisfied with her new floors.

If you have a bathroom that looks similar, hopefully this tutorial will give you an idea on how you too can change your bathroom.
The Demolition | Bathroom Reno
The demo is always my favorite part of a renovation because it always feels good to just rip things out; in some ways its a little therapeutic for me! We were able to get everything ripped out in a day and a half.

Luckily, I had a lot of help on this project, and most of you saw Papa Fred and I tackle this Reno together! This is the first project where I was able to work with my dad and I must say we make a great team!
One of the many questions I received was, "What in the world did you use to cut that tub in half." I used my handy dandy reciprocating saw. Head over to instagram to see it in action!

Since this was a full bathroom renovation, we had to remove everything except the exiting drywall. We did leave the light up until the very end however, to make sure we had some light.
Tiling the Floor | Bathroom Reno
I was most excited about this part of the bathroom reno because I was just as tired as those floors as my mom was. I decided to spend a little more on the floor and opted to go with these mosaic tiles.
First, we laid down backerboard and secured it down to the floor with adhesive and screws. Once that was down we were ready for tile. While my dad laid down the tiles, I cut the tiles; this really made the tiling go a lot faster vs. me doing it all on my own.

I've raved about my tile saw many times before and I still love that thing. Its accuracy with cuts is spot on and it makes tiling projects so much easier.

We were able to get all of the tile laid over two days. Once the thin set was dry, I grouted the tile with pre-mixed grout. I opted to go with white because I wanted to mute the floor a bit. As you can see below, the grout definitely toned it down a bit and gave me the look I was searching for.

To complete the floor I sealed it to make sure the floor stays nice and clean.
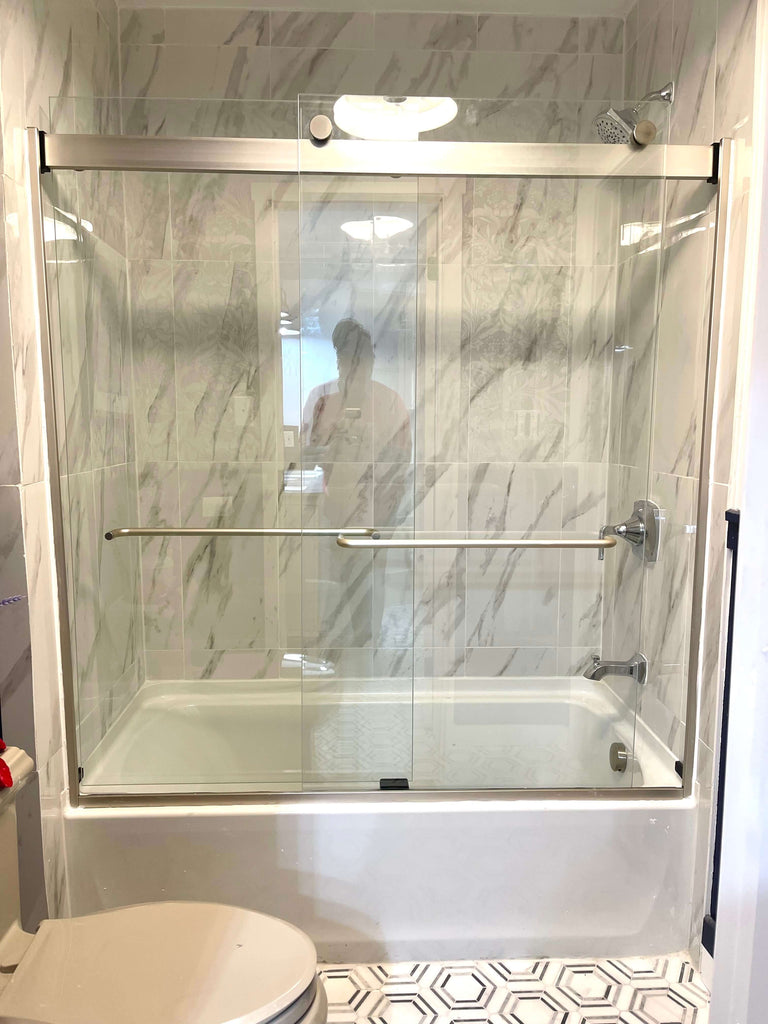
Installing Tub and Shower | Bathroom Reno
In order to get the shower space ready for the tub, we had to add in a few 2x4s so that the tub would fit, once we got the area ready, we called one of our friendly plumbers to come set the tub. He came in one afternoon and got it all set up for us.

Once it was set in place, we were able to screw the tub to the 2x4s and start adding the backer board.

Once the backer board was all secured down with screws, we started waterproofing the board using Redgard; it's also recommended that you cover the seams with tape and thin set to make sure the seams are completely secured.
The porcelain tile I used looked amazing but was extremely affordable. I splurged on the floor, so I used something more affordable on the shower but you'd never know it because it still looks great.

We let the RedGard dry for 24 hours and then we were ready to tile. This tiling process was similar to the last except it was on the wall. I wanted to lay the tiles vertical straight to make the shower feel like it was all one piece.
This was my first time using these spacers and I absolutely loved them; definitely will be using these spacers again.

I used the same grout that I used on the tile floor. I didn't want the lines to be visible so I opted for white and man does it look good.
With all of this hard work, I couldn't just slap a shower curtain up here, so I decided to add this sliding shower door and I'm so glad I did! It definitely elevated the look of the shower. It was the perfect match to the Kohler 3-Spray Wall-Mount Tub and Shower Faucet.
Replacing the Doors | Bathroom Reno
With replacing everything, we couldn't forget about the doors and man did these doors really change up the feel of the room. I went with these 5 paneled doors and I just love the look of them.
We were able to hang these pretty easily. They are pre-hung doors, so we just placed it in the door frame, set it with shims and secured it back to the frame.

We found these door trim kits at The Home. Depot and decided to trim out all the doors with these kits.

Installing Wainscoting | Bathroom Reno
With all of the heavy lifting out of the way, it was time to add some character to the space. I decided to add wainscoting to the walls to give it a little flair.
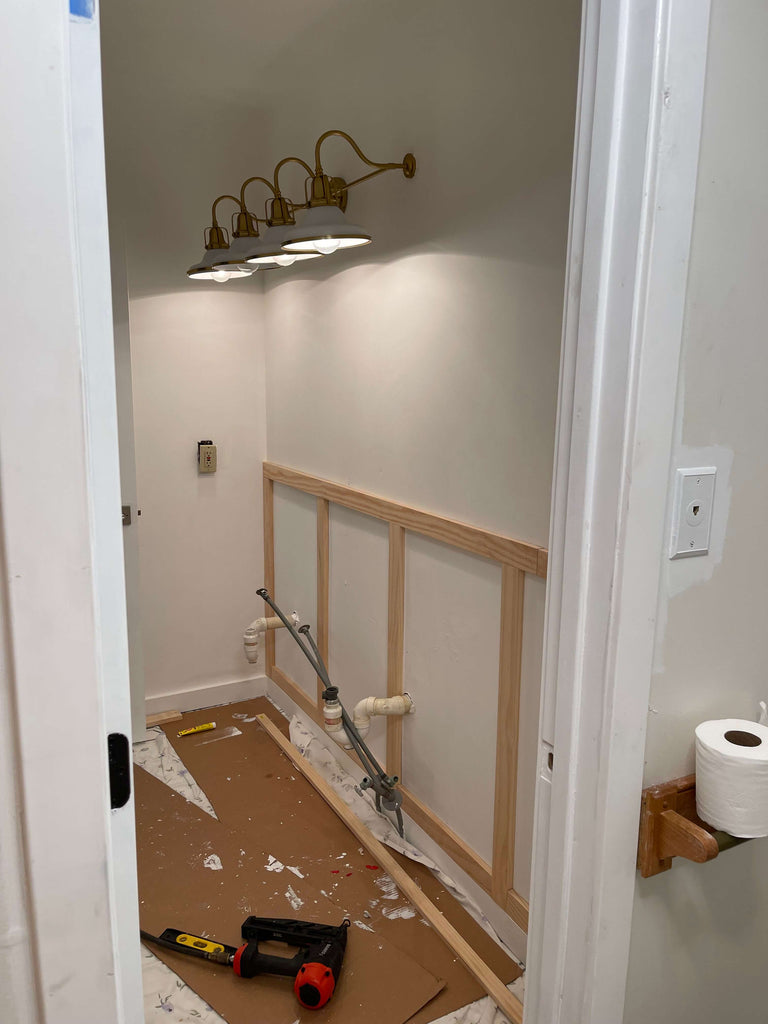
I used 1x3 select pine for the bottom wainscoting and attached it to the wall using a brad nailer. Once it was attached, I used caulk and wood filler to fill all of the cracks and holes.

Once the wallpaper was installed, I added a 1x2 trim piece to the top to finish it off. My mom mentioned that she likes blue, so I decided to paint the wainscoting with this dark navy. I usually use a higher sheen when I'm painting in bathrooms because of the moisture.
Installing the Toilet | Bathroom Reno
Now most people wouldn't get excited over a toilet but I did with this bathroom renovation because I was so excited to try this toilet out. Additionally, I absolutely fell in love with the color when I first saw it and I knew it would be the perfect color to bring some good contrast to my design.

Aside from the color, the one thing that really impressed me about this toilet was the system in which it's installed. The system underneath is independent from the toilet, so it made it really easy to take off the toilet without having to remove the wax ring.
I also like that its a little wider and taller; as my parents get older they will appreciate it for sure!

I knew this would be the perfect addition to my design and I couldn't be more happier with this addition.
Building a Custom Cabinet | Bathroom Reno
My mom previously had a big linen cabinet in her bathroom and wanted to keep it, so I opted to give her a more modern sleek cabinet. I decided to lower it to make the room feel a bit larger.
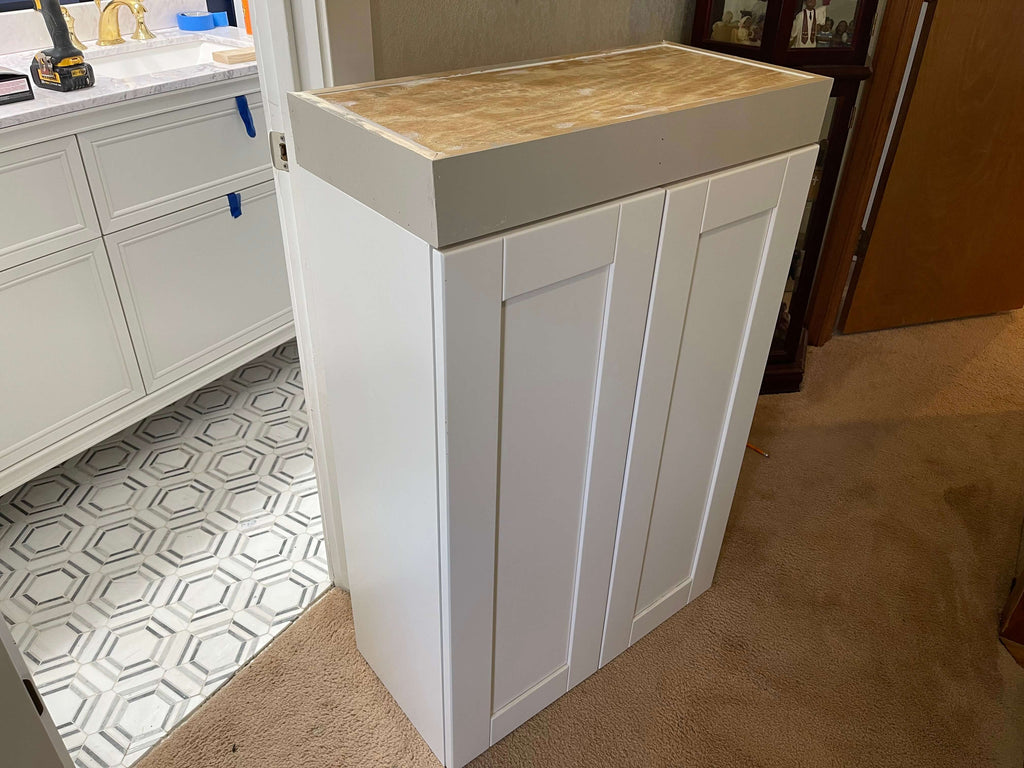
To create the cabinet, I used two shaker style wall cabinets to create one full cabinet. This saved loads of time, as I was on a tight timeline.

In order to make it look like one cabinet, I added a bottom wood piece and a middle wood piece, so that when I attached them together it would look like a solid piece when painted.

Then I added trim on the two sides to bring it all together. I used caulk and spackle to fill in all of the cracks and holes.

With the wainscoting being blue and the vanity white, I wanted to break it up a bit and choose a color similar to the toilet to ground everything. I decided on this color Behr Grey Mist and I really like how it played off the existing colors.
Finishing Touches | Bathroom Reno
I always enjoy seeing a room coming together and I was anxious to get to this part of the bathroom reno. I bought this wallpaper a few months back for my pantry, but couldn't use it.
When this bathroom reno came up I knew immediately that I wanted to use it here. It elevated this bathroom for sure and was such a good match to my other design choices.

I also have to rave about this Semi-Flush Mount Light because this has to be the brightest light I've ever installed. It brought in so much light which is a great choice for a smaller space.
Being that the light, mirror and bathroom fixtures were gold, I didn't want the vanity area to be overwhelmed with more gold, so I found these Acrylic pulls that were the perfect addition to the vanity and the area as a whole.

With everything in place, we added in the Kohler 4-Light 47 in. Sconce and Kohler 28" Round Decorative Mirrors; it was a perfect match to the Kohler Devonshire Bathroom Faucets.
The great thing about this vanity countertop was that it had a hint of purple which really contrasted well with the blue wainscoting and the wallpaper.

Now you may be wondering, "what would something like this cost?" Well here is a breakdown of everything. Some of my items were on the high end, so if you're on a tighter budget you can swap out items for something more affordable, but here is my specific breakdown.
Cost Breakdown | Bathroom Reno
| Bathroom Reno Products | Cost |
| Mosaic Floor Tile | $1418 |
| Tile Accesories | $284 |
| Porcelain Wall Tile | $241 |
|
|
$2298 |
| Kohler Single Flush Toilet | $1566 |
|
|
$332 |
|
|
$175 |
| Kohler Toilet Paper Holder | $29 |
| Kohler 28" Round Mirror | $195 |
| Kohler LED Semi-Flush Mount | $1249 |
| Kohler 4-Light 47 in. Sconce | $869 |
|
|
$33 |
| Kohler Bathroom Faucet | $854 |
|
|
$445 |
| Double Sink Vanity Countertop | $498 |
| Shaker Style Cabinets | $340 |
| Wainscotting/Door Trim | $560 |
| Wallpaper | $170 |
| Plumber Services | $550 |
| 3 Five Paneled Doors | $890 |
| Acrylic Pulls | $62 |
| Paint and Brushes/Rollers | $175 |
| Outlets/Switches and Covers | $35 |
| Miscellaneous Items | $500 |
| Total Cost | $13768 |
The Final Reveal
Now for the moment you all have been waiting for; the final reveal.

This bathroom came out exactly how I envisioned it and in some cases even better than I imagined. My parents are super happy with how it turned out and very grateful for their new bathroom.

Overall, I was extremely impressed with the Kohler products that I used in this bathroom renovation. They have some solid pieces and the pictures tell it all.

But the toilet just does it for me. It's such a statement piece and I love that its something different. I was able to tie it all in and it really makes the room pop.

If you have been on the fence about wallpaper, I'm hoping this design gets you closer to adding it into your spaces because it is a game changer.

As always, thanks for reading guys! XOXO Ashley

Paint Project with Behr | Craft Room Organization
"This craft room is getting a lot more colorful with Behr Dynasty paint."
I have been wanting to tackle my craft room for quite some time and I'm excited that I finally get the chance to do so. Since my craft room is half my assistant's office, I really wanted to make it a fun and colorful space. So I went and picked out several vibrant Behr paint colors to transform my space.
"There are some affiliate links in this post, meaning I get a small commission if you purchase through these links, at no cost to you. Click Here to read my full disclosure."
Colors Used
- Behr Dynasty (Eggshell) - Sunwashed Brick
- Behr Dynasty (Eggshell) - Breezeway
- Behr Dynasty (Eggshell) - Studio Clay
- Behr Dynasty (Eggshell) - Shiny Kettle
- Behr Dynasty (Eggshell) - Potter's Clay
- Behr Dynasty (Eggshell) - Sustainable
- Behr Dynasty (Eggshell) - Orange Flambe
Materiels
- Sharpie Paint Marker
- Painter's Tape
- Paint Brush
- Drop-cloth
- Step-Ladder with Project Bucket
The Before
As always, I like to take a good look at the before before diving into the project. Like most of my rooms in the house, they are plain white; this room was no different.

I hope you're ready for a total transformation, because it's about to get a lot more colorful in this room.

The Process
Painting the Walls
First, I started off with painting the walls with sunwashed brick, the lighter pink color. I knew this would be the perfect pink for the surrounding room. Then I went back over the sunwashed brick and created an arch using the color shiny kettle.
I utilized painter's tape to make sure the arch was nice and straight. I also utilized a laser level to make sure the tape was straight on the lines.

I also utilized painter's tape to create shapes on the wall. This particular painters tape is for delicate surfaces and I like to use this kind when Im taping on walls that are already painted.

The ceiling is probably the most coolest but most tedious part of this project. I knew this would totally elevate the project, but man did my neck and arms hurt after this one.
First, I used a pencil to sketch out the lines and then went back with a paint brush and the color breezeway to create this groovy ceiling.
I purchased this ladder specifically for this project and I was so glad I did; the project bucket that's attached to the ladder was great for holding my different paints and eliminated me having to take additional trips up and down the ladder. I would definitely recommend for your future paint projects.

Painting the Murals
I knew I wanted to incorporate some type of mural, so I decided to incorporate two drawings on my wall.
The first drawing I saw on amazon on a canvas print, and I knew I wanted to draw this on my wall, it was the perfect addition to my craft room.

The mural I added on the corner wall was created in Canva first to make sure I knew exactly what was going on the wall. Here is my mockup of the drawing.Its a lot easier to draw something when you have a reference photo versus trying to draw from memory, or at least it is for me.

I used my craft paint pen to draw the murals on the wall and I was highly impressed with how good the black paint pen was. It made the drawings look great.
Switching out the Ceiling Fan
When I picked these original ceiling fans out for my house, I knew I would be changing them out down the line. I was super excited to get this fan switched out. I originally bought this new gold fan because I thought it would be great for a mural wall and I was right.

This ceiling fan was the perfect addition to my craft room. If you are interested in the ceiling fan, check it out here.
Staging the Craft Room
Most people I talk to are always surprised when I tell them that I get a lot of my home decor from Home Depot but don't sleep on them because they have tons of furniture options online.
The Final Reveal
The final look came out better than I ever could have imagined. I was able to pull off the look I was going for and the room looks super unique.

All of these paint colors were a part of Behr Dynasty's 2022 lineup and they go so well together!
I was able to throw in a few murals to give the room a little flavor and it was the perfect addition to the room!

One of my other favorite features is the pink arch! I wanted to make the desk area stand out so I added this arch detail to give it the right touch.

and I can't let you go without a few before and afters. I am so happy with how this room turned out!

all of the colors worked so well together and I really enjoyed using Behr paint for this project.

The best part is that paint is always an affordable way to update a space, so it didn't break the bank to bring this room to life!

Thanks for reading guys, XOXO Ashley.

6 DIY Accent Walls | Home Improvement
Accent Walls are the perfect addition for any room.
Accent walls are such a simple project that can completely transform your wall. I have done many DIY projects to add character to my walls, and you can do it too!
Here are 6 different accent wall tutorials that you'll absolutely love. Let's get into it!
6 Accent Walls | Home Improvement
Brick Accent Wall
This thin brick wall project is a wall installation that will immediately add character to any room. Even if you've never worked with brick before, I promise you that you can still accomplish this project! If you want to add this brick accent wall into your home using thin bricks, check out the tutorial for this fun project here.

DIY Wall Paneling Install
Wall Paneling is one of the easiest and cheapest ways to update a space. This simplistic approach to paneling will spice up any wall. Check out the plans for this project, and do it yourself here!

DIY Mirrored Wall
Who knew mirrors could look so good? This mirror wall is the perfect statement piece for any room. Check out the blog post and some tips here to do this project yourself!

Guest Bedroom Makeover
This bedroom makeover has been one of my favorites, and the accent wall makes it even better! This wall is done with pine boards installed vertically. This simplistic idea is budget friendly and will make a huge difference in your room. Check out the plan here.

Arch Nook Makeover
This shiplap paneling is a beautiful addition to an empty space that will provide a modern, clean look to any wall. It's a fun project that will add character and design to any plain space in your home. Check out the plan here, and try it yourself!

DIY Wall Paneling
This DIY Paneled Wall added the perfect amount of character to my living room. The diamond design does a really good job at making sure that happened. Check out the plan here, and add some character to your own wall!


10 Home Improvement Projects
"Looking to update your homes? Check out these home improvement makeovers."
Sometimes your house can start to feel plain and boring, and that's when an update is needed! If you're looking to improve your home, then you came to the right spot. You can refresh your home with these DIY building plans!
Small Pantry Makeover | Organization and Storage
The pantry is one of the most important parts of the kitchen, but it is also one of the hardest to keep up with. Thankfully, there's an easy fix to get your pantry to look more organized and provide more storage! Check out this tutorial for some pantry organization tips here.

Guest Bedroom Makeover | Installing an Accent Wall
This Guest Bedroom Makeover is one that will make your visitors never want to leave their room! This super fun project only took a weekend, and it makes a huge difference. See how an accent wall and some paint transforms a room. Check out the plans here.

Bathroom Refresh Makeover
Are you needing a refresh for your guest bathroom? This the perfect plan. It was a super quick and easy DIY project that your guests will love. Check out the tutorial here to do it yourself!

Arch Nook Makeover - Installing Shiplap
This Arch Nook Makeover is perfect to add some shiplap paneling design and character to an empty space. This fun transformation project will easily make a small space stand out. Check out the plans here.
Wall Paneling Install
Wall Paneling is one of the easiest and cheapest ways to update a space with wall paneling. This simplistic approach to paneling will spice up any wall. Check out the plans for this project, and do it yourself here!
DIY Master Closet Reveal - Installing Built-Ins
This Master Closet plan is perfect for organizing and provides tons of storage. The closet includes a full built-in wardrobe and shoe built-in. Check out the plans here, and build your own dream closet!

DIY Office Nook
Working from home has become the new norm, and its important to work in a space you love! You can transform your boring nook space into a beautiful, stylish home office space with shiplap paneling and butcher block. Check out the plans here.

Kitchen Reno
If you are in need of renovating your kitchen, you've come to the perfect spot. This renovation will completely change your kitchen, and it can be done on a budget! Check out the plans here and how it was done with just $3200!

Brick Accent Wall - Installing Thin Brick and Grouting
This thin brick wall project is another wall installation that will immediately add character to any room. See how to install thin brick and apply grout. If you want to add this into your home, check out the tutorial for this fun project here.
DIY Mirrored Wall
Who knew mirrors could look so good? This mirror wall is the perfect statement piece for any room. Check out the plan and some tips here to do this project yourself!

Small Pantry Makeover | Organization Tips and Storage Ideas
"Who says pantry organization and storage can't look good."
- (2) 4'x8' 3/4" Sanded Plywood
- (2) 1x4x8 Pine Boards
- (3) 1x2x8 Select Pine Boards
- (1) Project Panel (20" x 48")
- Behr Dynasty Paint - Rush Hour
-
Behr Dynasty Paint - Cloudy Day
- 1/4" Pocket Hole Screws
- Nail Pulling Pliers
- DAP Wood Filler
- 80-Grit Sandpaper
- 220- Grit Sandpaper
- Painters Tape
- Paint Brush Kit
- Pre-Mixed Thin Set
- Pre-Mixed Grout
- Polyurethane
- Merola Tile
Tools Used
The Before
As always, I like to give you guys a good look at the before. As you can see, my pantry organization was a definite no go. I knew I needed some better pantry organization and storage ideas. 
As you can see, these shelving units just weren't cutting it for me. I knew I needed to split up the shelves a bit and have varying sizes for it to be a better fit for me and my items. The plan is to remove the bottom two existing shelves and build a cabinet that will be more functional for me.
 You would be amazed just how changing up a small portion of a space can make such an impact! Let's get into it.
The Pantry Demo/Rebuilding the Pantry
I first started out with removing the two existing shelves. They were installed with nails, so with a little push and tug with a hammer and my foot, I was able to knock them right out.
 With the existing shelves out, I was able to start building the bottom cabinet. Unfortunately, because of the size of the pantry, I had to build the cabinet in the space vs. building it outside and putting it in there afterwards.
I used 3/4" Sanded Plywood to build the bulk of the cabinet and then framed it out with 1x2 boards.

When building the cabinet, I really tried to pay attention to how I had been using the pantry previously and the items I have to store, ultimately that led to me creating the cabinet the way I did.
There was a lot of unused space, so I knew I wanted to create an additional space to store more items. If you can tell instead of three spaces at the bottom, the cabinet added four.
Painting the Pantry
Before I started the pantry, I knew I wanted to go with some sort of blue color. I browsed the Behr Dynasty paint colors on HomeDepot.com and found the perfect shade of blue Rush Hour. Luckily, there are many colors to choose from.
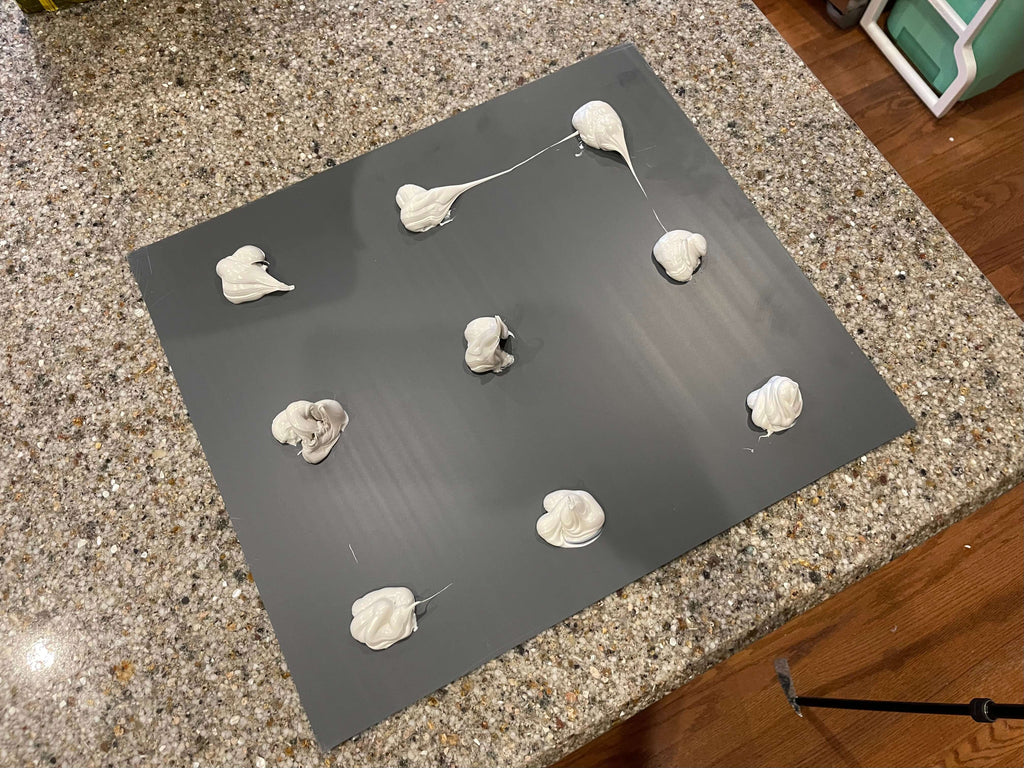
 With the bottom cabinetry color all picked out, I had to determine which color to paint the top. I picked three different colors to choose from and tested them out on the pantry.

If you aren't that great at picking out colors, luckily the Home Depot app gives you a little help. I typed in the bottom cabinet color within The Home Depot app and it showed me similar colors to choose from.

I ended up going with one of the suggestions from the app, Cloudy Day, for the top pantry cabinets and it turned out perfectly. The paint calculator also helped me determine just how much paint I needed, so that I didn't overbuy.

Tiling the Pantry
Now on to this amazing tile. I wanted to make my pantry feel more like a butler's pantry and I knew tiling the middle would help make it feel more like one. Instead of the two shelves that were there before, I created four shelves by adding three spaces to the cabinet and having a space in the middle.

Having varying sizes and adding an additional slot will allow me to organize items a lot more effectively. There was a lot of unused space within the pantry as it was, so I am making it a lot more functional by designing it this way.

I used my Ridgid tile saw to cut down the tile to size. This is my second time using this tile saw and I really love it. It makes tile laying a lot easier and cutting a lot more accurate.
I adhered the tiles to the wall with a Pre-Mixed Thin Set. This comes ready out of the container and I love using this brand. You can opt to get a mortar that isn't pre-mixed for cheaper, but I am a fan of the easy road, so pre-mixed it is!

Once the mortar was dry and sat for about a day, I went back in the next day and started grouting. I used a Pre-Mixed Grout that was ready right out of the container, same brand as the thin set.

I applied a little bit of grout and then used a sponge and water to wipe the additional grout off of the tile.
Once the grout was dry, I installed a project panel underneath to serve as a countertop and sealed it with polyurethane.
Pantry Storage and Organization
Now for the fun part; organizing! By the time I had finished the grout, I was super excited to start organizing the pantry with all of the containers and items I found.
I really took advantage of The Home Depot's Home Delivery Service for this project. I was able to order all of my containers and tile right online and it was delivered right to my front door. At one point I had so many packages at the door, I had to leave them outside until I had time to bring them all in.

Now thats what I call a good service, items arriving right at your door!
Having dedicated containers really helped bring some great storage to the pantry but also made it look more appealing. This clear jar set was the perfect set of containers for this pantry.
If you notice a common theme, you probably can tell that I went heavy on the rose gold! I knew it would couple well with the blue and I was absolutely right. The rose gold accents on the glass jars and the bread logo just tied everything together.
The Final Reveal
Now I know why most of you are here, you're wanting to see the final reveal. Well, here it is. Meet my new organized pantry!

These colors were the perfect match for this pantry makeover. Shout out to Behr for the amazing blues.
 The real heroes of this pantry makeover are the storage solutions! I was able to find some great finds to help organize my pantry and I absolutely love how they contrast with the colors I chose! The rose gold accents on the storage containers and the bread container, really made this pantry pop. This bread box was a close second!

My favorite organization item is hands down the cereal dispenser. It's such a fun and cool way to display cereal and as a cereal lover, it makes me that more excited about it.

As always, I have to leave you guys with a before and after. As you can see, I was in need of some serious pantry organization. With a little tweaking I was able to make my pantry more functional and it looks ten times better than it ever would have.

Thanks for reading guys, XOXO Ashley

Guest Bathroom Makeover Refresh
"An easy guest bathroom refresh my guests will love."
If you were around for my guest bedroom makeover, you know how excited I was to add some color to my guest bedroom. Well, I felt it was only right to carry that into the guest bedroom. I decided to take a weekend and update my guest bathroom and give it a little refresh.
"There are some affiliate links in this post, meaning I get a small commission if you purchase through these links, at no cost to you. Click Here to read my full disclosure."
The Before
Here is a look at the before. I know, I know, it doesn't look bad, which luckily for me was a great thing. I just wanted to make a few minor tweaks to really make this bathroom makeover come to life. No real big bathroom renovation here unfortunately, but you won't be disappointed!
 I really loved the tile choices I made when I built this house, but I wanted to make this room bold. So I decided to add a bold paint color and change out the hardware!
Sources
Now I know what most of you are here for; the sources. Here are all the items I used to makeover this guest bathroom! I may have gone overboard with the gold finishes, but I think it came out well!
Colors Used:
- Behr Marquee Interior Paint - Twinberry - Satin
- Behr Marquee Interior Paint - Rice Crackers - Satin

Hardware
I think one last look at the before and after is a great way to finish out this post. I hope you enjoyed this mini bathroom refresh just as much as I did.

As always, thanks for reading Guys!

DIY Arch Nook: Shiplap Paneling
"Adding a little shiplap and character to a small arched nook."
I have been eyeing this little nook area since I moved in the house. I knew from he very beginning that I wanted to add some color to this spot but went back and forth on how exactly I wanted to carry it out. Well now its time to show you guys what I came up with!
"There are some affiliate links in this post, meaning I get a small commission if you purchase through these links, at no cost to you. Click Here to read my full disclosure."
Materiels
- 11 Shiplap Boards
- 1x2x8 Select Pine Boards
- Wood Filler
- Caulk
- Scotch Painters Tape
- Delicate Surface Tape
- Sherwin Williams - Nomadic Desert
- Brad Nailer
- Brad Nails
- Miter Saw
- Jigsaw
The Before
As always, I have to show you a shot of the before, so you can see the full transformation of the project. I love this little reading nook because its small but gives the house a lot of character and now it's really about to stand out with this fun transformation.
 A lot of folks always ask me about this little reading light and if you missed it I break down all of my home lighting choices in another post. Be sure to check that out as well.
Step 1: Installing the Shiplap
First, I started off by adding the shiplap boards to the wall. I have always loved how clean shiplap looks. I didn't want a farmhouse look, which is what I normally see when I hear shiplap, but I'm using it in hopes for a more modern feel.
I secured the shiplap to the wall with my brad nailer and 2" brad nails. Some people like to use paneling adhesive along with this, which is entirely your choice. In order to make the shiplap fit around the existing hardware, I used my jigsaw to make the appropriate cuts for a nice fit.

Step 2: Prepping the Area for Paint
Once all of the shiplap was installed, it was time to prep the area for paint. First, I went through and filled all of the nail holes and crevice with wood filler. Then I went back through and caulked any areas where there were opening seams. This makes it look seamless.
 I used Scotch Painter's Tape to tape off all of the edges and hardware, so I could have a nice clean line around the painted area. Once that was done, I was ready for paint!
Step 3: Paint the Shiplap Nook
Now its time for paint and I was most excited about this part because I found the absolute best color! I was so excited to try this color out and now I am hooked.
 It was the perfect color to really bring this nook to life and I think it goes perfectly with my wooden floors. I used Sherwin Williams - Nomadic Desert and now I want to paint all of my walls this color. It's just so pretty and so me!
The Reveal
Once the paint was dry, I added in some decor and the arched nook transformation was finished! Even though this was a small project, this paint really made this nook stand out and the pictures honestly don't do it justice.
 When you see the before and after side by side, you can really see the difference between the two. I's amazing what a little paint can do to a small space.

and that's a wrap. As always, thanks for reading guys! XOXO Ashley

Chair Makeover w/ Rustoleum Outdoor Fabric Paint
"No need to throw out those old cushions, Rustoleum's Outdoor Fabric Paint is here to save the day."
- Outdoor Fabric Paint
- Spray Paint Attachment
- Older Outdoor Cushions
The Before

Prep and Paint
To get my cushions ready, I had minimal prep work. I took a damp rag and wiped down the outside of the cushions to prep it for paint. The can suggests cleaning with soap and water for dirty cushions, so if you have some older cushions a good soap and water wash down should be good enough for prep.
 Then I started spraying the cushion with the Outdoor Fabric Spray Paint in khaki. I used my spray paint attachment which I absolutely love. I don't spray paint without it. It is a totally lifesaver against hand cramps and such an effective inexpensive tool.
 I could immediately tell that the color was going to turn out beautiful. I definitely picked the right color. Once I sprayed both sides of the cushion, I let it dry for two hours and then it was ready to set them back in the chair! The can suggest waiting a total of 24 hours to be 100% dry.
The Results
Once everything was dry, I set up the cushions in the chair and decorated the chair in the back patio, and man did I love the results!
 The Khaki color was definitely the best choice, it elevated the look of my patio chair and it only costs me $12. That sounds much better than buying some new cushions; things are getting pricey these days.
Frequently Asked Questions
If you want to see the video process of me spray painting the chair, head on over to my Instagram and check out my "Fabric Paint" Highlight! I had a ton of questions about the outdoor fabric paint so I figured I'd answer some of the frequent questions here!
How do the cushions feel once dry Does it feel stiff or crunchy?- One of the more popular questions. My cushions did not feel stiff after drying, and I couldn't tell much of a difference from how it was before spraying. I made sure to do really light coats which I believe helped with that. Some people mentioned experiencing stiffness when using the paint and I think over-saturating your cushions with paint may be the cause of that.
- No. Once the paint is dry, it will not rub off on your clothes. Make sure you allow 24 hours for the paint to completely dry before use.
Does it have a smell?
- When using the outdoor fabric paint, I did not detect a smell.
Can you wash it?
- The can mentions that your cushions should be machine washable after 3 days.
How many cushions can you paint with one can?
- I used about half a can to paint these two cushions. Again, using light coats helped with this.
and that wraps up my furniture chair makeover, but I can't let you leave without another before and after, so here it is.

And as always, thanks for reading guys, XOXO Ashley.