
Projects

DIY Master Closet | Final Reveal
"This DIY master closet system is what dreams are made of."
Today is a very exciting day because I finally get to share the final reveal of my DIY Master closet and man am I happy to say that all of the hard work was worth it. It came out better than I had imagined.
"This post is sponsored by The Home Depot."
But before we get into the final reveal, let's do a little recap of how the closet was built! If you've been following along since day one, you know that the closet includes a full on wardrobe built in and a shoe built it in.
Master Closet Recap
Be sure to check out Part 1 and 2 of the closet build for more detailed information and step-by-step instructions!
Part 1: Shoe Built-In Install
Part 2: Wardrobe Built-In Install
| Materials Used |
| 3/4" Plywood |
| 1 1/4" Pocket Hole Screws |
| Fluted Casing |
| 1" and 2" Brad Nails |
| Wood Glue |
| 12" Drawer Slides |
| 3" Wood Screws |
| Select Pine Boards - 1x2, 1x6, 1x8, 1x12 |
| Wood Filler, Caulk, Spackle |
| Painters Tape |
| Tools Used |
| Brad Nailer |
| Miter Saw |
| Drill |
| Kreg Jig |
| Right Angle Clamps |
| Track Saw |
| Staple Gun |
| Hammer / Crowbar/ Utility Knife |
| Stud Finder |
I first started off with the shoe built in. Honestly, because this was the side I was most excited about. I decided to designate a whole area for my shoes; I mean a girl can never have too many shoes right.
 Watching the shoe built in come together was so fun, and the more I began to build it the more excited I became about it. If you want more details on how I built this shoe built in out, make sure you go check out Part 1 - Shoe Built In.
 Now even though I always had a plan to paint the built-ins, man did they look good naturally. I was almost swayed to leave it like it was, but ultimately I knew I would be happier with it painted.
 Now, the wardrobe portion of the walk-in closet system was a beast. This took a lot of work to get done, and being that I work alone, I was definitely feeling the burn after this one.
 One of the things that helped the most was mapping out the design first with the tape! Even though I changed the design up along the way, being able to visualize everything was a game changer during this build.
 Although it was a ton of work, seeing this closet come together was so exciting and fulfilling. To know that I built this with my one two hands just makes it that more special!
Many people asked why not use the IKEA Pax closet system, but I wanted to build my closet custom, it was a lot cheaper and I knew the wood I was using was better then the pre-fabbed cabinets.
Applying the Finishing Touches
The most fulfilling thing was finishing all of the building of the closet. I'm not going to lie, I was so out of gas at this point but I knew I was so close to finishing. Now with everything built out it was time to paint my DIY master walk in closet; closet organizer of my dreams.
But before I started painting, I had to prep everything. I went through and filled all of the nail holes and pocket holes with wood filler and caulked all of the corners and crevices for a clean look, drawers included. Once that was all dry I went back and sanded everything down, first with 80-grit sandpaper and then again with 120 and 220 grit. Sanding is tedious and it sucks but the better you prep, the better your finish will be in the end.
 Once everything was sanded down, I used my Graco X7 to spray paint the built ins.Theres no way I wouldn't use a pint sprayer on a project like this. Even though the prep takes a while, the clean finish is so worth it.
 Anytime I'm using a paint sprayer, I use Behr Premium Plus because I don't need to thin it. I just dip the tube in the bucket and I'm good to go. For this particular project, I decided to go with Behr-Spanish Sand because I wanted to stay in the white family but I wanted a warmer tone.
 The overspray wasn't too bad after adjusting the pressure of the sprayer. I just made sure to cover the floors and the surrounding areas to prevent anything from getting sprayed. Make sure you have a good respirator mask and goggles when spraying for safety.
 Right after I painted and the paint dried, I immediately started putting my clothes in the closet because I just couldn't contain my excitement. I used these socket set rods to hang up my clothes. They were really simple to install.
I hadn't even finished yet! HA! Has anyone else been there? Next up was adding some fancy hardware.
When I first saw these gold drawer pulls, I was absolutely in love and they definitely elevated the closet.
The Final Reveal
Well the time has come; the moment you all are waiting for the final reveal. Well here it is folks!
 There are no words to describe how happy I was to finally finish this beast of a project. It took a lot of work, but I must say it was absolutely worth it! The drawer pulls really gave it a luxurious look.
 During the build process, I had a few folks say that they couldn't envision how I was going to make the corners work, but I think I knocked it out of the park. This closet organizer is the perfect place to hang all of my favorite clothes. I wanted to make sure I used every single space and it turned out better than I could have imagined, now I have two designated corner areas for my longer clothes.
  Let's talk about this shoe built in though; this thing is a work of art and I am so glad to finally get my shoes out of the guest room and in a designated area and of course I couldn't forget my hat collection. I figured, why not use that empty space up top and make a place for them as well.
Even better, I have a spot for all of the socks and other miscellaneous items underneath and all hidden and tucked away.
 I knew I wanted the middle portion to be a focal point, so I added in some fun items to make the middle really draw your eye. The first thing I added was this decorative wallpaper in the back. I saw this online and immediately knew that was the one. It was peel and stick, so it was really easy to install.
I also added this round mirror to one side for my personal preference and a fun piece of wall art on the other side.
 but I must say, the ironing board drawer takes the cake. I absolutely love this feature in my newly built closet.
 I am so in love with my new closet, I don't think I ever want to leave.
and that's a wrap folks, I hope you love my closet just as much as I do and I can't wait for you guys to follow me along on the next project!! Thanks for reading guys, XOXO Ashley.

DIY Farmhouse Console Table
"Console Tables can never get old."
With all of the building I have done within my building career, I think it is safe to say that console tables are something that I have built the most. They are both, easy to build and fun to style.
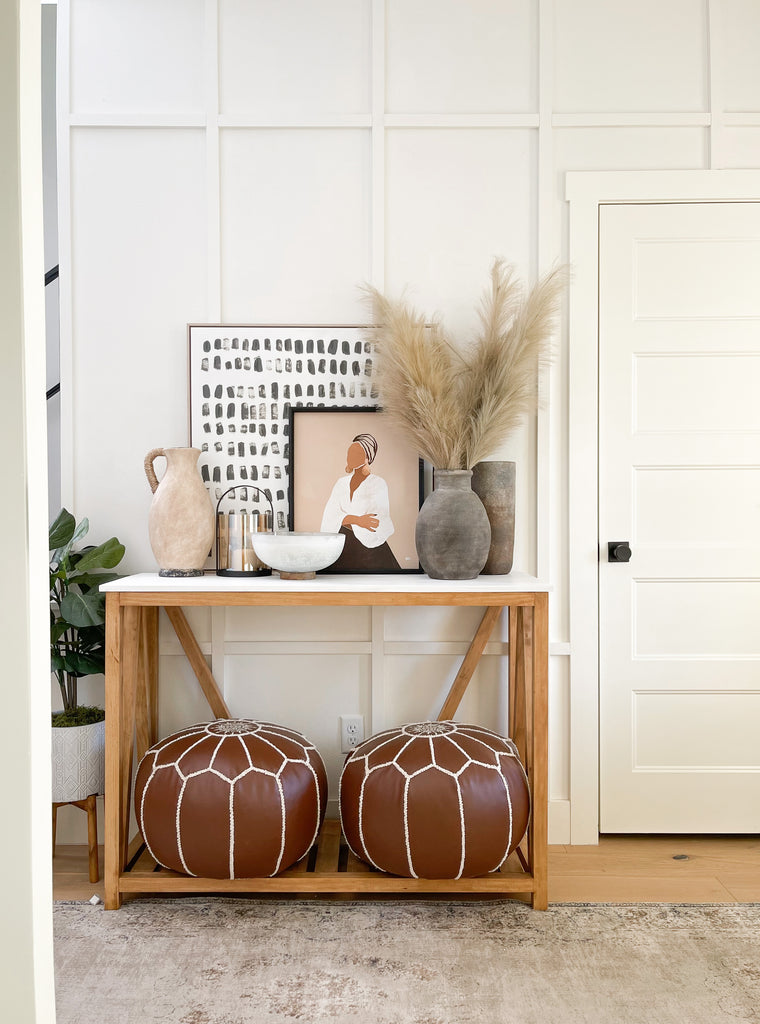
So today, I am providing you guys the plans for this fun little entryway project that I built. The even more exciting part is that this build was the first project that I built for my home! Even better, it was caught all on film.

- 3 - 12x2x6s
- 4 - 2x2x8s
- 2 - 1x3x8s
- (1) Project Panel (15.75" x 48")
- 2 1/2" Pocket Hole Screws
STEP 1: Assemble Console Sides
The first thing I did was build out the sides; and it should be to no surprise that I used my handy dandy Kreg Jig to do so. I really had fun with this particular build because I had some company with me; my girl Ashley! Yup, two Ashley's building!
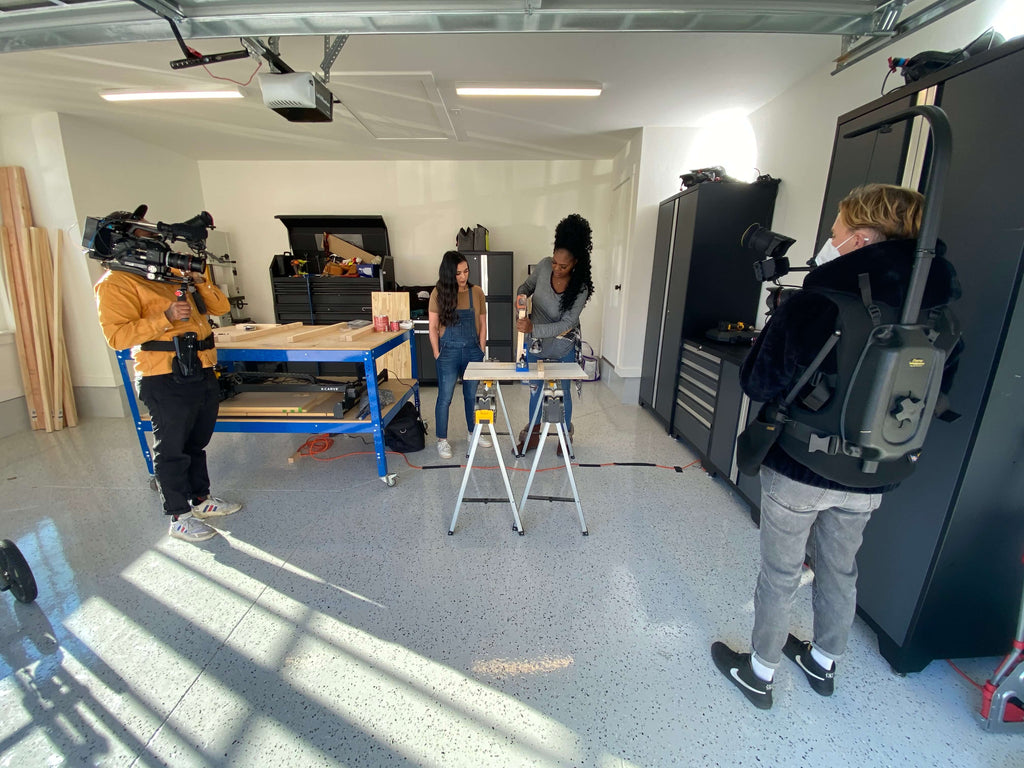


STEP 2: Build the Frame
Once the two sides were built, I started building out the frame. I first attached the top two stretchers and then the bottom two.

Again, clamps can be helpful with this step, especially if you're working alone but luckily I had a few extra hands this time from my helper, Ashley.

STEP 3 : Add Bottom Slats
Once the frame was built, we started putting in the bottom slats. This part of the project really brought the console to life.

My parents were able be in town while Ashley and the crew came out, so even Poppa Fred got to join in on the building fun. Once the slats were all in, the console table was all built!
STEP 4 : Prep and Stain the DIY Console
Once the console was built, we filled all of the nail holes and cracks with wood filler and then used a pre-wood conditioner on the console. I always use this to get a nice clean finish when I'm staining.
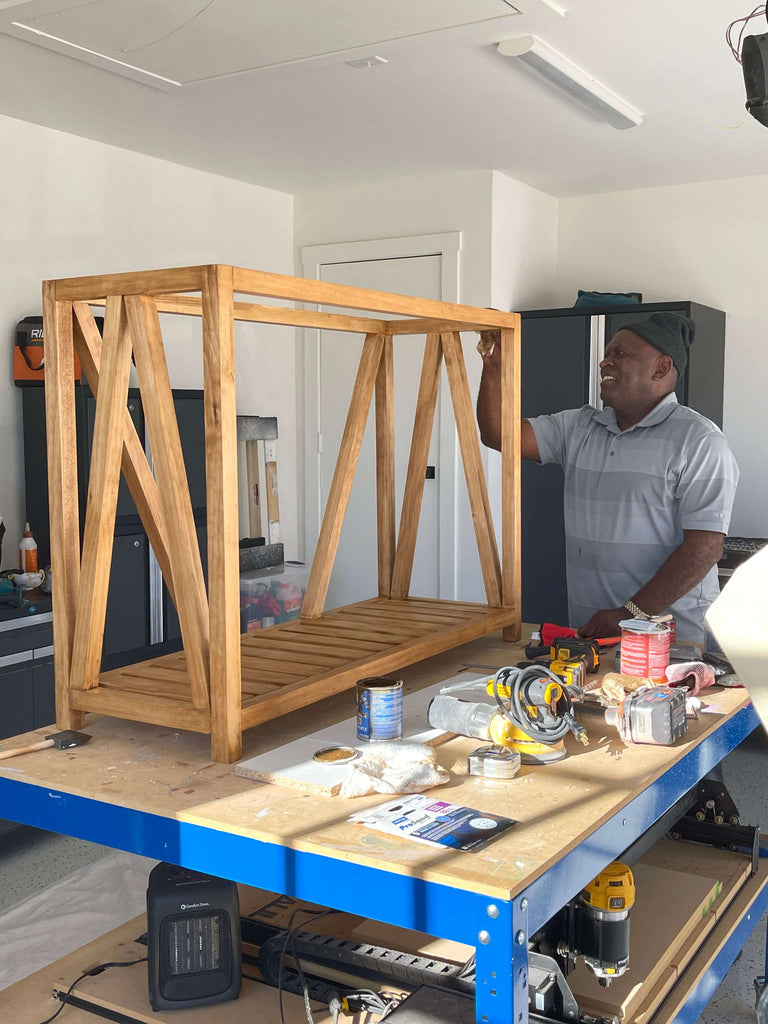 My dad helped me out here on the staining and I must say, it was pretty awesome to have some help in the shop. We used a gel stain on this build and I really loved how I turned out.
Once the stain was dry, we painted the top white and place it on top of the console and attached it using brad nails.
If you want to re-create this farmhouse console table, I surely won't leave you hanging. Check out the printable plans above.

And that's a wrap for the Farmhouse Console! I hope you guys enjoyed this post!

and as always, thanks for reading! XOXO Ashley

DIY Master Closet: Wardrobe Built In (Part 2)
" A wardrobe built in, you'll never forget."
The closet is well underway and we are moving on to the next part in the DIY Closet series; the wardrobe built in. Hopefully, you caught the first part of the series; the Shoe Built in, but if you haven't, go check out that post here first to see how I got my DIY closet started.
"This post is sponsored by The Home Depot"
The Before
I always love looking at the before before starting a project and this time is no different. You saw the other side of the closet in my Part 1 closet post, so here are the other sides of the closet. Check out the final reveal here!

Layout the Design
As you saw on Part 1 with the Shoe Built In, I used the same technique here with the painters tape. This technique is really helpful to me when building out the closet, because I can just reference where the tape is and figure out my measurements on the fly.
While I'm building, I just remove the tape piece by piece and replace it with the real thing; so satisfying.
 Here you can see my layout design for my plans for the closet. It's always so helpful to me to be able to see the design beforehand. Even if I change the design on the fly, seeing it beforehand makes the building process that much easier.

Before moving on to building the frame, be sure to remove baseboards from all sides of the wall, see Part 1 for additional info!
Step 1: Build the Bottom Frame
First, you will build out the bottom frame, like we did with Part 1 of the shoe built in. We will use the same technique here; build the frame out by joining 2x4s together with construction screws.
Again, be sure to screw the screws into studs to make sure the frame is secure. Utilize a stud finder to help if needed.
 Once the frame is secure, use a brad nailer to secure your top 3/4" piece to the frame. Being that this wall was on the back of the closet, I knew I could get away with a much wider section, so I decided to make the frame here 24".
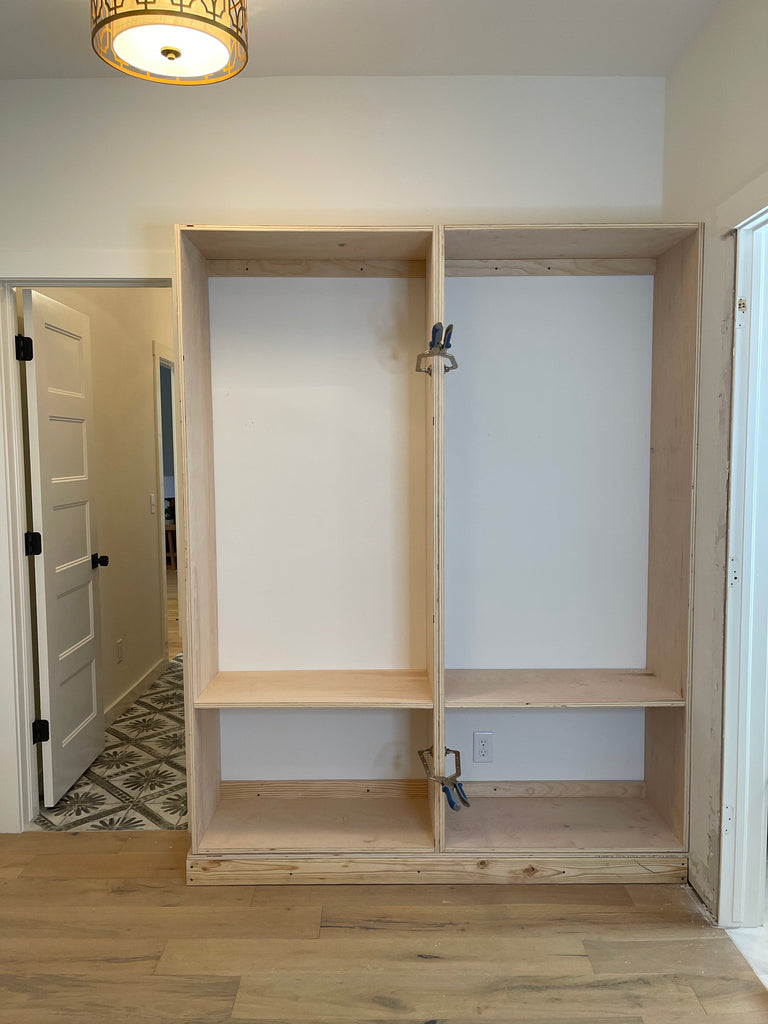
Step 2: Build the Dresser
I knew I wanted to build a huge dresser, to have plenty of room to store the clothes that I don't want to hang up, so I made this 23"+ deep.
I built this dresser the same way I built the shoe built ins; I used pocket holes to join the plywood pieces together to form the dresser with the help from my Dewalt Drill combo kit and then I used my Kreg jig to create the pocket holes. I put my jig on a 3/4" setting and used 1 1/4" pocket hole screws to attach the plywood together.
 Once the dresser was built, I added back supports to both the top and bottom and used those pieces to secure the dresser to the wall with wood screws.
In order to make sure my process of securing these built-ins to the wall went smoothly, I am utilizing my impact drill! It always increases my productivity when driving screws!
If you aren't quite as tool savvy, luckily The Home Depot has tons of how-to guides to assist you on which tools are best for your project, like this guide on How to Use an Impact Driver.
 If you ever need assistance on how to work a tool or want to see other fun guides on getting household projects done; be sure to check out The Home Depot's how-to library here.

Th best part is that these how-to guides are easily accessible from the mobile app, so you can view them while completing your specific project.

Step 3: Build the Adjoining Sides
Once the main drawer was in place, I started to add the adjoining sides. I knew I would have to make the width of these pieces a little smaller to make room for the corner pieces and 15" was the perfect width for this.
First, I started off with the bottom pieces. I first adjoined two 15" boards to the drawers by first glueing the long sides to the dresser and then secured it to the bottom with pocket hole screws Once the two long side were secure on the bottom, I used a long horizontal board to connect the two boards at the top.
 Once that was secured down, I built the top shelf box and then placed it on top of the bottom wardrobe and secured it both to the wall and the bottom piece with screws.

Step 4: Build the Side Wardrobe
Now on to the side wardrobe! This was probably the most medius part for me being that it was in the corner. I really loved the idea of these corner shelves, but it took me a while to figure out the best way to implement it.
 Originally, I thought it would be a good idea to assemble the whole shelf at once and put it in all together, but I quickly learned that this was not the way to go.
You can see here my thought process on how I assembled them together.
 Once, I quickly realized that putting it in all at once wasn't a great idea, I started installing it in shelf by shelf, and this was a much better approach.
First, I installed the outer shelf, to create the main frame and then moved on to the additional shelves.
 I would install one shelf and secure it to both the wardrobe and the wall, and then add in the L shelf to make it look like one whole shelf. I joined the shelfs together with pocket hole screws.
 I also made sure to put support boards underneath the shelves. This helps when installing and also takes the pressure off of the shelves, in regards to weight. It makes the shelves feel more sturdy and just increases the integrity of the built ins all around.
 Once the left side wardrobe was finished, it was time to move on to the right side. This side was designated for all of my short clothes. This side was the easiest because it just consisted of three big boxes.
 I did have a little difficulty figuring out the size for this side though. I wanted it to be wide enough to where it hid the clothes well but also short enough so that there was a good enough clearance in between the dresser when walking through the door, so ultimately, I decided on 19.5 inches wide minus the trim.
 Once the right side was all installed, I started building out the corner. I wanted the corners to be identical for symmetry and also wanted to use that corner space for extra storage for my longer clothes.
Even though I ll be enjoying this closet on my own, I still tried to keep in mind that one day there may be two people using the closet, so I tried to design it in a way that was good for two people.

Step 5: Trim out the Wardrobe Built Ins
I felt such a sense of relief after getting everything built out! Now for the trim. The trimming portion always makes the built-ins look clean! I went back through to add 1x2 trim to all of the sections of the wardrobe.

Step 6: Adding the Drawers
Next up, was adding drawers! When posting this DIY walk in closet on instagram, it seemed like most people were nervous to tackle a project like this because of drawers! But after posting a quick tutorial in my "Closet Pt. 3" highlight, some people seemed to feel a little better about the process. Check it out here.
 First, I installed the drawer slides to each drawer opening and then built the drawer box using select pine, based on the sizing of each opening. Once all of the drawers were installed; I started adding the drawer faces.
If you've been following along on Instagram, you've probably seen my little card trick. I use a deck of cards to try and get an even spacing when I'm installing my drawer fronts.
 You can play with the spacing by adding or taking away cards until you achieve the spacing that you like. The best part about these drawers is the secret drawer that I revealed recently; an ironing board!
 Thats right; I decided to add this fun ironing board drawer to my closet to make it that much more fun and it was pretty simple to install after figuring out the instructions.
Now, with the Shoe Built In and the Wardrobe all built out, it's time to sand this baby down and paint! The next time you see this closet, she will be all finished and ready to organize. I don't want to give too much away, so here is one last look before the final reveal! Can't wait for you guys to see!!
and as always, thanks for reading guys, XOXO Ashley.

DIY Master Closet : Shoe Built In (Part 1)
"A DIY Master closet to die for! Built ins never looked so good."
| Materials Used |
| 3/4" Plywood |
| 1 1/4" Pocket Hole Screws |
| Fluted Casing |
| 1" and 2" Brad Nails |
| Wood Glue |
| 12" Drawer Slides |
| 3" Wood Screws |
| Select Pine Boards - 1x2, 1x6, 1x8, 1x12 |
| Wood Filler, Caulk, Spackle |
| Painters Tape |
| Tools Used |
| Brad Nailer |
| Miter Saw |
| Drill |
| Kreg Jig |
| Right Angle Clamps |
| Track Saw |
| Staple Gun |
| Hammer / Crowbar/ Utility Knife |
| Stud Finder |
For all of you visual learners, I tried my best to video the process so you can see it in action! See the full video below!
The Before
This particular project feels a little extra special because this is the first project I'm tackling in my new home! When I was having my home built, I knew I wanted to tackle my closet on my own and bring a cool custom design to it, so I asked my builder if he would leave my closet empty so that I could create my own dream closet and I'm so glad I did.
I had my builder install wood flooring and leave the walls blank, so I had a blank canvas to start with. Let's take a look.

Step 1: Layout the Design
Before I started building out the closet, I decided to use some painters tape to lay out the design. I didn't really have a design mapped out, so I wanted to visualize it beforehand before actually committing to build it. This is a great way to visualize a design before starting.
Many people asked why not use the IKEA Pax closet system, but I wanted to build my closet custom, it was a lot cheaper and I knew the wood I was using was better then the pre-fabbed cabinets.
 I used frog tape to first map out the shoe built in and then mapped out the other side of the closet.
The great thing about this technique is that you can always change your design on the fly. I am more of a "design as you go" person so I love using this technique and its so fun to compare the two pictures once I'm done building.

Step 2: Choosing Materials
Once, I had everything mapped out, I started figuring out what kind of materials I wanted to use for the closet. With this being a custom master closet, I knew I wanted to use a materiel that would last, so I used my Home Depot mobile app to search for plywood options.

After searching, I eventually landed on this maple plywood that I knew would be great for this project. The great thing about The Home Depot's mobile app is that it will show you how many items are in stock at your local store.
I was able to also utilize the mobile app to pick out some special items and have them delivered to the house while I was working on the closet. They arrived just in time!

Step 3: Remove Baseboards
The first step of the actual building process is to simply remove the baseboards. Now, this can seem like an intimidating process but it is fairly easy. The main thing you want to do before removing the baseboards is to score the caulk.


Step 4: Build out the Bottom Frame
Next, I started building out the bottom frame. I decided to put my built ins on a frame so that I could trim out the bottom to make it match the trim throughout the rest of my house. This step isn't necessary if you don't want to trim out your closet piece as I did.
Pro Tip: If you decide to trim your built in as I did, make sure your bottom frame is 3/4" wider than the actual built ins.

First, I built the frame by joining 2x4s together with construction screws. I found it much easier to the screw the screws through the wood after first drilling pilot holes into the desired location.
Once the frame was built, I placed it in its desired location and attached it to the wall. When attaching the frame to the wall, you want to make sure you drill the screws into the studs to ensure it's secure. If you drill the screws into the drywall it will likely just pull itself out.
If you need help finding the studs, use a stud finder. This particular stud finder, finds the edges of the studs for you so you know exactly where to screw.

Once the frame was secured to the wall, I added a 3/4' piece of plywood to cover the top of the frame. I secured the frame top to the frame with 2" brad nails, wood glue and a brad nailer.
Step 5: Build the Built Ins/Dresser
Sizing
Now with the frame all in place, it's time to start building the actual built ins. I decided to go with different sizes on each wall to allow for spacing within my closet.
For my shoe built in, I opted to go for a 15" depth. I made it smaller since it would be only holding shoes and I wanted to allow enough space for the door to be able to open fully.

When you're building your built in, feel free to decide which depths work best for you and your space
Building the Cabinets
I had my plywood cut down in half at my local Home Depot and then used my track saw to make additional cuts.
I used pocket holes to join the plywood pieces together to form the cabinets for my shoe built in using my Dewalt Drill combo. I used one of my favorite tools, the handy dandy Kreg jig to create the pocket holes. I put my jig on a 3/4" setting and used 1 1/4" pocket hole screws to attach the plywood together.
 I also utilized right angle clamps to help me put the cabinets together. I love these clamps because they help a ton when building by myself. One of the ends of the clamp fits right in the pocket hole.

Step 6: Secure Main Built Ins to Wall and Platform
When building the built ins, I made sure to add braces to the back of the built ins, so I would have something to drill the screws through to attach the built in to the wall. again, you want to make sure you secure the built ins to the wall by screwing those wood screws into the studs.
 I used my Ridgid Drill to screw in the construction screws into the Stus to secure the built ins. I also utilized clamps to clamp the pieces together once they were in place to ensure everything was lined up.
 Once everything was clamped together and all square I used brad nails to secure everything together. The built ins were tightly fit, so it didn't take much to secure everything together.

Once you screw a few screws into the studs, the built ins will stabilize and become nice and secure.
Step 7: Add Additional Shelving
Once the built ins were all secure, I started adding additional shelving. Now, a lot of people asked why I didn't just build the whole cabinet and then put it into place. If that's the avenue you want to take, by all means, its your choice to do so.
Personally, I like to build once I'm actually in the space, so I can make design choices on the fly; also, being that I build alone, its always easier for me to build within the space as well, but again this is your project so do what you feel is best.
 The first thing I needed to decide with the shelving was whether I was going to make the shelves adjustable or stationary. I personally don't like adjustable shelves, so I just decided to make my shelving permanent.
I attached the shelving to the built in with a Kreg Jig on a 3/4" setting and used 1 1/4" pocket hole screws to attach.
In order to hide the pocket holes, I made sure to place the shelving in a way that would hide them. If the shelve was taller than me, I placed the pocket holes on the upside of the shelf and if the shelf was shorter than me, I placed the pocket holes on the bottom of the shelf.
Step 8: Add Trim to Built Ins
Trimming out Cabinets
With all of the shelving in place, it was time to start adding the trim. The trim is what really makes the shoe built in look fresh and clean . I used 1x2 select pine boards to trim out the shoes built in.
To attach the trim I used wood glue and used my brad nailer to secure it with 2" brad nails.
Fluted Casing
Once the main trim was underway, I thought it would be cool to add a cool design to the side, so I found this cool fluted casing to add to the shoe built in.
The cool part about this fluted casing is that it's double sided. So you can choose which design you want to go with.
 I attached the fluted casing to the shoe built in using wood glue and a brad nailer. If you have a finish nailer, this would work better for this type of casing, but unfortunately, mine was in storage during this project, so I had to make the brad nailer work for the time being.

Once the fluted casing was in place, I used spackling, caulk and wood filler to fill all of the nail holes and cracks within the shoe built in.
Step 9: Build and Attach Drawers
Now on to the fun part; drawers! I saw a lot of excitement around this part because a lot of you guys want to build drawers but don't necessarily know how, so here is a little insight into how I installed them.
Install Drawer Slides
First, I installed the 12" drawer slides. With the built in only being 15" wide. 12" was more than enough for my shoe built in.
Because my shoe built in had a lip with the added trim, I first had to add in a scrap board to make sure the drawer slide was flush with the side of the drawer opening.

Then I added the drawer slide to the bottom of the drawer opening. I made sure to place the drawer slide 1" away from the drawer opening to make room for my drawer front. When you make your drawers, make sure that you account for the size of your drawer front.
I also find it a lot easier to screw in the drawer slide screws after first drilling in small pilot holes.
To ensure your drawer slides are level, use a little level to ensue everything is nice and straight.
Build Drawers
I used 1x6 select pine to build my drawers for this shoe built in. I screwed pocket holes into the front and back piece, so the pocket holes would be hidden, and then attached the four pieces together.
 Then I attached a 1/4" sheet of plywood underneath and attached it to the drawer with wood glue and a staple gun and 1" staples.

Install Drawers
Once I had the drawers built, I added the drawer slides to the drawers. I placed the pull out slide pieces to the bottom of the drawers and then screwed them into place. Once both slides were on, I slid the drawer into the opening.
 Build Drawer Fronts
With the drawer in place, I then measured the opening in order to get the accurate measurements for the drawer front. I built the drawer front with select pine. I used a pine board underneath and 1x2s to trim it out.

Once the front was built, I used playing cards to get even spacing around it. Once I had the accurate spacing, I nailed in two brad nails to hold it in place while opening the drawer open and then drilled to screws into the back of the drawer to secure it.
Step 10: Trim out the Shoe Built In
Once the drawers were installed, I trimmed out the top and bottom of the shoe built in. I placed a 1x4 piece of trim at the top and mitered the corners and added a 4.5" piece of trim on the bottom.
 In order to secure it to the built in at the top, I had to place a few two by twos on top of the built in, so I would be able to nail it into something. Once the trim was in place, I went back through with caulk to seal any cracks.
 and that's a wrap! Now that my shoe built in is all built out, it's time to sand them down and make it pretty. Stay tuned for Part 2 and 3 of my Master Closet to see how I finish it out!
 I hope I was able to answer all of your closet questions, if there is anything I missed, feel free to comment your questions below!


DIY Entryway Console
"An entryway console with a farmhouse feel."
- 7 - 1x2x6s
- (1) Project Panel , 15.75" x 48"
- 2 1/2" Pocket Hole Screws
- Kreg Jig
- Kreg Right Angle Clamp
- Drill
- Circular Saw
Step 1: Assemble Console Sides
The first thing I did to build the entryway console was building the sides. This first step was fairly easy. I used my handy dandy Kreg Jig to create pocket holes on the console stretcher pieces to use for the joinery


Step 2: Build the Frame
Once the sides were built, I began building the frame of the console by adding the 2x2 stretchers. I made sure to have the pocket holes facing down on the bottom to hide them and facing up on the top, so the console would look nice and clean.

Once I added the stretchers, I added the back decorative pieces and cut the project panel down to size and attached it using brad nails.


Head on over to Build Something to check out the free plans.

DIY Home Office Nook
"A Stylish Home Office Nook for the Everyday Homeowner."
The Before
Before we get into the details of this home office nook, it wouldn't be a true transformation without a good look at the before photos.
 As you can see, this office nook space was really blah. Super plain and it really didn't look pleasing to the eye because I had taken down some previous wall boards and never did anything with it. But don't fret, it's time to make this space come to life.
The Transformation
When I first started this project, I knew I wanted it to be really simplistic , yet stylish. Surprisingly, I only used a few products on this makeover but the results were amazing. Let's dive into the details.
If you are more of a visual person, don't fret, I was able to catch the whole process on video!
Painting
I first started off with painting the adjoining walls. I knew I wanted the space to feel bigger and brighter so I opted to go with white.


To create contrast, I decided to use two different whites; Swiss Coffee on the adjoining wall, which is more of an off-white, and Ultra Pure White on the the back wall; a pure white.
Luckily, there wasn't mush guess work when determining how much paint I would need. I was able to use The Paint Calculator right in Home Depot's mobile app to determine the amount of paint needed for this project.
Once you pull up the paint calculator, on The Home Depot's website, you enter in all the dimensions for the room and then it calculates the amount of paint needed.
I absolutely love this calculator because it prevents me from buying excess paint. The Home Depot's mobile app is full of all sorts of great calculators and tips and tricks to help with your projects.
I also decided to mix it up a bit and throw in a beige color (Behr Sandy Clay) for the built ins to give the home office nook a more warm feel. Paint is always a great way to transform a space on a budget and it really went a long way on this project.
Shiplap
I always love working with shiplap because its the quickest way to cover up a wall quick and easy, while remaining fun and stylish. I also wanted to use the shiplap because I knew the vertical lines would make the space feel a lot bigger.
 I started from top to bottom and started placing the shiplap into place. Once I cut the boards down to size, I attached the shiplap to the wall with my brad nailer and 2" brad nails.
Now during the shiplap install, I had a little bit of a mishap and accidentally broke off a piece of my outlet plate, but luckily I was able to recover quickly with The Home Depot's Image Search feature on the mobile app. This is a great feature if you are looking for items quickly or if you can't remember the exact name of the product you're looking for.
 When you open up the Home Depot App, you have an option to either snap a picture or search the product by voice and The Home Depot App will find product options for you. Even better, the "Product Locator" feature will show you exactly where you can find the item. It's like having a GPS for your shopping.
Once I got to the end of installing the shiplap, I realized that I would need to cut down the last piece of shiplap down to fit into the remaining hole. So I used my Kreg Adaptive Track Saw Cutting System to cut the shiplap down. This tool made it really easy and simple to cut those smaller pieces down safely.
 Once the shiplap was into place, I went back with wood filler and filled all of the nail holes. Once that was dry, I used some sandpaper to gently sand all of the excess wood filler off of the shiplap to prep it for paint.
Butcher Block Desktop
Now on to my favorite part; the butcher block! I recently used butcher block in a Kitchen Reno project and I fell in love, so I new I had to incorporate into this project somehow.
I love that The Home Depot has a "Buy Online, Pick up in Store" Service, where you can purchase your items online and they are ready to go when you get there.
When you order online, be sure to select the "Store Pickup" option and once you purchase your items, you will get an email notice when your items are ready for pickup.

If you're store is anything like mine, then they offer Curbside Service as well, so you don't even have to leave your car! When I arrived to the store, I text the Curbside Pickup line and my butcher block was brought out right to my car and loaded in the back of my SUV. Sounds like a win to me.
 Adding this butcher block to the desk was such a great design element and it gave the home office space a sleek look. Its also really durable and a great addition to the space.
 I secured the butcher block down with four screws from underneath and she sits nice and sturdy into place.
Once everything was painted and sealed, I knew this transformation was one I was going to absolutely love.

The Reveal
Now enough talking, let's get into the final reveal. I am so happy with how the nook turned out and I'm even happier that it was an inexpensive project.

Of course, I had to add some goodies. I was able to grab this amazing office chair and a few decor items, like these decorative vases and wire baskets.
Luckily, they qualified for free shipping, so it was delivered right to my doorstep while I was working away on the DIY Home Office Space.
 I mean this couldn't have turned out any better than it did. I really love the look of the butcher block with the warm tones. I can definitely get used to this home office space.

The transformation is just WOW! I mean look at these before and afters. Amazing what a little paint can do right?
 You can really see all of the differences clearly when you look at the before and after side by side. This transformation really opened up this space and I can't wait to start working in my new office space.
 With a little paint, shiplap and elbow grease, this DIY home office nook really feels like a brand new space and I couldn't be more happier with how it turned out.
 Welp, that about wraps up the DIY Home Office Nook Makeover. I hope you enjoyed this project and I can't wait to see how you transform your spaces. How about one more look before we go?

Now I know most of you want a recap of all of the products featured, so here's a list:
As always, thanks for reading guys, XOXO Ashley.

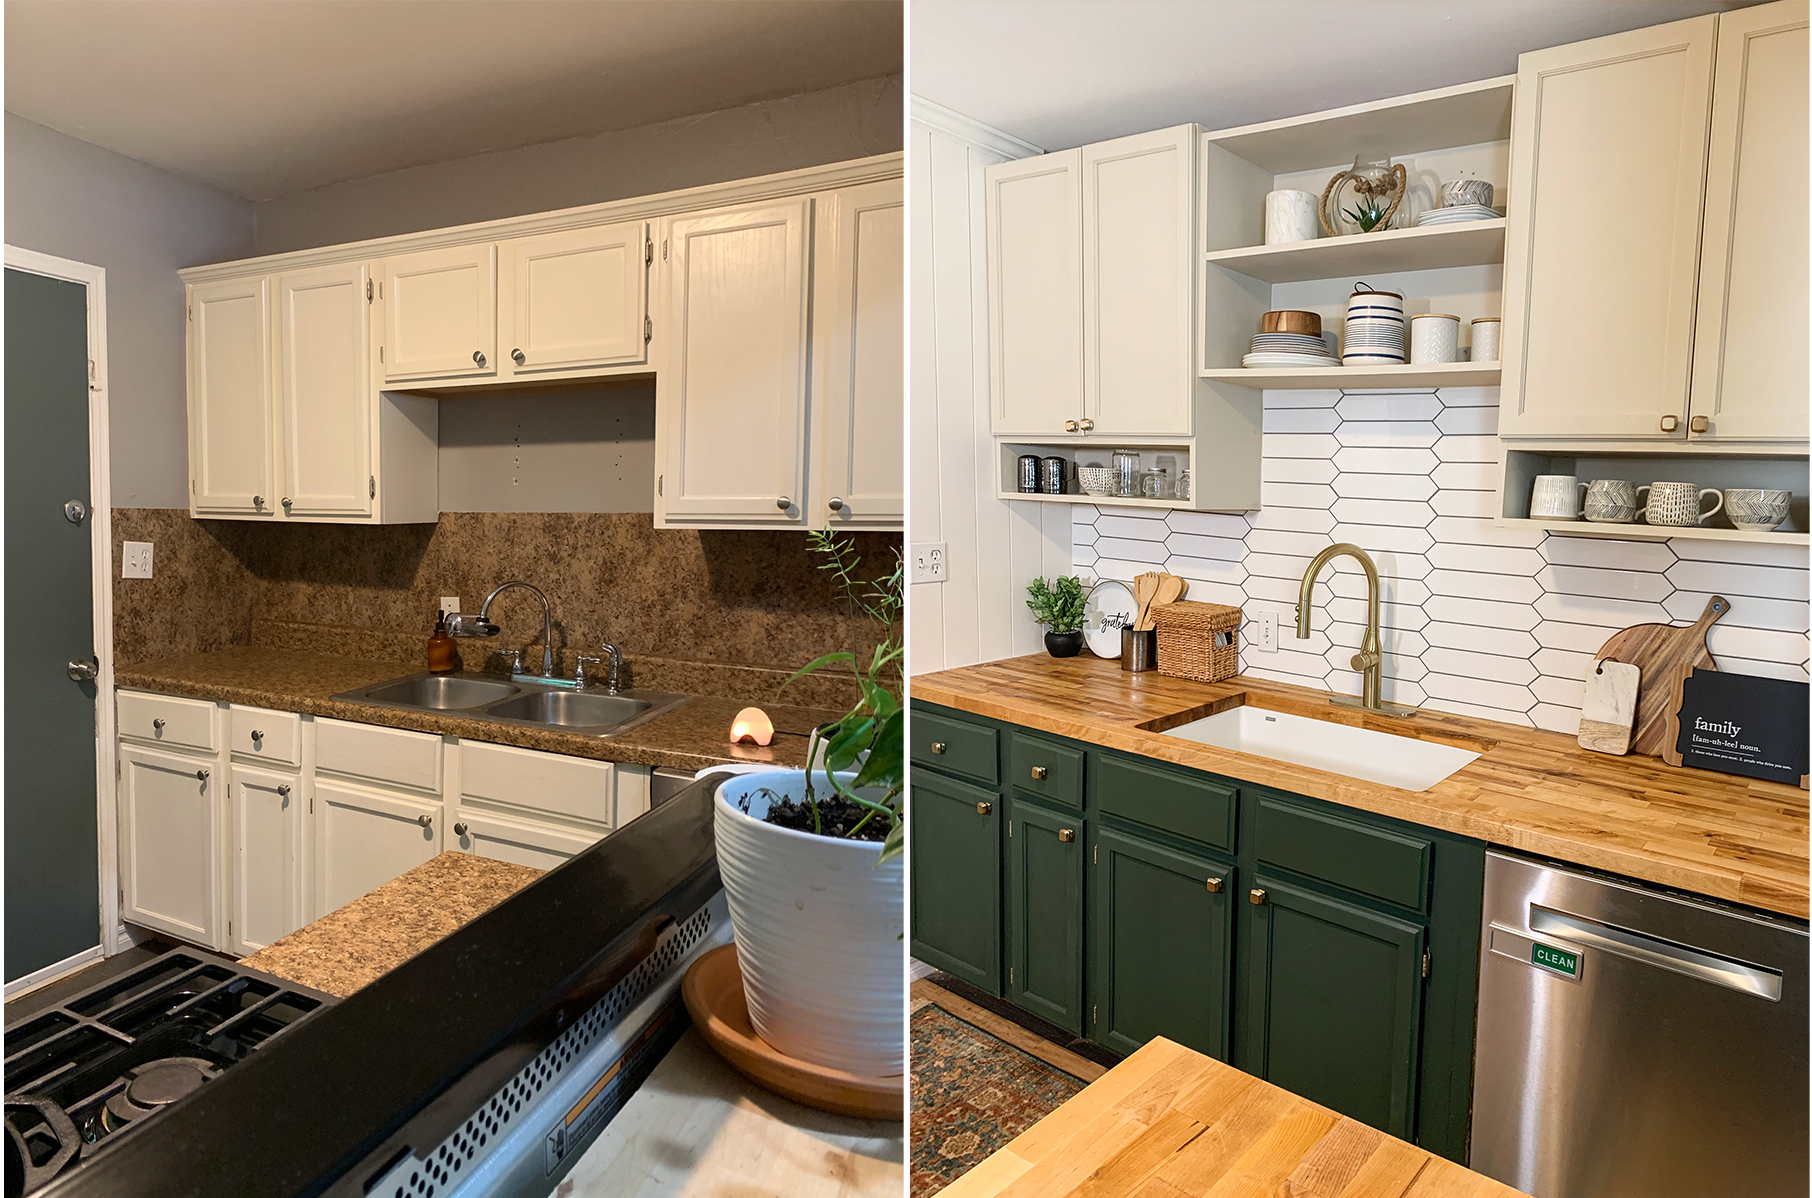
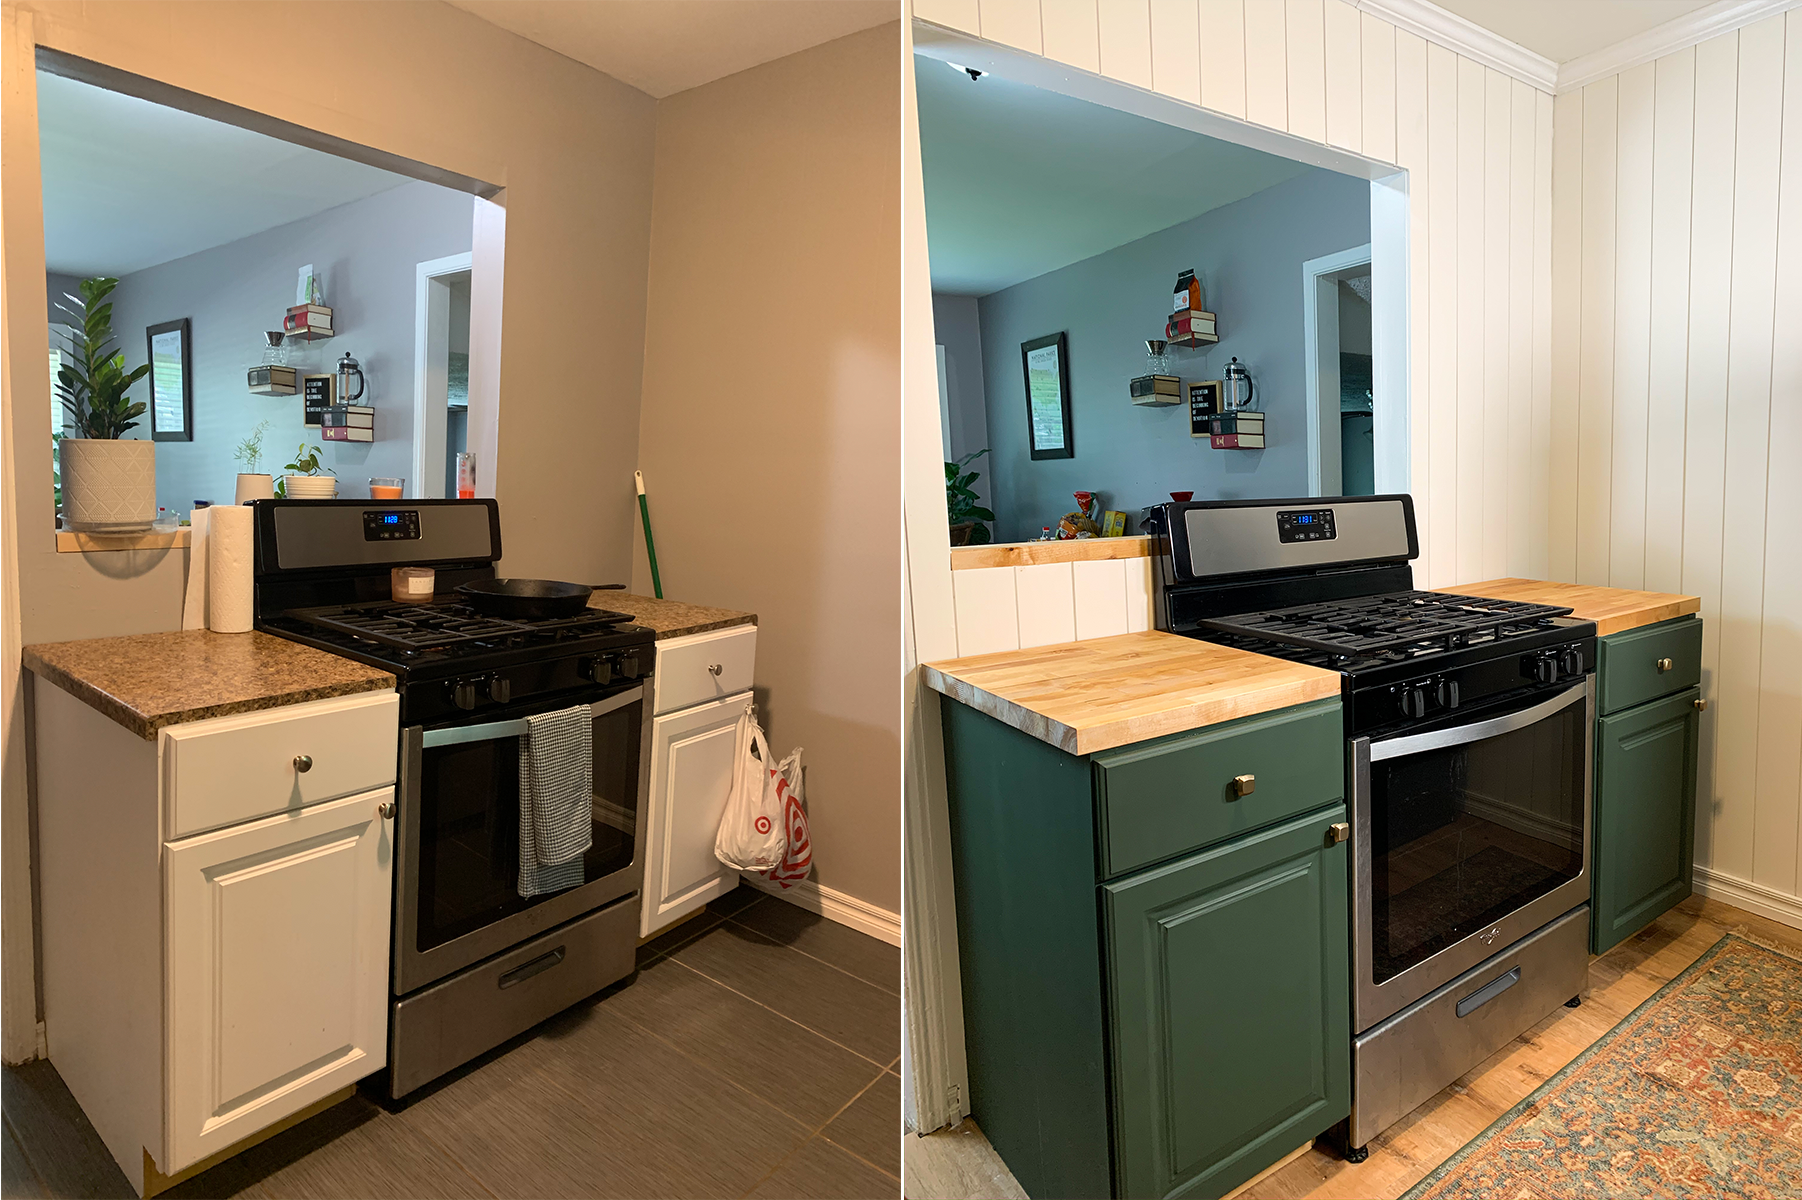
Kitchen Renovation for Essential Worker
"A Kitchen Renovation for someone deserving."
If there was ever a project I was excited for, this is it! I am so excited to finally be sharing the Kitchen Renovation Reveal. If you missed the news, I have been working on a Kitchen Renovation for M'Kaylah Woods, a nurse here in OKC.
"This post is sponsored by The Home Depot."
With all the craziness going on in the world right now, I figured why not give back to someone who gives themselves to people daily, so here we are and it was all made possible by The Home Depot.
The Why?
I was super excited to announce that I would be doing this Kitchen Renovation. I met M'Kaylah through one of my really good friends and they were in need of a new kitchen; so I thought it would be a great idea to give them a brand new kitchen space they would love. Let's take a look at the before.
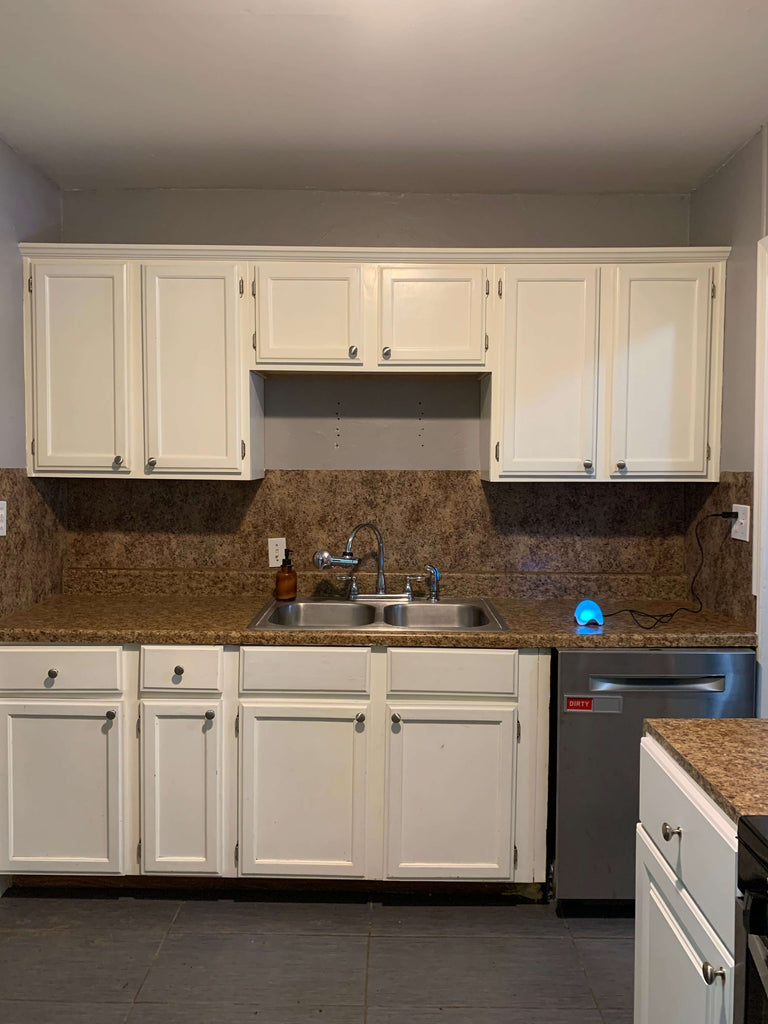
Even with a small budget to work with, I knew I could totally transform this space with a few familiar products from The Home Depot. Luckily, M'Kaylah's kitchen was on the smaller side, so I knew the money could go a little longer. But I was able to totally transform the space with $3200! Crazy right!? If you're wondering how I pulled it off, keep reading on to see just how I tackled M'Kaylahs kitchen.

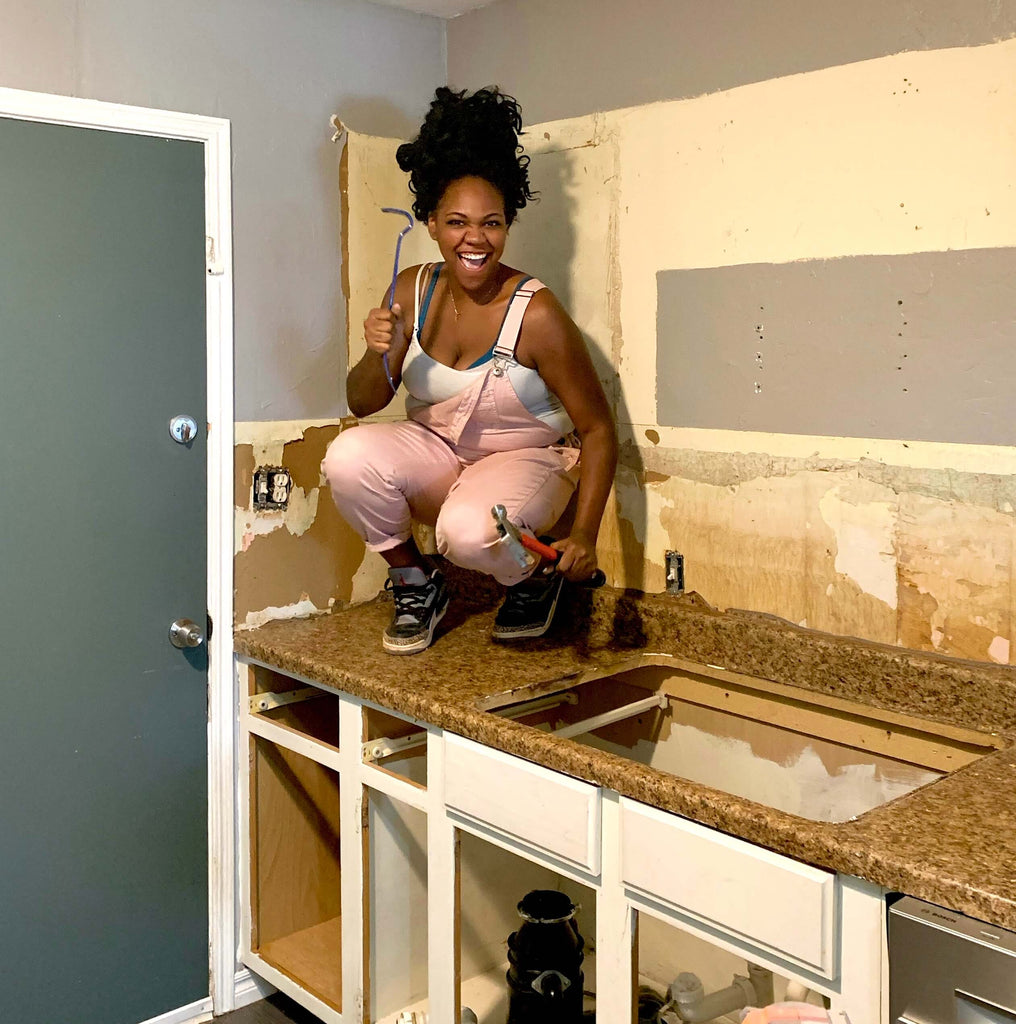
The Demo
Being that this was my first Kitchen Reno, I was super excited about the Demolition. I always see home renovation shows and think "How cool would it be to tear down a kitchen." Well my demo dreams have come to life, because I now have my first Kitchen Demo under my belt and it was just as fun as it imagined.
Here is the order in which I tackled the Demo:
- Taking Down Cabinetry - The cabinets were really simple to take down. All of the cabinets were secured to the wall with four screws. I simply took out the screws with my drill, tugged on the cabinets and they came right down.
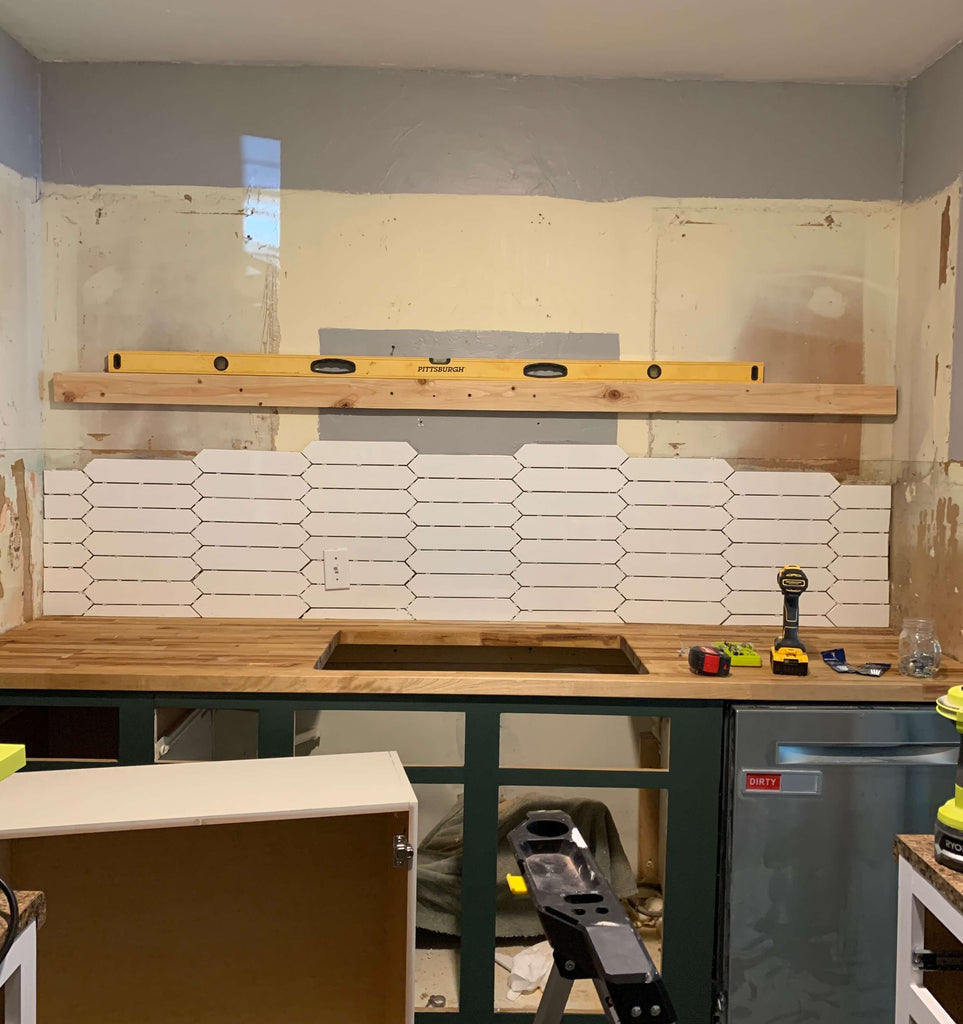
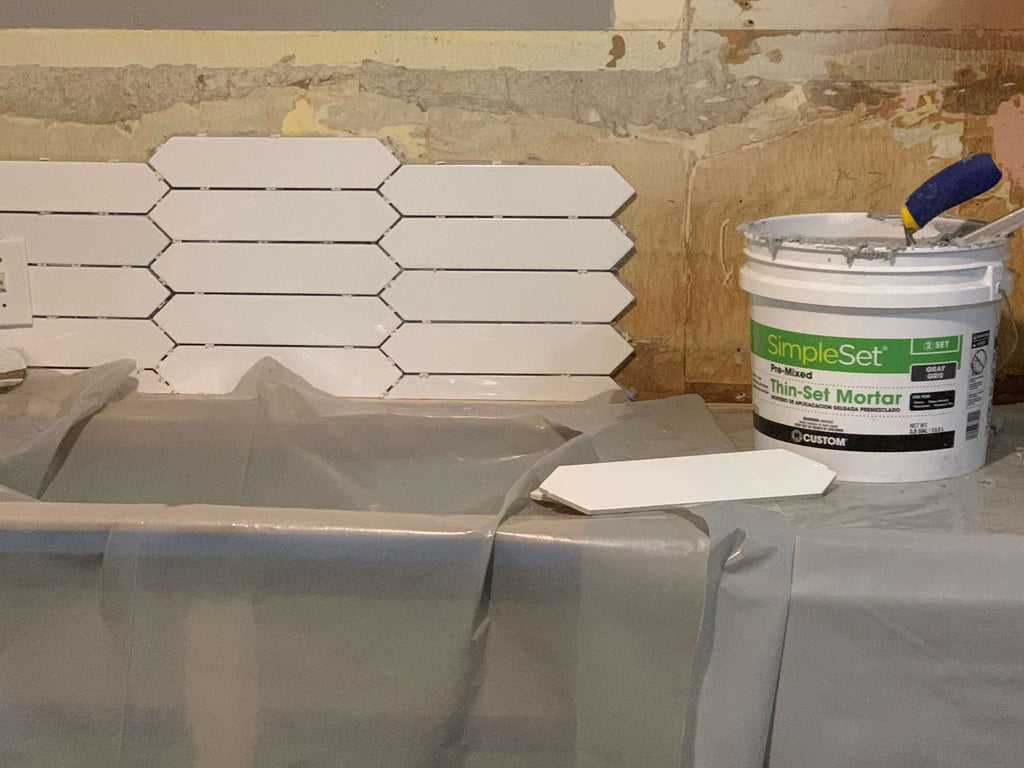
- Removing Backsplash - I removed the backsplash with a hammer and crowbar. Luckily, the backsplash was a thin laminate materiel. It was barely stuck to the wall and came right off.
- Removing the Sink - In order to remove the sink, I first had to disconnect all of the drainage and appliances. First, I had to turn off the water valves, and then I disconnected the drainage tubes for the garbage disposal and dish washer. This was a lot easier than I had originally anticipated. Once the drainage was unhooked, I removed the undermount screws underneath the sink (screws holding the sink in place). Once the screws were off, I took a crowbar and a knife to break the sealant around the sink and tugged on it a bit and it came right out.
- Removing Counter Tops - To remove the countertops, I un-screwed the screws underneath that were holding the countertop to the bottom cabinets and then used my strong girl arms to break it into half. Now that I've demo'd a kitchen I feel like I can do anything. HA!
- Removing Cabinet Doors - After all that hard work, my friend Kim removed the cabinet doors to complete the demolition.
After I completed the demo, the Kitchen looked an absolute mess, but I was excited to continue on and turn a drab space into a fabulous one. Now with the demolition out of the way, it was time to get started with the makeover.
For all of you visual folks, luckily I was able to video the process and cram it into a 15-min video. Check it out and then read on for all of the juicy details.
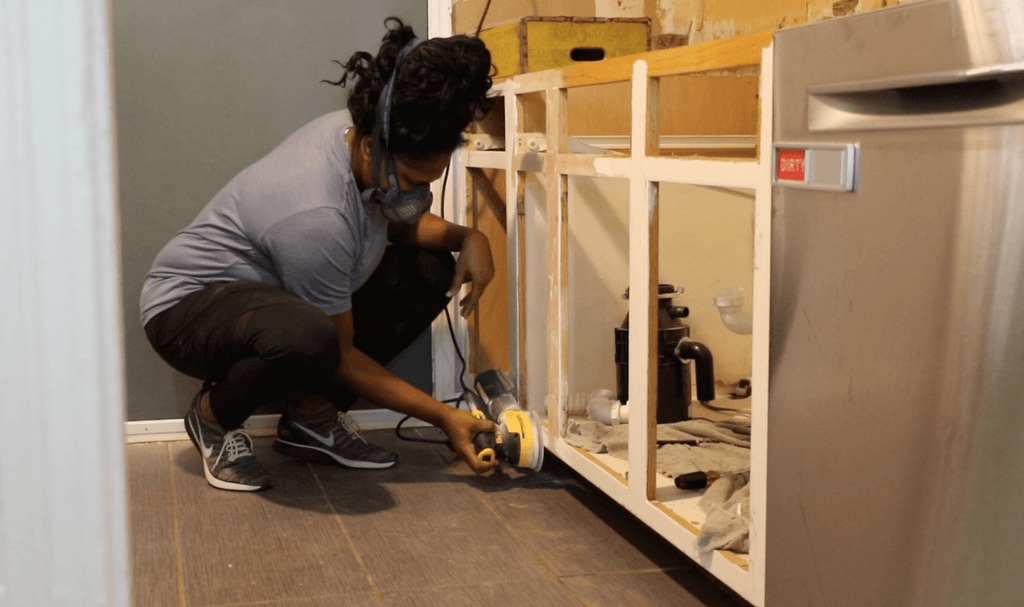
Refinishing the Cabinets
I decided to tackle the bottom cabinets first and work my way up. Being that I was on a budget, I decided to purchase new upper cabinets and just refinish the old existing cabinets. I knew with a little love and elbow grease, I could get the bottom cabinets looking new again. This is how I tackled the cabinet refinish:
- Sanding - First, I sanded the cabinets down with my orbital sander and used 80-grit sandpaper to remove the existing cabinetry paint. Once the paint was removed, I went back around and sanded it with 120-grit sandpaper to smooth it out.
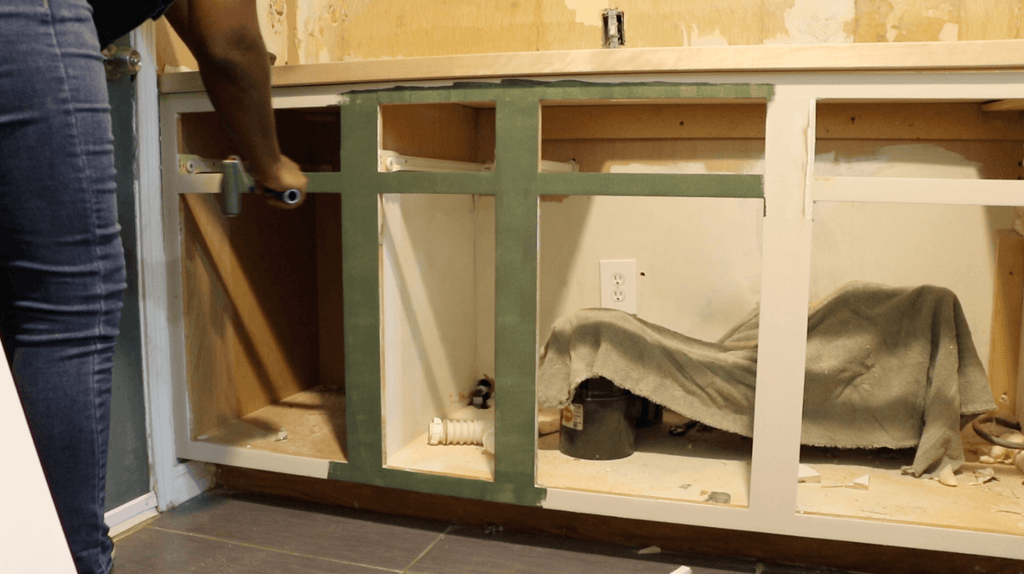
- Prep for Paint - Once the cabinetry was sanded down, I filled all of the holes and imperfections with patch and paint, let that dry and then sanded down the cabinets again to get it nice and smooth.
- Prime the Cabinetry - Once the cabinets were ready for paint, I painted them with a primer, to ensure good coverage. I used a regular paint roller to roll it on. I did around two coats.
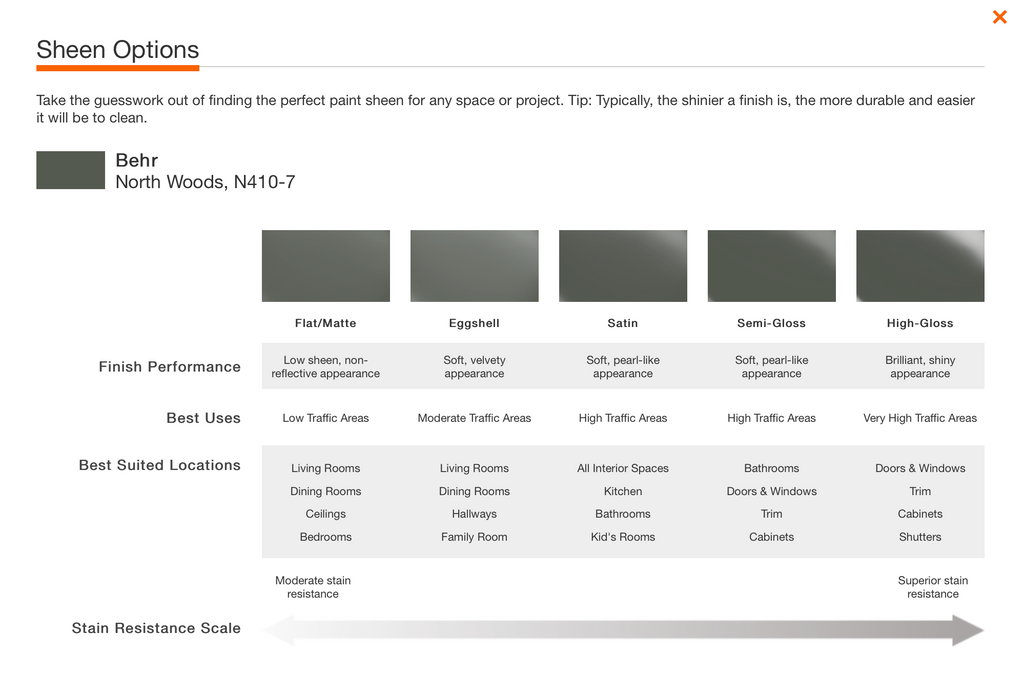
- Painted the Cabinets - After the primer was dry, I went back and painted the bottom cabinets with this amazing Behr Marquee Paint. This time with three coats. I painted the upper cabinets with Behr “Sandy Clay”
It was really easy to pick out the type of paint and sheen. When you go to The Home Depot website and choose a color, they make it easy for you to find the right type and sheen of paint. This really made picking out paint a breeze.
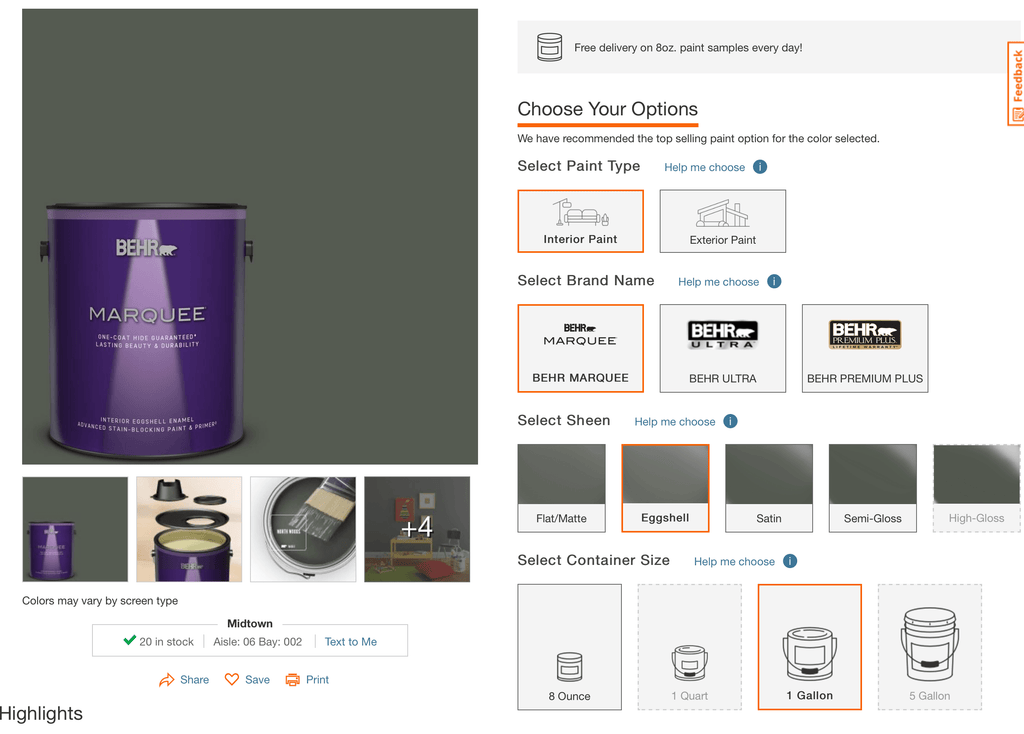
I really love that The Home Depot breaks down each option and what's best for your project on their site. If you are having trouble picking out which paint to use and what sheen you want, The Home Depot has got you covered.
Installing the Butcher Block Countertop
Now with the bottom cabinetry out of the way, it was time to move on to the countertops. I was most excited about this part of the project because I have always loved the butcher block look and have been wanting to try it out.
I was so surprised to find this butcher block just hanging out in The Home Depot aisles, normally you would think this is the type of materiel you can only get online but I was happy to find it right at my local Home Depot. Now let's get into how I tackled the countertop.

- Cut to Size - The first thing I did was cut the end off of my butcher block to make sure it would fit in the kitchen spaces. To cut the butcher block down I used my track saw and man was I never happier to have gotten that tool. This was the perfect tool for this counter job. The saw cut through it like butter and the track helped make sure everything was nice and even.
- Secure in Place- Once the butcher block was cut to size, we placed it in it's appropriate space and secured it down by drilling 2 1/2" wood screws from underneath the cabinet up into the butcher block to secure it down into place. I decided to use screws with a star head because they are a lot harder to strip and its easy to strip screws on a step like this. If you don't hold the drill evenly, it can be harder to try and drill those screws in.
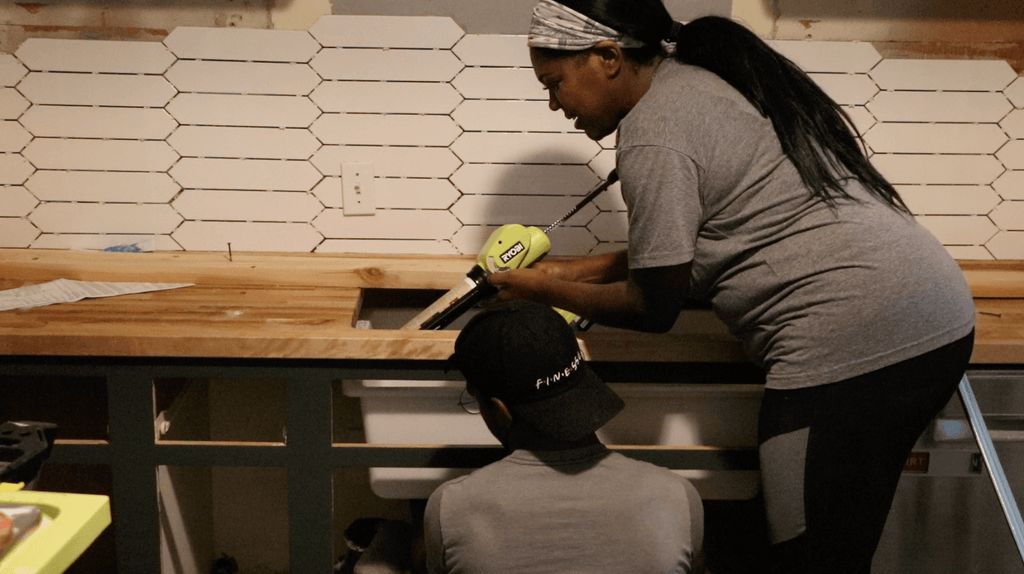
- Cutting the Sink Hole - This step probably gave me the most anxiety because I knew if we messed this up, the whole piece would basically be ruined. So to eliminate the guess work, I first made a sink hole template to make sure I cut the hole exactly where it needed to be.
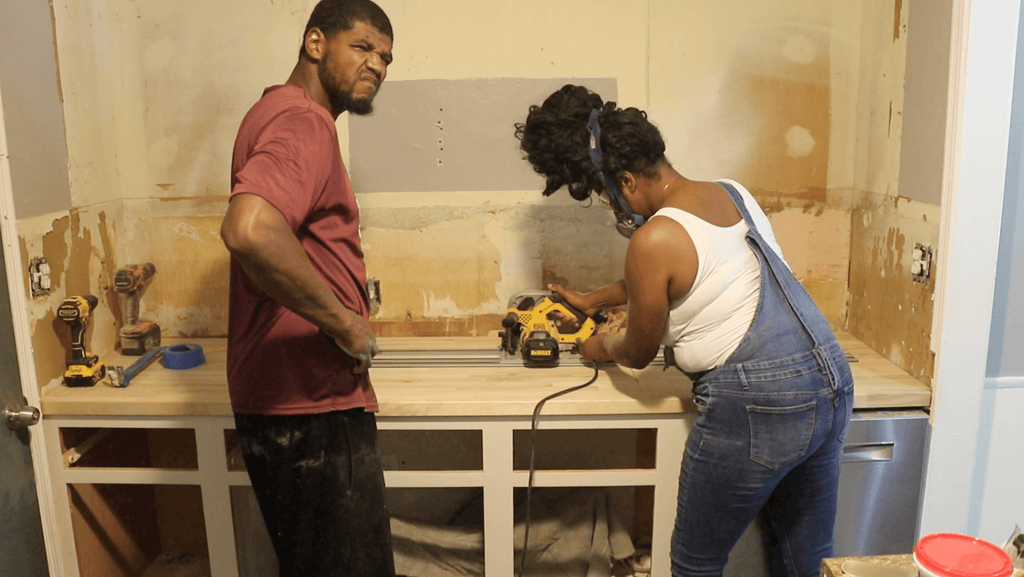 After creating the template, I traced the hole line on the countertop and then begin making four plunge cuts in the counter top with my track saw. I did not go all the way around the corners with my track saw, I left just enough space to go back around with my jigsaw to curve the corners. P.S Someone get my brother a mask!
4. Sealing the Countertops - This was one of the most popular questions on my Instagram. How are you sealing the counter tops. First, I went and filled the little small holes in the butcher block with epoxy. This was my first time trying this particular epoxy and it worked fairly well, but I may try another product next time just to see the differences.
After that dried, I sanded the butcher block down. First with 120-grit and then 220-grit sandpaper to get it nice and smooth.
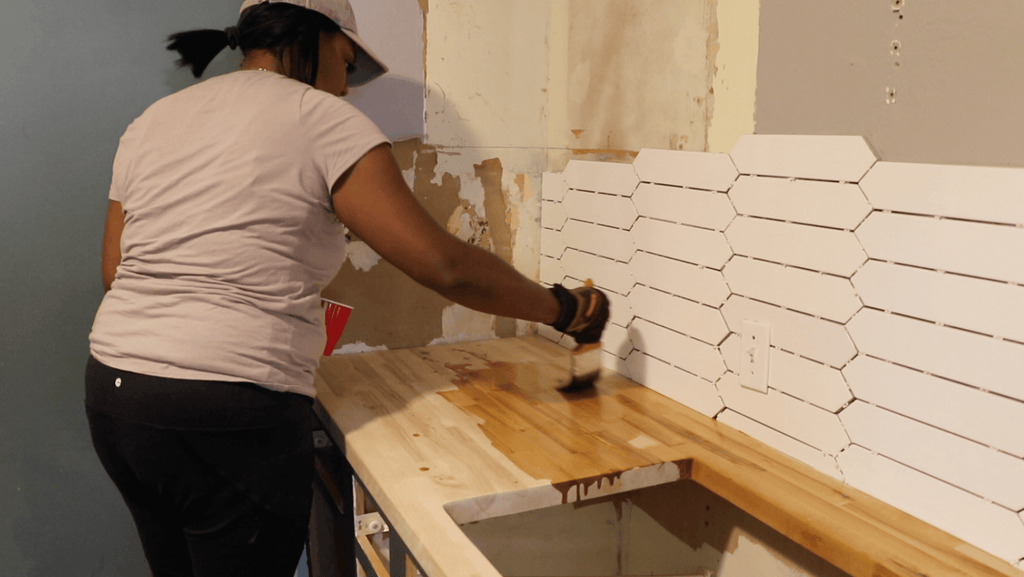 Then to seal it, I applied tung oil to the surface using a bristle brush. I put on three coats to make sure the butcher block was fully saturated, with a light sanding in between each coat. I just love how the tung oil makes the butcher block stand out. With butcher block, there is some follow on maintenance, being that its wood, but a fresh coat of tung oil is always an easy step to tackle when needed.
Upper Kitchen Cabinets
Even though I had a pretty tight budget, I knew I wanted to splurge on some new cabinets for the upper cabinets because the older cabinets weren't salvageable. So I ordered two sets of frameless unfinished cabinets through The Home Depot Delivery Service. Luckily, they were amongst the many items eligible for free delivery and were delivered right to my door step. I was able to un-package them and get right to work. Now let's get into the details.
- Painting the Upper Cabinets - I painted the upper cabinets with a cream color and painted the cabinets using my paint sprayer. If you are debating whether to refinish your kitchen cabinets, I would highly suggest using a paint sprayer. It makes the paint go on evenly and saves a bunch of time. I used my Home Right Sprayer and I absolutely love this sprayer, its the best one I've tried for the price. These cabinets really took the paint well and were super easy to work with.
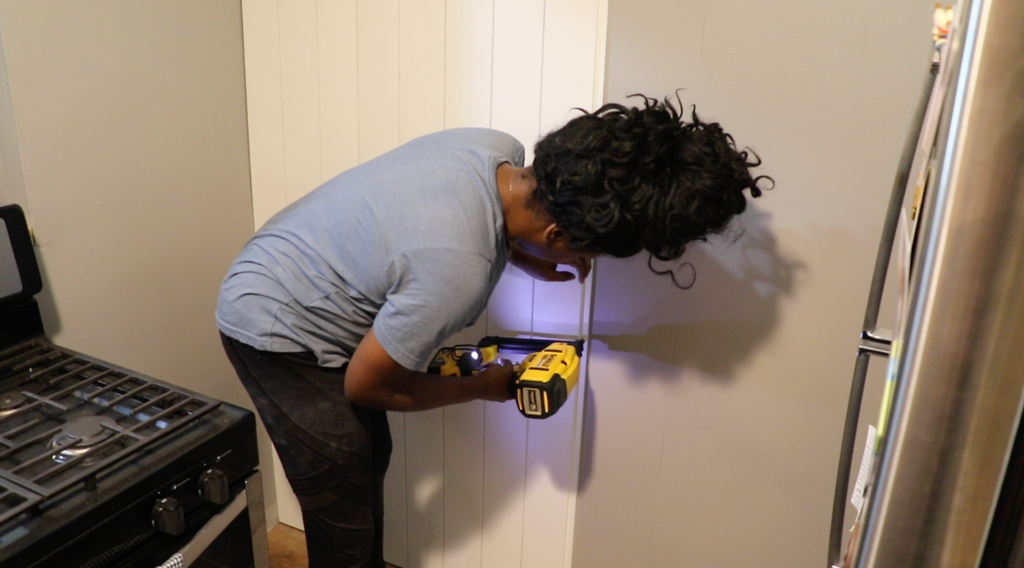
- Hanging the 2x4 - Now if you are someone who has been wondering if you can hang kitchen cabinets, this is a step you definitely down want to miss. So the first thing I did was find all of the studs with a stud finder to hang the cabinets. Once I found the studs, I screwed in a 2x4 into the wall and used my level to make sure the 2x4 was level. You don't want to skip this step because this 2x4 is what helps hold the cabinets into place and keeps it level while screwing the cabinets to the wall.
 Once the 2x4 was secure, I placed the cabinet on top and screwed the cabinets into the wall using wood screws, these were the suggested screws that came listed with the cabinets instructions. The cabinets looked so good on the wall and I knew early on that I wanted to lift the cabinets up to make the room feel larger. What I didn't anticipate was how it would look raised.
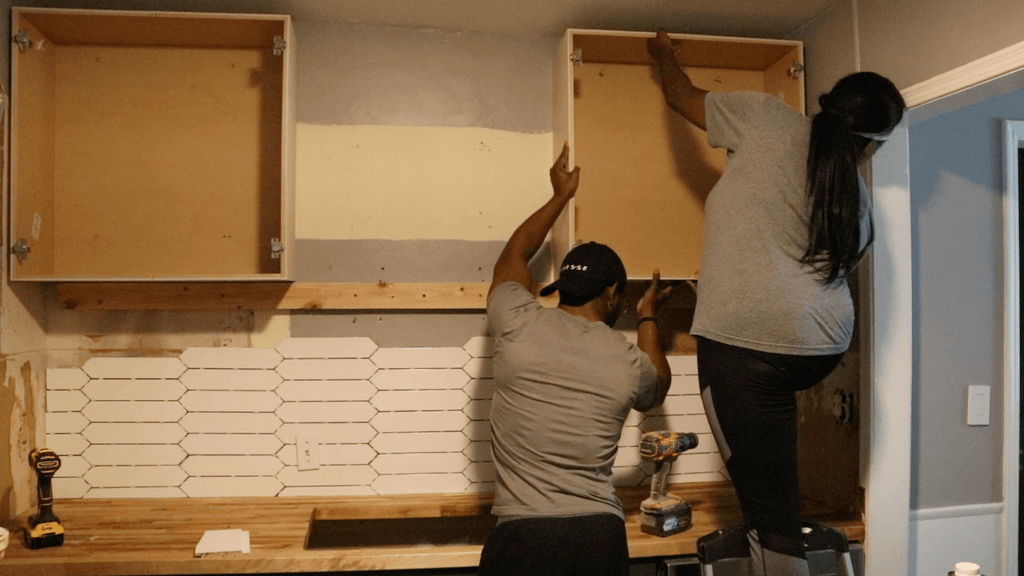 When I saw the raised cabinets, I loved the height of them, but I knew that it didn't look proportionate, so I had to do some quick on the job troubleshooting. I quickly decided to add some little fun open storage cubbies and I am so glad I did. They look like they are a part of the existing cabinets and it created more storage for the Woods. Yay for thinking on your feet.
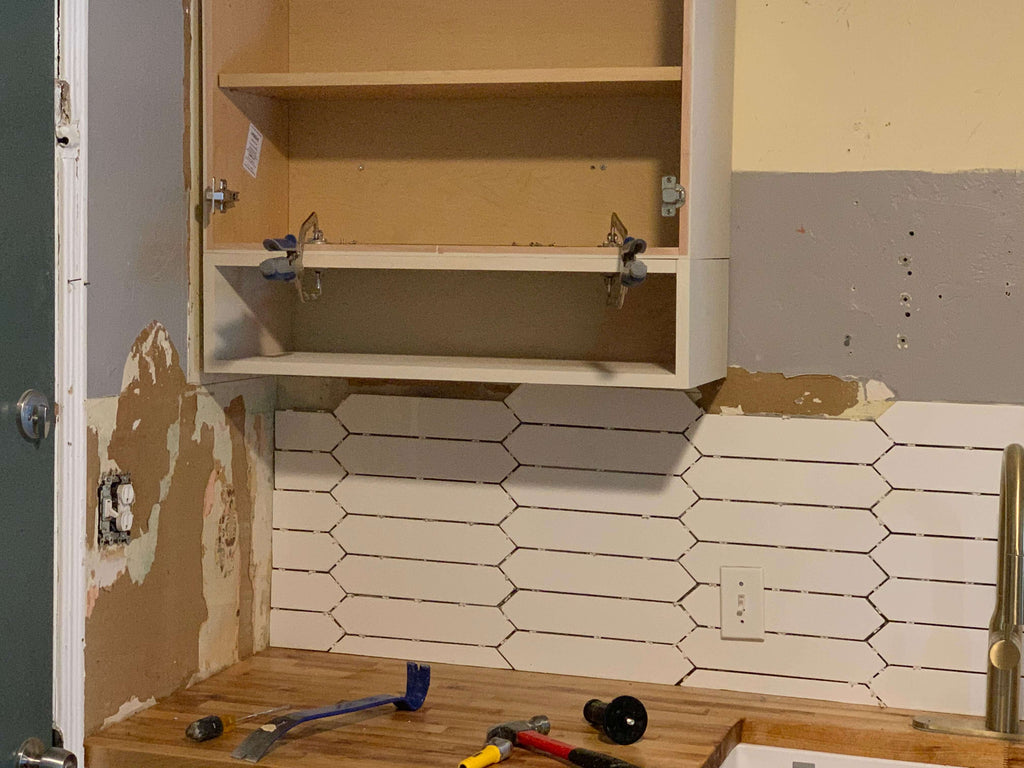 I built them using select pine wood, which is a better grade than regular pine, because I wanted them to look really sleek.
I added the little cubbies by using my right angle attachment to screw them directly into the upper cabinets while clamped into place.
Installing the Sink/ Faucet
Originally the Woods had a regular double stainless steel sink but I decided to splurge on this huge Blanco Sink. I was able to get it delivered right to my door step and a fun service I learned that The Home Depot has is the "free delivery & haul away on appliance purchases $396 or more", where they will haul away your old appliances for you. Technically a sink doesn't count but if you have a kitchen renovation in mind and you're worried about where those old appliances will go, The Home Depot has got you covered.
This sink really changed the whole look of the kitchen and I absolutely love how it coupled with the butcher block counter tops. Unfortunately, because of the way the counter was shaped, we had a little bit of a hard time getting the sink in, only because it was an uncomfortable position to put it in there, but with the help of my friend Michael, we were able to get it into place.
- Set up Clamp - The first thing I did was get my clamp ready to go. I set a long 2x4 on top of the sink so I could clamp the sink into place. You want to have this ready to go, so when it's time to clamp it into place, you can do so quickly.
- Add Sealant to Sink - In order to hold the sink into place you want to make sure to add a silicon sealant to the top first. While my friend held the sink down, I used my battery powered caulk gun to apply the sealant to the top of the sink. Once the sealant was added, we lined up the sink with the sink hole and pushed it onto the countertop and I clamped it into place. I let the clamp sit for 24 hours so the sealant could fully cure.
- Add Undercount Sink Clips - Once the sealant had dried, I went back around and added undermount sink clips underneath the sink to make sure the sink was securely in place.
- Add Quick Lock Mount - This step was one of those figure it out during the process steps. Because I removed the old sink I hadn't realized that the lock mount for the garbage disposal was attached to the old sink. So I got a new quick lock mount for the garbage disposal and installed it into the new sink and placed some plumbers putty around it to make sure it was sealed and secure.
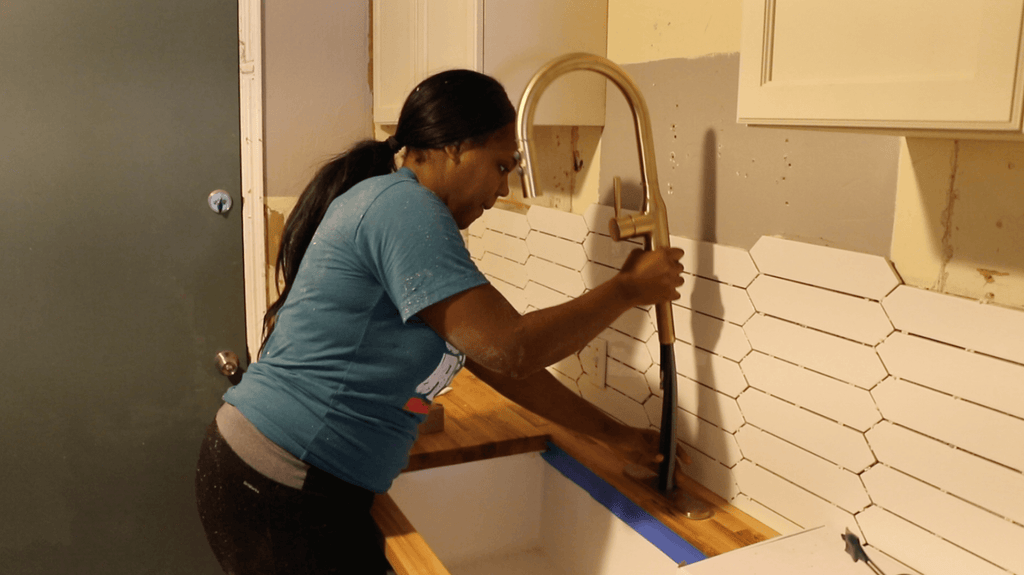
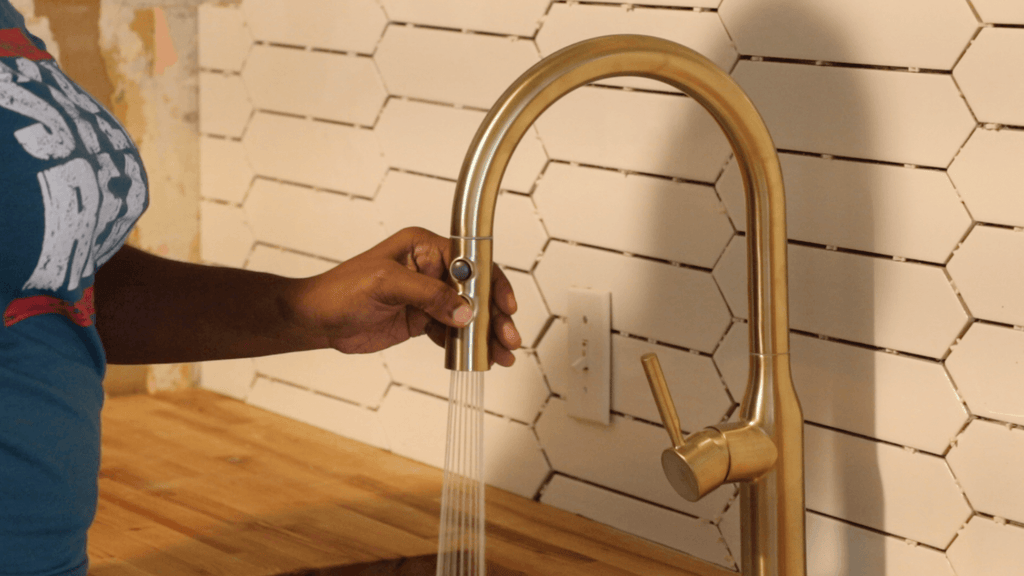
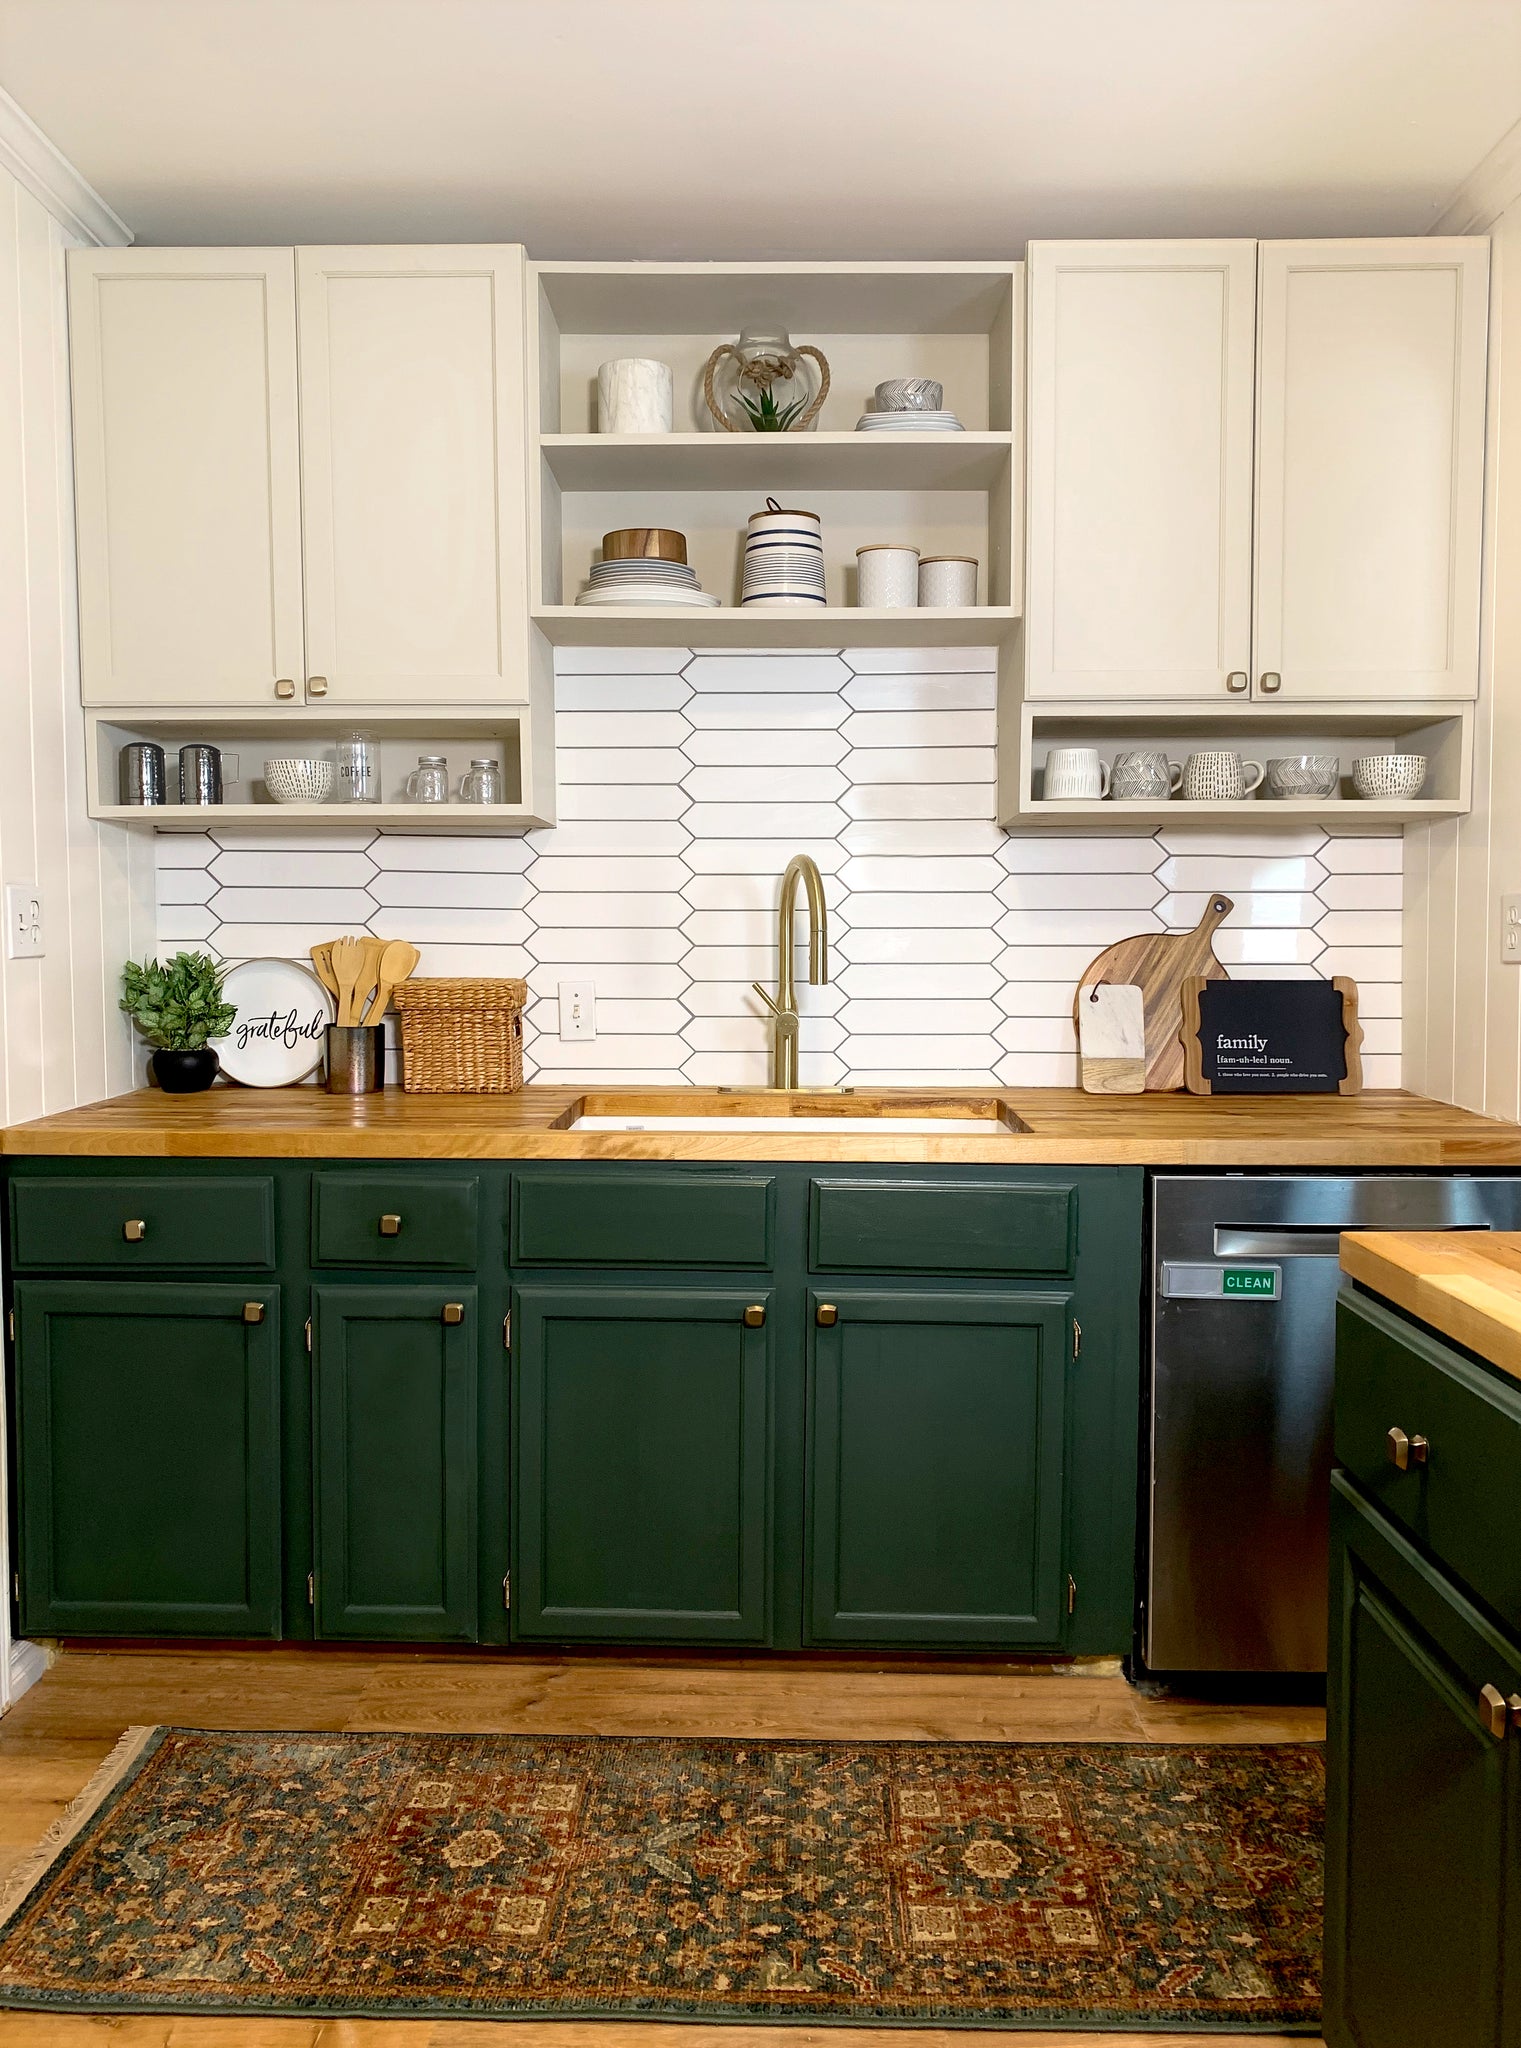
 Once the sink was in place, I begin to add the faucet. Like the sink, I decided to splurge on a nice gold faucet to match the new Blanco sink and I definitely don't regret my decision.
Installing the Faucet
This kitchen faucet was the perfect combo for this kitchen and the pictures definitely don't do it justice. First, I had to drill three holes for the kitchen faucet. The directions for the faucet were pretty straight forward and I just followed them to install the faucet.
 Once the faucet was installed, I hooked up the sink and garbage disposal and all of the drainage pipes underneath and turned on the water to test out the new faucet. Turning on the sink was one of those moment were you realize "wow! I really just installed a sink." There were a lot of firsts in this project and I was super proud of myself all throughout this reno.
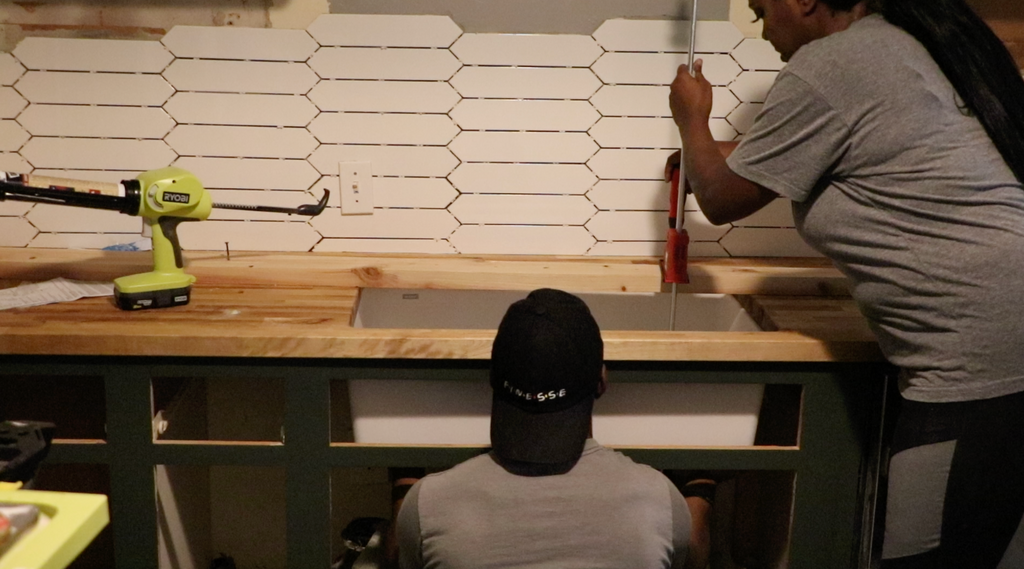
Installing and Grouting Tile
Now on to the tile and grouting. I was super anxious to try this portion of the project out because I've never actually tiled before. My brick wall is the closest I've come to it, so I was super excited to learn and be able to experience actually doing it for the first time. Now I must rave about this amazing tile.
I really like that it has that subway feel but with a modern twist. I used one and a half cases for this particular project but if you need some help figuring out just how much tile you need, Home Depot has you covered with their tile project calculator.
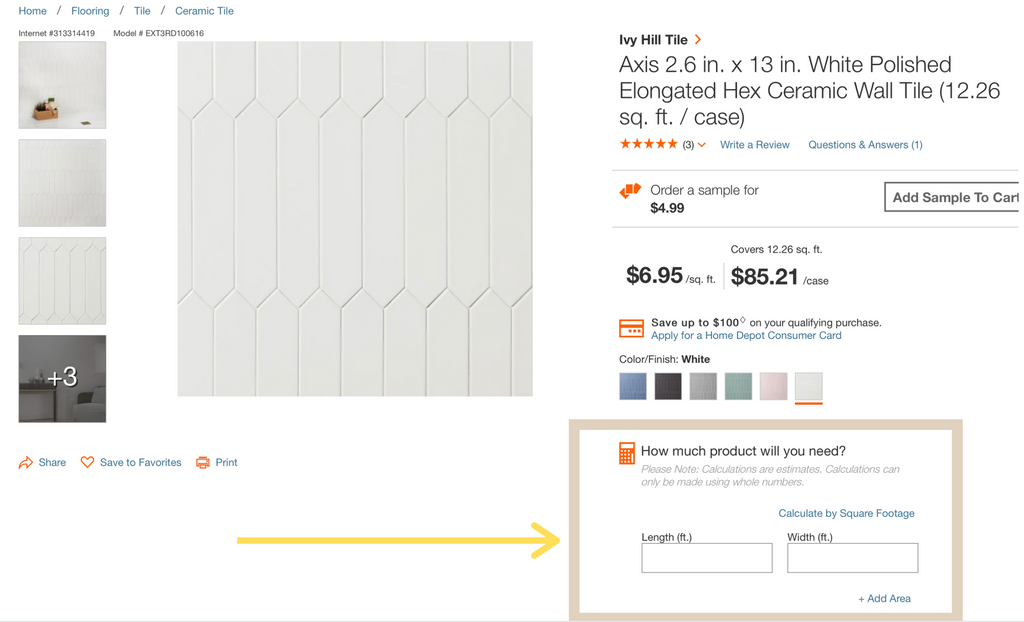
Luckily, once I had chosen the tile I wanted. The tile calculator was embedded right there in the product page. If you are worried about how much tile you will need, The Home Depot's tile calculator will eliminate all of the guesswork.
Tilling
Instead of spreading the mortar on the wall first like you'd normally see, I decided to just back butter the tile one by one with my trowel. My reasons for this was because it was my first time and I felt it would be easier to manage the tile that way and also, I knew that I would be splitting the tiling into two sessions because I was waiting on the cabinets to arrive. This way worked out for me but I'm excited to try it the other way next time.
I opted not to replace the existing drywall because the laminate backsplash didn't mess it up too much and we were on a tight budget, I think each reno is different and you just have to kind of play it by ear, but for this particular project I just decided to go ahead and put the new tile on the existing drywall and it worked out fine.
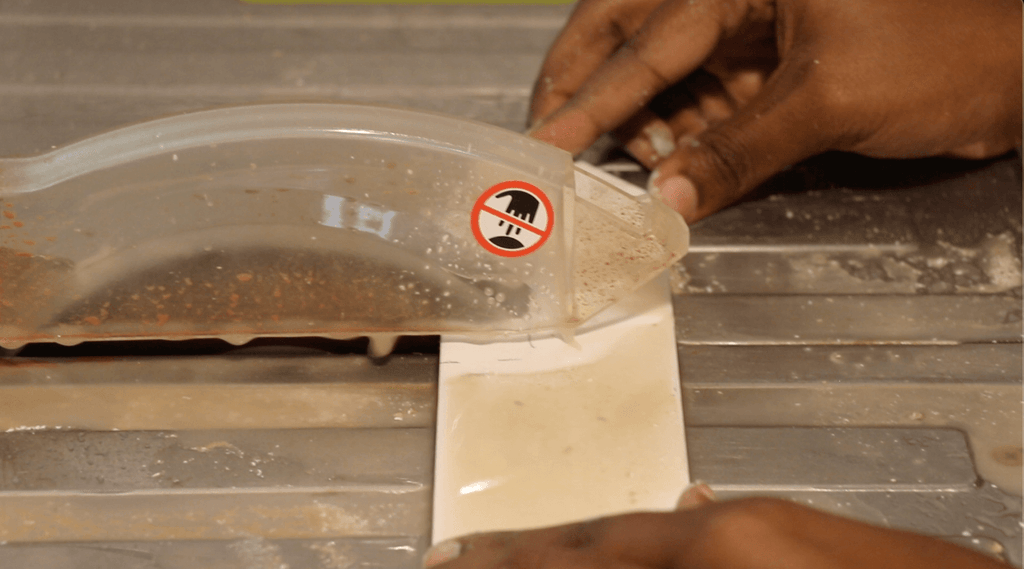 I used spacers in between the tiles to ensure I had the correct spacing all the way around and utilized my tile saw to cut the tiles on the ends and top. After I laid the tile, I let it sit for 48 hours and then removed the spacers to prep for grouting.
Grouting
For the grouting portion, I decided to go with a pre-mixed grout to make the process easier. I went with a grey color to bring out those white tiles and it matched perfectly.
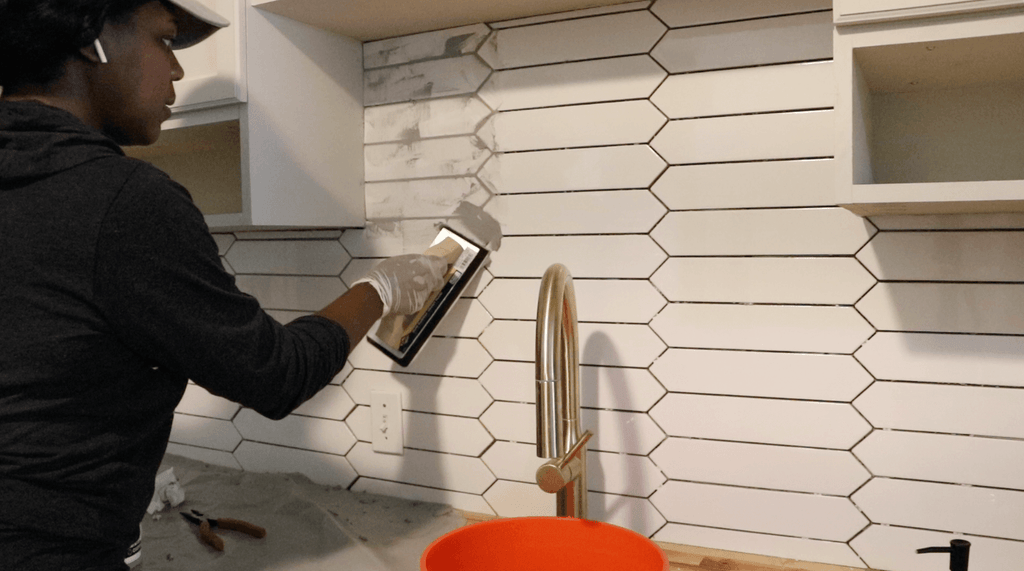 I first started by using my float to push grout into the tile in small sections. You want to make sure you do small sections because the grout will dry fast and its hard to get the grout off the tile once its dry. After doing a small section, I would take my sponge and clean off the excess grout and then use a damp rag to wipe it completely clean and continue the same steps all along the wall.
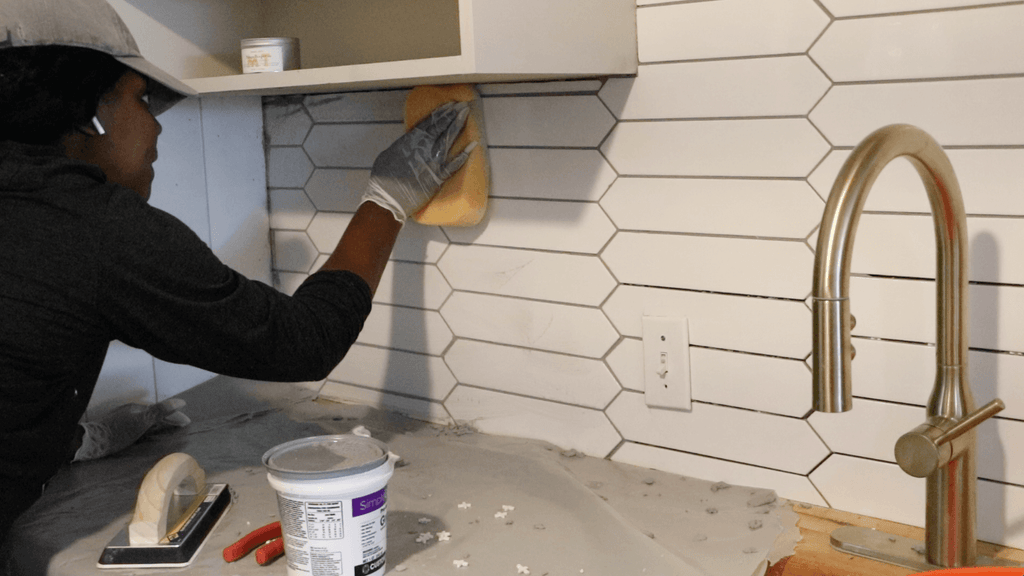 This process was fairly easy, just a little time consuming with the cleanup. Two people would definitely come in handy here. To my surprise, this only took one quart of grout to complete.
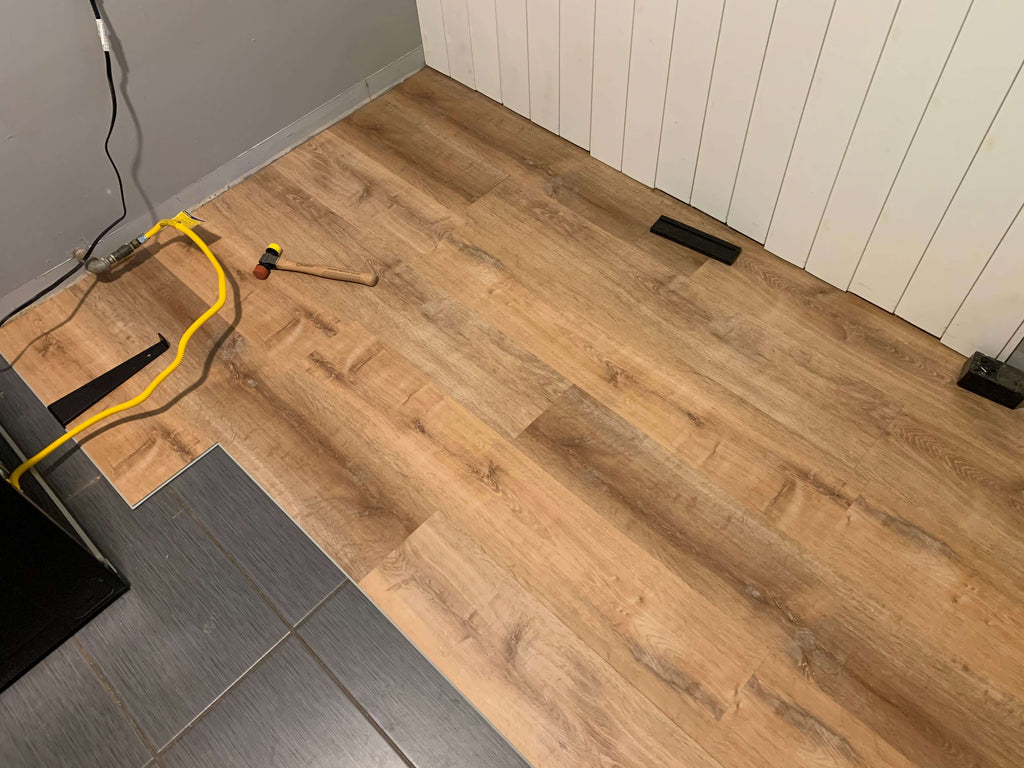
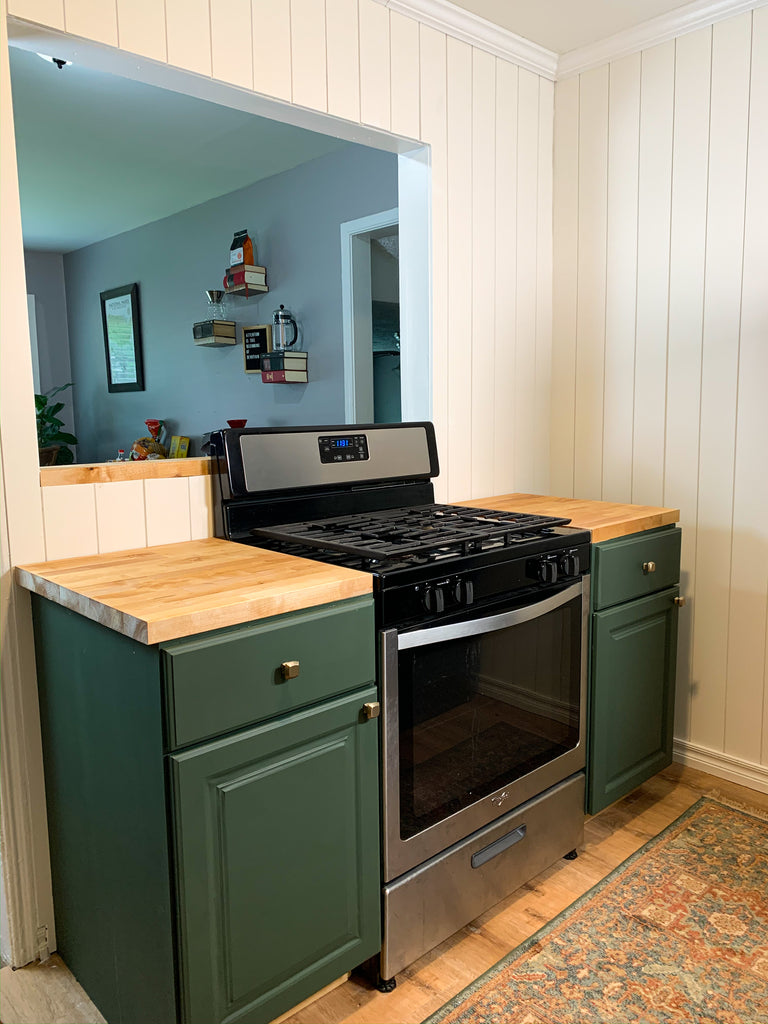
Installing the Flooring
Now on to the flooring. The old kitchen had a darker tile but I wanted to add some flooring that would brighten up the space a little bit. Knowing the budget, I knew that this Lifeproof flooring would be the perfect addition to the new kitchen.
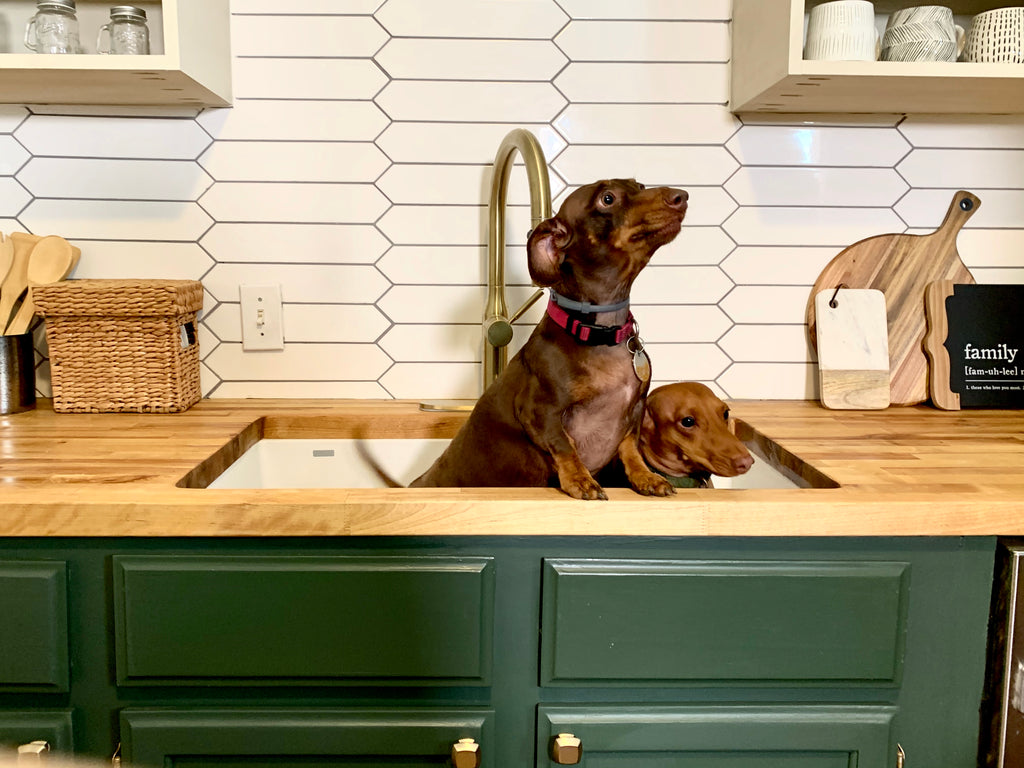
 I put this flooring in my laundry room a few years back and absolutely love it. Its also supposed to be pet friendly, which was perfect for this project being that the Woods have two little dogs.
The thing I love the most about this flooring is that it can go right over your existing tile and doesn't take long to install. With the help of this flooring kit, I was able to install this floor in less than an hour. Crazy right!? I cut the flooring down with my miter saw and just placed it right over the existing floor and man does it look good. Just don't forget to wear those knee pads!
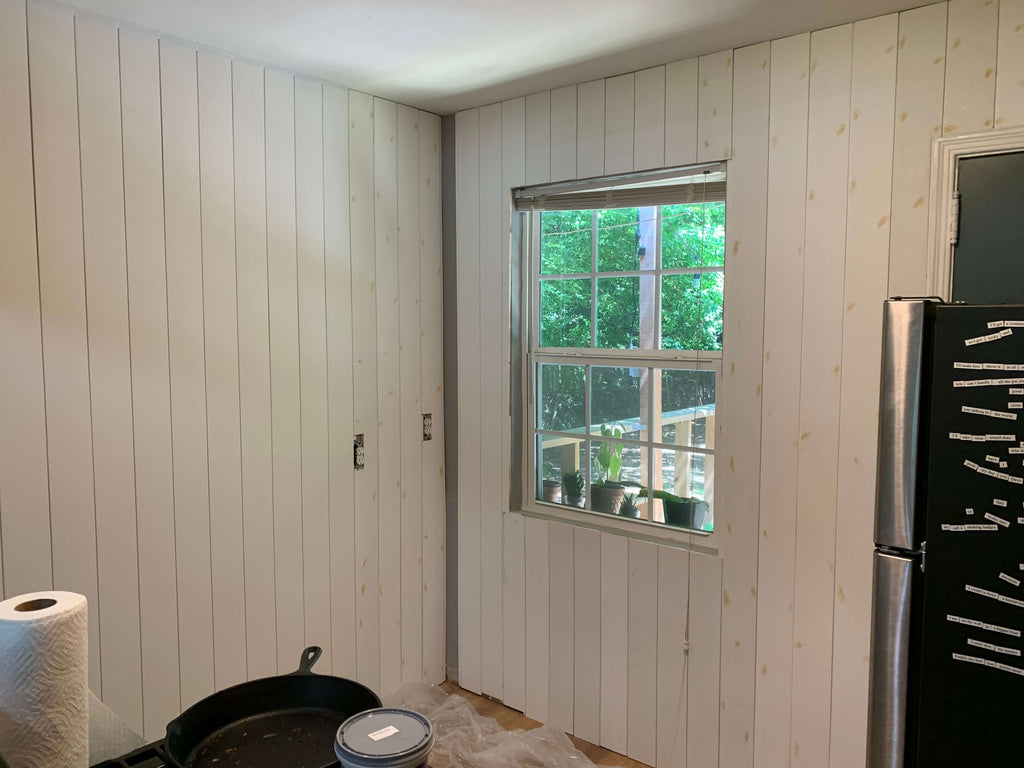
Installing the Shiplap
Being that the Woods house was older, the walls really weren't as appealing as I would like, so I decided to add shiplap all across the walls. I knew this would be a little pricey, but worth it in the end.
 I opted to go with a ready made shiplap to speed up the process and it was really great to work with. I ended up using nine boxes for the whole kitchen. I secured the boards to the wall using my brad nailer and went back and filled the holes with wood filler. This shiplap also made the kitchen feel much bigger.
Once all the holes were filled, I went back and painted the shiplap with a muted white.
Finishing Touches
Once everything was all in place, I went back around and adding gold knobs to all of the door handles.
Budget Breakdown
| Backsplash Tile | $200 |
| Frameless Cabinets | $250 |
| Shiplap | $600 |
| Kitchen Faucet/ Sink Drain | $200 |
| Blanco Sink | $343 |
| Paint | $150 |
| Sink Undermount Clamps | $21 |
| Butcher Block Counter Tops | $330 |
| Hardware | $70 |
| Cabinet Cubbies/Middle Cabinet/ Trim | $258 |
| Lifeproof Flooring/Tools | $350 |
| Tiling Tools/Grout/Mortar | $120 |
| Miscellaneous (Paint Tools, Varnish, Caulk, Filler, Sandpaper, screws, plastic, adhesive, etc.) | $300 |
| Total | $3200 |
The Final Reveal
Now let's get to the moment you all have been waiting for, The FINAL Reveal. I think I surprised myself with this project, because I couldn't have imagined this project turning out any better.
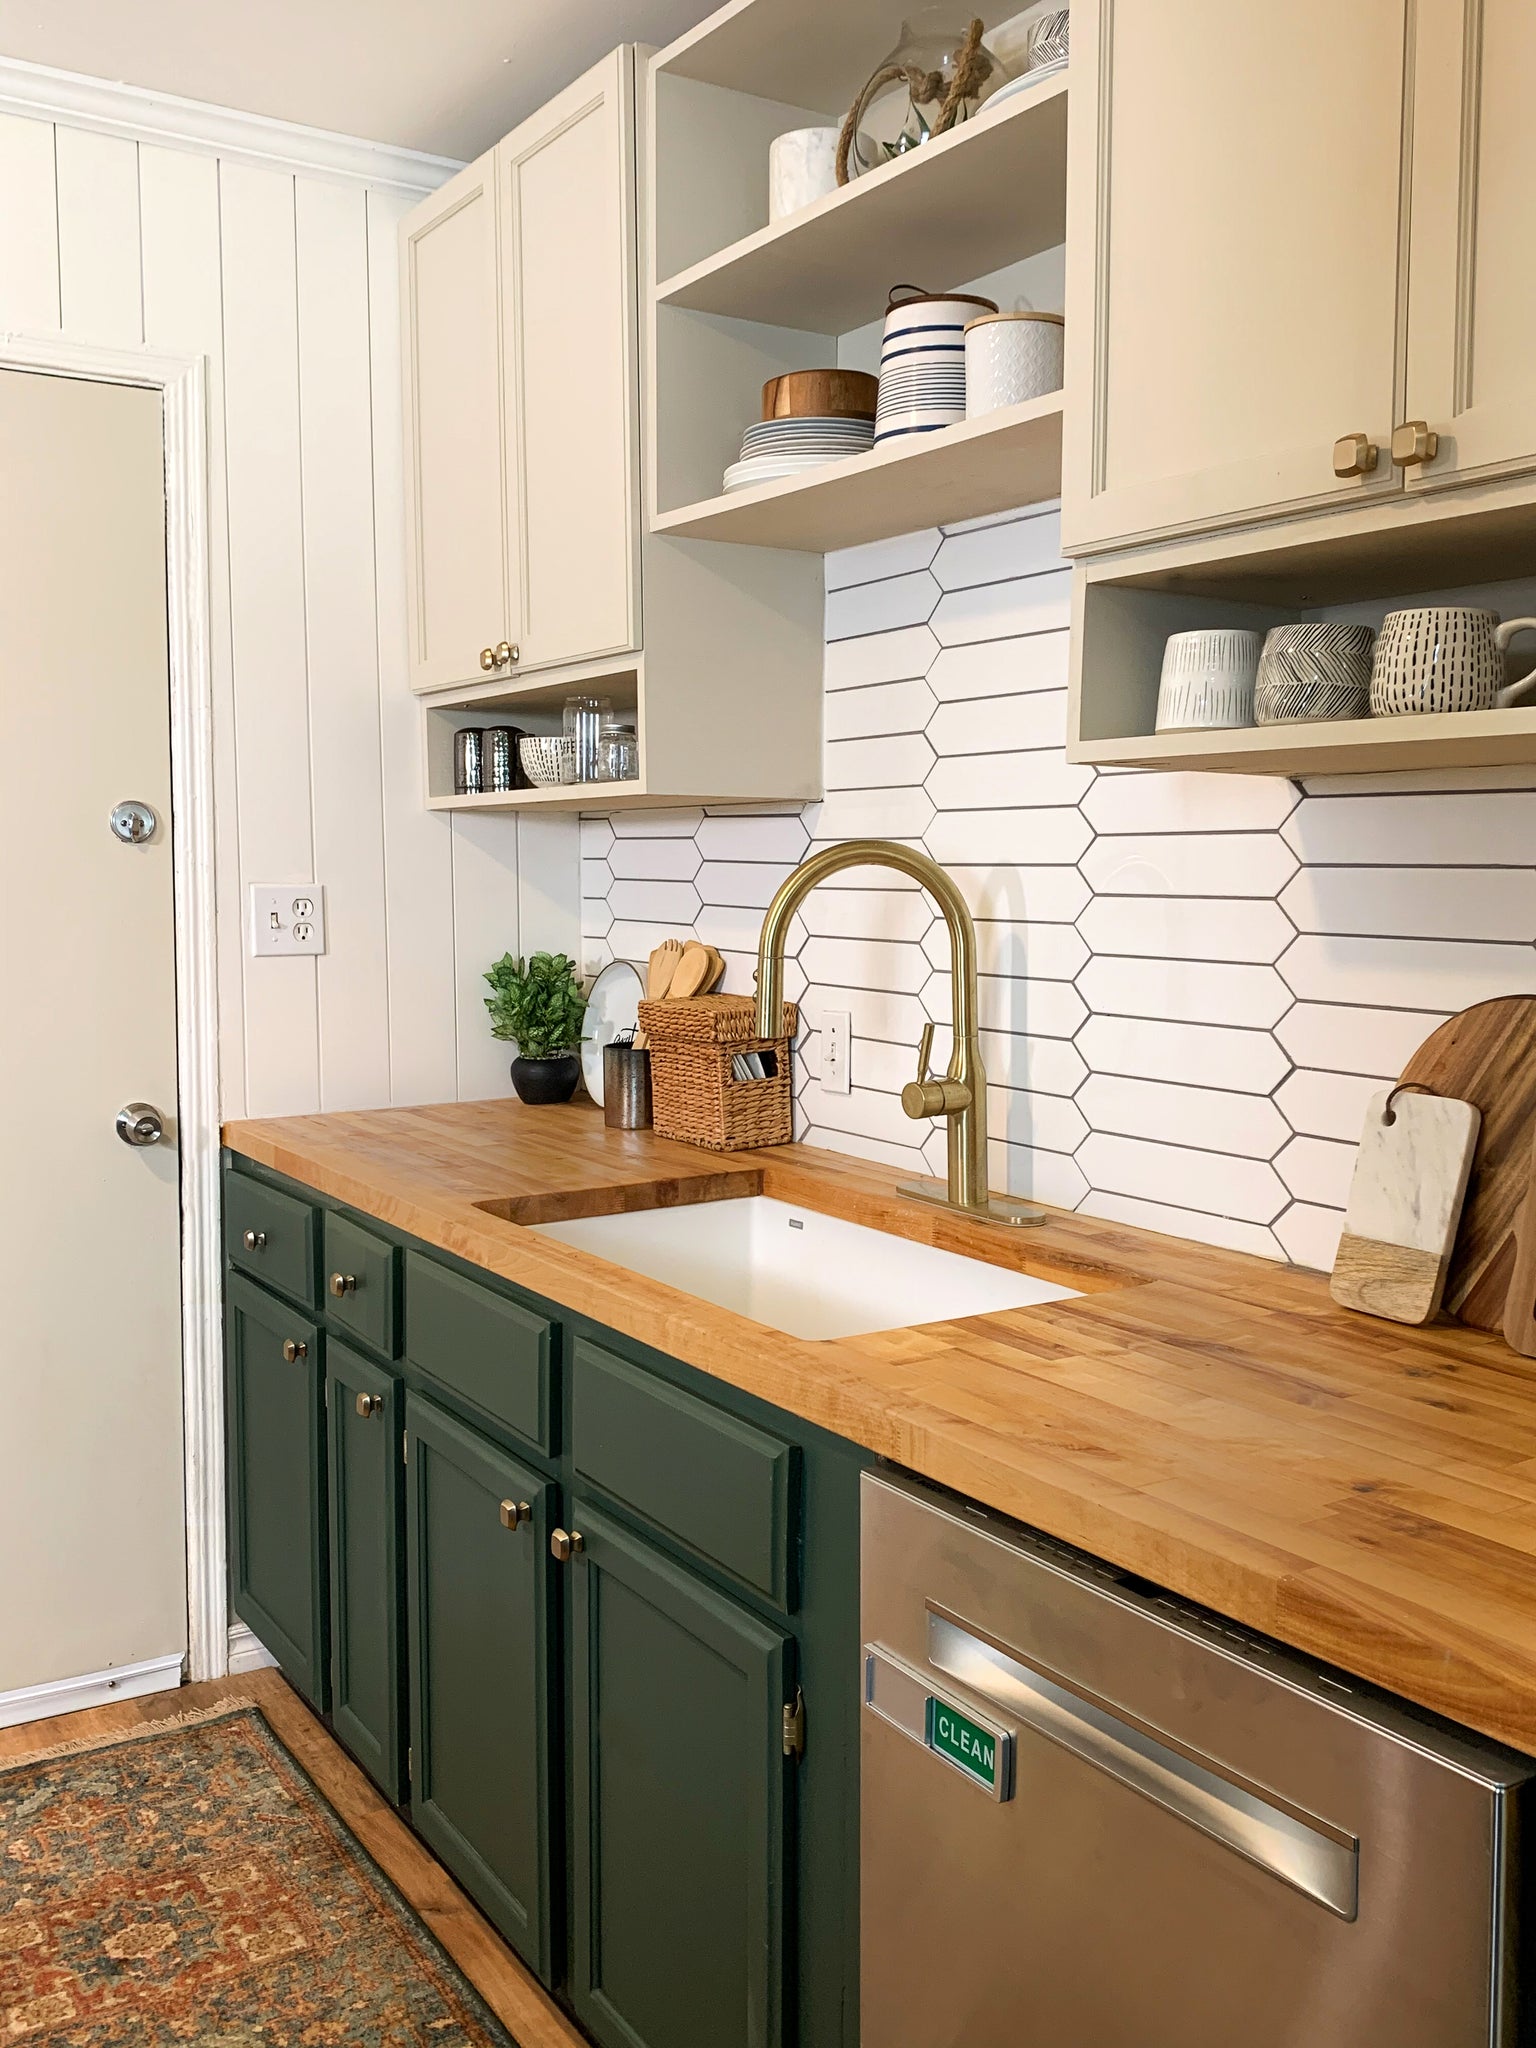 I'm simply amazed with how I was able to completely transform this kitchen with $3200, and I hope you guys love it just as much as I do.
 All of the materials tied in so nicely and it really made it look like a brand new space. I'm so glad with the design choices I made.
 I was super happy to get the approval from Chewy and Major, they absolutely love their new sink. If they are happy then I think my job here is complete.
and who doesn't love a few good before and after photos?
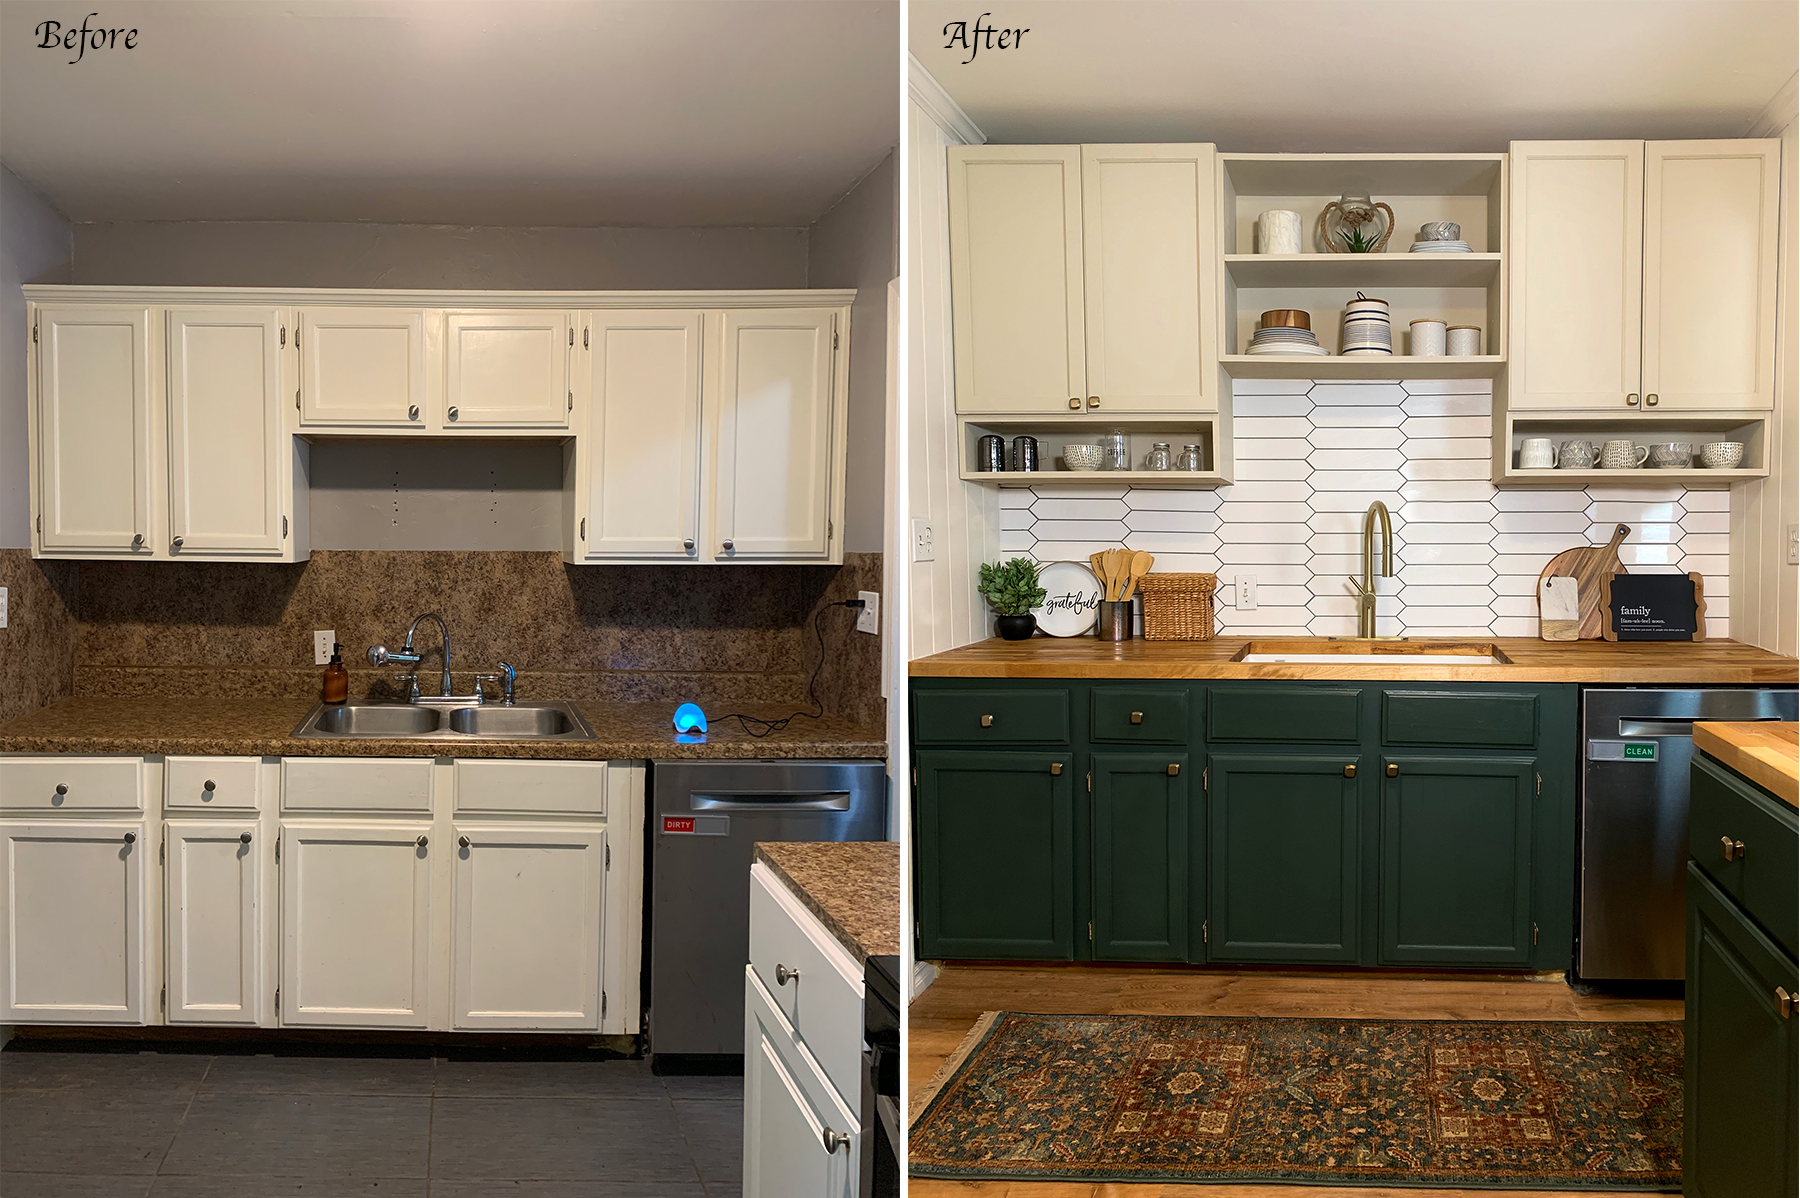 Seeing the two pictures side by side really makes you realize just how much the kitchen changed with the small changes.
If you are a little scared to tackle your kitchen Reno, this is proof that it can be done. This was my first kitchen renovation project and I think I knocked it out of the park.
 Welp, that wraps up the Kitchen Renovation, I hope you guys enjoyed this project just as much as I did and as always, thanks for stopping by guys, XOXO Ashley.

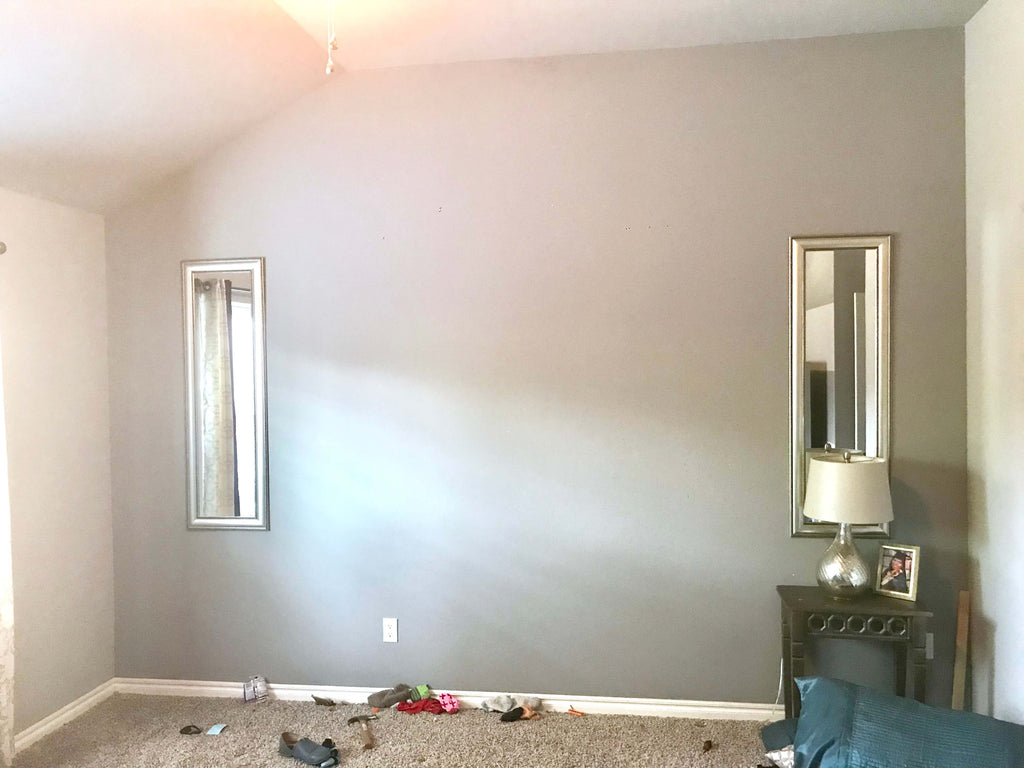
Master Bedroom Makeover
"A Master Bedroom refresh that will make you take a second look."

"There are some affiliate links in this post, meaning I get a small commission if you purchase through these links, at no cost to you. Click Here to read my full disclosure."
The Room Design
So, let's dive right in. First I planned out the style for my living room; I wanted it to be a little mix of rustic, industrial and glam. Sounds crazy right? But I knew it would all come together. Here is my room mood board with my initial plan.

Once I got the design on paper, it really started to come together in my head. Let's look at the before. My room was super plain Jane. I hadn't really done much since to my master bedroom since buying my house, so I was excited to tackle it.
Now that we've got that out of the way, let's jump into the creative process.
The Accent Wall
One of the main things I knew I needed to elevate my bedroom was a grand accent wall; and it doesn't get any grander than laying hundreds of bricks. I knew these bricks would bring the rustic and industrial feel I was looking for.
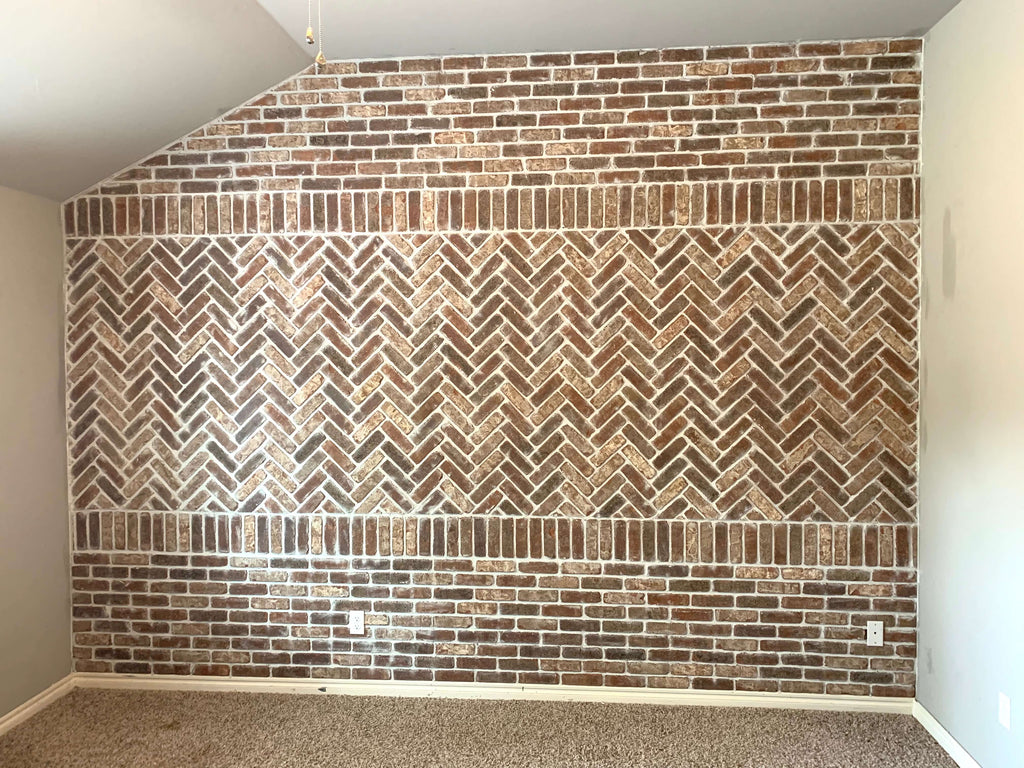
This is probably one of my favorite accent walls to date and I absolutely love how it came out. It completely changed the look of the room and made it feel grand. Exactly the look I was going for.
Lucky for you, I documented the whole process if you're interested in re-creating it. Check out my full blog post on that wall here for more details.
Once the brick accent wall was up, I painted my existing grey walls white and it really made the brick wall stand out.
Staging the Room
Outside of the brick wall, choosing the furniture pieces for the room was probably the most exciting process. The furniture really brings the room together.
I knew that I wanted good contrast between the bed and the nightstand, so I decided to get a nice cream tufted bed and couple it with mirrored nightstands. I couldn't have picked a better match for the brick.
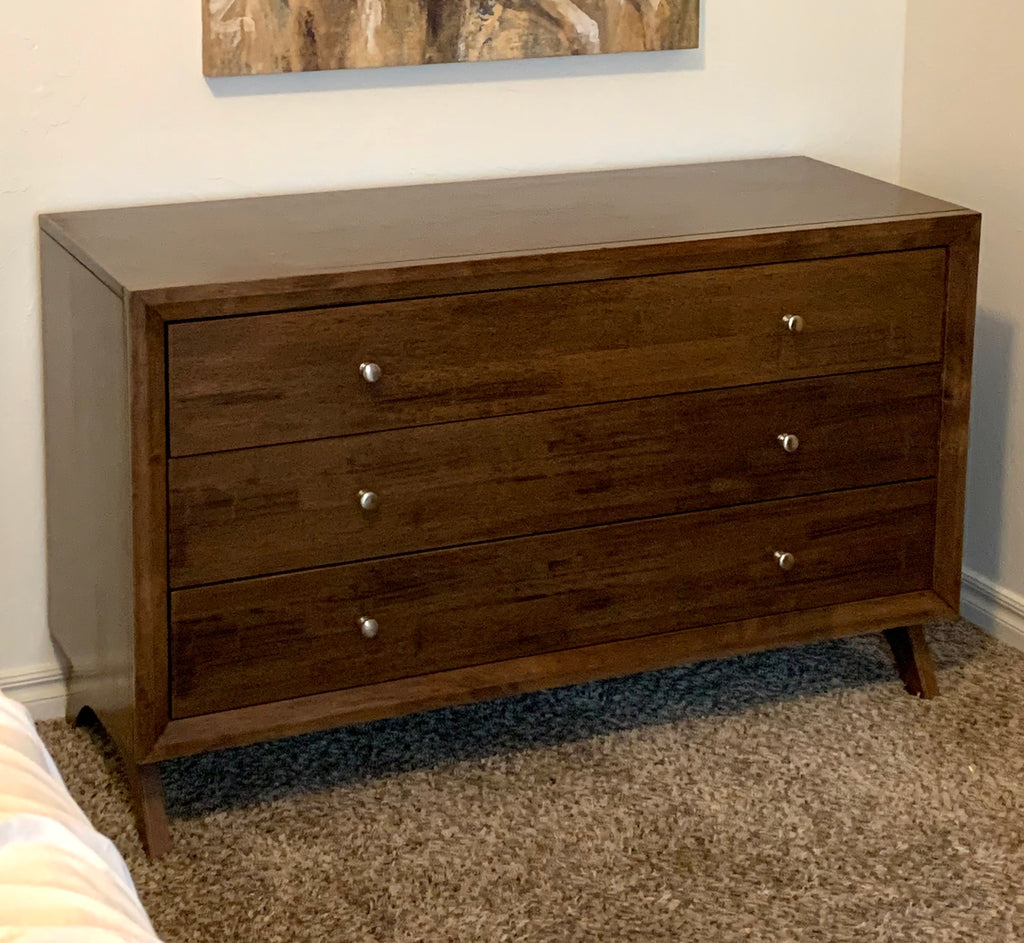
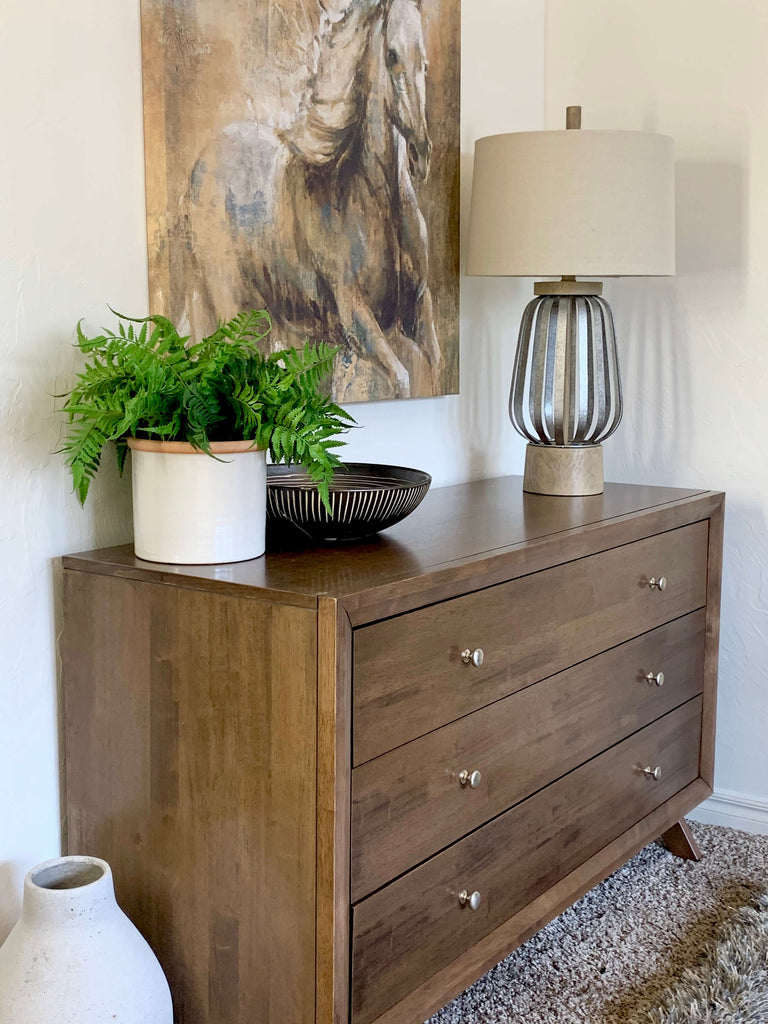
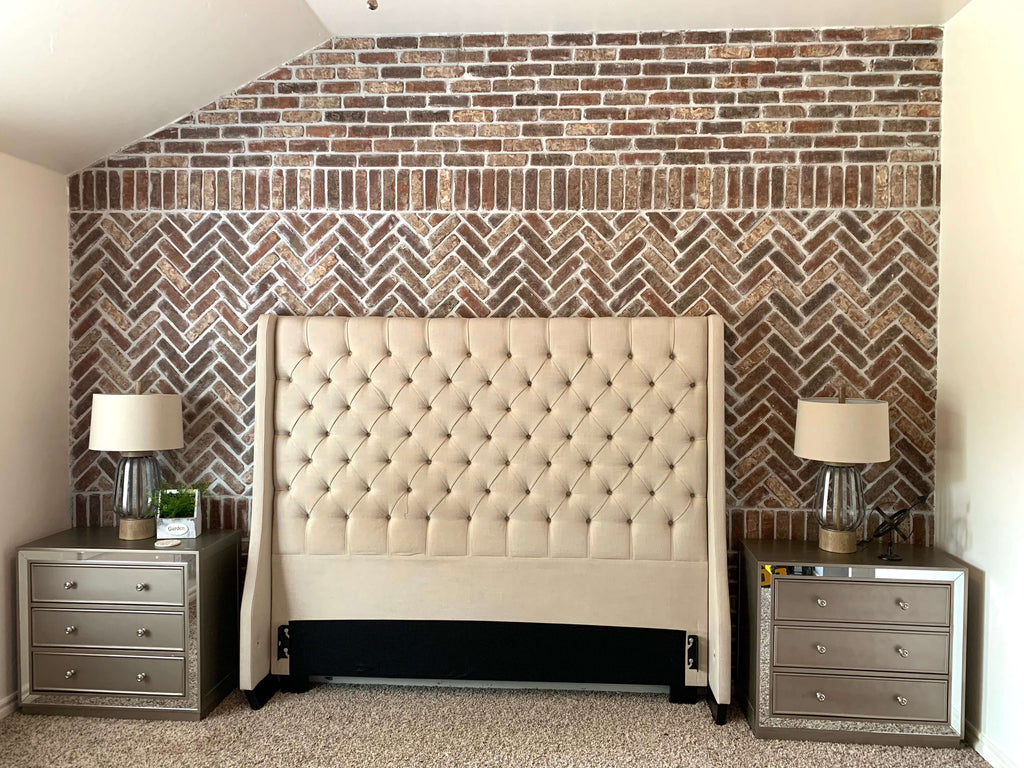 I also decided to add in a fun three drawer dresser that could serve as both a stylish and functional piece. There were so many choices to choose from, Wayfair's dresser options were endless, but I absolutely love how this particular walnut dresser plays off of the tufted cream headboard and brick wall.
 Seeing it all come together just made me smile inside.
The Final Reveal
Once everything was put into place, it was time for the final reveal and man did it blow my expectations.
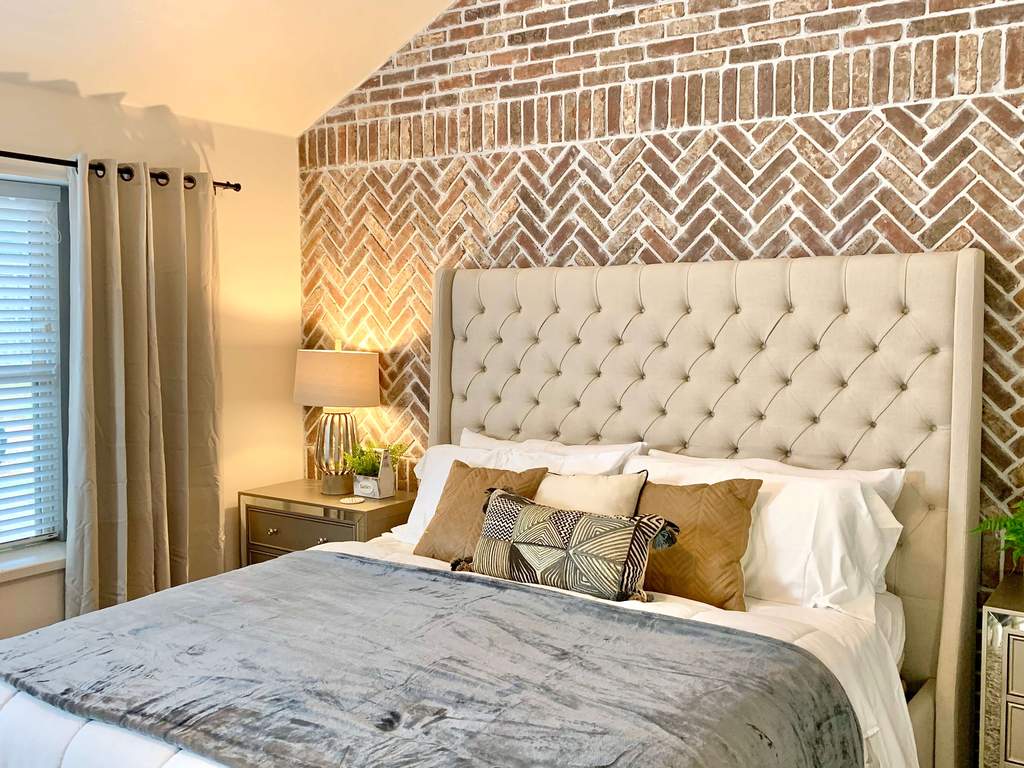 The warm tones of the bed and the brick wall really made my bedroom feel like a cozy oasis. All of the colors really came together nicely.
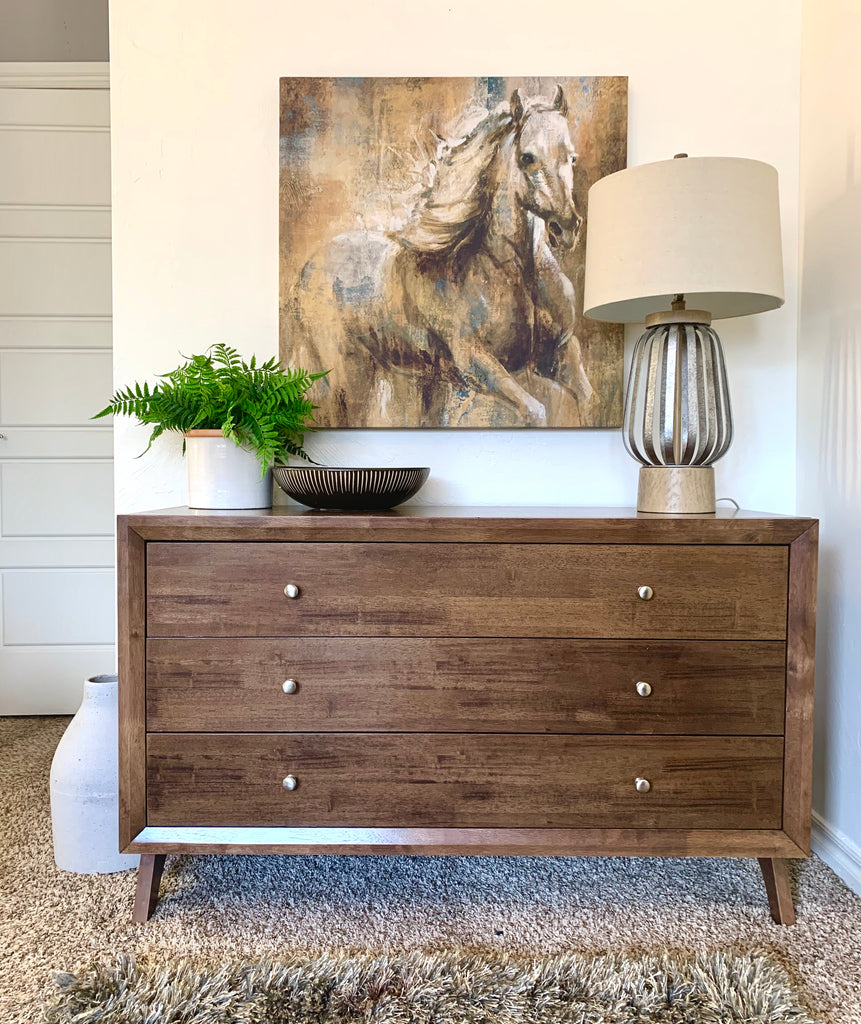 I am also absolutely in love with this walnut three drawer dresser. I needed some more storage space for some of my clothes, but it's such a stylish piece it doesn't even feel like a dresser, it feels more like a stylish piece of furniture. The modern legs brings a modern feel to the room as well.
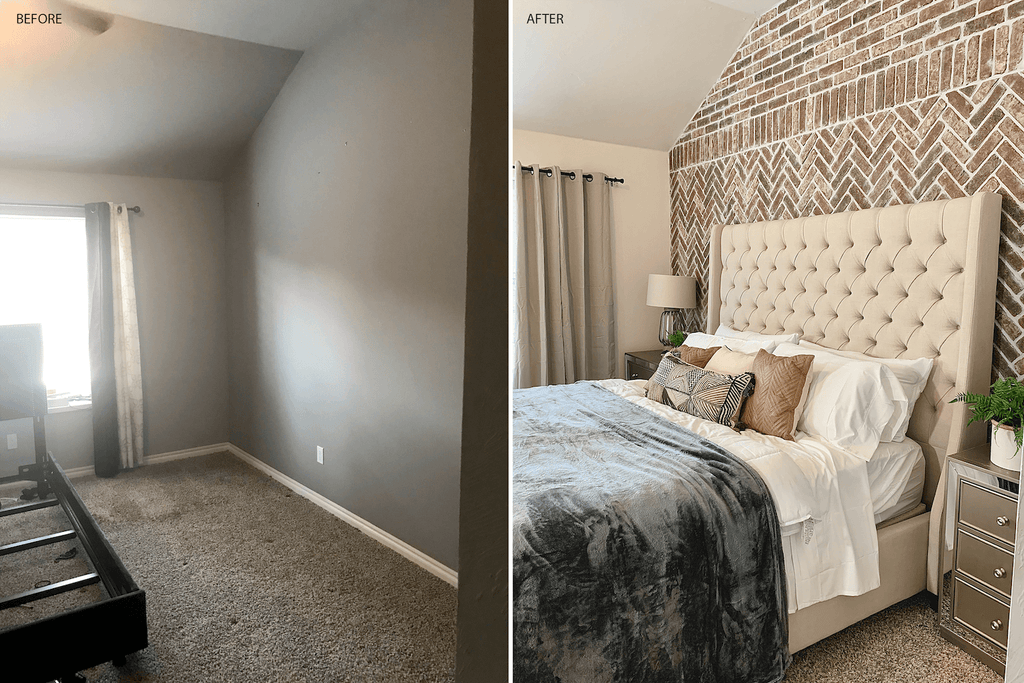 and who doesn't love a good before and after? I am so blown away with how this room makeover came out.
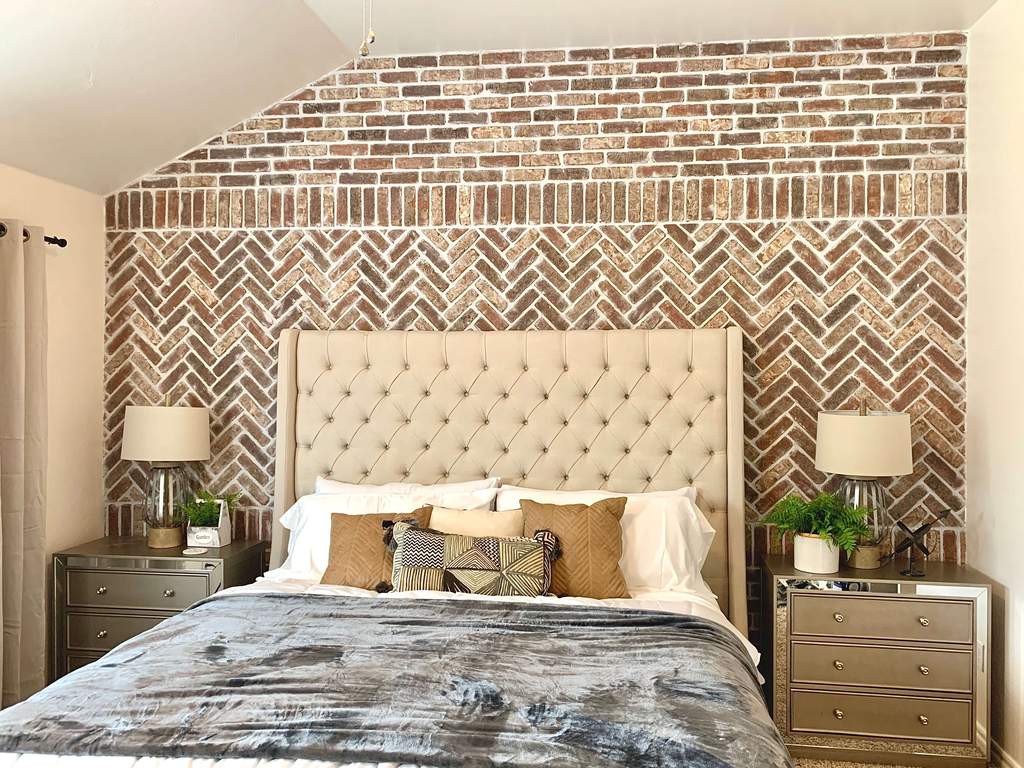 The Brick wall coupled with the the beautiful furniture was a great call and I can't be happier with how it turned out.
 Welp, that wraps it up for the bedroom master makeover. I hope you guys enjoyed the results just as much as I did.
As always, thanks for reading guys, XOXO Ashley.

Diablo Metal Cutting Saw Blades Tool Review
"Diablo's metal cutting blade is on the cutting edge."
"This review is sponsored by the Home Depot as a part of The Home Depot's Pro-Spective Campaign."
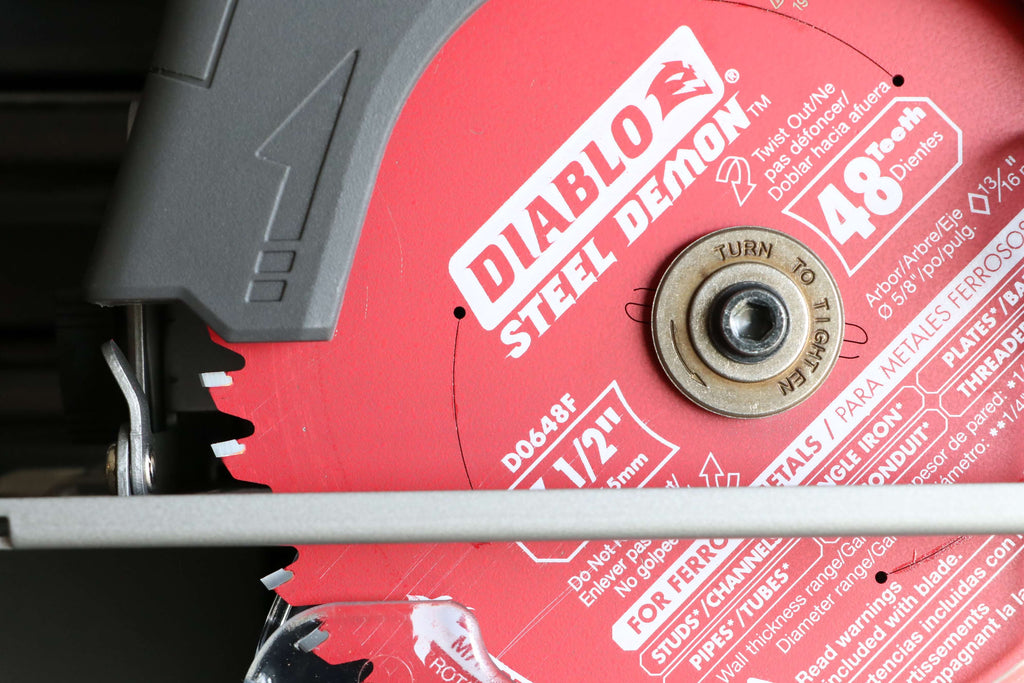
Diablo has always been a brand that I've highly respected, and I don't foresee that changing anytime soon. Diablo's new steel cutting blade is redefining metal cutting with safer and new innovation and I can't wait to share more about it.
There are some affiliate links in this post, meaning I get a small commission if you purchase through these links, at no cost to you. Click Here to read my full disclosure.
Testing out the Diablo Metal Cutting Blade
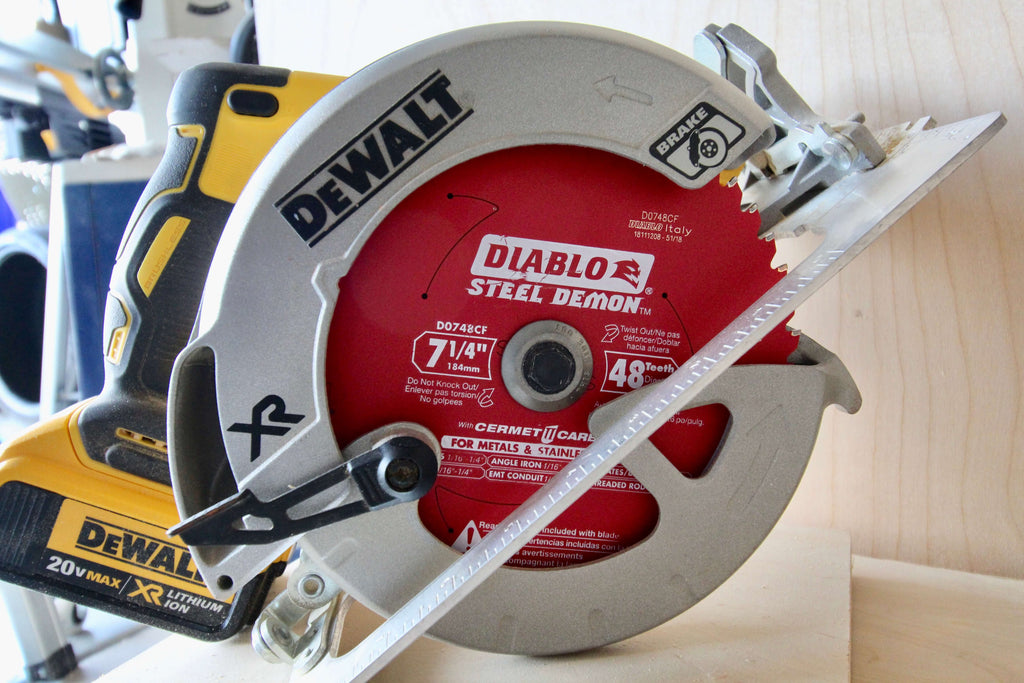
To test out the Diablo Steel Demon blade, I am coupling it with my DEWALT circular saw and I must say, they make a great team. One of the items I used to take this blade for a run was a metal flat bar. It cut like butter! Normally I use a jigsaw to make my metal cuts, but I am retiring the jigsaw because this blade can truly cut.
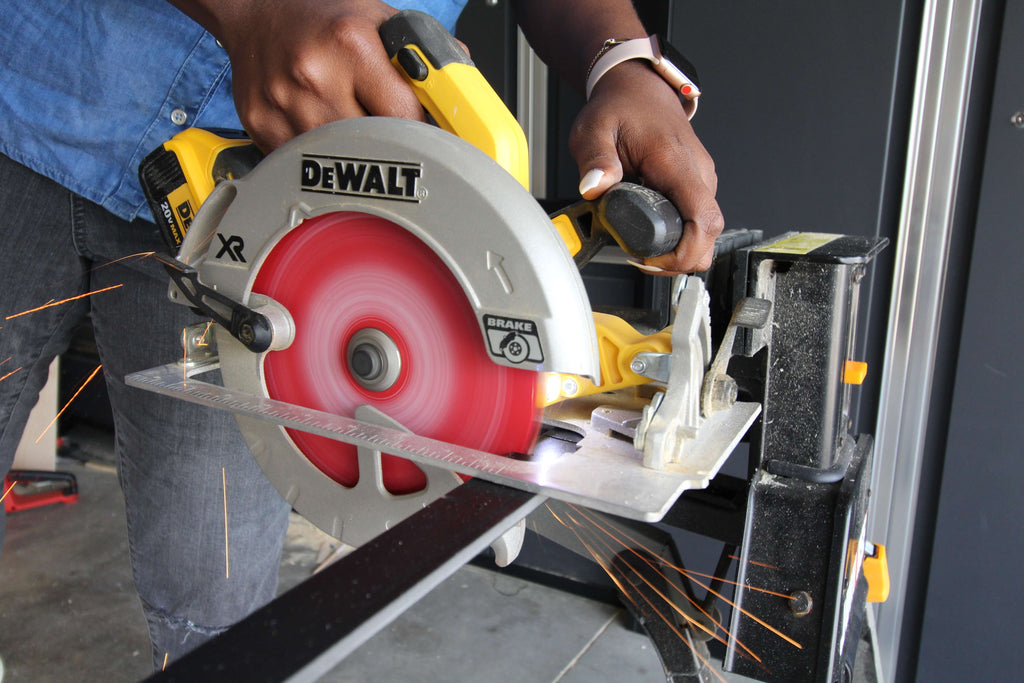
This particular saw blade features Cermet teeth that provide a high heat tolerance and increased hardness for great cutting life, which allows the blade to last up to 40X longer than a regular carbide metal cutting blade.
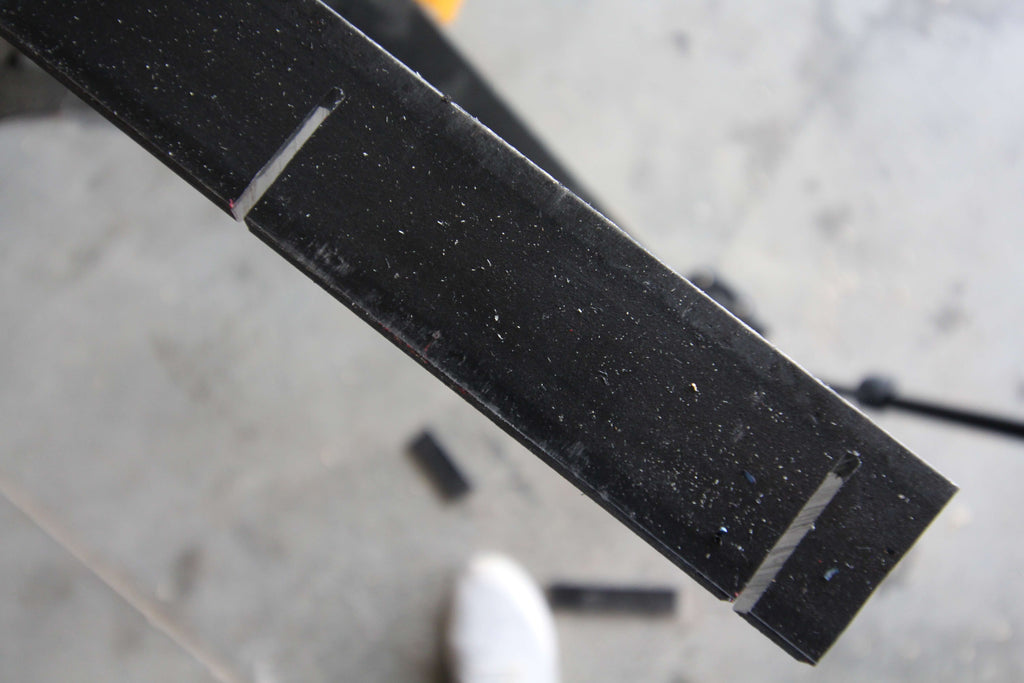
As you can see, the Diablo blade made clean cuts on the metal flat bar. With the advanced laser cut stabilizer vents, it traps noise and vibration for stability, which allows the the blade to remain cool for straight, accurate cuts.
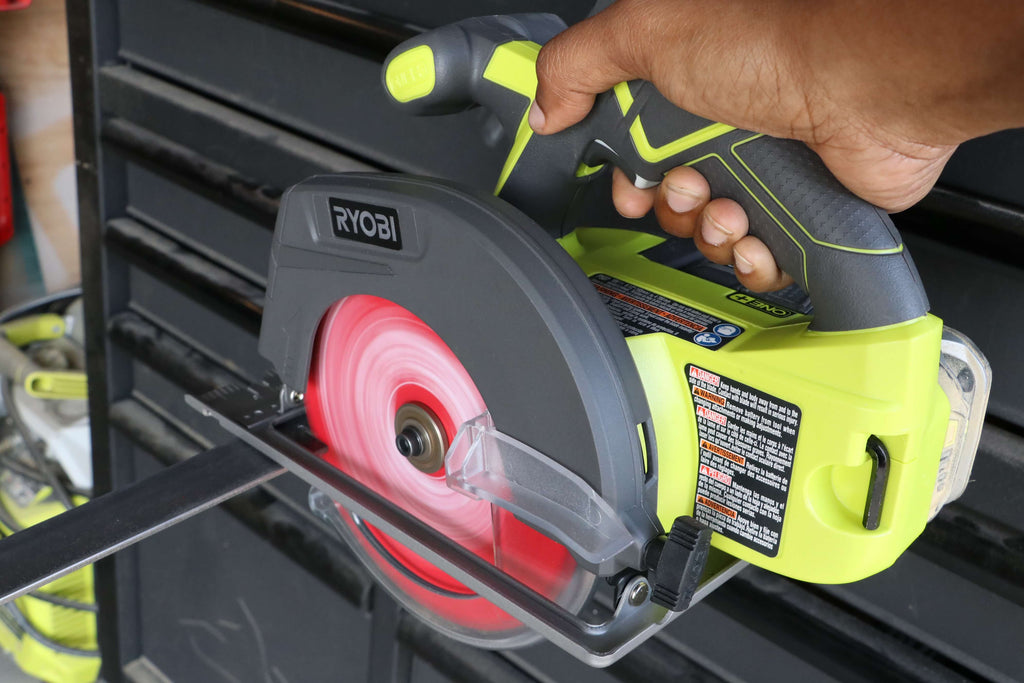
 The best part is that they have blades with all sizes and all types of features. So you if you don't have the bigger 7 1/4" circular saw, Diablo has blades to fit your needs.
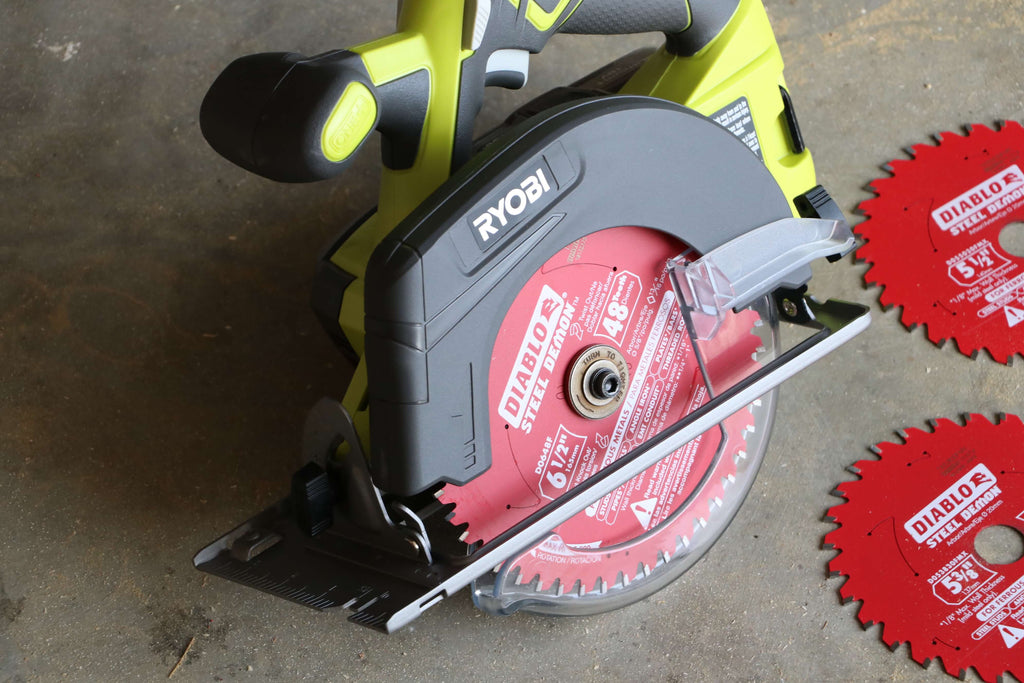 Shown above is the 6 1/2" Steel Demon Saw blade in the Ryobi Circular saw, and the two 30-Teeth 5 3/8 in saw blade and 5 1/2" saw blade.
The 6 1/2" Saw blade features trim-metal shock resistant brazing that allows the metal cutting carbide tips to withstand extreme impact. It cut through the metal so easily.
 I remember doing some barn door projects and cutting through metal with a jigsaw. It was a complete nightmare. This metal cutting blade makes it so easy.
The 30-Teeth saw blades both have the laser cut stabilizer vents that traps noise and vibration as well as keeping the blade cool.
I actually didn't have this metal bar clamp down, I was holding it with my hadn't and the vibration was minimal, which for me was nice because I don't always like spending the time clamping things down (even though it's probably safer).
FAVORITE FEATURES
Tri-Metal Shock Resistant Brazing
Diablo's tri-metal shock resistant brazing is a three metal brazing system that allows cermet teeth to withstand extreme impact for maximum durability making this blade extremely efficient when cutting through metals.
Versatility of Cuts
I love that this blade has the ability to cut through so many things. I feel like I'm getting a bang for my buck. Check out the last below of what this blade can actually do.
- Cuts 1/16 in. to 1/4 in. wall thickness in steel studs, EMT conduit, angle iron, flat bar, and channel
- Cuts 1/4 in. to 1 in. diameter threaded rod
- Cuts 1/16 in. to 1/4 in. wall thickness in plate and bar stock

Triple Chip Tooth Design
The Triple Chip Tooth Design provides burr-free finishes that eliminate rework, and allow for a longer cutting life.
Perma-SHIELD Coating
The Perma-SHIELD non-stick coating protects the blade against gumming and corrosion which resists heat build-up.
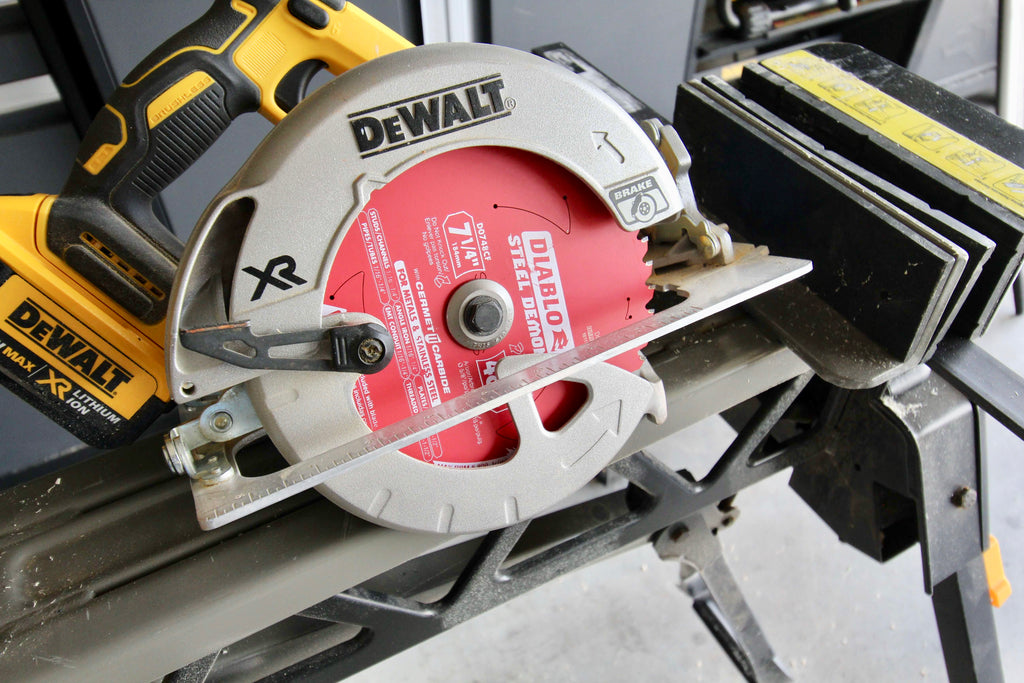
HOW COULD IT BE BETTER?
This seems to be a great blade but I question how long the blade would actually last after making an excessive amount of cuts. I am anxious to see how the blade operates under wear and tear.
Get your Diablo Blades today at the Home Depot.

DIY Thin Brick Wall | Installing Thin Brick and Grouting
"Who knew a thin brick wall could look so good."
This thin brick wall project has been quite the popular project and I am so glad to finally be sharing all of the details with you. I am so happy to be partnering up with my friends from Old Mill Brick to bring you this tutorial.
Today I will be sharing all of the fun details on how I completed this thin brick wall project; and I promise you won't be disappointed.
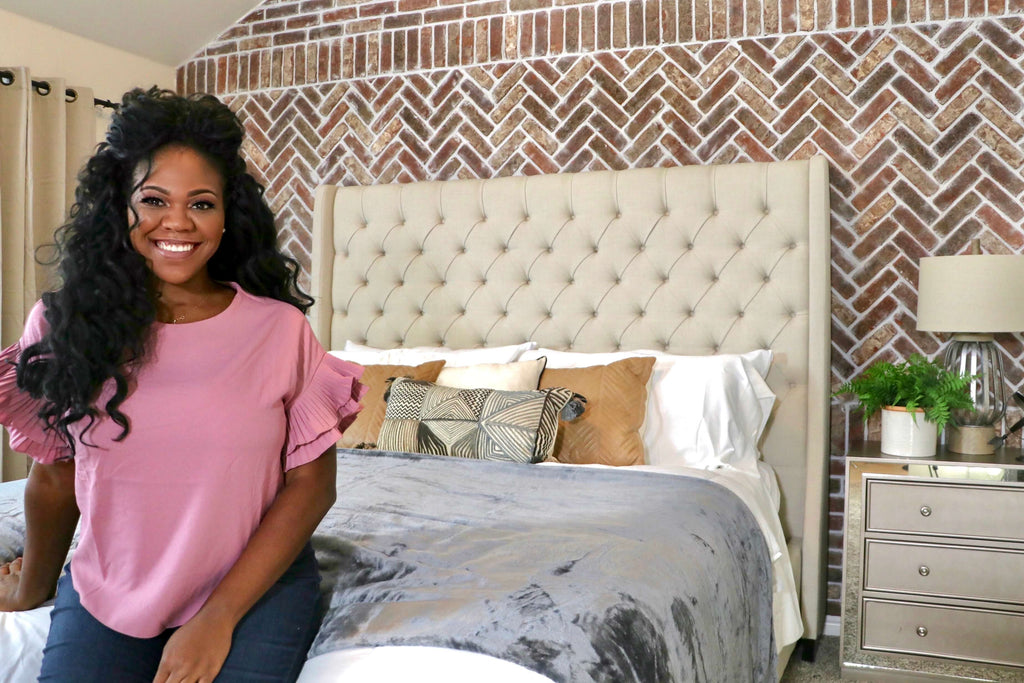 The crazy thing about this project is that I have never worked with brick before! Can you believe it? If you are wondering if you can tackle a project like this, you absolutely can, and I am sharing all of the details to get you started. I originally saw this idea on Remington Avenue's Instagram and knew I had to have it, so let's get into it!
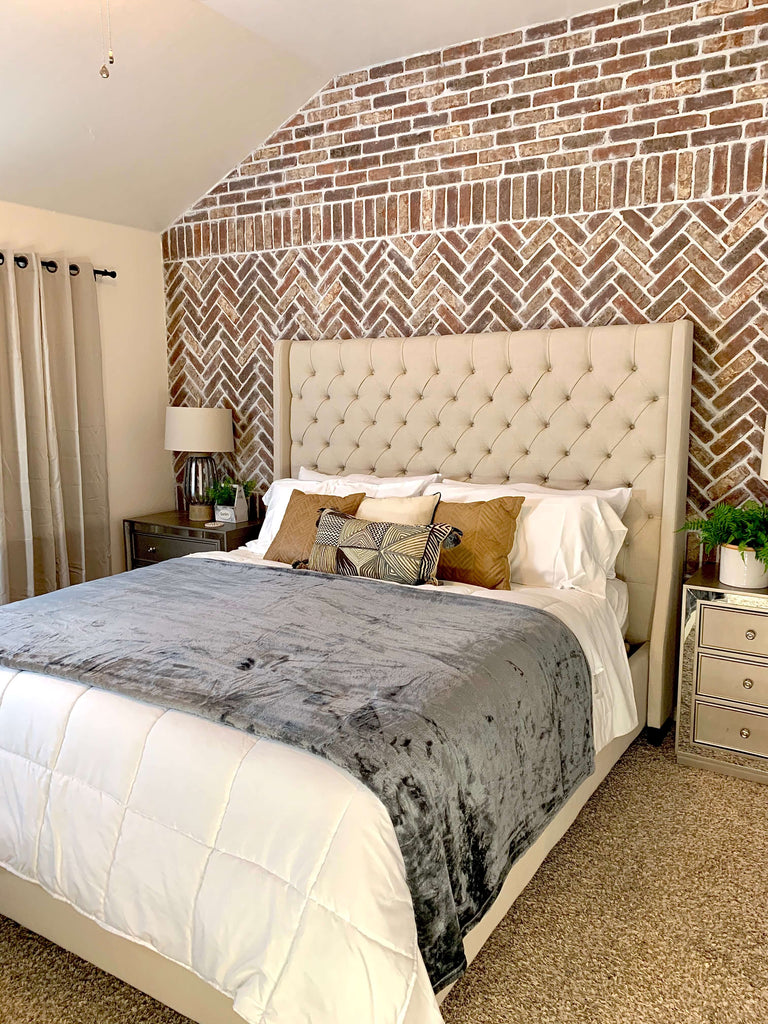
Materiels
- Old Mill Brick - Thin Brick Singles (Castle Gate)
- 3/8" dowel
- Loctite Adhesive
- Sanded Grout - Bright White
- Sanded Grout - Platinum
- 3/8" Trowel
- Bristle Brush
- Grout Bag
Tools Used
If you are more of a visual person, check out this how-to video on my installation process.
Phase 1: Applying the Thin Brick Wall
Step 1: Taking Wall Measurements
Before getting started, I first had to take wall measurements to figure out how many materials I would need to tackle this brick wall project. My wall was 13' high and 10' wide, which is pretty big.
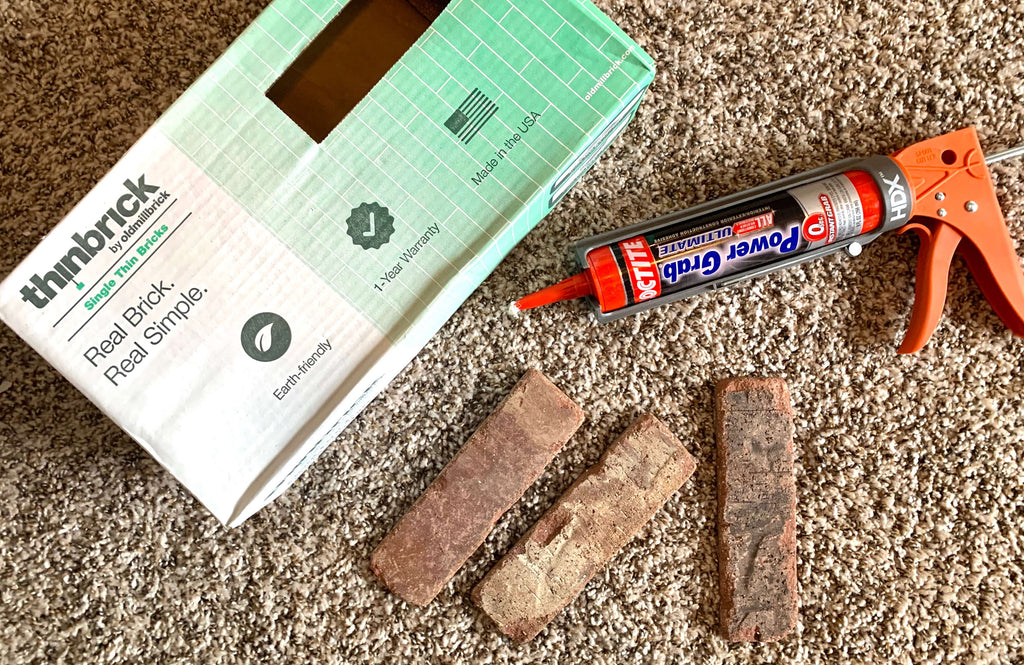 I used this sq. ft calculator to calculate my total square footage. You enter in the width and length of your wall and it will tell you exactly how many square footage of materiel you will need. I ended up getting 19 boxes of the thin brick singles, just to have a little extra for mistakes, but only used 18 of the boxes.
Once I figured out the sq ft. , I also calculated I would need around 12 packs of Loctite Adhesive for this wall project and my math was perfect; I used all 12 tubes. Normally, you would see people using mortar for brick, but I am always one who likes to work harder and not smarter, so I decided to use this adhesive for an alternative. It's a lot less messier, cures faster, and holds the brick to the wall very well.
Step 2: Prepping the Wall for the Thin Brick
I had to do a little more wall prepping than normal because I had wall paneling on my bedroom wall. I added this paneling to my bedroom wall but I decided to go for something with a little more pizzaz. Let's take a look at the before.

A few people were bummed about me taking down my wall paneling, but I think after they saw the brick, they were just fine with me taking it down. Once I took the wall paneling down, I wiped the whole wall down with a damp rag and then went back and wiped off all of the dust with a dry cloth to make sure the wall was completely free of debris.
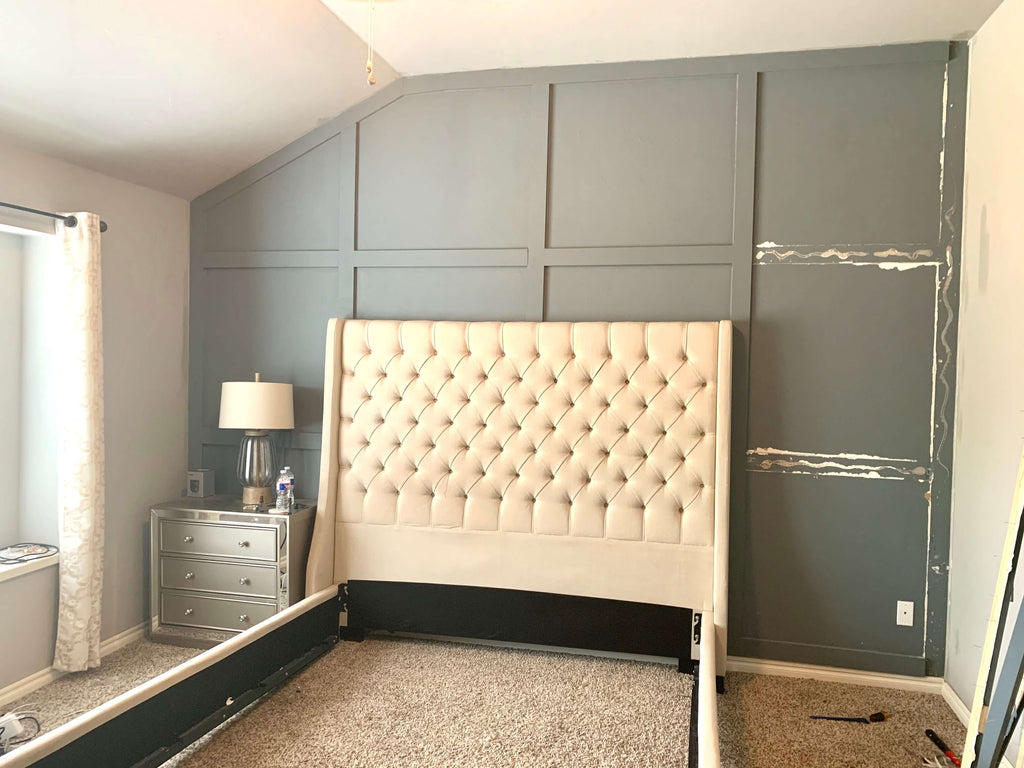
Once the wall was all dry, it was time to start applying the bricks; the fun part of the project.
Step 3: Applying Brick to the Wall
I begin applying the thin bricks on the wall and started at the top of the wall and worked my way down. It really doesn't matter where you start with these thin bricks because they aren't building on top of each other. I personally wanted to start at the top so if there were any imperfections or unevenness, it would fall at the bottom.
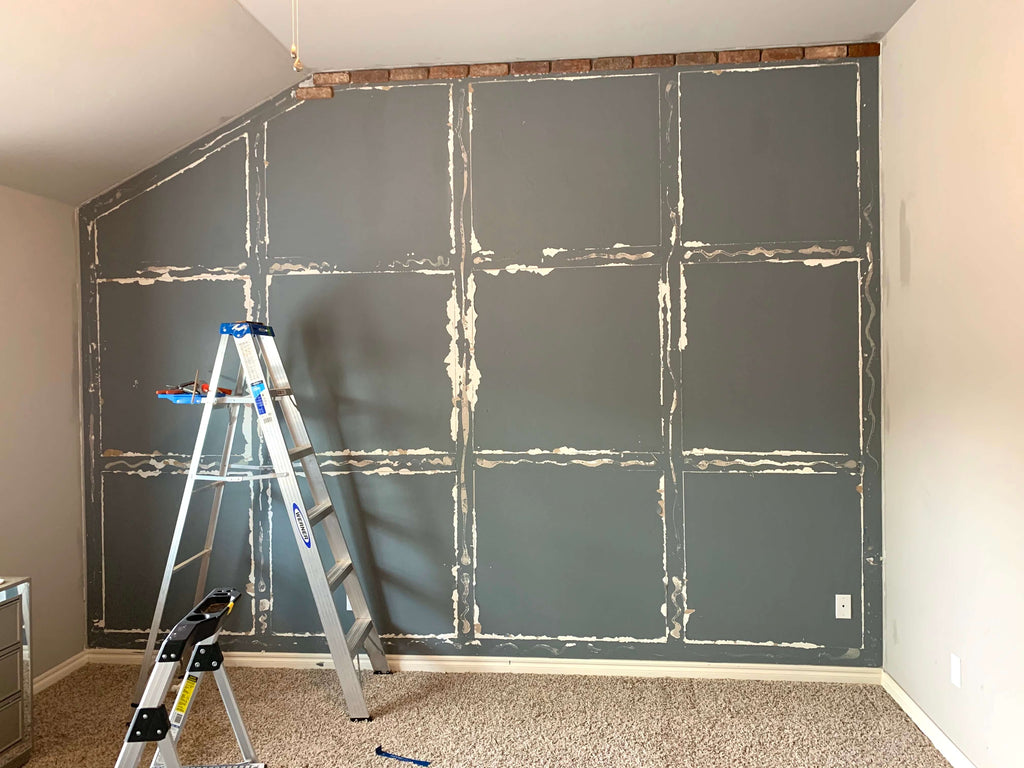
I decided to start applying the full singles first and then go back afterwards to cut the angles on the bricks. I decided to go with various designs for the wall, so I started laying the bricks straight across first. The first line is probably the most important because it needs to be 100% straight. My bedroom wall isn't all the way square so it was important to make sure the first line was completely level. 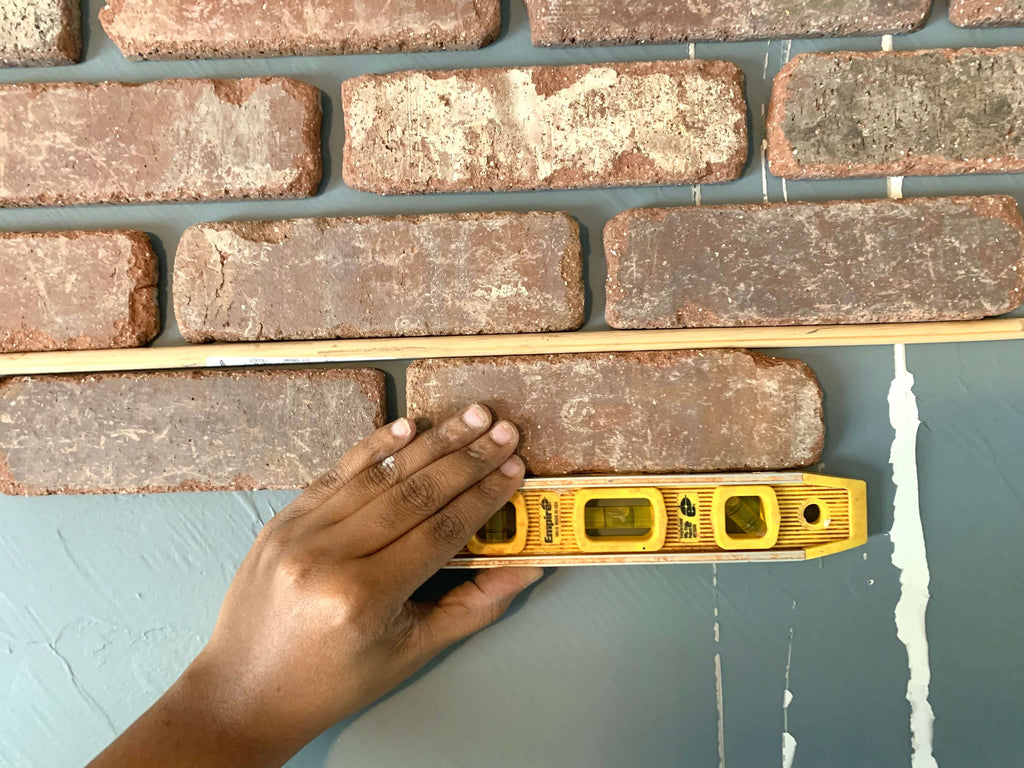
I placed nine rows of bricks on the top of the wall to get me started and used a 3/8" dowel to make sure my spacing was correct. The dowel will definitely be your friend, so have a couple handy. I also used a level to make sure each brick was level. This can seem a little meticulous but I wanted to make sure my bricks looked as flawless as possible. If your first line is straight, the lines below should go on level, but some bricks were still off, so I checked each brick; I know , Im crazy.

I applied a decent amount of adhesive to each brick to make sure it sticks well. I was so impressed with this stuff, it is super strong. As soon as you place the brick on the wall it sticks. You do get around 10 minutes to move it freely before it starts to cure. Make sure you play close attention to your bricks once you place them; I found that after about 30 minutes, there's no budging them. I also found that it was better to apply adhesive to a bunch of bricks and then apply them to the wall rather than doing them one by one.
Even though this was a one man job, if you can find help, use it. Don't be like me, I would have appreciated a helping hand with this portion.
Now take it from me, if you are doing this project alone or if you have help, you will want to get this battery powered caulk gun. I used a regular caulk gun for the first nine rows and man were my arms on fire! The battery powered gun made it go a lot faster and put less strain on my arm.
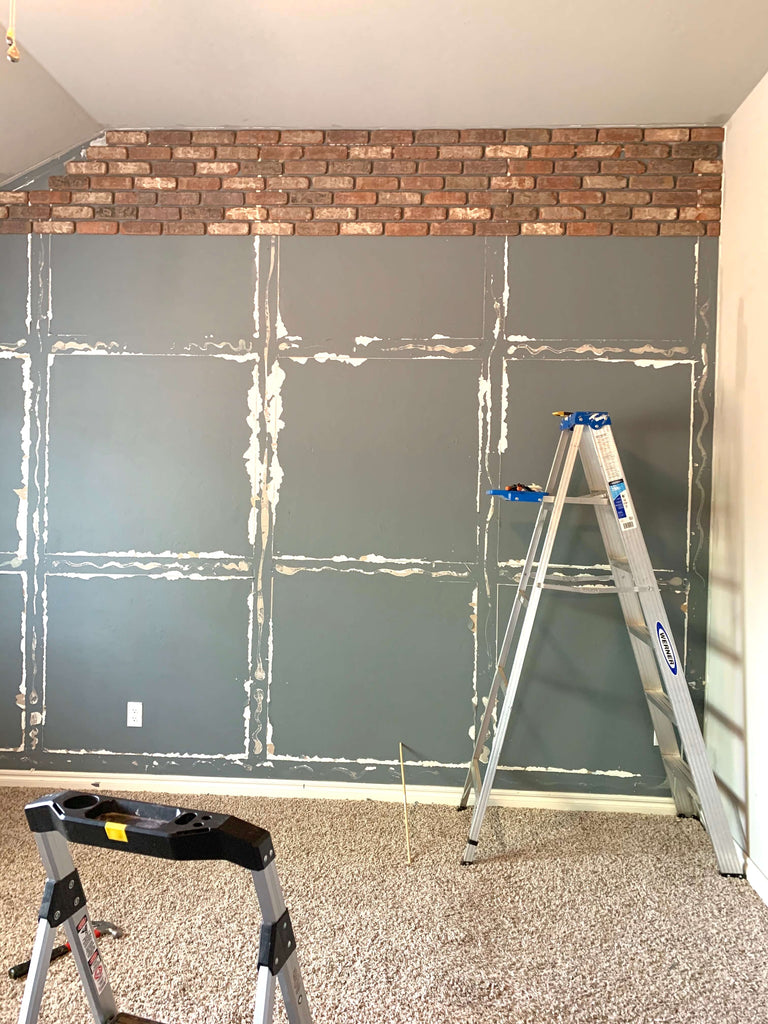
After I laid out the nine rows of singles, I switched over to the vertical pattern. This was probably the easiest part of the design. I laid these out pretty quickly and then on to the herringbone.
In order to make sure the herringbone pattern was straight, I used a laser level to make sure the bricks were laid down evenly and on square. This helped the middle portion go a lot faster.
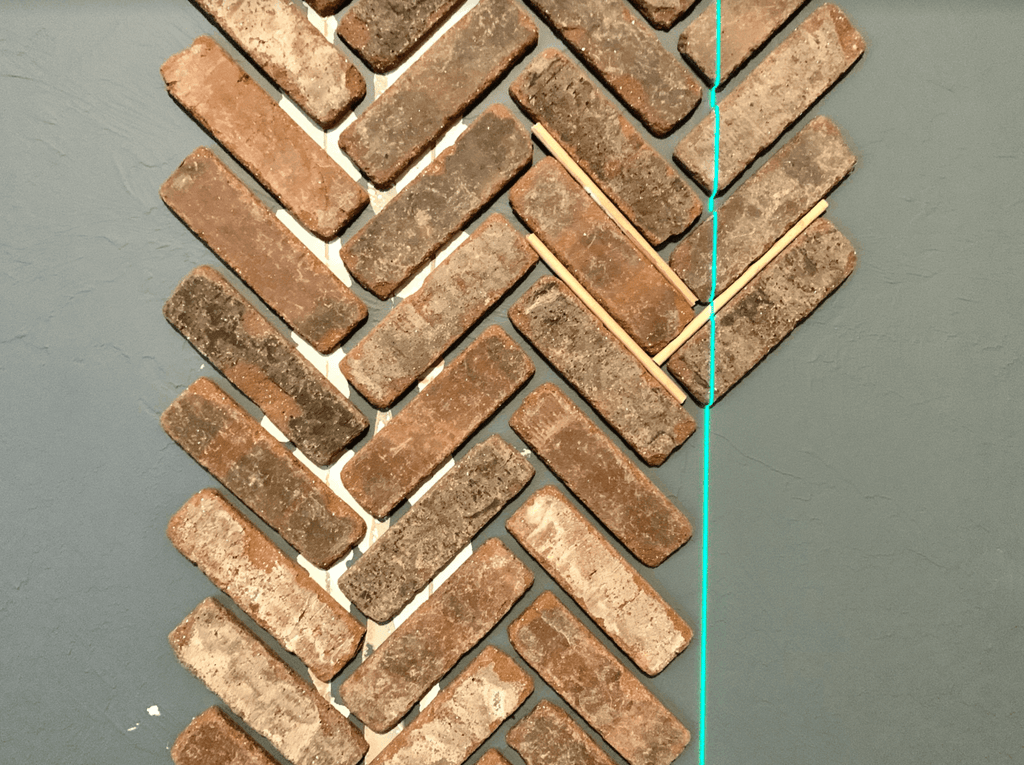 It was interesting to see the pattern once the bricks were all done. I was amazed at how good it looked.
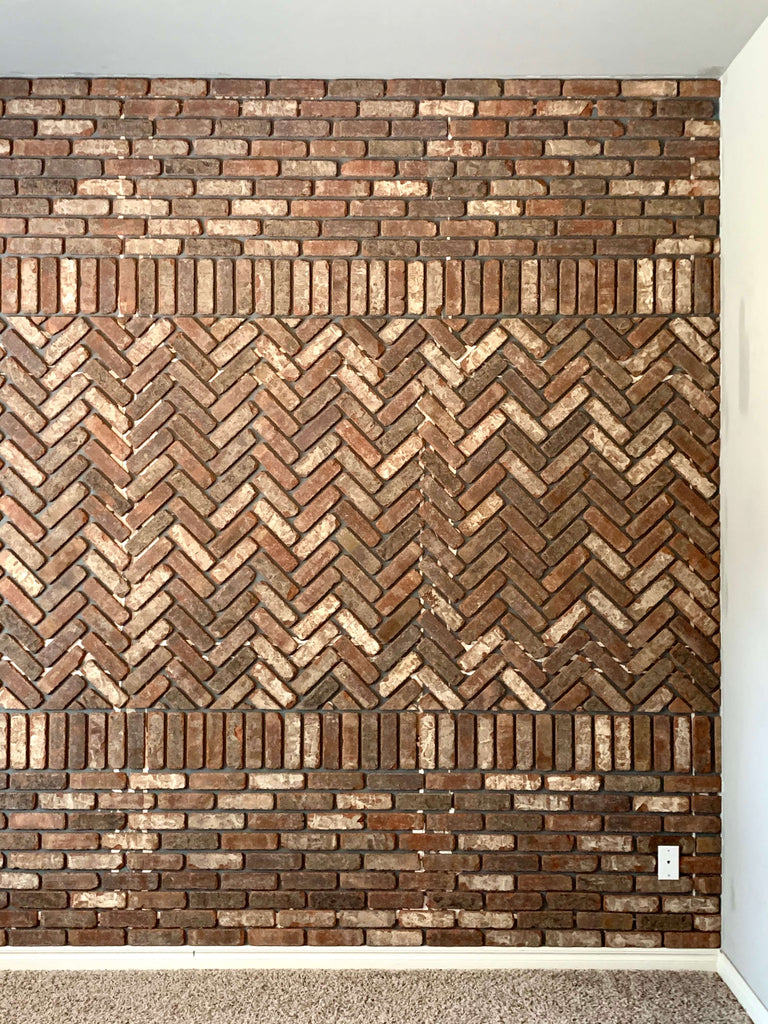
Let's check out the wall pattern once its done.
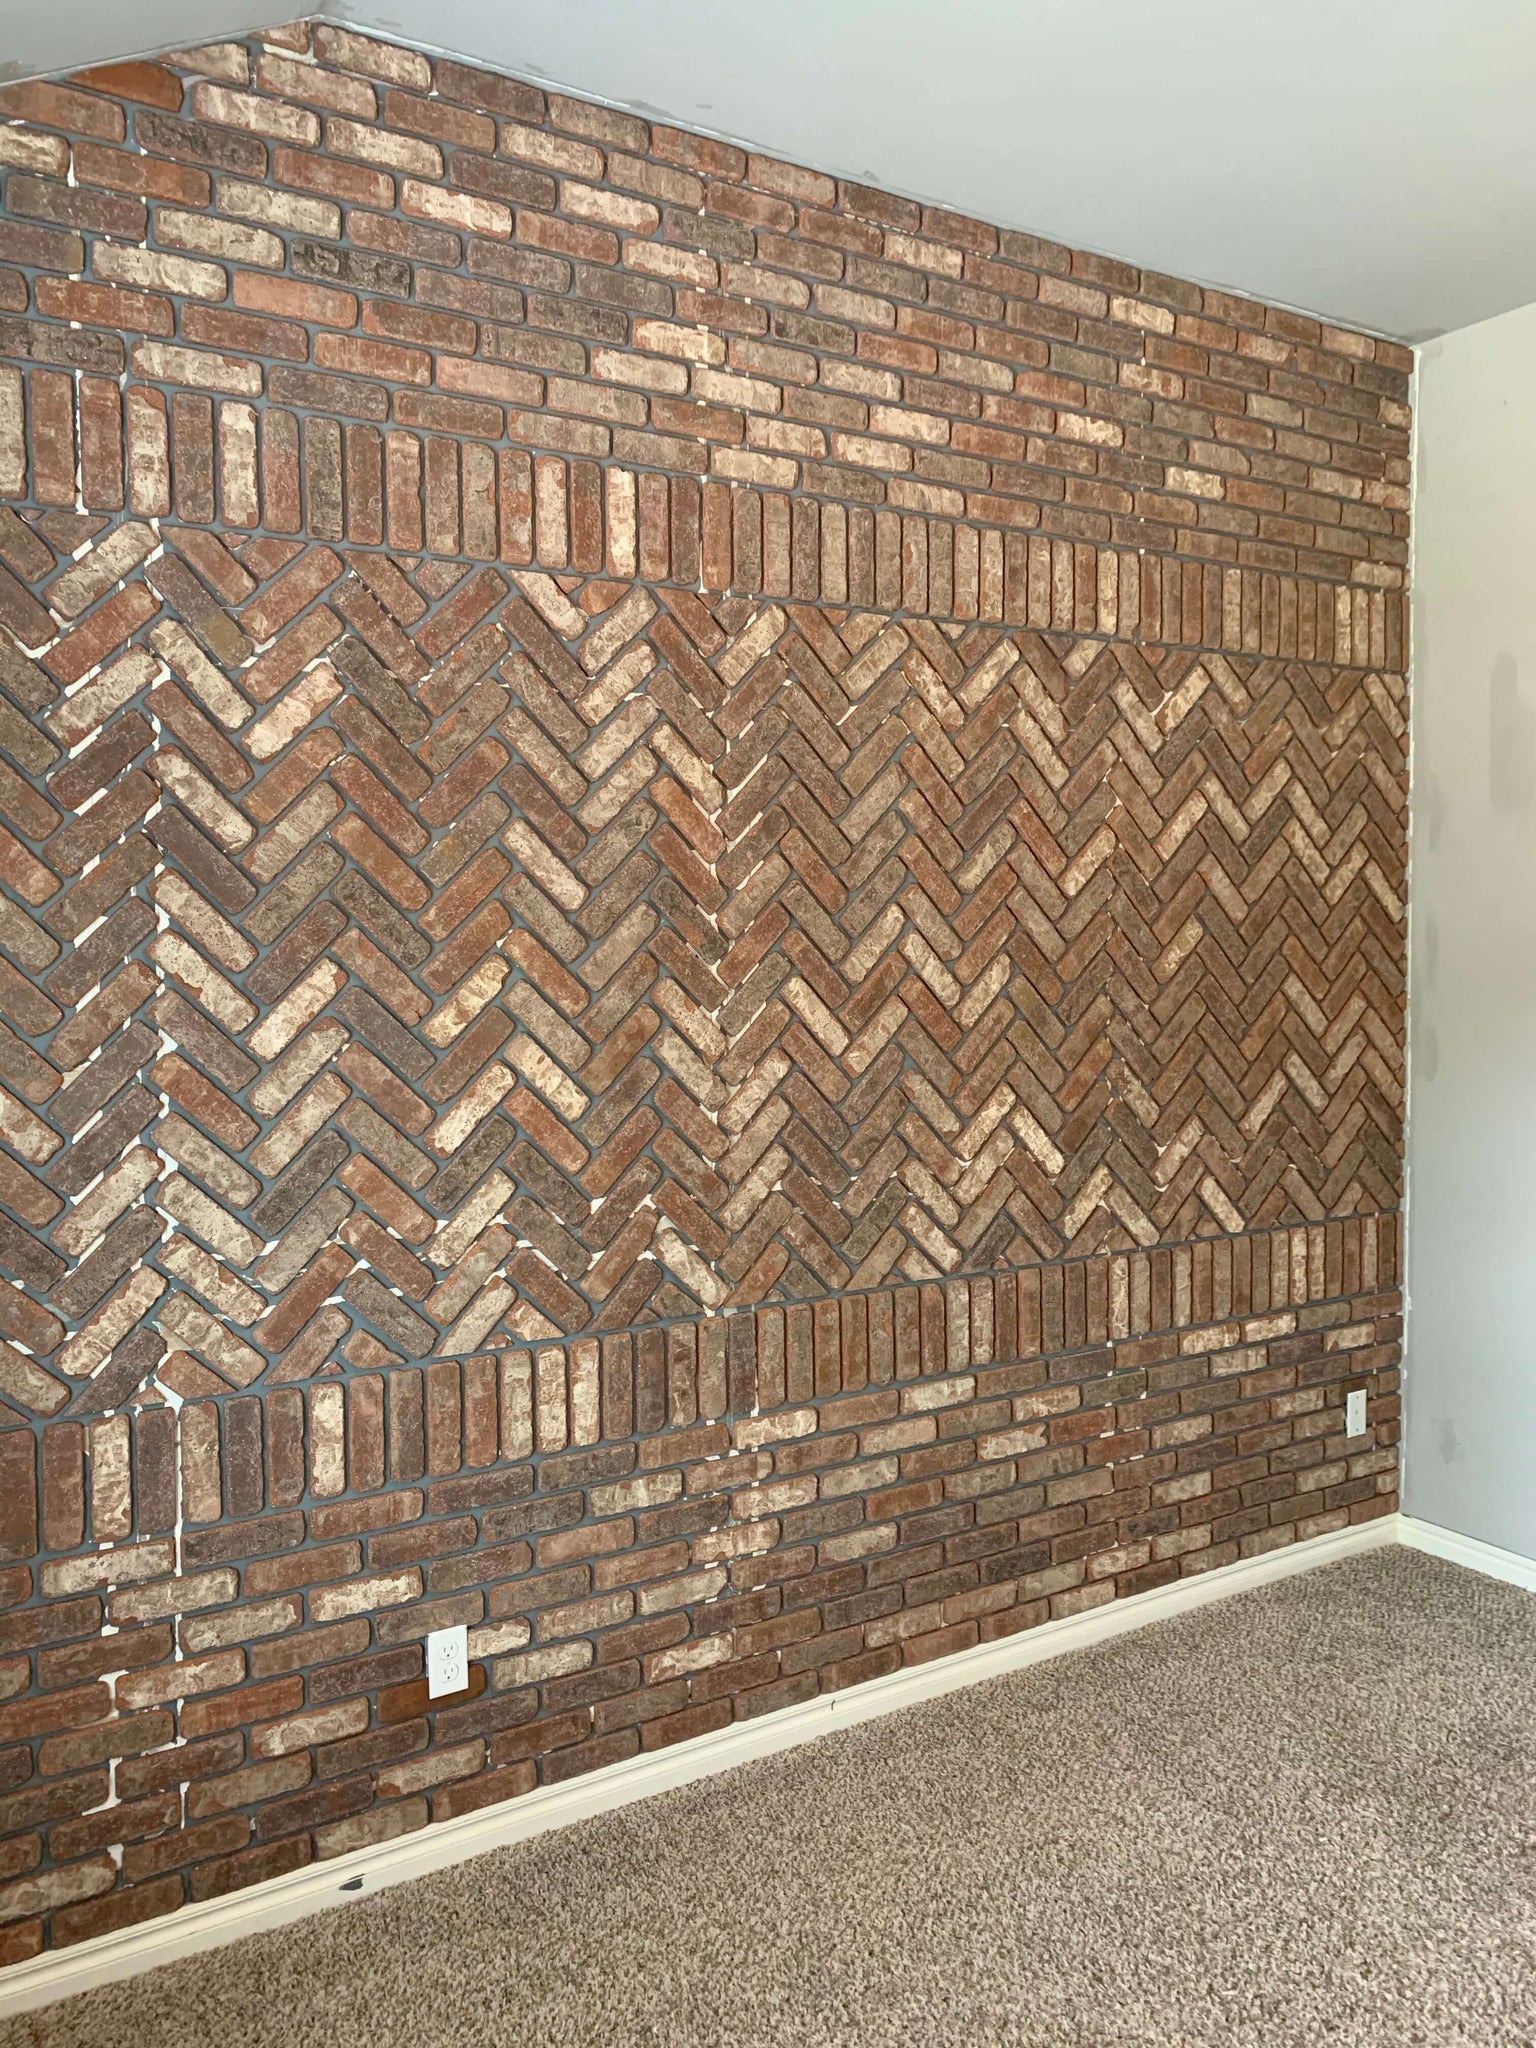
Phase 2: Grouting the Thin Brick
Now on to the fun part; the grout. This was my first time grouting, so I was both excited and anxious to see how it would turn out, but I wasn't pleasantly surprised how easy it was. so if you are wondering how to grout thin brick, you're in luck.
Originally, I tried the Antique White, but discovered very quickly that the antique white wasn't the color I was looking for. I decided to try to try two other colors and they both weren't right. After trying those two, I decided to just mix them together and BOOM, I had found the right color for my wall. I did a 50/50 mix of the sanded grout in Bright White and Platinum.
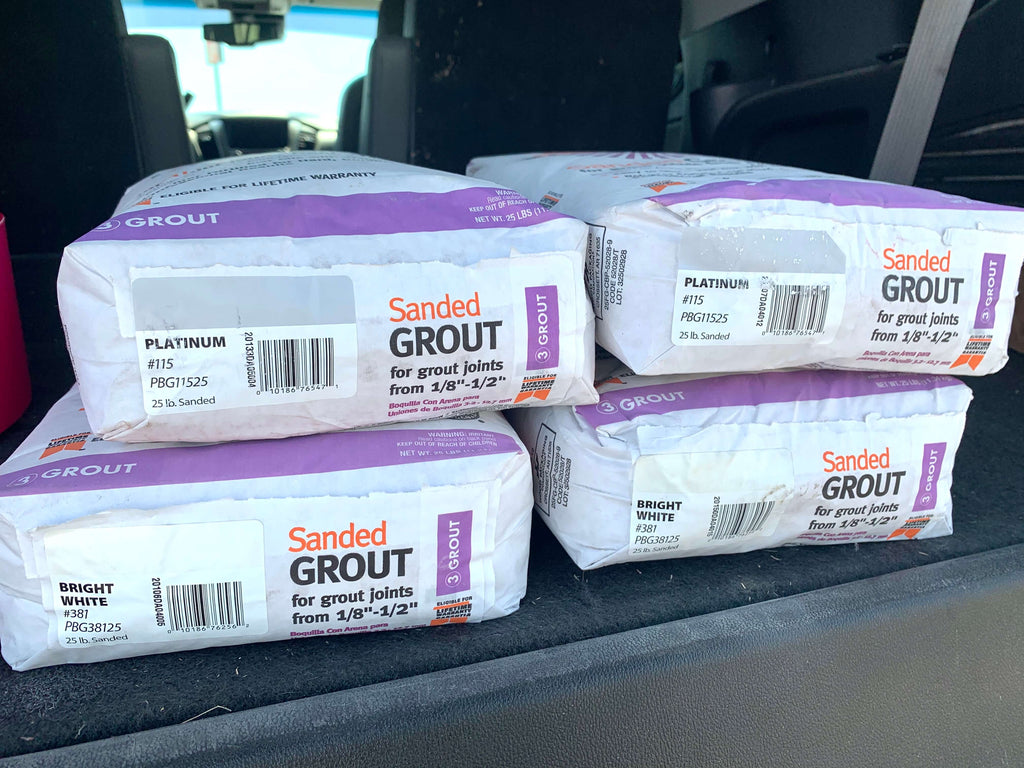
I ended up using four bags for my project; it was just enough, like scrapping the bag enough. I used around six cups of grout each mix to make sure I didn't waste any grout.
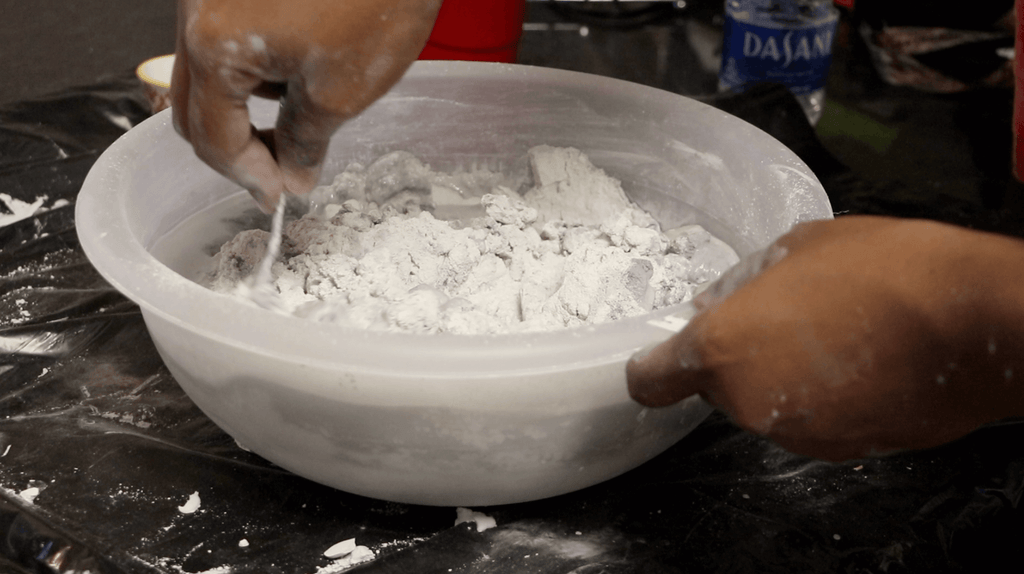 I used a small bowl and spoon to mix the grout to the consistency that I wanted and then poured it and then let it sit for 10 minutes. After the ten minutes, I poured it into the grout bag and started to grout the brick. I really loved this grout bag because it was re-usable. I washed it out after every use and it was the perfect size to get my sections knocked out.
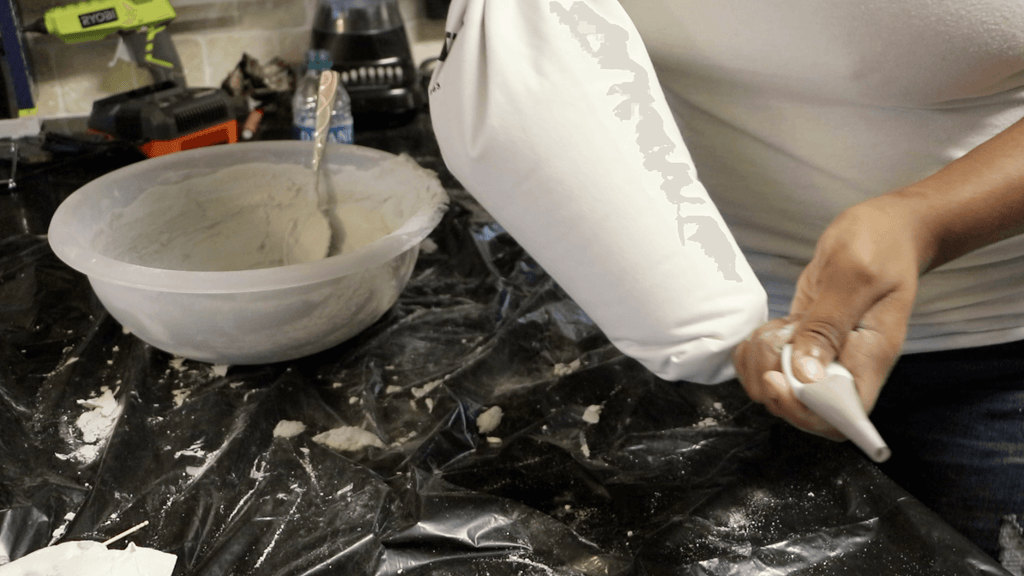 Grouting the brick was fairly easy, but time consuming. If you have extra hands available, you will definitely want to use them. One thing you want to make sure you do before grouting is laying down plastic. It will get super messy, so you don't want to mess up your floors.
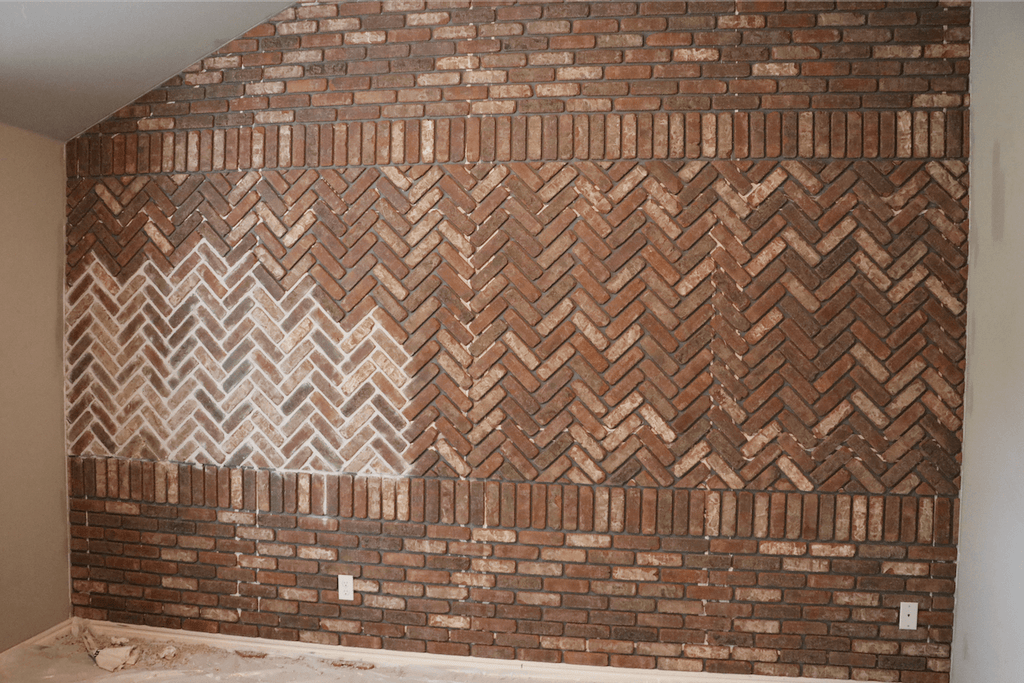 Once I applied the grout, I used a trowel and a bristle brush to flatten and set the grout into place. It's amazing how the grout really brought out the brick.
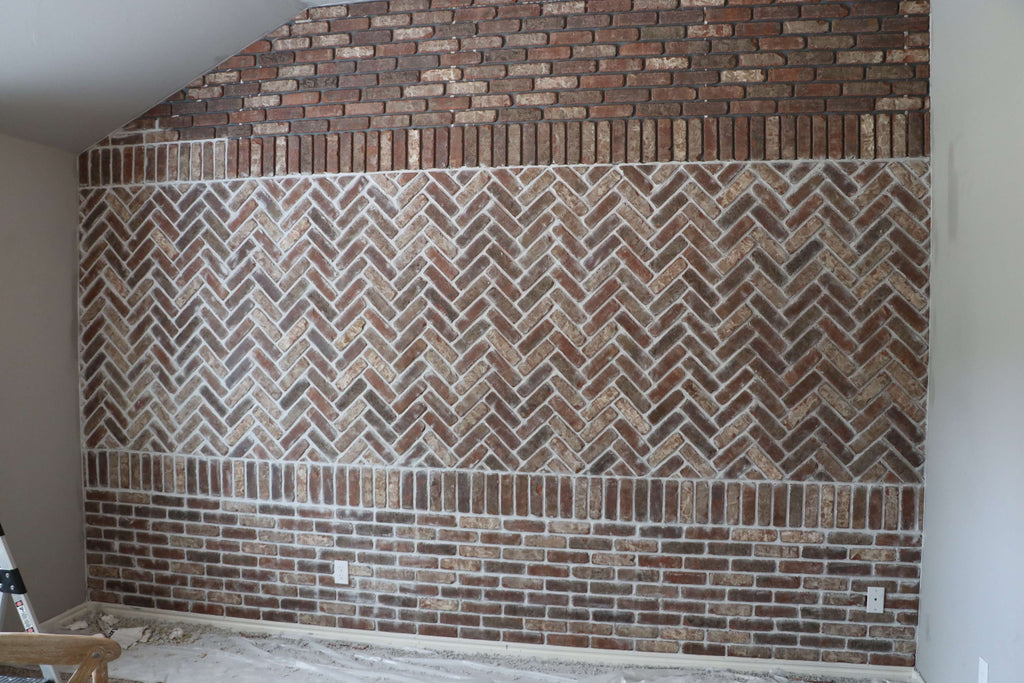 I knew this project was going to bring my bedroom to life and there's nothing like a good before and after.
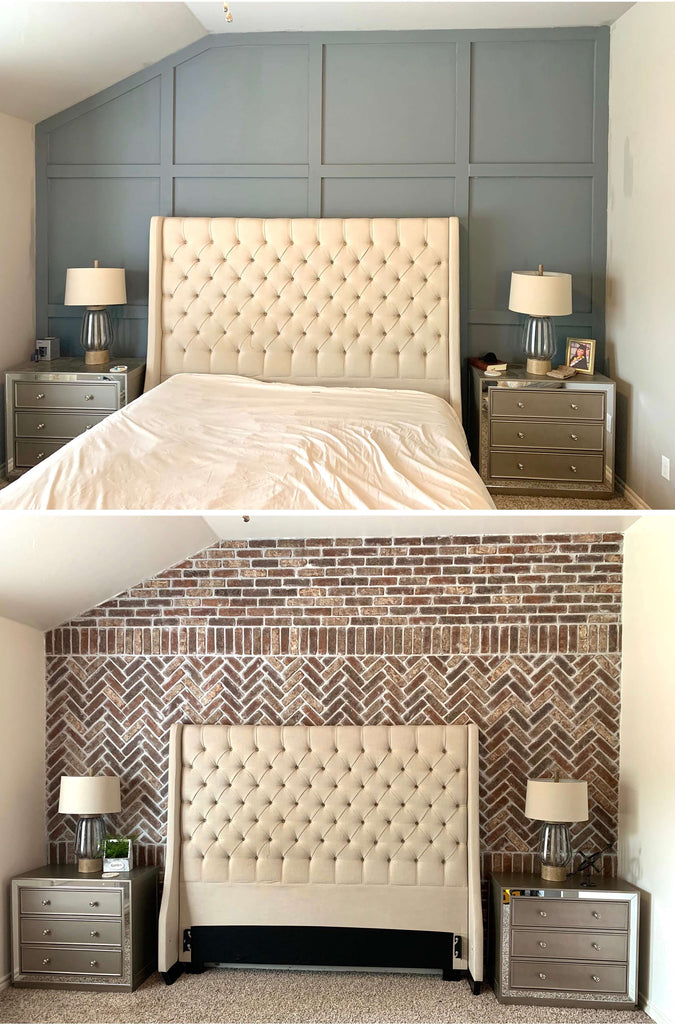 Now let's take one more last look at the wall. Let me know what you think in the comments below. I am absolutely in love!
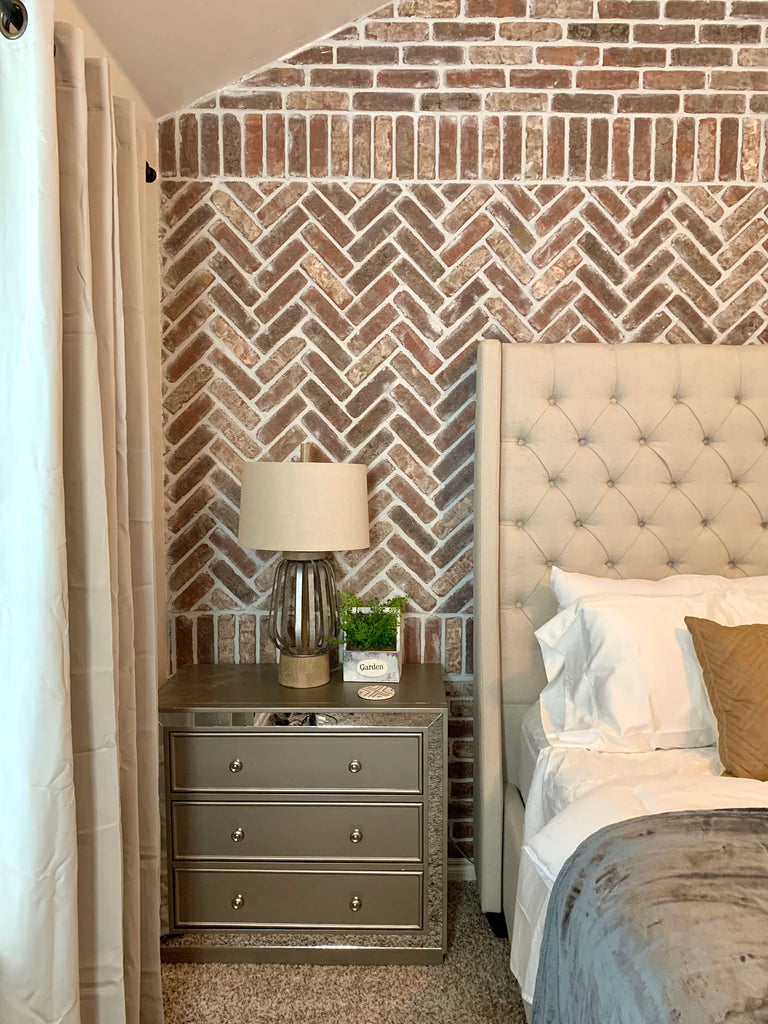

 Welp that wraps up the brick project! I hope you guys are inspired to tackle your own brick projects; I can't wait to see.
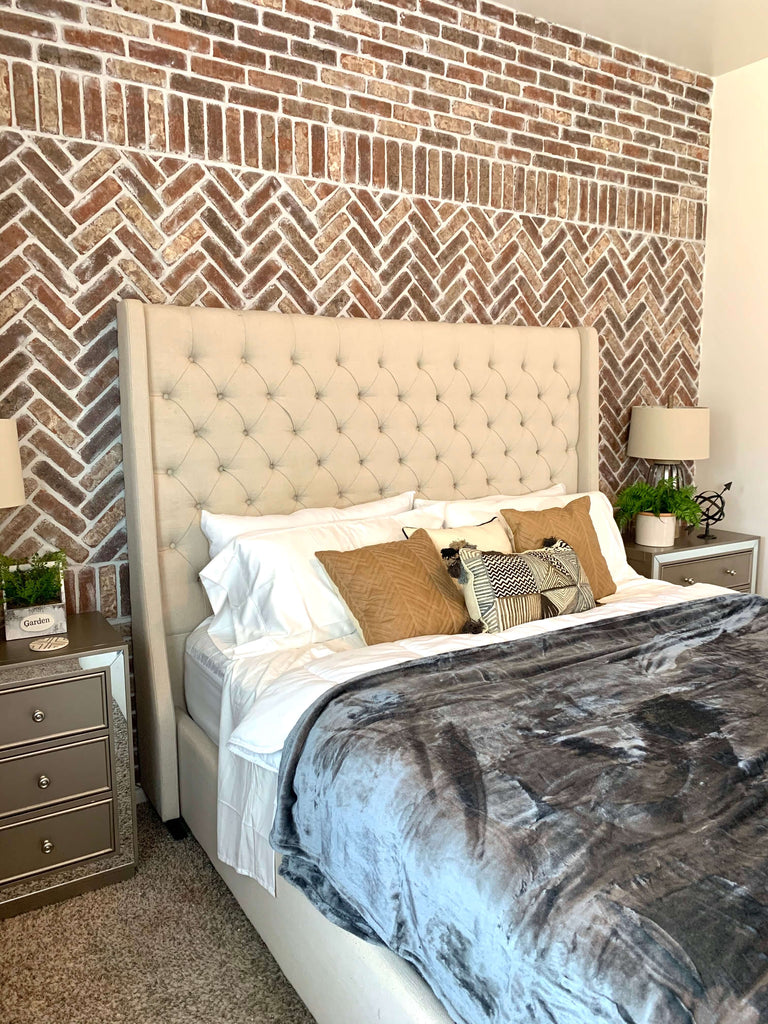
As always, thanks for reading guys, XOXO Ashley.

Sawhorse Craft Desk
"A Sawhorse Craft Desk to get your supplies in order."
Who doesn't like to get crafty? I'm excited to be sharing this fun crafty desk today and even better, I am partnering with my friends at Build Something to provide you the free plans for this sawhorse desk.
"This post is sponsored by Build Something."
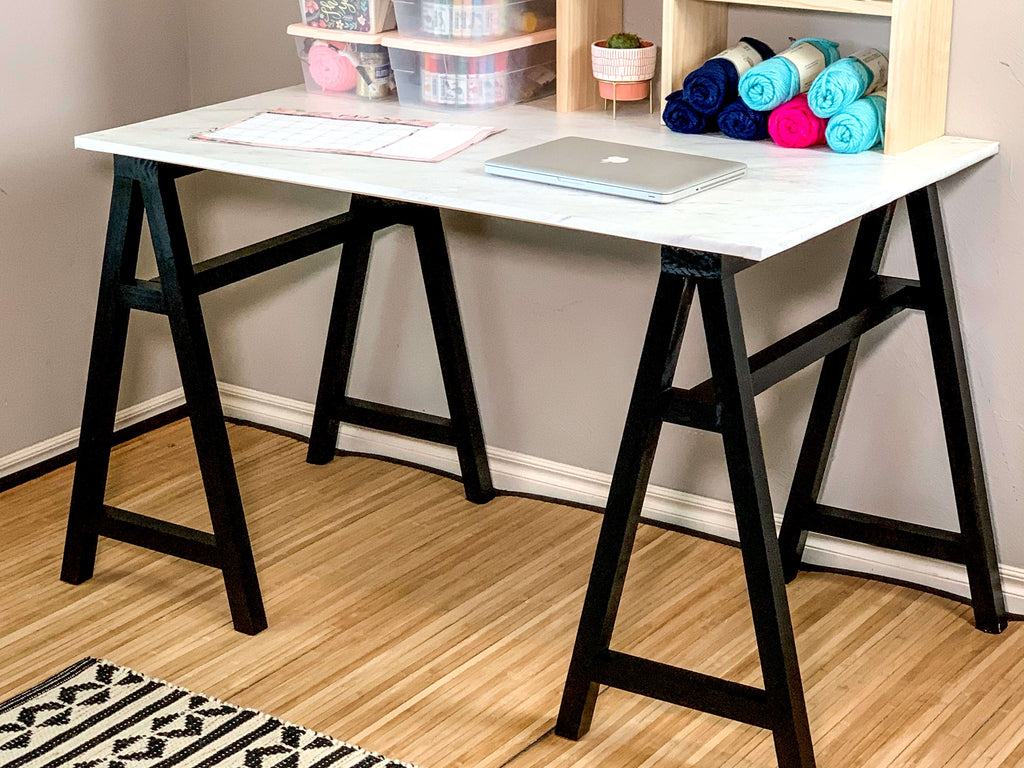
Being that this is a craft desk, I knew I had to do something fun with the legs, so I figured why not create a fun sawhorse design to make it interesting. I absolutely love how they came out!
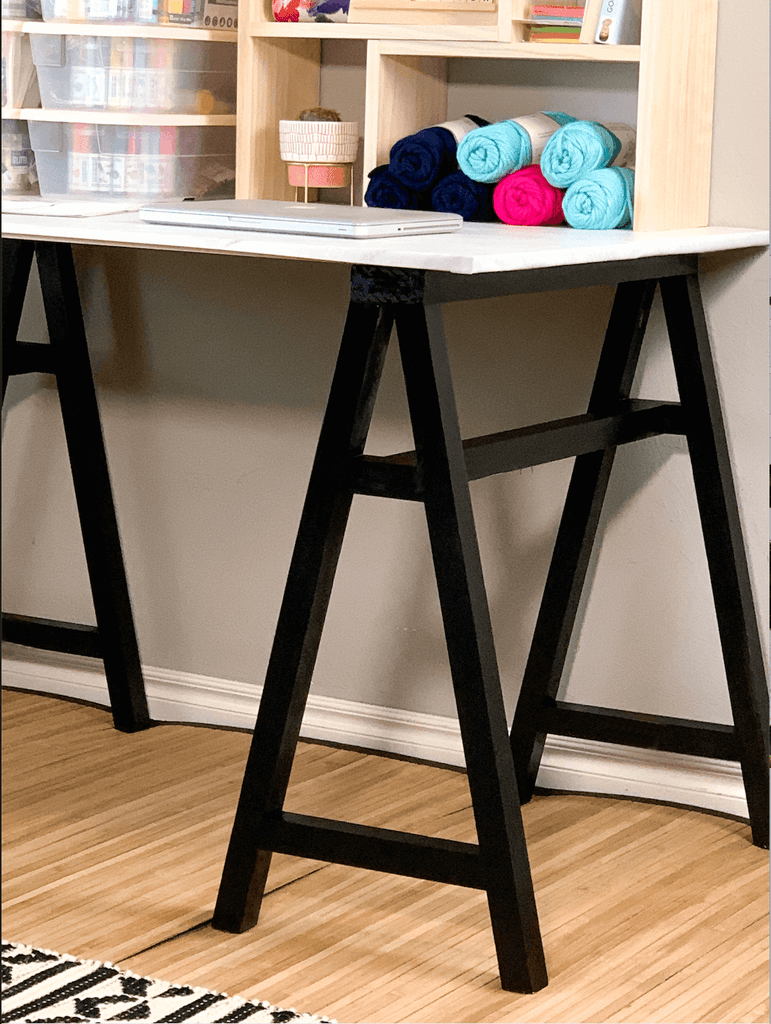
"There are some affiliate links in this post, meaning I get a small commission if you purchase through these links, at no cost to you. Click Here to read my full disclosure."
Dimensions
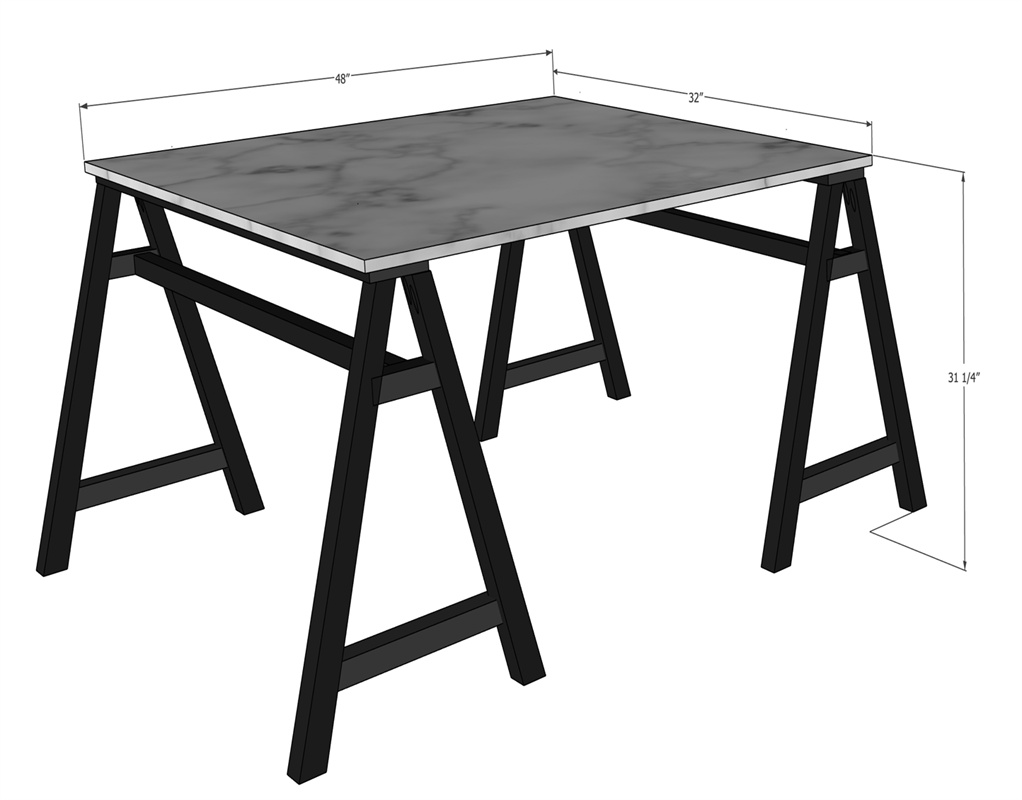
Materiels List
- 1 - 2x4x8
- 6 - 2x2x6
- 3/4" piece of plywood
- 2 1/2 Pocket Hole Screws
- Wood Glue
- 2" Brad Nails
- Black Spray Paint
- Contact Paper
- 3M Adhesive Spray
Tools Used
Step 1: Create Sawhorse Craft Desk Frame
First I started off with the sawhorse desk frame. You may need to plane down your 2x4s to make sure its straight. Once I had my 2x4s ready, I then used my handy dandy Kreg Jig to drill pocket holes into the sawhorse legs.
I made sure to drill the pocket holes on the inside of the legs to make sure the pocket holes were hidden.
I then attached the legs to the sawhorse using my impact drill and pocket hole screws. I made sure to add four legs to each sawhorse.
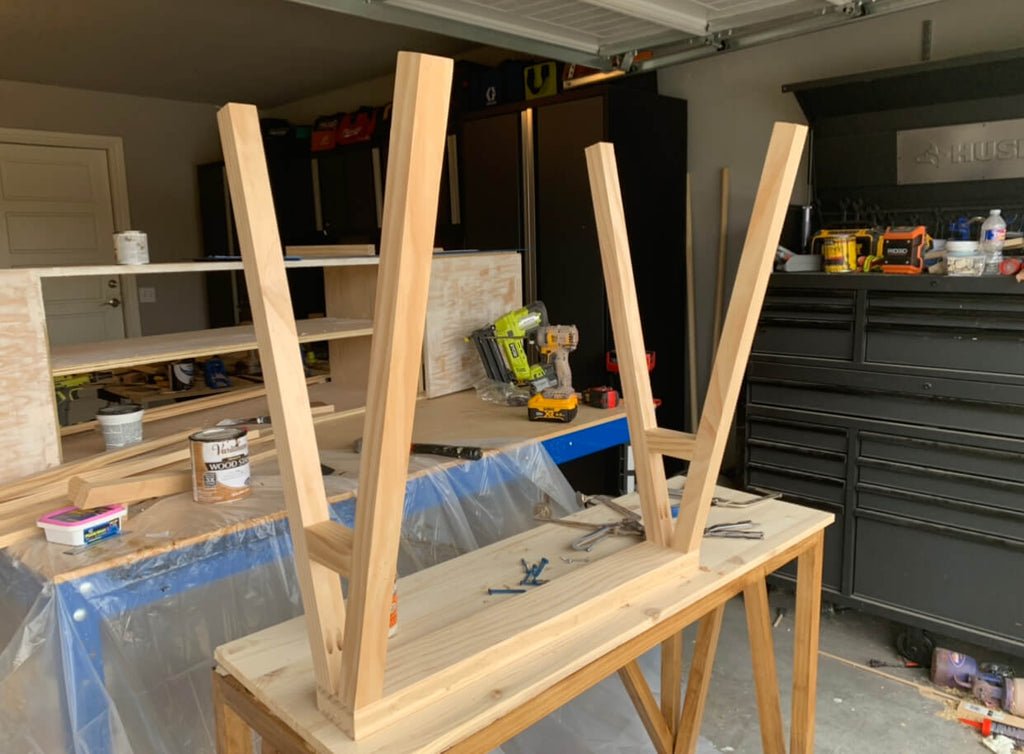
To make sure the legs sit straight on the floor, I had to make sure to angle the top and bottom of the legs. Once the legs were attached. I used my right Kreg Clamps to help add in the side pieces. I always rave about these clamps. If you build by yourself often, these clamps come in handy if you use pocket holes often.

Step 2: Attach Middle Sawhorse Support
Once I got the frame all assembled, I added in the middle support. I attached the middle top support to the outer frame using pocket hole screws and used my right angle clamp here again to hold it into place while I drilled in the pocket hole screws.
I made sure to use a lot of wood glue on the places where I joined the wood together to make sure the desk had extra strength. You can never have enough wood glue!
The sawhorses were super simple to make, I knocked this out in about 30 minutes. If you are a beginner woodworker, this would be a great project for you to try.
Step 4: Cut out Sawhorse Desk Top
Once I had the sawhorses complete, I used my Kreg Adaptive Cutting System to cut the desktop down. I absolutely love this system; if you don't have a table saw this is a great alternative to have to cut down sheet goods.
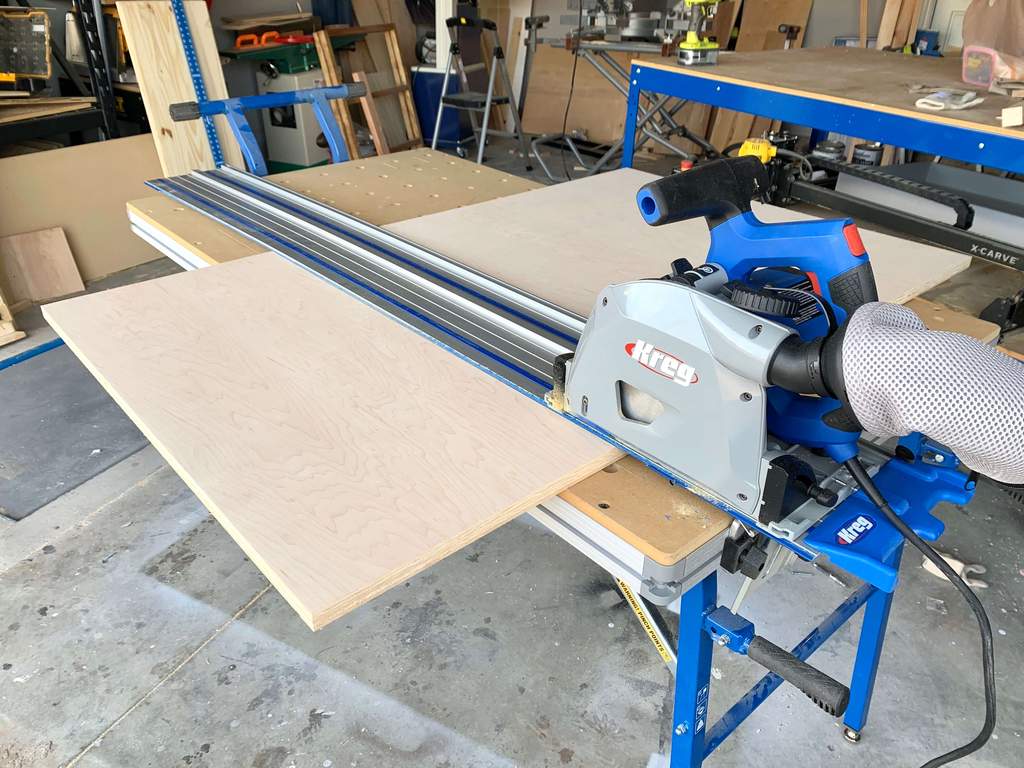
I cut down a 3/4" piece of plywood for the desktop easily with this system. If you are debating whether to get this tool, let me save you some time, you should definitely invest.
Step 5: Prep and Paint Sawhorse Desk
I opted to go with all black for the legs because I wanted a more modern feel and Im so glad I did. For this particular project, I wanted to try out this COLORSHOT Spray Paint so I decided to coat the legs with it.
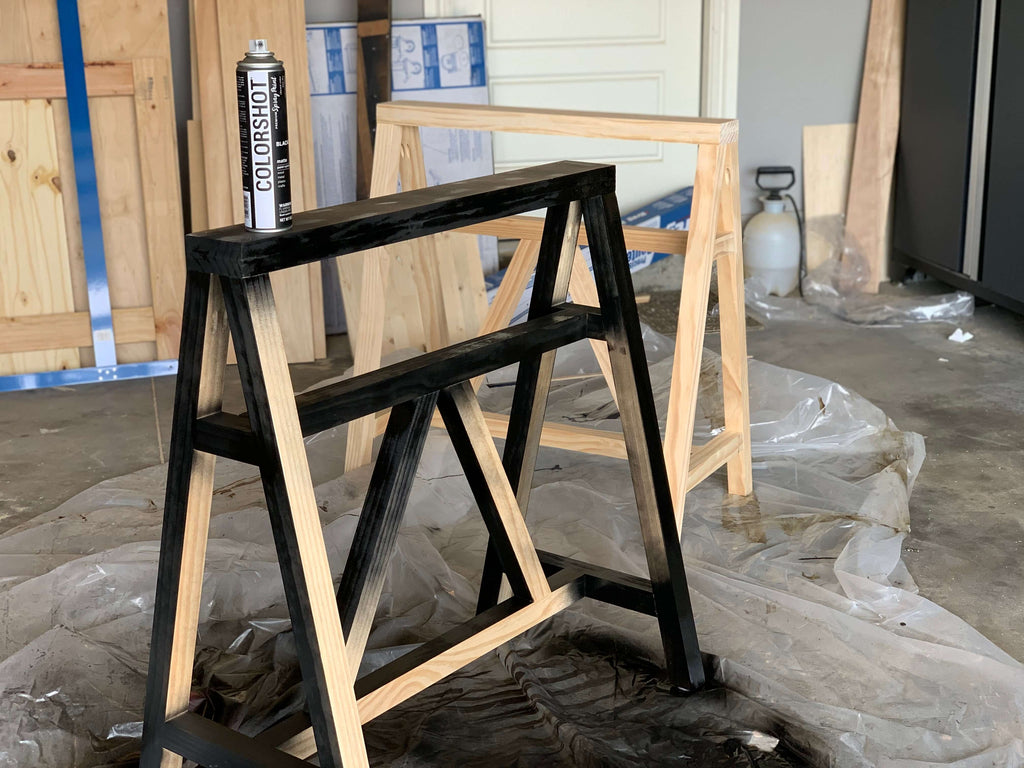
It did give it a good coat, but it took quite a bit of spray paint for the legs to look completely black. Next time, I think I may try painting it with a white primer first, but it still would likely equal the same amount of paint.
Another alternative could be using interior paint and a spray painter, either way there are many options to achieve this look, so are your pick.
Step 6: Apply Contact Paper
For the desk top, I wanted the look of marble but the easy way, so I decided to add contact Paper to the top. I started adding the contact paper to the desktop. One of these rolls covered the desk but I had to cut the last row in half for it to fit.
If you want the second row to be completely seamless, you will likely need to get two of these contact paper rolls. I also decided to add a little 3M Adhesive to the sides for more stick. The adhesive is great on the top of the desk, but the adhesive allowed the contact paper to hold on to the sides a lot better than without.
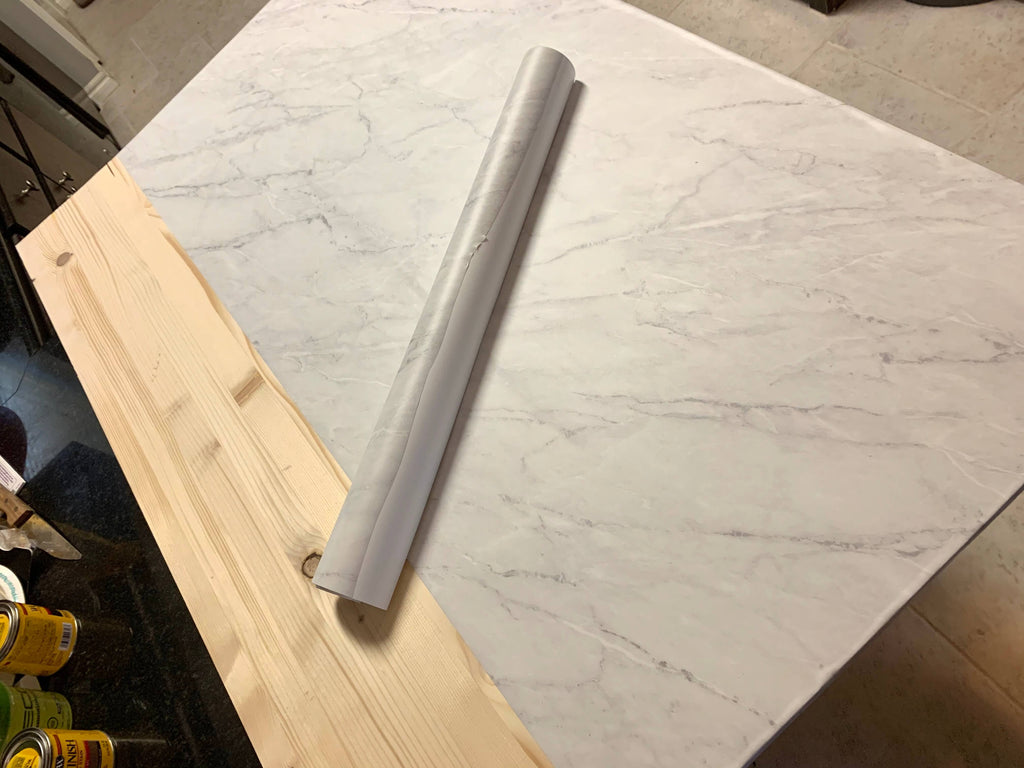
This contact paper was a super easy way to give a modern marble feel. Once the contact paper was set, I screwed a few screws through the legs to attach the desk and WAA-LAAH, here we have it, a modern DIY Sawhorse Desk.
I can't wait to see you guys tackle this project. If you want to get the free plans for this desk head on over to build something for the free plans.
Click Here for Free Plans at Build Something!
Even better news, if you don't quite love this design, I've built a similar sawhorse desk to this one! If you like the alternative below, you can check that one out here.
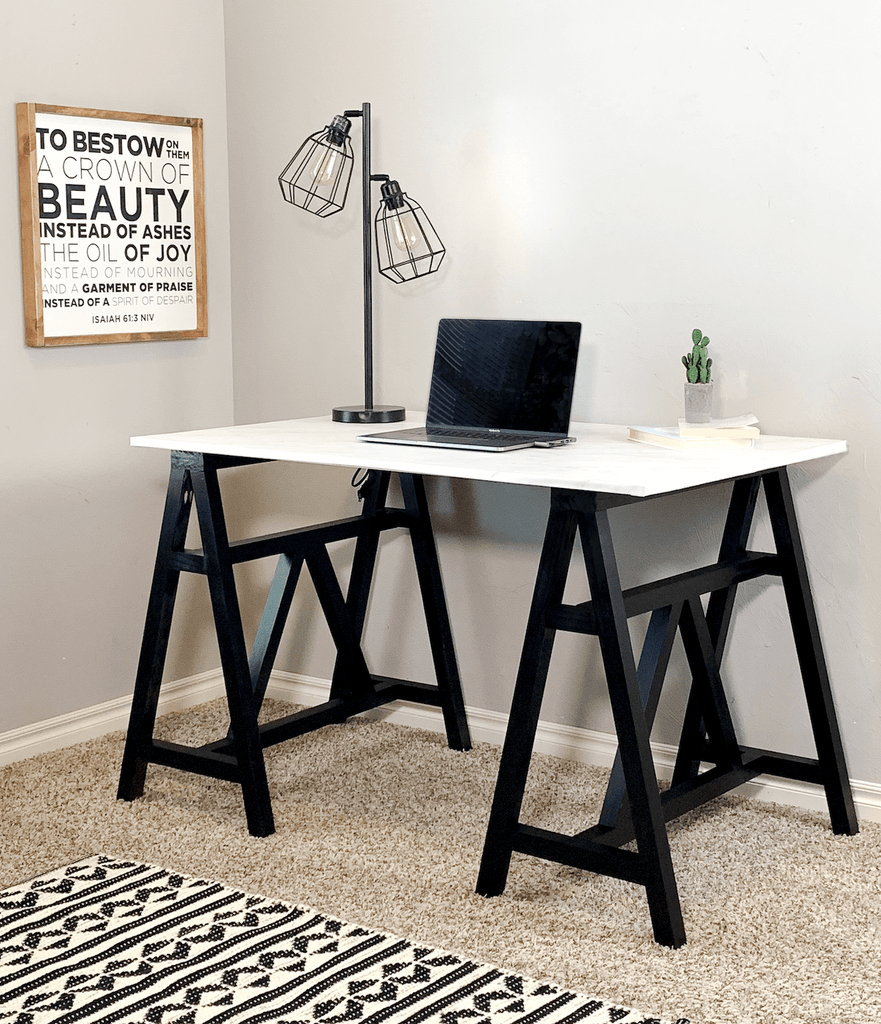
But before you go, let's take one last look at this design!
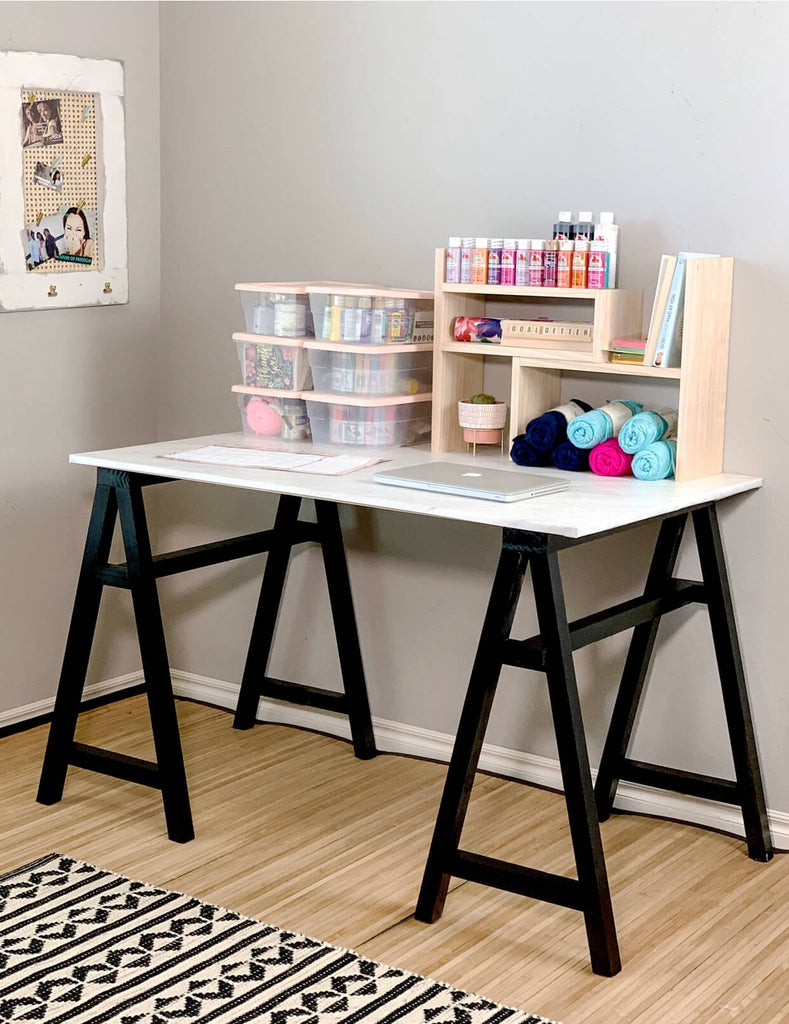
As always, thanks for reading guys, XOXO Ashley.

DIY Sawhorse Desk
"This DIY Sawhorse Desk is giving me all the modern feels."
I always love a good desk, so I am super excited to share this new desk I recently built. It's giving me so many good vibes. I have always loved the sawhorse desk trend, but never had the chance to build one, so of course I had to put a fun spin on it, and I am so excited with how it turned out.
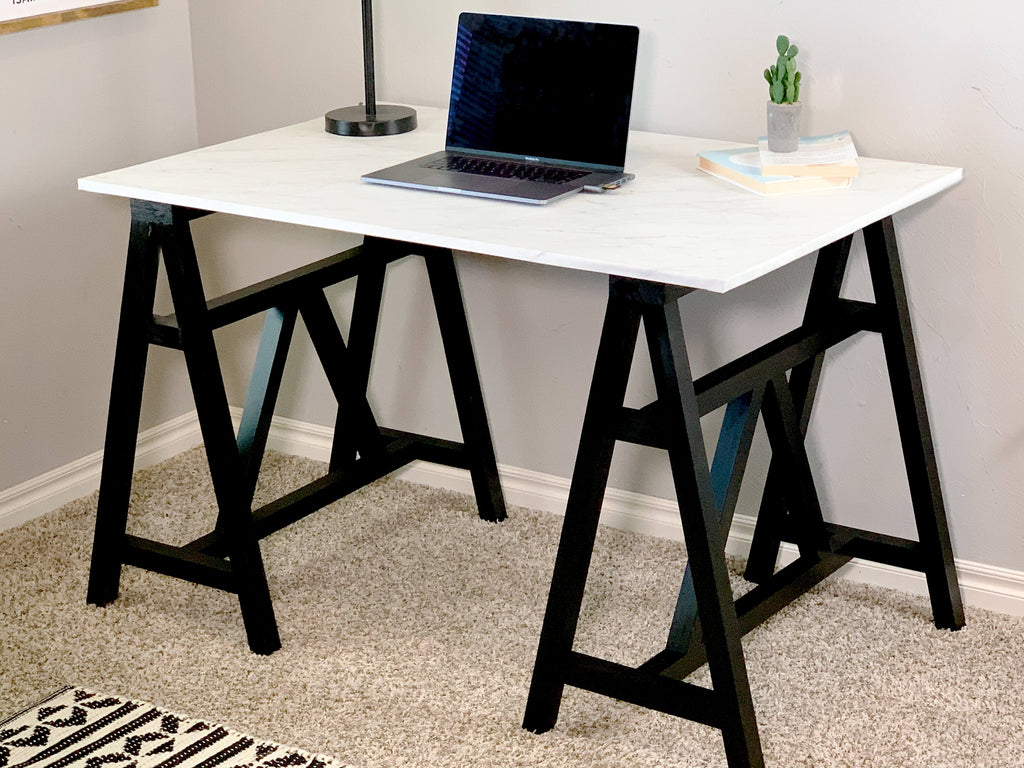
What I really love about this design are the desk legs; Im so in love with this design I can't contain my excitement. If you're looking for a fun desk to spruce up your craft room, look no more! I think you've found the one.
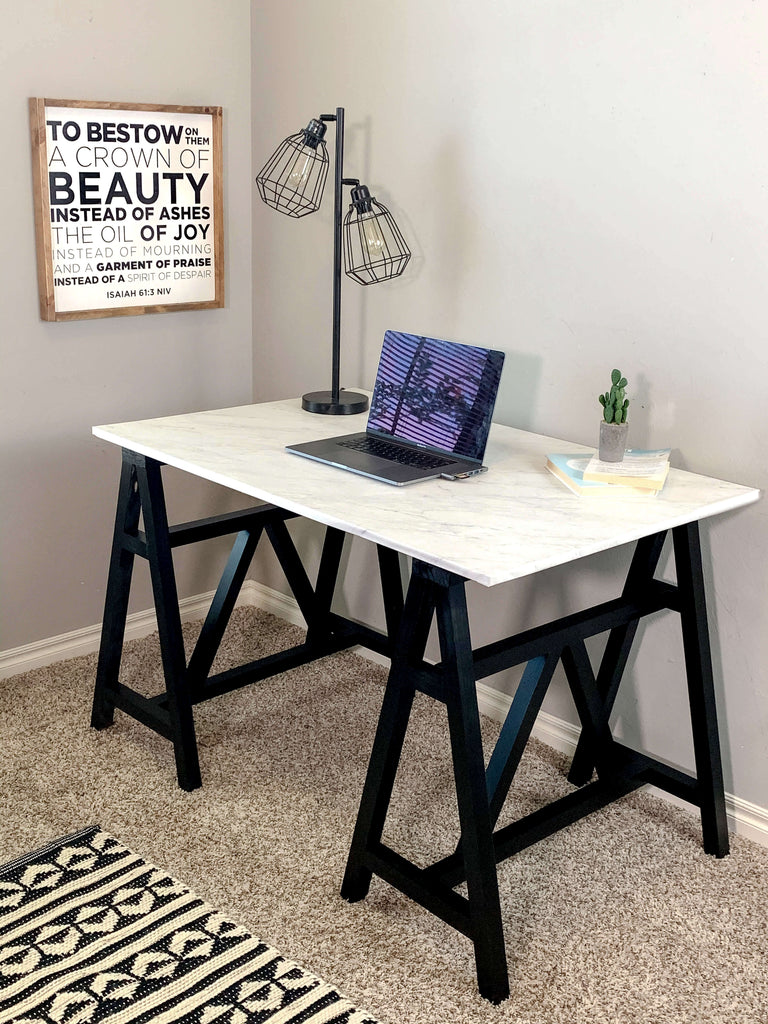
"There are some affiliate links in this post, meaning I get a small commission if you purchase through these links, at no cost to you. Click Here to read my full disclosure."
Dimensions

Materiels List
- 1 - 2x4x8
- 8 - 2x2x6
- 3/4" piece of plywood
- 2 1/2 Pocket Hole Screws
- Wood Glue
- 2" Brad Nails
- Black Spray Paint
- Contact Paper
- 3M Adhesive Spray
Cut List
* See Detailed Plans for Cut List
Tools Used
Step 1: Create Sawhorse Desk Frame
First I started off with the sawhorse desk frame. You may need to plane don your 2x4 to make sure its nice and straight. Then I used my handy dandy Kreg Jig to drill pocket holes into the sawhorse legs.
I then attached the legs to the sawhorse using my impact drill and pocket hole screws. I made sure to add four legs to each sawhorse.
To make sure the legs sit straight on the floor, I had to make sure to angle the top and bottom of the legs. Once the legs were attached. I used my right Kreg Clamps to help add in the side pieces.
Step 2: Attach Middle Sawhorse Supports
Once I got the frame all assembled, I began adding in the middle supports. I attached them to the outer frame using pocket hole screws and used my right angle clamp here again to hold it into place while I drilled in the pocket hole screws.
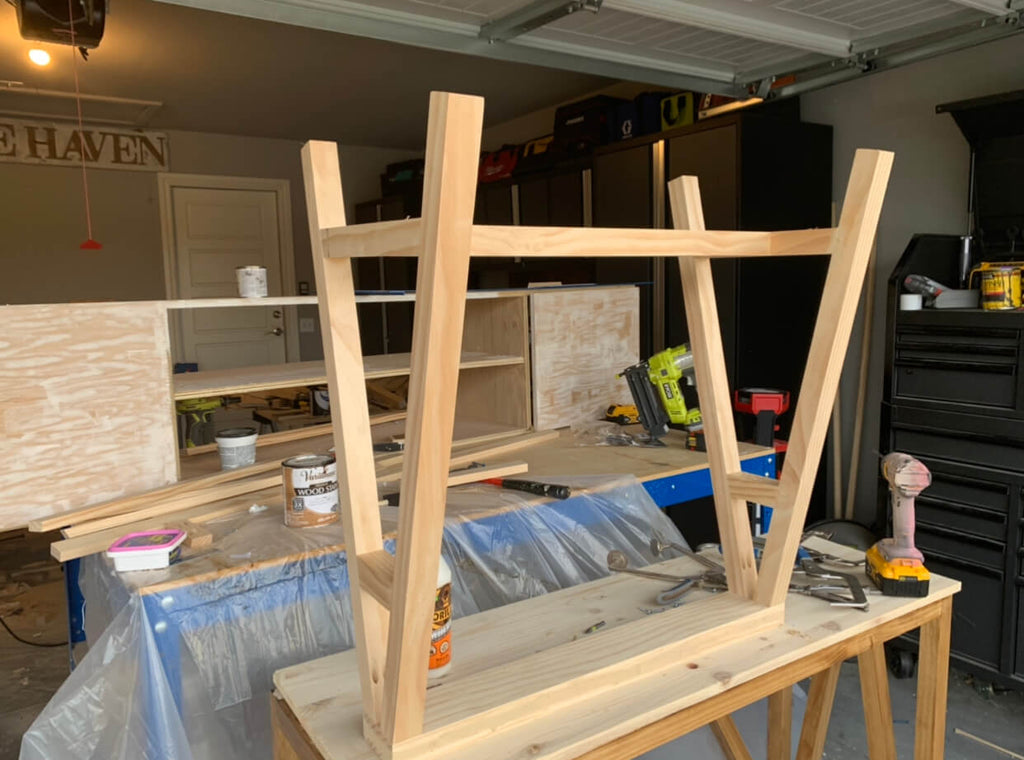
I added supports to both the top and bottom side supports. I made sure to use a lot of wood glue on the places where I was joined the wood together to make sure the desk has extra strength. You can never have enough wood glue!

Step 3: Attach Decorative Trim
Once the middle supports were all in, I began adding the decorative trim. I used brad nails and wood screws to make sure the supports were secured to the middle supports.
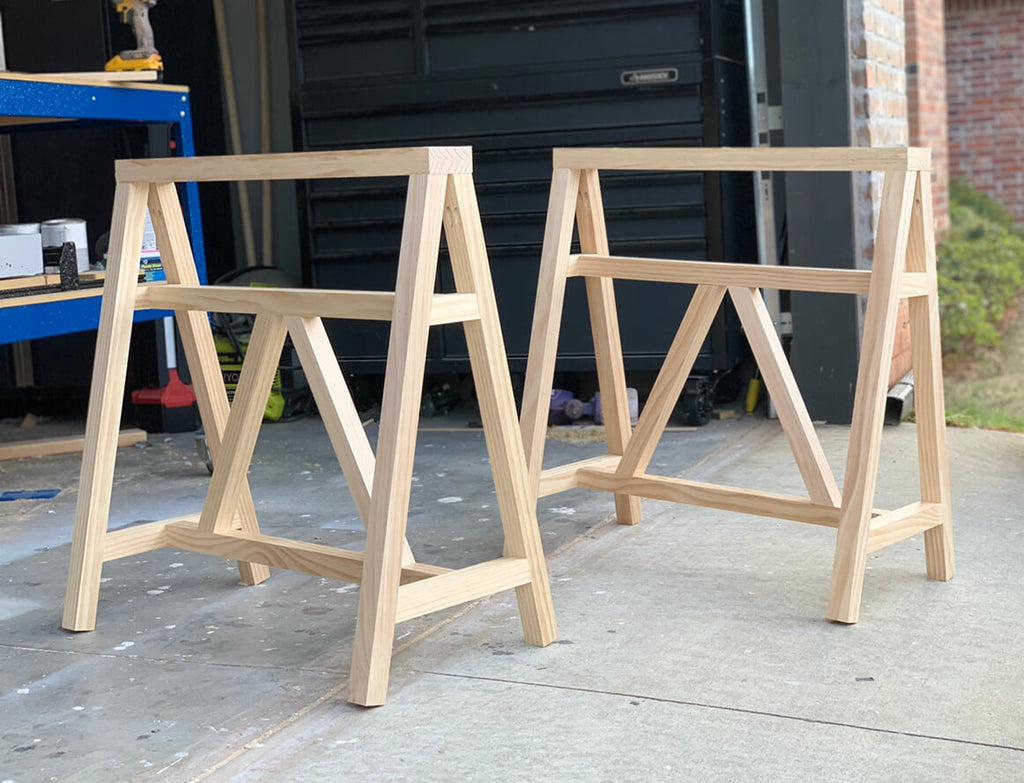
I really love how the trim add a decorative feel to the sawhorse legs. I think it gives it a modern, playful feel. I've seen a lot of sawhorse desk designs, but not one quite like this one.
Step 4: Prep and Paint Sawhorse Desk
I opted to go with all black for the legs because I wanted a more modern feel and Im so glad I did. For this particular project, I wanted to try out this COLORSHOT Spray Paint so I decided to coat the legs with it.
It did give it a good coat, but it took quite a bit of spray paint for the legs to look completely black. Next time, I think I may try painting it with a white primer first, but it still would likely equal the same amount of paint.
Another alternative could be using interior paint and a spray painter, either way there are many options to achieve this look, so are your pick.
Step 5: Apply Contact Paper
For the desk top, I wanted the look of marble but the easy way, so I decided to add contact Paper to the top. Once I cut out the desk top, I started adding the contact paper to the desktop. One of these rolls covered the desk but I had to cut the last row in half for it to fit.
If you want the second row to be completely seamless, you will likely need to get two of these contact paper rolls. I also decided to add a little 3M Adhesive to the sides for more stick. The adhesive is great on the top of the desk, but the adhesive allowed the contact paper to hold on to the sides a lot better than without.
This contact paper was a super easy way to give a modern marble feel. Once the contact paper was set, I screwed a few screws through the legs to attach the desk and WAA-LAAH, here we have it, a modern DIY Sawhorse Desk.
I can't wait to see you guys tackle this project. Even better news, if you don't quite love this design, I've built a similar craft desk to this one! If you like the alternative below, you can check that one out here.
But before you go, let's take one last look at this design!
As always, thanks for reading guys, XOXO Ashley.