
Projects

DIY Bathroom Makeover: How I Transformed My Space Without a Contractor
Revitalize your space with ease, Home Depot offers the tools to get it done.
"This post is sponsored by The Home Depot."
If you’ve ever scrolled through Pinterest or Instagram and thought, “I wish my bathroom looked like that , but I can’t afford a remodel,” I’ve got good news. You don’t need a professional (or a massive budget) to give your bathroom a total refresh!
I recently took on a weekend project to transform my bathroom with new wallpaper, updated lighting, a modern vanity, and some stylish mirrors all on my own. Here’s how I did it and how you can, too.
There are some affiliate links in this post, meaning I get a small commission if you purchase through these links, at no cost to you. Click Here to read my full disclosure.
Explore a variety of high-quality Glacier Bay products available exclusively at The Home Depot.
- Glacier Bay Oswell 4-Piece Bath Hardware Set
- Glacier Bay Rory 72 in. Double Sink Walnut Bath Vanity
-
Glacier Bay 24 x 30 Medicine Cabinet with Mirror
- Glacier Bay Two Handle Bathroom Faucet
Supporting Products
- Vanity Lights
-
Tropical Textured Wallpaper
- Peel and Stick Floor - Carrara Marble
- Peel and Stick Floor - Smoke Slate
The Before
Here is a look at how the bathroom looked before. A little outdated and in need of a fresh makeover.

![]() Step 1: Plan Your Vision and Budget
Step 1: Plan Your Vision and Budget
Before picking up a paintbrush or screwdriver, I created a simple mood board. Pinterest and Canva are perfect for this! Think about:
-
Style: modern farmhouse, boho, minimalist, glam?
-
Color palette: keep it cohesive, 2–3 main tones work best.
-
Budget: list every item you’ll need (wallpaper, tools, lighting, etc.) and set a spending cap.
💡 Tip: Always add 10–15% extra to your budget for surprises — they always happen!

Step 2: Update the Lighting
Swapping out your light fixtures makes the biggest difference. I replaced my old fixture with two sleek, modern vanity lights that fit my new aesthetic.
You’ll need:
-
A screwdriver
-
Voltage Tester Pen
-
Wire connectors (Always turn off the power first!)
If you’re not comfortable with wiring, you can always call a friend who is; it’s still way cheaper than hiring a pro.

Step 3: Add Wallpaper for Instant Character
Wallpaper is a game-changer. It adds texture and pattern without a full renovation.
My process:
-
Cleaned the walls thoroughly.
-
Used traditional wallpaper (with a good adhesive!).
-
Started from the corner and smoothed out bubbles with a squeegee.
💬 Pro tip: Choose moisture-resistant wallpaper if your bathroom gets steamy
Just look how that wallpaper totally transformed the space! The great thing is that it is easy to tackle for any beginner and a budget friendly way to drastically transform a space.

This wallpaper was such a showstopper; it's definitely making a statement.

Step 5: Install a New Vanity
This was the centerpiece of my remodel! I chose this beautiful walnut assembled vanity with built-in storage.
Here’s what I did:
-
Turned off the water supply.
-
Disconnected the old sink and vanity.
-
Slid in the new one, reconnected plumbing, and sealed around the edges with silicone.
It instantly made the space look high-end!

Step 5: Add Mirrors That Reflect Your Style
Mirrors do more than just show your reflection, they bounce light around and make your bathroom look bigger. I went with a pair of mirrors with rounded edges and a medicine cabinet to frame my double sink.
Here’s what I did:
- Locate the stud on the wall and mark it with my laser level
- Hold up the mirror to mark the holes
- Insert anchors for the other side
- Attach the mirror to the wall with screws and a drill
Quick tip: Measure carefully before drilling; symmetry makes a huge visual impact! and Always try to hang heavier items on a stud.

Step 6: Install Your Faucets for a Fresh, Polished Look
Swapping out your old faucets instantly updates your vanity and gives the whole bathroom a more elevated feel.
Here’s what I did:
-
Followed the manufacturer’s instructions to install the new Glacier Bay faucets (the step-by-step guide makes it super easy).
-
Used plumber’s tape and plumbers putty to prevent leaks and ensured all connections were snug but not over-tightened.
-
Turned the water back on and checked for any drips before sealing everything up.

These small upgrades made a huge difference in how modern and refreshed the space feels.
💡Pro tip: Choose faucet finishes that coordinate with your mirror and towel hardware—it’s an easy way to make the space look cohesive and high-end. (I love mixing hardware, so I don't always follow this rule)

You guys peep those floors! These peel and stick floors really tied it all in.
Step 7: Add a Towel Bar and Ring for Function & Style
Once the big items were in, I focused on the small but impactful details, like new towel hardware.
Here’s what I did:
-
Installed a matching towel bar for bath towels.
-
Added a towel ring beside the vanity for easy hand-towel access.
-
Used a level and measuring tape to make sure everything lined up perfectly.

These small touches not only tie the look together but also make the bathroom feel polished and intentional.
💡Pro tip: Match your towel hardware finish to your faucet or light fixtures for a cohesive design.
The Final Touches
Once everything was installed, I added finishing touches, new towels, a few plants, and framed art. These small details tie everything together.
The Final Reveal
This project proved that you don’t need a contractor or massive budget to love your bathroom. With a weekend (or two), some planning, and a little courage, you can completely transform your space yourself.

Whether it’s a full renovation or a small update, Glacier Bay has the style and value you’re looking for. For this makeover, I focused on a few key updates that made a big impact without a full remodel.

Each of these updates was simple enough to tackle on my own, but together they completely transformed the bathroom. It’s proof that small changes really can make a big difference and that you don’t need a professional to create a space you love coming home to.


Glacier Bay has officially impressed me with their pieces. This refresh is right in line with some of my other high dollar renovations and that's saying something!

As always, thanks for reading guys!

Girl Bedroom Makeover | Will The Color Stick Ep3
Sydney gets a Birthday room transformation.
I am so excited to share this room makeover with you because this one wasn’t just a design project, it was a birthday surprise. Sydney, my client, is a fun, creative, and opinion-filled 10-year-old who had been dreaming of a more “grown-up” space. Her mom applied to make that wish come true just in time for her birthday.
This tween bedroom makeover features a modern blend of soft blue paint, bold patterned wallpaper, improved storage, and intentional styling. The room was redesigned to transition from a playful childhood space into a more mature, organized, and personality-filled tween room, perfect for growing into.
From rendering, to paint, to wallpaper, and finally styling, every step was intentionally planned to create a room that could grow with her while still feeling fun and expressive. And the best part? When she walked in for the room reveal, her reaction made every detail worth it.
The Before
When I first stepped into the room, it was full of personality, color, and memories, but it lacked structure, storage, and a cohesive design. The walls were a bold coral hue, artwork and posters were placed wherever there was space, and furniture had slowly evolved without a true layout plan. Like many kids' rooms, it had become a mix of favorite things rather than a functional space that supported sleep, play, studying, and organization.

There was so much potential ,trophies, artwork, stuffed animals, and personal pieces worth celebrating, they just needed a space where everything had purpose and a little breathing room. The goal wasn't to erase personality but to refine it, organize it, and build a room that could grow with Sydney.
The Design Plan
Every great room transformation starts with listening. For this project, my client had a clear wish list:
✔️ a soft blue palette
✔️ bold black elements for contrast
✔️ a place to proudly display trophies and medals
✔️ posters and personal artwork incorporated into the design
The challenge was blending those playful elements with a layout and style that would still feel elevated, organized, and able to grow with her over time. Instead of guessing how everything would come together, I moved into the planning phase with a 3D rendering.
 Before committing to furniture, paint colors, or wallpaper, I created a full digital rendering of the space. This step is honestly a game changer. Not just for me as a designer, but especially for clients.
The rendering allowed us to:
-
Test bold design choices (like the black patterned wallpaper and deep navy curtains)
-
Visualize furniture scale and placement
-
Make decisions about wall décor layout before making a single nail hole
-
Confirm that the soft blue tones would balance the graphic patterns and still keep the room feeling calm
It also helped us refine the details: rug size, desk location, bedding tones, and even trophy display placement. I did leave the shelving area simple to make adjustments at the end but removed the guesswork for everything else.
Once everything arrived, the fun part began, making the rendering come to life. Painting the Room
Painting the Room
Once the room was cleared and prepped, paint was the first major step in setting the tone for the redesign. The original bright coral walls were full of energy, but they didn't align with the calm, modern direction we envisioned. So we started fresh with Benjamin Moore Swiss Coffee. It created a perfect blank canvas without feeling stark or cold.
 A question I know some people will ask is: “Why paint the walls if you're just going to cover them with wallpaper?” and here’s the simple answer: because it’s the professional way to do it.
Painting first creates a clean, even surface so wallpaper adheres properly and looks its best. Any uneven color, patchy drywall, or previously bold paint (like the coral walls we started with) could show through lighter wallpaper or affect how the pattern reads.
But there’s another bonus: future-proofing.
Wallpaper trends change and kids grow, one day this wallpaper may come down. When that happens, the room already has a fresh, neutral foundation. Instead of peeling off paper and revealing a loud background color or patchy walls, everything underneath is smooth, clean, and move-in ready.
So even though the wallpaper steals the spotlight, the paint still plays an important behind-the-scenes role, setting the stage now and protecting the room later.
 After the base was complete, we layered in color with Benjamin Moore Yarmouth Blue. This shade brought in the soft, peaceful blue tone my client originally requested, soothing enough for a bedroom, but still rich enough to make a statement. Using it selectively helped define the room’s design zones and brought depth back into the space without overwhelming it.

This two-tone approach allowed us to balance calm neutrals with personality and gave the room a fresh foundation for all the styling and décor that followed.
Installing the Wallpaper
Selecting the wallpaper was one of the defining moments of this design. We wanted something modern, bold, and full of personality, but still timeless enough to grow with the space. After exploring several options, we landed on two striking patterns from Happy Wall:

These bold patterned wallpapers pair beautifully together because they share a similar scale and rhythmic flow, but each brings its own mood. The black and cream design creates a high-contrast statement moment, while the softer geometric layout on the adjacent wall adds balance and warmth.
Side by side, they transform the room into a space that feels curated, intentional, and full of style, not just decorated. The patterns became the backbone of the entire design direction, influencing furniture selection, color palette, and even the artwork we chose later.

If you're wanting to hang wallpaper but a little nervous about the process; check out my hanging wallpaper tutorial to help!
Styling the Room
Designing this room was such a fun challenge because Sydney had a very specific wish list: soft blue tones, bold touches of black, trophies proudly on display, and wall art and posters that felt personal and meaningful. The goal was to blend style with personality, something that feels polished and intentional, but still reflects the playful energy and accomplishments of the person living in it.
Furniture Pieces
I started with a soft blue backdrop to bring calmness and balance to the space. Because blue can lean serene and subtle, I contrasted it with graphic black elements, like the bold wallpaper pattern and deep navy curtains, to create visual interest and maturity. Storage was another key factor, so I incorporated baskets, shelving, and a clean-lined dresser to keep everything organized without sacrificing aesthetics.
Decor Pieces
- Rug
-
Curtains (
Avalon Blue Heritage Plush Velvet Room Darkening Curtain)
- Curtain Rod
- Table Lamp
- Hanging Baskets
- Circle Metal Accent Shelves
- Cane Shelves
- Acrylic Bookshelves
- Big Art Print
- Vanity Mirror
The trophy and medal displays were a highlight of the design process. Rather than tucking achievements away, we showcased them using modern round shelves so they feel like decor while still being accessible and meaningful. Soft textures, like the accent pillows, quilted blanket, and cozy rug, helped soften the bold patterns and add warmth.
In the end, the room feels like a perfect balance: soft but structured, playful but elevated, and full of personality. And most importantly, my client loves it.
Final Reveal
This room was such a fun one and I was able to incorporate all of the little things Sydney wanted. From the fun patterns, right down to the decor.
Sydney's mom requested a new big girl's room and this corner of the room shows just how playful and grown-up a kid’s space can feel at the same time.
 The bold black-and-cream wavy wallpaper sets a modern backdrop while the deep navy curtains add the perfect contrast. The upholstered bed softens the space with cozy curves, layered bedding, and a mix of fun pillows and stuffed animals that show off Sydney's personality.
This gallery wall is where the room’s personality truly shines. Sydney loves posters, so creating a curated art moment was a must. The mix of pieces brings together inspiration, bold style, and a little sparkle. At the center, a striking editorial-style portrait becomes the anchor of the wall, surrounded by soft, motivational prints like “You got this” and “dare to dream.” A colorful disco ball painting adds a fun, whimsical touch, while the abstract figure print grounds the arrangement with calm simplicity. All of it stands out beautifully against the geometric wallpaper, turning this corner into a stylish and confidence boosting focal point.

On the left, a simple wood desk paired with a glowing vanity mirror creates a sweet spot for homework, creative play, or getting ready. This was one of Sydney's first requests; so I made sure to create a separate area just for it. The patterned rug ties everything together and adds texture underfoot, balancing all the graphic elements in the room.
 This side of the room highlights how functional storage can still feel stylish. The light wood dresser brings warmth and clean lines, topped with a sculptural lamp that gives off a soft, inviting glow. Wall-mounted baskets neatly hold plush toys, while a small shelf displays favorite characters.
 Above the dresser, round gold shelves showcase medals and trophies, turning achievements into artwork. The framed collage adds a personal touch, making this wall feel loved, lived-in, and uniquely hers. The geometric rug continues across the space, tying the two sides of the room into one cohesive design.
 Last but not least, I created this little reading display area because Sydney loves reading books. It was a simple way to both display her book and create some more organization for all of her things!

As always, Thanks for reading guys!
Square Footage Calculator
Square Footage Calculator
Calculate the area of any rectangular space
💡 Tip: Works great for rooms, yards, flooring, and any rectangular area!

How to Hang Wallpaper | Tips and Tricks
Let's stroll together through the wallpaper installation process, with some handy tips and quirky tricks to keep things smooth sailing!
Wallpaper has easily become one of my favorite projects to tackle because it brings so much personality to a space. I've officially wallpapered all of the walls in my home and I'm always looking for an extra room where I can install some, but today I will be walking you though how to tackle your own wallpaper project!

Tools Needed to Install Wallpaper
- Laser Level
- Wallpaper Adhesive
- Paint Roller/ Paint Stick
- X-Acto/ Additional Blades
- Smoothing Tool/ Joint Knife
- Roll of Paper Towels
Step 1: Choose Your Wallpaper Design
Here are some things to consider when trying to find the right wallpaper for your project:
Consider the Room Type
-
High-moisture rooms (like bathrooms or kitchens): go for vinyl wallpaper, they’re more moisture resistant and easy to clean.
-
Living rooms, bedrooms, or offices: paper or fabric-backed wallpaper offers a more luxe texture and depth.
Think About Pattern Scale
-
Large patterns make a bold statement but can overwhelm small rooms; they shine on accent walls.
-
Small or subtle patterns work best in tighter spaces or if you want something more classic and less busy.

Mind the Lighting
-
Natural light brings out color and texture; darker wallpapers can make dim rooms feel smaller, while lighter tones open them up.
Order Samples First
-
Always order swatches or sample rolls before committing. Tape them on the wall and look at them at different times of day to see how they play with your lighting and decor.
Pattern Match & Repeat
-
Before buying, check the pattern repeat; that’s how often the design starts over. Larger repeats look beautiful but mean you’ll need more wallpaper to line up the design correctly (we’ll cover that below).
If you didn't know, I released my own wallpaper collection, with a bunch of fun and bold designs; so that is a great place to start if you're looking for a wallpaper design.

Here are a few other places with some great wallpaper designs:
- Spoonflower
- Copper corners
- Chasing paper
- Milton & King
- Drop It Modern
- Mitchell & Black
- Tempaper
- Astreetprints.com
- Carter and Main
- Graham & Brown
- Flavor Paper
- Roommates Decor
- Backdrop
- AllModern
- Jungalow
- Minted
- Flavor Paper
- Kate Zaremba
- Hovia
- Hygge & West
- Walnut Wallpaper
Step 2: Figure Out How Much Wallpaper You Need to Buy
1. Measure Your Walls
-
Measure the height and width of each wall you’re covering.
-
Multiply the two to get the square footage per wall.
-
Example: a wall that’s 8 ft high × 10 ft wide = 80 sq. ft.
-
-
Add up the square footage for all the walls you’ll cover.
2. Subtract Large Openings
-
Subtract the square footage of doors and big windows, but it’s usually smart to leave them in if you’re new to wallpapering (it gives you a small buffer).
3. Check the Wallpaper Roll Coverage
-
A standard single roll in the U.S. covers about 28 sq. ft. Some wallpapers are sold as double rolls, which cover around 56 sq. ft.
(Always check your specific wallpaper’s label for exact coverage.)
4. Account for Pattern Repeats
-
If your wallpaper has a pattern repeat, you’ll need extra paper to match the design across seams.
-
Add 10-15% extra to account for patterned wallpaper.
6. Always Round Up
-
Wallpaper dye lots can vary slightly, so it’s better to buy one extra roll from the same batch just in case you need to replace a strip later. There have been a number of times where I have ordered the same wallpaper in different batches and the colors are slightly off. It's better to buy extra than buy it in two separate lots.
Quick Tip:
If math isn’t your thing, many wallpaper brands and retailers have online calculators. Feel free to use this one if needed!
 Step 3: Prep Your Walls
Start with Smooth Walls Fill in holes, sand rough patches, and clean off dust or grease. A smooth, clean surface helps the wallpaper adhere evenly and prevents bumps.
I have personally installed wallpaper over a number of textured walls, but if your walls is very textured, it way be wise to skim coat first to get a smooth wall first.
If you're interested in Skim Coating, check out our video tutorial here.
Step 4: Set Up Your Laser Level
Never assume your wall or corner is perfectly straight, they rarely are! Use a Laser Level to Set Your First Line.
This is one of the most important steps. A laser level projects a perfectly straight vertical (plumb) line that you can use to align your first strip.
If your first strip goes up crooked, even by a little, every following strip will follow that same angle, and by the time you reach the other side of the wall, your pattern will look slanted.

Step 5: Apply Your Wallpaper Adhesive on the Walls
Before applying anything, check what kind of wallpaper you have:
-
Pre-pasted: The adhesive is already on the back, you’ll just need to activate it with water.
-
Unpasted (traditional): You’ll apply paste either to the back of the wallpaper or directly to the wall.
-
Peel-and-stick: No adhesive needed; skip this step.
Use the Right Paste
-
Use the adhesive recommended for your wallpaper type, vinyl wallpapers need a stronger paste than paper ones.
-
If in doubt, choose a clear, strippable adhesive (it’s easier to clean and remove later).
Apply Evenly
-
Use a paint roller or brush to spread the adhesive evenly on the wall (or the back of the paper if required).
-
Avoid thick globs; too much paste can cause bubbles or weak adhesion.
Mind Your Laser Line
-
Keep that laser line visible; it’s your guide for laying the first strip perfectly straight.
-
Only paste a section slightly wider than your strip so the line stays clear and doesn’t get covered in adhesive.
Let It Settle (If Needed)
-
If you’ve pasted the wallpaper itself, let it “book;" fold the pasted sides together (glue-to-glue) for about 5 minutes to let it absorb and relax before hanging.
Quick Clean-Up
-
Keep a damp sponge or paper towels nearby to wipe any paste that seeps out of the seams or gets on your trim.
Step 6: Install Your Wallpaper
When installing your wallpaper; keep the following in mind!
Measure and Cut with Extra Length Add 2–3 inches to the top and bottom of each strip to allow for trimming at the ceiling and baseboard.
Work from the Top Down - Use a smoothing brush or plastic smoother to press out air bubbles as you go. Always work from the center outward.
Wipe Excess Paste Right Away- Keep a damp sponge/paper towel handy to clean paste from seams and the ceiling/baseboard area.
Check Alignment as You Go Every few strips, re-check with your laser level to make sure your pattern is still plumb. Walls can shift slightly, especially in older homes.
Trim Cleanly Use a X-Acto Knife and a straightedge(joint knife) to trim at the top and bottom for crisp edges.

Step 7: Enjoy Your Wallpaper Project
Hopefully these tips and tricks will help you along on your next wallpaper project and as always, thanks for reading guys.

Office Transformation | Will the Color Stick Episode 1
Witness the magical transformation of this office through the captivating use of the color blue in the premiere episode of 'Will the Color Stick.'
I always love a good office makeover and this one is especially my favorite because it's the premier of my new room makeover series; "Will the Color Stick?" A series where the color of my client's rooms are up to the spin of the wheel.
Be sure to tune in first to see this makeover come to life and then read on to see everything it took to bring it together!
The Before
First, let's take a look at the office before the makeover. Nadine explained that this was an office space that could use a little love. In Episode 1, she shared that she really wanted to consolidate storage and that she really wanted a bigger desk; oh yeah, and no pink. (If you saw the episode, you know why!)

With Nadine being a teacher, I know how important it is to have a space at home where she can get some things done, so I was really excited about bringing her office dreams to life!
The Design
Since blue was our color of the hour, I decided to go with this beautiful shade of blue from Benjamin Moore - Blue Heron. I knew it would be the perfect shade. I also decided to go with a mural on the back wall because blue typically leans a little more masculine and I wanted to bring a little femininity to the room.
 Originally, I thought that maybe gold curtains could work for this space; but if you caught the first episode, you know why that didn't happen!
The great thing about design is that you can change things as you go. I think that the best spaces are curated over time, so I was happy to show the changes that occurred throughout the process.
The Mural
I'm always a fan of knocking out a mural because it gives so much personality to a space. I first went in with Benjamin Moore - Evening Sky. I had a visual of what I wanted it to be and used that as a free guide and just kind of freehanded different patterns. When doing murals, I always love using my favorite brushes; they are hands down the best.
 I decided to go with a mix of blues and golds and tans. The most exciting part of this room makeover series is getting to show people the possibilities that can be done with color. I love a bold room and I'm loving bringing these colors to life.
 Anytime I paint a mural, I always typically do two coats. I go in and freehand the shapes to make sure I'm good with them and then go back in with a second coat. I think the mural was a good call because it came out great!
Here are the colors used within the mural:
Benjamin Moore Regal Select Interior Paint (Eggshell):
- Evening Sky
- Blue Heron
- Sandy Valley
- Graham Cracker
- Bridgewater Tan
- Oakwood Manor

Painting the Walls
Once the mural was figured out, I went in with Blue Heron on the rest of the walls and hit the ceiling with Oakwood Manor. Because the office is a little on the smaller side, I wanted to open up the space a bit, so I opted to keep the ceiling light.

Styling the Office Space
Now for my favorite part; Styling!

The Final Reveal
Here it is! Nadine's office turned out better than expected and the mural works so well with everything.
 I just love how the desk turned out and it was the perfect match for Nadine's Office.

Thanks for reading guys!

Bathroom Renovation | Creating a Spa-Like Bathroom with Japandi Tile
Explore our approach to bathroom renovation and creating a serene spa-like atmosphere with Japandi tile.
With so many home renovation projects, it's hard to choose favorites when there are so many good transformations, but I am so excited to share this bathroom renovation because this was really one for the books.
"There are some affiliate links in this post, meaning I get a small commission if you purchase through these links, at no cost to you. Click Here to read my full disclosure."
Bathroom Transformation: The Before
The before was absolutely atrocious! I counted down the days to this bathroom renovation because it was so outdated, I couldn't wait to get started on it.

Bathroom Transformation: The Design
I had seen this Japandi tile everywhere and knew it would be the perfect tile to bring the spa-like feel I was looking for. I am also a huge fan of wall paneling and it looks almost identical to it. It also felt really simple, but I knew it would really make a statement. I decided to couple it with a simple floor and shower tile and it was absolutely the perfect choice.

Before I started the actual renovation, I created this render to put my ideas on paper to help me bring the design to life. It also really helps my contractors when I'm trying to explain my vision. When i can visually show them what I'm wanting it makes the process a lot smoother.

Bathroom Transformation: Demo
With the design all mapped out, it was time to actually get started with the bathroom remodel. So we got right into demo. I always try to do the demo myself to help save money, so I had my assistants help me tear everything out.
 There was originally one sink in this bathroom but I wanted to switch it to a double sink, so I pulled out all of the drywall, so the plumber could work his magic. Adding an additional sink was definitely a good call.
 We ripped out the old shower and tub and then my plumber added all the additional plumbing needed. The price was a little inflated because there was a lot of additional plumbing work that needed to be done. This house is on a well and has hard water, so we had to replace a lot of fittings. Good thing is, everything is brand spanking new!
 I really wanted a rain shower head, but I wanted to make sure it was operational on its own, because I knew I wouldn't want to use it all the time and I knew I wanted a freestanding tub.
Bathroom Transformation: Tile Installation
Since I wanted a more peaceful vibe, I decided to go with a more simplistic floor tile.
 My tile guy started laying the floor tile first and it looked so good. Simple but makes a statement and I decided to just go with a white grout so it wouldn't stick out too much.
 Once the floor tile was down and grouted, we started adding the drywall and cement board back to the walls to get started with the shower. I opted to add a rain head shower head, so we had to open that up as well for the plumber to add everything that was needed.
 Then the guys started prepping for the drypack. They have to set up the wood in order to form the concrete. I showed my tile guy the idea I had for the shower and he was able to create it.
 Here is what it looked like once all the concrete was all laid. It took a few days for it to completely dry before we could proceed.
 Then it was time to start laying the Japandi tile! I had been waiting on this moment because it meant one step closer to getting my new bathroom. The important part about laying these tiles was making sure that they line up perfectly so that when they were grouted it looked seamless.
 I decided instead of having a regular square niche, I wanted to go with an arched niche to give it that Moroccan feel, so I had my tile guy create this unique niche and it was the perfect touch to the shower.
 These large format tiles really are nice and seeing the vision come to life in real time was well worth the wait. I was able to find these polished marble mosaic tiles to place in the shower area and they were the perfect fit for the Japandi tiles and floor. It had just enough uniqueness to stand to on its own but still fit in with the full design.
 Next up was picking the grout, and I wanted to fins something that was closest to the colors of the tile so that it would blend in with the tile, so I opted to go with Pale Umber.
 Once the tiles were grouted, everything really looked seamless, making sure the tiles lined perfectly really made the whole look come together.
Bathroom Transformation: The Details
With the tile work out of the way, it was time to start adding in all of the extra details to make this bathroom come alive.
 For the countertops, I decided to go with this pretty marble and decided to do a tall 15" backsplash for a different design. I wanted the mirrors to overlap over the backsplash so I made it a little higher than normal.
 The walls in the bathroom had this orange peel texture that I absolutely hate, so I decided to skim coat the walls to give them a fresh look and it was definitely worth it. After skim coating, the walls looked so fresh!
 Next up, was adding in the bathroom lighting. I especially love this dome pendant light over the tub, it scream spa to me. The vanity lights were no different; I really love the uniqueness of them. Use code "Ashley20" for 20% off Mitzi Lighting!
 Then I had to decide on mirror that I would go well with the tall splash, so I decided on these big square gold mirrors. They come in many colors and sizes, so you hav options if you like them.
 Once the backsplash was in place, we had to prep the walls for the backsplash. With the backsplash idea, we did have to bring out the wall a bit, so the tiles would be seamless with the splash. So we added two sheets of thin drywall to bump the wall out. We also made sure to add studs where the mirrors would hang, so there was enough support and we pre-hung the mirrors, so e could just tile around the screws.
 I have used this Chloe Tile many times before, so I decided to use it for the backsplash. This was my first time using it in this color. I love Chloe tile so much because of the variation of the tiles.
 Just make sure you realize where you are placing your tiles, so you don't get the same color right beside each other.
 I was able to find this large tub at a local store called the Builders Warehouse. It was just under $900 and went perfectly in the space. My plumber hooked it in and started hooking in the shower head and handheld and the tub fixtures.
 I personally am a fan of mixing metals and finish colors, so I decided to go black with the faucets to tie in with the black shower hardware.
 I wanted the cabinet to be slightly darker than its natural tone so I used tung oil to seal the cabinet. it created the perfect color.
 I found the prefect hardware to use for the cabinet, so I installed those next. There are these two-tone handles and went perfectly with the mixed metals.
 The last step was transforming this square door into an arch and adding in this new interior door!
Bathroom Transformation: The Final Reveal
Here is the final look of my main bathroom. I knew the Japandi tile would look great but this bathroom really exceeded my expectations
 Can we talk about this soaker tub though?! It was the perfect tub for this space and I love that its a little larger than a standard size tub.
 Everything came together beautifully and the peaceful spa vibe I was going for was created! I'm glad that I decided to go for it and do a higher splash because I love how it looked in the end. Honestly, I wish I would have went a little higher now!
 Now it's time for me to go and enjoy my new bathroom. Hope you enjoyed this post.

As Always, Thanks for reading.

How to Limewash Walls | Tips for Painting your Walls
"Discover the Distinctive Beauty of Limewash Walls."
Limewash Walls is a phenomenon I have been dying to try and I'm so glad I have. Painting walls is always a great easy to bring change to a pace and lime wash is no different. It brings texture to a space and I have absolutely fell in love.
Today I am sharing my experience with it and some helpful tips along the way. Check out this video to see in-depth details of how I apply lime wash to a fireplace!
My first experience with lime wash was on HGTV when I competed on Battle on the Beach. It was a little nerve wracking to try it for the first time on a competition show, but I am so glad I did.
MUST HAVES
- Lime Paint
- Masonry Brush
- Paint Stick
- Painters Tape
There are a few lime washes that I have researched, but ultimately decided to go with Color Atelier. I am using the color "Soft Taupe - 100%" for the fireplace.

If you didn't know, I appeared on HGTV's Battle on the Beach, and that was actually the first time I ever used lime wash. Here is how that room turned out!
 I used this (Limewash Pictured - Soft Taupe) in this beach house and this is when I fell in love with lime wash. I particularly loved that it was so simple to accomplish but made such a statement. If you don't want to commit to a whole wall, you can always just use it for an accent wall like I did belew.

Prep Work
Before applying the lime wash, I opted to paint the walls underneath a similar color and I feel like it brought out the color more. This isn't a must need step; but in my experience having a similar color underneath helped bring out the look of the texture. But again, I have done it both ways, so it's really personal preference.
Helpful Tips when Applying Limewash
Here are a few things I've picked up on after lime washing several times.
- The first coat never looks good. If you apply the first coat and the wall looks off, you're likely doing something right.
- Try not to brush the lime wash in the same spot over and over, after two swipes move on to a new area. Going over the same spot too much can cause uneveness.
- Limewash is much harder to cover up than regular paint, so be sure to tape off any areas that you don't want lime wash paint on.
The one good thing about lime wash is that it also comes in many colors, so the options are endless with what you can do with it. Here is a room that I lime washed in purple. See the full post here for details.
 If you're looking for an easy way to bring dimension to a space, lime wash is definitely a great option to try!
 Thanks for reading guys!

Teen Bedroom Wallpaper Refresh
Transform Your Teen Bedroom with Luxurious Color Palettes and Trendy Wallpaper Designs.
My little sister has been asking me for a room makeover and I finally found the time to give her one. Her room was super plain with white walls, so I decided to bring a little fun and flavor by painting and using one of my very own signature wallpaper collections. Let's look into how I got it done.
Materiels
- Behr Dynasty - Eggshell - Color: Audition
- Scotch Painters Tape - Delicate Surface Tape
- Scotch Painters Tape - Sharp Lines
- Wooster Brushes
- Paint Stick
- Paint Rollers
- Line Essence Wallpaper
- Wallpaper Adhesive
The Before
This was the perfect blank canvas for a makeover. The walls were just plain white, so with a little paint and wallpaper, I was able to transform this bedroom into something really nice.

Step 1: Prep and Paint
I first started off by prepping all of the walls with Scotch Painters Tape - Sharp Lines to make sure I had crisp paint lines. I opted use the Scotch Painters Tape - Delicate Surface Tape on the ceiling to make sure the ceiling paint didnt come off when peeling off the tape.

Paint prep is always tedious and a pain, but it really does give you a more quality product in the end.
I picked this beautiful paint color and painted it on the walls using one of my favorite paint sticks.
Step 2: Installing Wallpaper
Once the walls were dry, I went in and installed this beautiful Line Essence Wallpaper, designed by yours truly.
I rubbed the wallpaper adhesive on the walls and then installed the wallpaper on top, and it matched the color perfeclty.

Once the wallpaper was installed, I started getting really excited because I knew it was time to style the room.
Step 3: Styling the Room
I had so much fun styling this room and found a lot of great finds at an affordable price.

Here are all of the furniture sources for the bedroom:
The Final Reveal
Now take a look at how it turned out. This was a super simple transformation that really made a world of difference.


Fireplace Makeover | Demolition and Remodel
"From Boring to Blazing: Jazz Up Your Living Room Fireplace!"
I have been so excited to transform this fireplace, ever since I moved into this lake house. It has gone through many phases and today I'm going to walk you through all of the phases we've gone through.
First Phase - Fireplace Refresh
The first phase of the fireplace was the refresh. I decided to go in and spruce up the fireplace with paint. I knew it would be a while before I got the chance to completely change it, so this was an attempt to make it look a little better in the meantime.
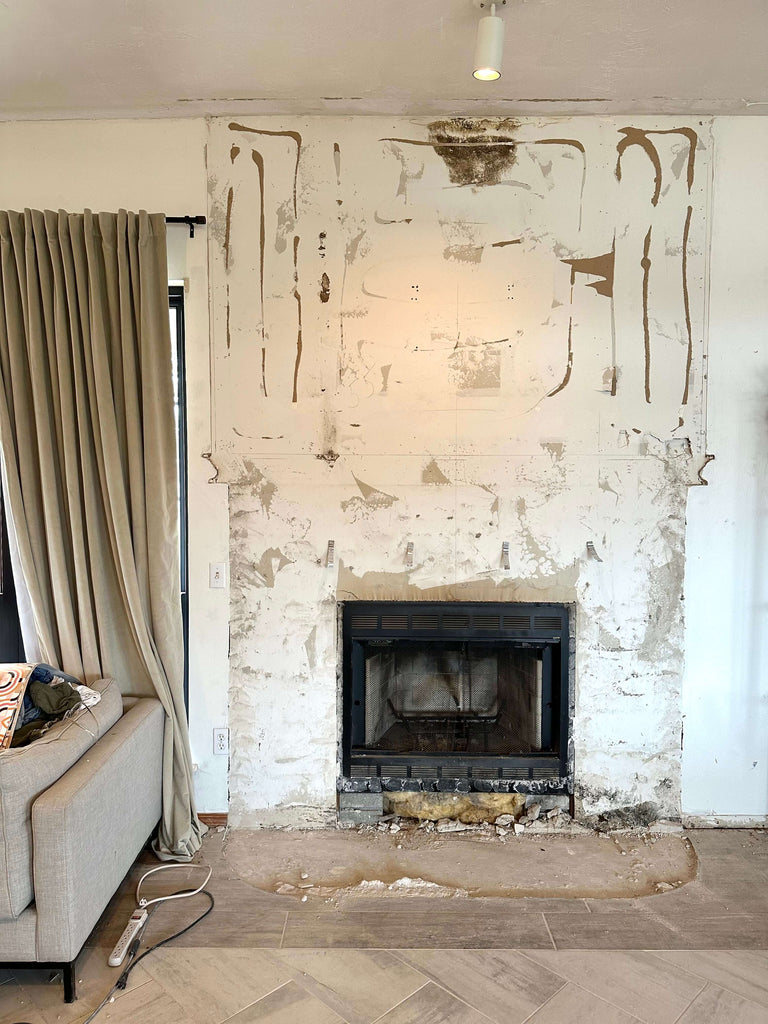
So here is where we started out. Lots of wood and 90's wallpaper, I can't wait for you guys to see the updated look.

First, I went in with this black paint to cover the bottom half of the brick. Most people say that it's better to use lime wash on brick but I had no issues with this paint.
 I used this brush to get all of the paint in the cracks, there were a lot of little holes to get into. You likely won't be able to paint with just a roller.
 The paint that I used went on glossy but dried matte, which I really loved because I was wanting that matte look. After I painted the brick, I went in with a high heat spray paint to cover the fireplace cover since its close to the fireplace.

Once I finished the brick, I went in and painted the top this awesome grey color. it was the perfect match to the black and this is how it turned out!

Now, let's get into the next phase of the fireplace!
Phase 2 - Brick Demolition
Let's get into the brick demolition. I always had a vision for what I wanted the fireplace to look like, so I was happy to get it going.
Here are the Tools I Used to demo the fireplace:
Check out this video to see the Brick Fireplace Demolition in action!
I was actually surprised by how easy this demolition went, my friend and I were able to knock it out in about two hours. This is how it looked once we were finished.
Phase 3 - New Fireplace Build Out
Once we completely removed everything, we then went in and started building out the fireplace. We used 2x4's to build out the frame to get the desired look I was looking for.
 Once everything was framed up, we covered the frame with drywall and added cement board around the fireplace opening. Then used corner bead on the edges and used mud to make everything seamless.

As you can see the fireplace was completely transformed. I've seen a similar style fireplace and fell in love with it.
Phase 4: Limewash the Fireplace
Next up was tackling the finish on the fireplace. I opted to go with lime wash because I really wanted to make a statement with the fireplace. Check out this video below to see the process and if you want more details, see the post here.
The Final Reveal
Here is the moment you have been waiting for; the final reveal. I am over the moon with how this fireplace turned out, it came out better than I thought it would with it being my first fireplace.
 I'm so glad I decided to go bold and make a statement, it was the perfect match to my living room.

Thanks for reading guys!

Implement Slat Walls with Wood Panels in Your Home | DIY
Lately I have been on a wood panel kick; so I decided to share four different ways to implement wood paneling in your home that feels fresh and fun!
Some people may not be a fan of slat walls because it is a little trendy; but Im always a girl that encourages people to just go with what they love and I absolutely love them. today Im diving into several projects where I was able to utilize slat walls in my home.
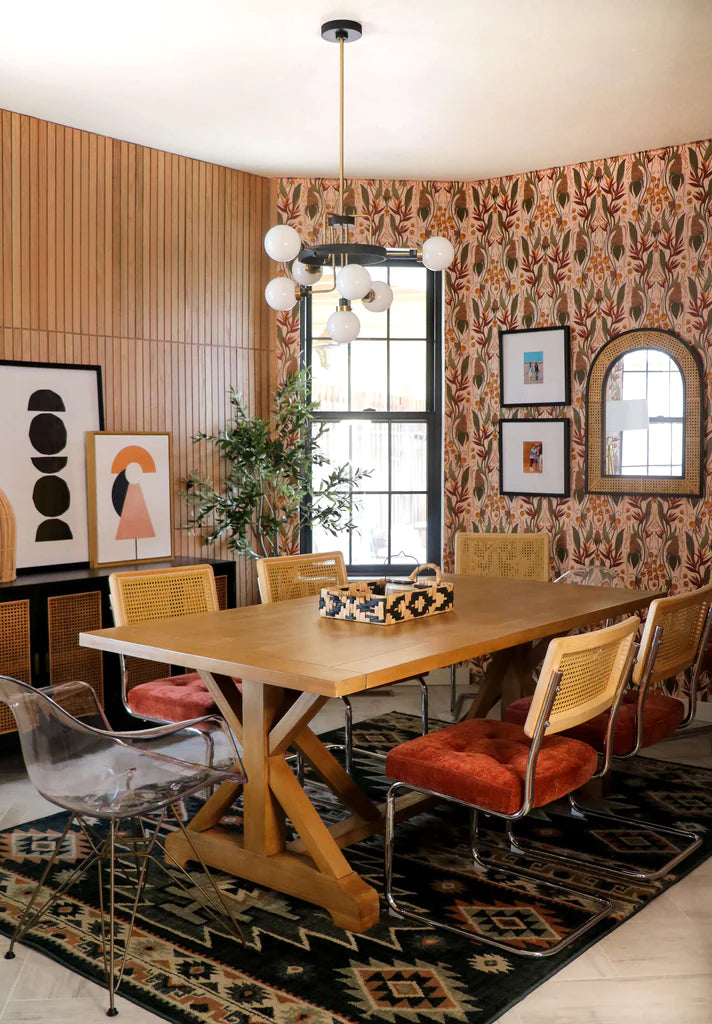
Wood Paneling for the Movie Room
One of my favorite rooms in my home is my movie room; and a big reason for that is the wood paneling that I installed. These Luxe panels were the perfect match for this space and I really loved that these particular panels were a little wider in size. Typically they come a little smaller, but this company made a great decision on adding a wider sized option. They also now come in 10 and 12 ft. options for all wall sizes.
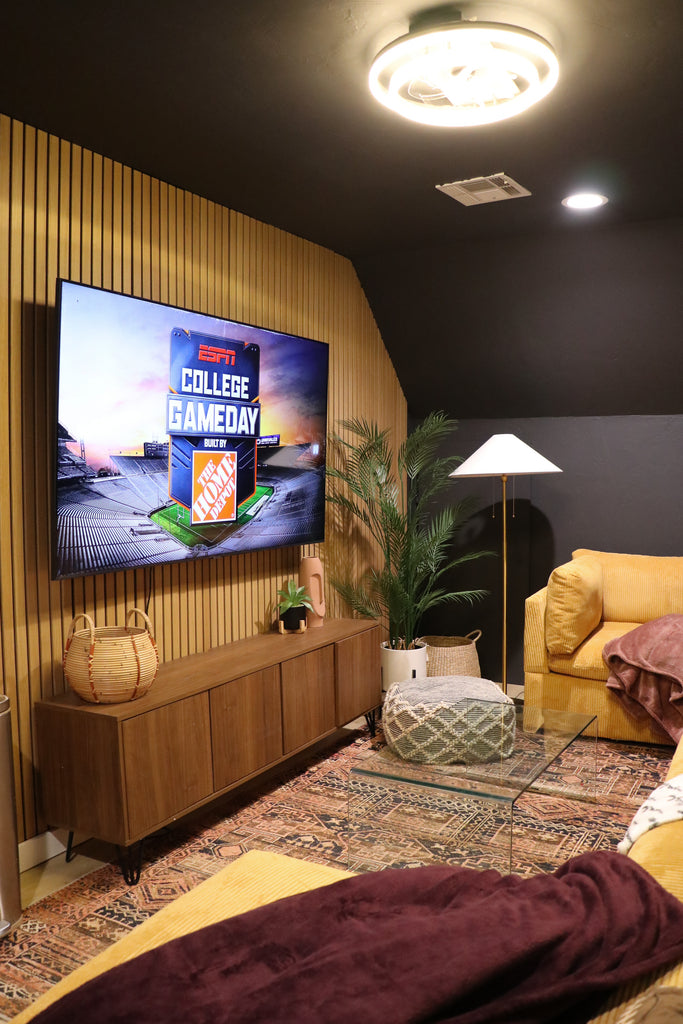 I really love the versatility of the panels as well. I was able to use this as a backsplash for my movie room bar.

Pre-Finished Wood Oak Slats
Now these pre-finished wood oak slats are hands down my favorite because there is even more flexibility with these slats. They come in a smaller size so you can manipulate and maneuver them to use them however you'd like.
 Now these do require a little more work; but if you have taller walls or a furniture piece, these pre-finished oak boards are perfect for those types of projects. Click Here to see the full tutorial on this slat wall!
I used these oak slats in my husband's man room and they turned out great. As you can see, I was able to switch up the design here and this is anther reason why I like using these for particular projects; its easy to adjust your design based on the space.

Wood Looking Tile - Japandi
Now, Ive never seen wood paneling look this good and there is a slight reason for that! Here I used a wood looking tile called Japandi. It gives the look of wood paneling but it's made for bathrooms! She is a Stunner.
Check out the full tutorial on how I brought this bathroom to life here.

Light Wood Panels for a Guest Oasis
I figured I'd leave you guys with the last room in my home that I utilized paneling in. This paneling is similar to the first but it is from a different company and was slightly different. The panels were a little skinner than the first ones shown. Here is the rendering that I moved up of how I envisioned it.
 Here is how the room turned out. These luxe wall panels worked just as great as the ones I spoke of above. I would recommend them as well, and they also come in many sizes.
 I love that there are so many options for implementing paneling in the home and it can all be different but still come together nicely!

As always, thanks for reading guys!

Guest Bedroom Transformation | Home Depot Decor
"Discover the Science of Transforming Your Bedroom into a DIY Masterpiece"
Room transformations are definitely becoming my favorite DIY project these days. There's so many things you can do with a room makeover and with this project I got the joy of using some fun decor from Home Depot to help bring this transformation to life.
"This post is sponsored by the Home Depot."
There are some affiliate links in this post, meaning I get a small commission if you purchase through these links, at no cost to you. Click Here to read my full disclosure.
The Before
I always love looking back at the before photos to see just how much has changed, so I have to give you guys a look at where we came from first.

Transforming the Room
To get the room started, I decided to first lime wash the walls. I knew the lime wash would give the room texture and really create a fun effect. I first painted the walls with Behr's Fortune and then went in after to lime wash the walls with Color Atelier's Plume. I decided to not lime wash the ceiling and the plume went so well with the Behr color Fortune!
Want to learn more about how to lime wash? See my post here!
 I also decided to switch out the old fan that was in the room for a more modern look. I knew this grey ceiling fan would be the perfect change for this guest bedroom.
 I also decided to switch up the flooring and have some plush carpet installed for a more comfortable stay and it was such a good choice! Once the carpet was in and I started assembling my furniture I knew I had made some great choices. I just loved this palm tree plant. Check out my post here for more details on the carpet install.
Styling the Room
Being that I decided to lime wash the walls, I thought it would be the perfect match for a boho/tribal vibe. So I searched up and down the HomeDepot.com website to find some amazing decor finds and it did not disappoint.
 My absolute favorite is the Moroccan Printed Area rug I found; it went so well with the walls and really tied things together. It coupled perfectly with this amazing golden tufted headboard.
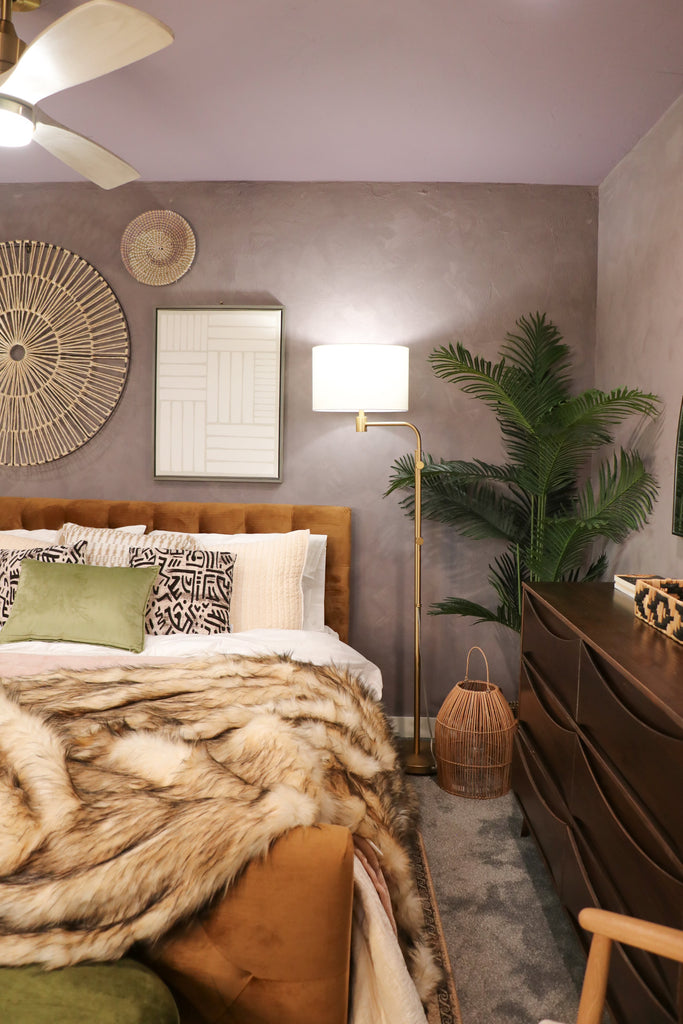
The Final Reveal
The final bedroom turned out so well; and I am so glad I decided to go with the plume lime wash. It coupled so well with all of the home decor finds. I really loved how the Abstract Art coupled with the Circulation Metal Work Art. These two pieces were the perfect match with this 2-Drawer Cane Nightstand.

With a brand new guest bedroom, I had to make sure to get some great bedding options so that my guests would enjoy their stay. I started off with some nice sateen sheets from the Company Store, and coupled them together with the light weight comforter and Luxury Velvet Cream Quilt.
I love to have plenty of blankets on my bed; and I wanted no different for my guests, so I also threw on this Pink Plush Blanket and a Fur Throw.
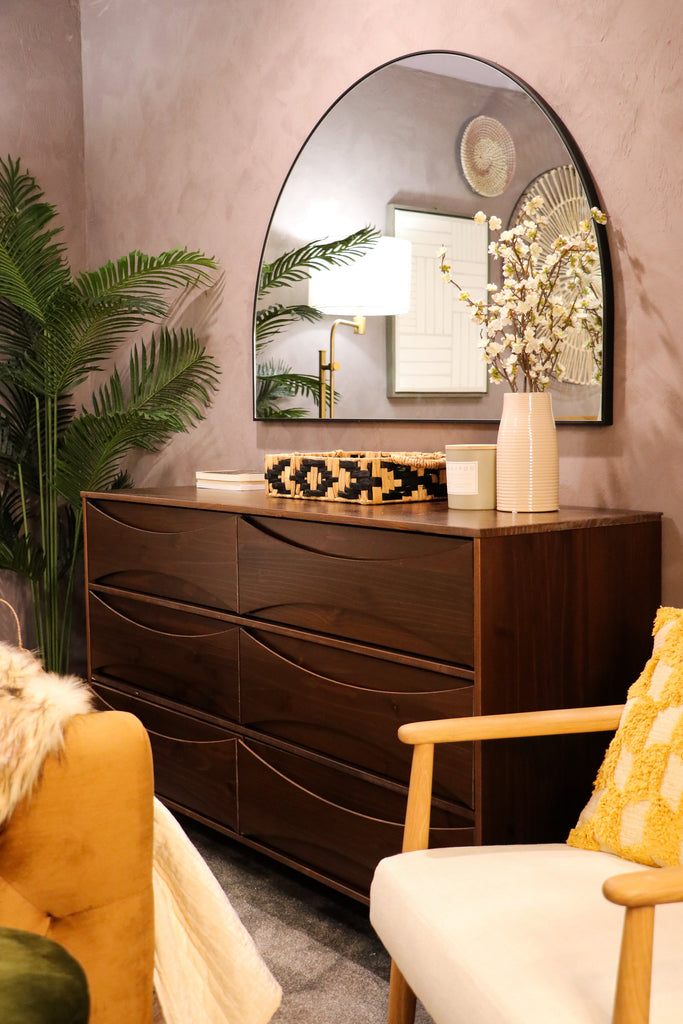

I also couldn't forget a place for my guests to put their things, so I found this amazing dresser with ample storage and decided to add this decorative tray on top to add a little flavor as well. But the showstopper here hands down is this arched mirror; talk about a statement piece.

One of my favorite pieces was this adjustable floor lamp; the uniqueness of the lamp handle caught my eye and I am a lover of all things brass. It's sturdy frame and uniqueness really was a no brainer for this bedroom and illuminates against the lime wash so well.

This Tufted Upholstered Arm Chair was just an extra added bonus of comfort and don't tell anyone but it's also hiding that tv cord plug; so that's a win win.


The funnest part however, was finding some unique pieces to go with my boho and tribal vibe and this Brass Metal Bedside Lamp and African Mask Sculpture really brought those styles to life.


and that is it for my guest bedroom makeover. I hope you enjoyed all of the amazing decor and furniture finds and if you have an upcoming room project; be sure to check out The Home Depot for your decorating needs.
 Golden Tufted Headboard || 2-Drawer Cane Nightstand || Green Velvet Storage Bench || Loloi Moroccan Printed Area Rug || Upholstered Arm Chair || Queen White Sheet Set || Brass Metal Bedside Lamp || Abstract Art Print || Light Weight Queen Comforter || Paradise Palm Tree || Velvet Cream Standard Sham || Velvet Cream Queen Quilt || Faux Fur Throw || Yellow Geometric Throw Pillow || Beige Geometric Tasseled Pillow || African Man Sculpture || Brass Height Adjustable Floor Lamp || Creamy White Flush Mount with Metal Shade || Gold Ceiling Fan || Modern Frameless Decorative Mirror || Arched Mirror || Abstract Black and White Pillow || Forest Green Lumbar Pillow || Pink Microfiber Blanket || Circular Metal Work Art || Decorative Rectangle Tray || Natural Rattan Lantern ||
As always, thanks for reading guys! XOXO, Ashley

How to Build a Custom DIY Closet | Shoe Storage Solutions
"Create the Perfect Custom DIY Closet for Your Space"
Building your own custom closet is something that I know all to well. Last year, I took on a huge DIY project and tackled my huge master closet build in my last custom home. So it was only right to build a DIY closet in my new home; except this time; there was a twist. This closet would be strictly for my shoes!
Materiels
- 5 sheets - 4' x 8' Plywood Sheets
- 1x2x8' Select Pine Boards
- Shiplap Boards
- Brad Nails
- Wood Glue
- 3" Wood Screws
- Caulk
- Aria Vent
- Behr Paint: Hi-Gloss, Premium Plus, Color: Retro Pink
Decor
- Pendant Light
- Arched Mirror
- Wallpaper
Tool
The Before
As you can see, this closet really needed some love and since my bathroom has three closets, I decided to dedicate one especially for my shoes. A girl has gotta have a spot for her shoes.
 This closet was originally used as a regular closet, so I decided to modernize it a bit and create an amazing storage solution for my shoes.
 I knew I didn't have a ton of space to work with; so I really wanted to utilize the vertical space and create built-ins that would extend all the way up the wall.
Building the DIY Closet
In order to start the shoe closet I first started building the bases for them to sit on. I personally like casing my closet builds out with trim and building these bases beforehand allows me to do that.
With some 2x4s, I measured the length of the space and assembled this base with construction screws and then used my stud finder to find the studs and secured it to the wall.
 I also went ahead and installed the shiplap boards because I knew I wanted them to sit behind the wall units. Once the frames were in place, I started assembling the closet units. I decided to assemble this outside of the space to make things easier. I was low on space; so I assembled the units together using plywood sheets cut down and pocket hole screws. My Kreg jig came in handy on this project.
 Once the closet units were built, I brought them into the space to make sure they fit properly. Once I had them in the space; I used my level and some scrap wood to make sure they were perfectly level and then secured the closet units to the studs using my construction screws.
 Being that these units are the main frame of the closet build, you want to make sure that these are properly secured to the wall studs. Once the two closet units were secured to the wall, I used my brad nailer to nail the two units together for extra hold and support.

With the units secured, it was time to add in the shelving and face frames. The face framing always makes the build look more custom. I cut down the shelving to size and then attached them to the closet unit with pocket hole screws. I based my shelving size on the sizing of my personal shoe collection to best fit my needs.
 Once the face frames were all in; it was time to move on to the flooring! If you are interested in seeing other closet builds that I've built, be sure to check out Phase 1 and Phase 2 of my master closet build.
Installing the Flooring
I decided to go with the same flooring that I installed in my studio because I absolutely loved the color. If you want more info on the exact flooring; check out my flooring install post here. I had to utilize my jigsaw for one vent cut; but the rest of the install went fairly quickly.
 I really love this flooring because it's easy to install and super durable. It took me about an hour to get the floor down and on to the next step.
 I also opted to use a fancy vent cover to make it feel a little more modernized. I used this aria vent and I absolutely love the look if it. Bye Bye old vent covers.
 Once the floor was in, I couldn't help but to pull my arched mirror in to see how it would look in there and this got me so excited to get this project done; I mean look at it!
Prep and Paint
With everything all built, it was time to paint the cabinets. I opted to use my Graco paint sprayer because it always leaves a clean finish. Any time I am using a pint sprayer I always use Behr's Premium Plus paint because it's a good line for sprayers.
Of course I decided to go for a fun and bold color, and yes this was decided before the barbie movie came out! I knew I wanted a blush color and finally landed on Retro Pink by Behr.
 I was able to fully paint the cabinets with two coats and got a nice finish. Once everything was all painted, I installed the drawers I built and created these reeded drawer fronts for a special little touch.
 I made sure to remove the drawers before painting to make sure I could get all around the drawers and then left the actual drawers natural. Now this color is pink, pink and my friend Steve happened to be wearing the same color pink when he came to check the closet out; so I had to snag a photo of him.
 Great minds must think alike.
The Final Reveal
With the drawer fronts installed, the DIY shoe closet was complete and I must say, it was a huge step up from the previous closet. Now I have a special place for all of my shoes. I don't see me running out of shoe closet space anytime soon.
 The pink really was the perfect choice and my shoes fit in the custom cabinets perfectly. Im so glad I decided to base the sizing off my current collection. If you are debating whether to build your own custom closet, I must say that it is well worth the work because I absolutely love my new closet.
 I hope you guys enjoyed this post and as always, thanks for reading guys! XOXO Ashley